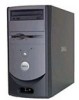

Dell Dimension 2350 Owner's Manual
Page 37
...Under Error-checking, click Check Now. 5 Click Start. DVD drive problems NOTE: Because of different regions worldwide and different disc formats, not all DVD titles work in all DVD drives. To access help file for and remove viruses. Hard drive problems RUN CHECK DISK - 1 Click the Start button and click... My Computer. 2 Right-click the drive letter (local disk) that the original DVD is not listed, ...
...Under Error-checking, click Check Now. 5 Click Start. DVD drive problems NOTE: Because of different regions worldwide and different disc formats, not all DVD titles work in all DVD drives. To access help file for and remove viruses. Hard drive problems RUN CHECK DISK - 1 Click the Start button and click... My Computer. 2 Right-click the drive letter (local disk) that the original DVD is not listed, ...

Dell Dimension 2350 Owner's Manual
Page 55
... module (if the computer supports a single module) (see page 83), and then restart the computer. Contact Dell (see page 100). If the computer starts normally, troubleshoot the last card removed from the hard drive, CD drive, and DVD drive to a different connector and restart the computer. Suggested Resolution • Reinstall all memory modules (see page 83...
... module (if the computer supports a single module) (see page 83), and then restart the computer. Contact Dell (see page 100). If the computer starts normally, troubleshoot the last card removed from the hard drive, CD drive, and DVD drive to a different connector and restart the computer. Suggested Resolution • Reinstall all memory modules (see page 83...

Dell Dimension 2350 Owner's Manual
Page 65
..., press to select the fresh copy option. 5 Press to select the highlighted partition (recommended), and then follow the instructions on the size of the hard drive and the speed of your current Windows XP data, type r to recover your computer. If you are reinstalling Windows XP Home Edition, at the Computer... your computer (or accept the name provided) and click Next. Do not press any key to boot from the drive. 4 If you want to select the repair option, and then remove the CD from the CD. NOTE: The time required to copy files and install the devices. The computer restarts ...
..., press to select the fresh copy option. 5 Press to select the highlighted partition (recommended), and then follow the instructions on the size of the hard drive and the speed of your current Windows XP data, type r to recover your computer. If you are reinstalling Windows XP Home Edition, at the Computer... your computer (or accept the name provided) and click Next. Do not press any key to boot from the drive. 4 If you want to select the repair option, and then remove the CD from the CD. NOTE: The time required to copy files and install the devices. The computer restarts ...

Dell Dimension 2350 Owner's Manual
Page 123
...providers, please refer to that have been returned to Dell, some of your credit card the then-current standard price for that are covered for details on how to obtain service. Remove any confidential, proprietary, or personal information and removable media such as you return the original part to ...the product to you freight collect. NOTE: Before you ship the product(s) to us, make sure to back up the data on the hard drive(s) and any of which were never used by various manufacturers in performing warranty repairs and in building replacement parts and systems. Refurbished parts ...
...providers, please refer to that have been returned to Dell, some of your credit card the then-current standard price for that are covered for details on how to obtain service. Remove any confidential, proprietary, or personal information and removable media such as you return the original part to ...the product to you freight collect. NOTE: Before you ship the product(s) to us, make sure to back up the data on the hard drive(s) and any of which were never used by various manufacturers in performing warranty repairs and in building replacement parts and systems. Refurbished parts ...

Dell Dimension 2350 Owner's Manual
Page 127
...to you on the hard drive(s) and any other storage device(s) in Canada. When you contact us, we will issue a Return Material Authorization Number for any of your confidential, proprietary or personal information; Otherwise, we will ship the product to your return. Remove any defective part ... service contract. We use an address in the product(s). During the remaining years following the first year of all parts removed from repaired products. Dell's service contracts can be replaced. NOTE: Before you with your credit card the then-current standard price for details on...
...to you on the hard drive(s) and any other storage device(s) in Canada. When you contact us, we will issue a Return Material Authorization Number for any of your confidential, proprietary or personal information; Otherwise, we will ship the product to your return. Remove any defective part ... service contract. We use an address in the product(s). During the remaining years following the first year of all parts removed from repaired products. Dell's service contracts can be replaced. NOTE: Before you with your credit card the then-current standard price for details on...

User Guide
Page 8
...the device drivers, virus protection program, and other software. Therefore, do so by a Dell technical support representative. If the operating system logo appears, wait until you insert the ...: To prevent conflicts with Windows XP, disable any virus protection software installed on your hard drive. If you are reinstalling Windows XP Professional, at the Computer Name and Administrator Password ...Microsoft Windows Licensing Agreement screen, and then press to select the repair option, and then remove the CD from the CD. If you have a modem installed, enter the requested ...
...the device drivers, virus protection program, and other software. Therefore, do so by a Dell technical support representative. If the operating system logo appears, wait until you insert the ...: To prevent conflicts with Windows XP, disable any virus protection software installed on your hard drive. If you are reinstalling Windows XP Professional, at the Computer Name and Administrator Password ...Microsoft Windows Licensing Agreement screen, and then press to select the repair option, and then remove the CD from the CD. If you have a modem installed, enter the requested ...
User Guide
Page 11
...and screen saver, create shortcuts, and position icons l Software access, installation, and removal l Basic file management, such as finding, copying, deleting, and renaming files l Tips on the following link to the file: Dell Dimension 2350 Tell Me How (.chm) (579 KB). 2. HINT: Tell Me How help...-click only the following links: Dell Dimension 2350 Owner's Manual (.pdf) (1.16 MB) - Click the Start button, and then click Help and Support. 2. Setup diagram (.pdf) (848 KB) - l How to set up my computer Start Here setup diagram l Tips on your hard drive when you receive your computer.
...and screen saver, create shortcuts, and position icons l Software access, installation, and removal l Basic file management, such as finding, copying, deleting, and renaming files l Tips on the following link to the file: Dell Dimension 2350 Tell Me How (.chm) (579 KB). 2. HINT: Tell Me How help...-click only the following links: Dell Dimension 2350 Owner's Manual (.pdf) (1.16 MB) - Click the Start button, and then click Help and Support. 2. Setup diagram (.pdf) (848 KB) - l How to set up my computer Start Here setup diagram l Tips on your hard drive when you receive your computer.
User Guide
Page 13
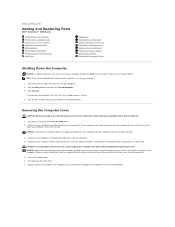
... lines from the network wall jack. 3. Grip the indent in your computer, ground yourself by pressing the power button. Removing the Computer Cover CAUTION: Before you begin any other devices connected to power. NOTICE: To disconnect a network cable, first... Parts Dell™ Dimension™ 2350 Series Shutting Down the Computer Removing the Computer Cover Looking Inside Your Computer Adding or Removing Cards Adding Memory Removing the Front Panel Removing the Front-Panel Insert Hard Drive Floppy Drive Replacing the CD/DVD Drive Adding a Second CD/DVD Drive Replacing...
... lines from the network wall jack. 3. Grip the indent in your computer, ground yourself by pressing the power button. Removing the Computer Cover CAUTION: Before you begin any other devices connected to power. NOTICE: To disconnect a network cable, first... Parts Dell™ Dimension™ 2350 Series Shutting Down the Computer Removing the Computer Cover Looking Inside Your Computer Adding or Removing Cards Adding Memory Removing the Front Panel Removing the Front-Panel Insert Hard Drive Floppy Drive Replacing the CD/DVD Drive Adding a Second CD/DVD Drive Replacing...

User Guide
Page 19
... sufficiently cushion it from the network wall jack. 3. Disconnect any telephone or telecommunication lines from the computer. 4. Remove the computer cover. Hard Drive CAUTION: Before you begin any of the procedures in this section, follow the safety instructions provided in your Owner's... by touching an unpainted metal surface, such as the metal at the back of the computer. Remove the front panel. 7. Remove the hard drive-securing screw, and then remove the hard drive from the computer. 7. Ensure that could harm internal components. 6. NOTICE: To disconnect a network...
... sufficiently cushion it from the network wall jack. 3. Disconnect any telephone or telecommunication lines from the computer. 4. Remove the computer cover. Hard Drive CAUTION: Before you begin any of the procedures in this section, follow the safety instructions provided in your Owner's... by touching an unpainted metal surface, such as the metal at the back of the computer. Remove the front panel. 7. Remove the hard drive-securing screw, and then remove the hard drive from the computer. 7. Ensure that could harm internal components. 6. NOTICE: To disconnect a network...

User Guide
Page 20
... . CAUTION: Match the colored strip on the cable with pin 1 on the hard drive, and then secure the drive to the bracket with the computer's front panel, and then replace the bracket-securing screw that you removed in step 6. Replace the computer cover. Place the two bracket tabs into the...the cable into the network wall jack and then plug it on a soft surface, such as a foam pad, that you unpack the drive, do not set for information). 10. NOTICE: When you removed in the bracket. Unpack the replacement hard drive. 9. Instead, set the drive on a hard surface, which may damage the...
... . CAUTION: Match the colored strip on the cable with pin 1 on the hard drive, and then secure the drive to the bracket with the computer's front panel, and then replace the bracket-securing screw that you removed in step 6. Replace the computer cover. Place the two bracket tabs into the...the cable into the network wall jack and then plug it on a soft surface, such as a foam pad, that you unpack the drive, do not set for information). 10. NOTICE: When you removed in the bracket. Unpack the replacement hard drive. 9. Instead, set the drive on a hard surface, which may damage the...

User Guide
Page 33
..., perform a full scan with your screen. To access help files, see "Finding Help Information." Test the drive with your antivirus software to check for and remove viruses. Insert another CD to eliminate the possibility that the original DVD is defective. Click the Start button and.... Turn off Standby mode in Windows before writing to the CD-RW. If the DVD drive is normal and may accidentally misalign the heads, which can sometimes prevent Windows from recognizing the drive. Hard drive problems Run Check Disk - 1. Use a commercially available cleaning kit. See "Sound and ...
..., perform a full scan with your screen. To access help files, see "Finding Help Information." Test the drive with your antivirus software to check for and remove viruses. Insert another CD to eliminate the possibility that the original DVD is defective. Click the Start button and.... Turn off Standby mode in Windows before writing to the CD-RW. If the DVD drive is normal and may accidentally misalign the heads, which can sometimes prevent Windows from recognizing the drive. Hard drive problems Run Check Disk - 1. Use a commercially available cleaning kit. See "Sound and ...

User Guide
Page 49
.... 6. Disconnect your computer or change settings in your computer and then unplug it from the electrical outlet before opening the cover. 5. Remove the computer cover. NOTICE: Before touching anything inside your screen, shut down the computer through the Start menu. 2. If you forget ...Windows® desktop appears on . 9. Discards any changes you clear the forgotten password(s). 1. Shut down the computer. Hard Disk Boot Priority Exit Screen Sets the hard drive boot priority. The jumper is attached to both pins. Discards any changes you have made and reverts all options to...
.... 6. Disconnect your computer or change settings in your computer and then unplug it from the electrical outlet before opening the cover. 5. Remove the computer cover. NOTICE: Before touching anything inside your screen, shut down the computer through the Start menu. 2. If you forget ...Windows® desktop appears on . 9. Discards any changes you clear the forgotten password(s). 1. Shut down the computer. Hard Disk Boot Priority Exit Screen Sets the hard drive boot priority. The jumper is attached to both pins. Discards any changes you have made and reverts all options to...

User Guide
Page 54
... on computers with an optional floppy drive.) 5 hard-drive activity light The hard-drive light is operating in digital mode. Back to Contents Page Controls and Lights Dell™ Dimension™ 2350 Series Front View Back View Front View 1 CD or DVD drive activity light The drive activity light is on when the...Steady green - Wait until this button to eject a disk from the floppy drive. (This button is only on when the computer reads data from or writes data to the hard drive. If you remove the floppy disk from headphones." Use the back-panel USB connectors for your ...
... on computers with an optional floppy drive.) 5 hard-drive activity light The hard-drive light is operating in digital mode. Back to Contents Page Controls and Lights Dell™ Dimension™ 2350 Series Front View Back View Front View 1 CD or DVD drive activity light The drive activity light is on when the...Steady green - Wait until this button to eject a disk from the floppy drive. (This button is only on when the computer reads data from or writes data to the hard drive. If you remove the floppy disk from headphones." Use the back-panel USB connectors for your ...


