
Dell Dimension 2100 Solutions Guide
Page 2
Other trademarks and trade names may be used in this text: Dell, the DELL logo, Dimension, Inspiron, Dell Precision, OptiPlex, Latitude, DellPlus, DellNet, and DellWare are registered trademarks of Dell Computer Corporation; Use of this document to refer to either potential damage to ... Corporation. Information in this document is subject to avoid the problem. Reverse engineering or disassembly is a trademark of Dell Computer Corporation is protected by Macrovision Corporation and other than its own. Trademarks used in this copyright protection technology must...
Other trademarks and trade names may be used in this text: Dell, the DELL logo, Dimension, Inspiron, Dell Precision, OptiPlex, Latitude, DellPlus, DellNet, and DellWare are registered trademarks of Dell Computer Corporation; Use of this document to refer to either potential damage to ... Corporation. Information in this document is subject to avoid the problem. Reverse engineering or disassembly is a trademark of Dell Computer Corporation is protected by Macrovision Corporation and other than its own. Trademarks used in this copyright protection technology must...
Dell Dimension 2100 Solutions Guide
Page 3
Safety Instructions 7 When Using Your Computer 7 Ergonomic Computing Habits 8 When Working Inside Your Computer 10 Protecting Against Electrostatic Discharge 11 1 Setting Up Connecting a Printer 14 Parallel Printer 14 USB Printer 16 Installing the Printer Driver 16 Transferring Information to a New Computer (Windows XP Only 17 Setting Up a Home and Office Network (Windows XP Only 18 Turning Off the Computer 18 Windows XP 18 Windows Me and Windows 2000 18 2 Solving Problems Finding Solutions 22 Accessing Help Files 24 Power Problems 25 Start-Up Error Messages 25 Contents 3
Safety Instructions 7 When Using Your Computer 7 Ergonomic Computing Habits 8 When Working Inside Your Computer 10 Protecting Against Electrostatic Discharge 11 1 Setting Up Connecting a Printer 14 Parallel Printer 14 USB Printer 16 Installing the Printer Driver 16 Transferring Information to a New Computer (Windows XP Only 17 Setting Up a Home and Office Network (Windows XP Only 18 Turning Off the Computer 18 Windows XP 18 Windows Me and Windows 2000 18 2 Solving Problems Finding Solutions 22 Accessing Help Files 24 Power Problems 25 Start-Up Error Messages 25 Contents 3

Dell Dimension 2100 Solutions Guide
Page 4
Video and Monitor Problems 26 If the screen is blank 26 If the screen is difficult to read 27 Sound and Speaker Problems 28 Printer Problems 29 If you cannot print to a parallel port printer 29 If you cannot print to a USB printer 30 Scanner Problems 31 Modem Problems 32 Mouse Problems 34 Keyboard Problems 35 Drive Problems 35 If you cannot save a file to a floppy disk 35 If you cannot play a music CD or install a program from a CD 36 If you cannot play a DVD movie 37 If the CD-RW drive stops writing 38 If you have a hard drive problem 38 Network Problems 39 Microsoft® ...
Video and Monitor Problems 26 If the screen is blank 26 If the screen is difficult to read 27 Sound and Speaker Problems 28 Printer Problems 29 If you cannot print to a parallel port printer 29 If you cannot print to a USB printer 30 Scanner Problems 31 Modem Problems 32 Mouse Problems 34 Keyboard Problems 35 Drive Problems 35 If you cannot save a file to a floppy disk 35 If you cannot play a music CD or install a program from a CD 36 If you cannot play a DVD movie 37 If the CD-RW drive stops writing 38 If you have a hard drive problem 38 Network Problems 39 Microsoft® ...
Dell Dimension 2100 Solutions Guide
Page 5
Resolving Other Technical Problems 43 Reinstalling Drivers 44 Using the Windows XP Device Driver Rollback 45 Resolving Software and Hardware Incompatibilities 46 Windows XP 46 Windows Me 47 Windows 2000 48 Using System Restore 49 Creating a Restore Point 50 Restoring the Computer to an Earlier Operating State 51 Undoing the Last System Restore 52 Reinstalling Windows XP 53 Reinstalling Windows Me 55 Reinstalling Windows 2000 57 3 Adding Parts Removing the Computer Cover 60 Rotating the Power Supply 62 Looking Inside Your Computer 65 System Board 66 Adding a 3.5-Inch Drive 67...
Resolving Other Technical Problems 43 Reinstalling Drivers 44 Using the Windows XP Device Driver Rollback 45 Resolving Software and Hardware Incompatibilities 46 Windows XP 46 Windows Me 47 Windows 2000 48 Using System Restore 49 Creating a Restore Point 50 Restoring the Computer to an Earlier Operating State 51 Undoing the Last System Restore 52 Reinstalling Windows XP 53 Reinstalling Windows Me 55 Reinstalling Windows 2000 57 3 Adding Parts Removing the Computer Cover 60 Rotating the Power Supply 62 Looking Inside Your Computer 65 System Board 66 Adding a 3.5-Inch Drive 67...

Dell Dimension 2100 Solutions Guide
Page 6
...Warranty (U.S. Only 113 Two-Year Limited Warranty (U.S. Only 90 Definition of "Dell-Installed" Software and Peripherals . . . . . 90 Definition of "Third-Party" Software and Peripherals 91 Contacting Dell 92 Contact Numbers and Addresses 92 Returning Items for Warranty Repair or Credit 106... Specifications 82 Standard Settings 86 Viewing Settings 86 System Setup Screens 87 Clearing Forgotten Passwords 87 Replacing the Battery 88 Dell Technical Support Policy (U.S. and Canada Only 131 One-Year End-User Manufacturer Guarantee (Latin America and the Caribbean Only 132 Index...
...Warranty (U.S. Only 113 Two-Year Limited Warranty (U.S. Only 90 Definition of "Dell-Installed" Software and Peripherals . . . . . 90 Definition of "Third-Party" Software and Peripherals 91 Contacting Dell 92 Contact Numbers and Addresses 92 Returning Items for Warranty Repair or Credit 106... Specifications 82 Standard Settings 86 Viewing Settings 86 System Setup Screens 87 Clearing Forgotten Passwords 87 Replacing the Battery 88 Dell Technical Support Policy (U.S. and Canada Only 131 One-Year End-User Manufacturer Guarantee (Latin America and the Caribbean Only 132 Index...

Dell Dimension 2100 Solutions Guide
Page 7
When reconnecting a network cable to your computer, first plug the cable into the network jack, and then into the network adapter. • To help avoid damaging your computer, be sure that the voltage selection switch is set to match the AC power available at your location: - 115 V/60 Hz in most of North and South America and some Far Eastern countries such as South Korea and Taiwan - 100 V/50 Hz in eastern Japan and 100 V/60 Hz in western Japan - 230 V/50 Hz in most of Europe, the Middle East, and the Far East 115V Also be sure that your monitor and attached devices are electrically rated ...
When reconnecting a network cable to your computer, first plug the cable into the network jack, and then into the network adapter. • To help avoid damaging your computer, be sure that the voltage selection switch is set to match the AC power available at your location: - 115 V/60 Hz in most of North and South America and some Far Eastern countries such as South Korea and Taiwan - 100 V/50 Hz in eastern Japan and 100 V/60 Hz in western Japan - 230 V/50 Hz in most of Europe, the Middle East, and the Far East 115V Also be sure that your monitor and attached devices are electrically rated ...

Dell Dimension 2100 Solutions Guide
Page 8
...power sources. Also, do not place your computer in a closed-in wall unit or on a bed, sofa, or rug. Special shelves are available (from Dell and other sources) to help you correctly position your keyboard. • Set the monitor at a comfortable viewing distance (usually 510 to 610 millimeters [20 ... not spill food or liquids on your computer's cables and that the monitor and keyboard are directly in front of the monitor. 8 www.dell.com | support.dell.com • To help prevent electric shock, plug the computer and device power cables into the openings of your computer. Do not use ...
...power sources. Also, do not place your computer in a closed-in wall unit or on a bed, sofa, or rug. Special shelves are available (from Dell and other sources) to help you correctly position your keyboard. • Set the monitor at a comfortable viewing distance (usually 510 to 610 millimeters [20 ... not spill food or liquids on your computer's cables and that the monitor and keyboard are directly in front of the monitor. 8 www.dell.com | support.dell.com • To help prevent electric shock, plug the computer and device power cables into the openings of your computer. Do not use ...
Dell Dimension 2100 Solutions Guide
Page 9
Adjust your chair's height or use both hands. 9 When you stop typing, try to do not have to type for extended periods of your chair seat. Try to organize your work so that you (such as overhead lights, desk lamps, and the curtains or blinds on nearby windows) to minimize reflections and glare on the monitor screen. • Use a chair that use a footrest, if necessary, to maintain proper posture. • Vary your work activities. • Adjust the tilt of the monitor, its contrast and brightness settings, and the lighting around you do things that provides good lower back ...
Adjust your chair's height or use both hands. 9 When you stop typing, try to do not have to type for extended periods of your chair seat. Try to organize your work so that you (such as overhead lights, desk lamps, and the curtains or blinds on nearby windows) to minimize reflections and glare on the monitor screen. • Use a chair that use a footrest, if necessary, to maintain proper posture. • Vary your work activities. • Adjust the tilt of the monitor, its contrast and brightness settings, and the lighting around you do things that provides good lower back ...
Dell Dimension 2100 Solutions Guide
Page 10
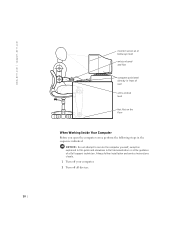
... Do not attempt to service the computer yourself, except as explained in this guide and elsewhere in the sequence indicated. www.dell.com | support.dell.com monitor screen at or below eye level wrists relaxed and flat computer positioned directly in front of user arms at desk level... feet flat on the floor When Working Inside Your Computer Before you open the computer cover, perform the following steps in Dell documentation or at the guidance of a Dell support technician. Always follow installation and service instructions closely. 1 Turn off your computer. 2 Turn off all devices. 10
... Do not attempt to service the computer yourself, except as explained in this guide and elsewhere in the sequence indicated. www.dell.com | support.dell.com monitor screen at or below eye level wrists relaxed and flat computer positioned directly in front of user arms at desk level... feet flat on the floor When Working Inside Your Computer Before you open the computer cover, perform the following steps in Dell documentation or at the guidance of a Dell support technician. Always follow installation and service instructions closely. 1 Turn off your computer. 2 Turn off all devices. 10

Dell Dimension 2100 Solutions Guide
Page 11
Also, before you connect a cable, make sure that might harm internal components. 4 Disconnect any devices connected to the computer, including the monitor, from your body before you touch anything inside the computer. Discard used batteries according to reduce the potential for personal injury or shock. Protecting Against Electrostatic Discharge To prevent static damage, discharge static electricity from their antistatic packing material until you pull connectors apart, keep them evenly aligned to install them in an antistatic container or packaging. 11 While you disconnect a ...
Also, before you connect a cable, make sure that might harm internal components. 4 Disconnect any devices connected to the computer, including the monitor, from your body before you touch anything inside the computer. Discard used batteries according to reduce the potential for personal injury or shock. Protecting Against Electrostatic Discharge To prevent static damage, discharge static electricity from their antistatic packing material until you pull connectors apart, keep them evenly aligned to install them in an antistatic container or packaging. 11 While you disconnect a ...

Dell Dimension 2100 Solutions Guide
Page 13
SECTION 1 Connecting a Printer Transferring Information to a New Computer (Windows XP Only) Setting Up a Home and Office Network (Windows XP Only) Turning Off the Computer www.dell.com | support.dell.com
SECTION 1 Connecting a Printer Transferring Information to a New Computer (Windows XP Only) Setting Up a Home and Office Network (Windows XP Only) Turning Off the Computer www.dell.com | support.dell.com

Dell Dimension 2100 Solutions Guide
Page 14
... printer and snap the two clips into the two notches. 14 Setting Up Parallel Printer 1 Turn off the computer (see the following sections. www.dell.com | support.dell.com See the documentation that came with the printer for any recommended preparation procedures, such as: • Removing the packaging • Installing the toner...
... printer and snap the two clips into the two notches. 14 Setting Up Parallel Printer 1 Turn off the computer (see the following sections. www.dell.com | support.dell.com See the documentation that came with the printer for any recommended preparation procedures, such as: • Removing the packaging • Installing the toner...
Dell Dimension 2100 Solutions Guide
Page 15
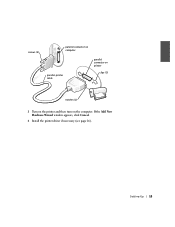
Setting Up 15 If the Add New Hardware Wizard window appears, click Cancel. 4 Install the printer driver if necessary (see page 16). screws (2) parallel connector on computer parallel printer cable parallel connector on printer clips (2) notches (2) 3 Turn on the printer and then turn on the computer.
Setting Up 15 If the Add New Hardware Wizard window appears, click Cancel. 4 Install the printer driver if necessary (see page 16). screws (2) parallel connector on computer parallel printer cable parallel connector on printer clips (2) notches (2) 3 Turn on the printer and then turn on the computer.
Dell Dimension 2100 Solutions Guide
Page 16
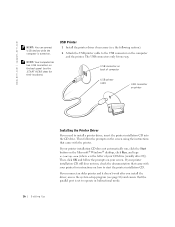
www.dell.com | support.dell.com HINT: You can connect USB devices while the computer is set to operate in bidirectional mode. If your printer installation CD still does not ...
www.dell.com | support.dell.com HINT: You can connect USB devices while the computer is set to operate in bidirectional mode. If your printer installation CD still does not ...

Dell Dimension 2100 Solutions Guide
Page 17
First you need to place in your printer is listed in the Printers window, the printer is titled Operating System. If your CD or DVD drive is ready to use. If the source computer uses another . HINT: The CD that you collect the data from a floppy disk created on a computer running the Windows XP operating system, click the Start button, click Control Panel, click Printers and Other Hardware, and then click View installed printers or fax printers. You may transfer the data to the new computer over a network or serial connection, or you import the data to the new computer. ...
First you need to place in your printer is listed in the Printers window, the printer is titled Operating System. If your CD or DVD drive is ready to use. If the source computer uses another . HINT: The CD that you collect the data from a floppy disk created on a computer running the Windows XP operating system, click the Start button, click Control Panel, click Printers and Other Hardware, and then click View installed printers or fax printers. You may transfer the data to the new computer over a network or serial connection, or you import the data to the new computer. ...

Dell Dimension 2100 Solutions Guide
Page 18
... Turn off Computer. 3 Click Turn off. NOTICE: To prevent data loss, you through the Start menu rather than by pressing the power button. www.dell.com | support.dell.com HINT: Selecting the connection method This computer connects directly to power. Windows XP provides a Network Setup Wizard to guide you must turn off...
... Turn off Computer. 3 Click Turn off. NOTICE: To prevent data loss, you through the Start menu rather than by pressing the power button. www.dell.com | support.dell.com HINT: Selecting the connection method This computer connects directly to power. Windows XP provides a Network Setup Wizard to guide you must turn off...

Dell Dimension 2100 Solutions Guide
Page 19
4 Click Shut down and then click OK. The computer automatically turns off after the shutdown process finishes. 5 Turn off your monitor and any other devices connected to power. Setting Up 19
4 Click Shut down and then click OK. The computer automatically turns off after the shutdown process finishes. 5 Turn off your monitor and any other devices connected to power. Setting Up 19

Dell Dimension 2100 Solutions Guide
Page 21
... Problems Resolving Other Technical Problems Reinstalling Drivers Resolving Software and Hardware Incompatibilities Using System Restore Reinstalling Windows XP Reinstalling Windows Me Reinstalling Windows 2000 www.dell.com | support.dell.com
... Problems Resolving Other Technical Problems Reinstalling Drivers Resolving Software and Hardware Incompatibilities Using System Restore Reinstalling Windows XP Reinstalling Windows Me Reinstalling Windows 2000 www.dell.com | support.dell.com

Dell Dimension 2100 Solutions Guide
Page 22
See page 25. See page 92. Get technical assistance from Dell. See page 25. 22 Solving Pr oblems www.dell.com | support.dell.com Sometimes it's difficult to figure out where to your questions. Use this chart to help you quickly find the answers to go for answers.
See page 25. See page 92. Get technical assistance from Dell. See page 25. 22 Solving Pr oblems www.dell.com | support.dell.com Sometimes it's difficult to figure out where to your questions. Use this chart to help you quickly find the answers to go for answers.
Dell Dimension 2100 Solutions Guide
Page 24
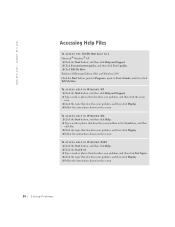
..., and then click List Topics. 4 Click the topic that describes your problem, and then click Display. 4 Follow the instructions shown on the screen. www.dell.com | support.dell.com TO A C C E S S T H E Tell Me How H E L P F I N D O W S M E 1 Click the Start button, and then click Help. 2 Type a word or phrase that describes your problem in the Search...
..., and then click List Topics. 4 Click the topic that describes your problem, and then click Display. 4 Follow the instructions shown on the screen. www.dell.com | support.dell.com TO A C C E S S T H E Tell Me How H E L P F I N D O W S M E 1 Click the Start button, and then click Help. 2 Type a word or phrase that describes your problem in the Search...
