
EMC Servers Installation and Service Manual
Page 13
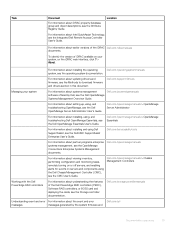
... about viewing inventory, performing configuration and monitoring tasks, remotely turning on or off servers, and enabling alerts for events on servers and components using Dell SupportAssist, see the Dell OpenManage Systems Management Overview Guide. Dell.com/storagecontrollermanuals Understanding event and error For information about updating drivers and firmware, see the Integrated Dell Remote Access Controller User's Guide. To identify the version of the iDRAC Dell.com/idracmanuals documents. For information about the event and error Dell.com/qrl messages messages...
... about viewing inventory, performing configuration and monitoring tasks, remotely turning on or off servers, and enabling alerts for events on servers and components using Dell SupportAssist, see the Dell OpenManage Systems Management Overview Guide. Dell.com/storagecontrollermanuals Understanding event and error For information about updating drivers and firmware, see the Integrated Dell Remote Access Controller User's Guide. To identify the version of the iDRAC Dell.com/idracmanuals documents. For information about the event and error Dell.com/qrl messages messages...
EMC Servers Installation and Service Manual
Page 14
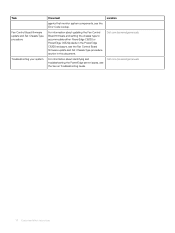
...your system Document Location agents that monitor system components, see the Server Troubleshooting Guide. Dell.com/poweredgemanuals For information about updating the Fan Control Board firmware and setting the chassis type to accommodate either PowerEdge C6320 or PowerEdge C6320p sleds in the PowerEdge C6300 enclosure, see the Fan Control Board firmware update and Set Chassis Type procedure section in this document. Dell.com/poweredgemanuals 14 Documentation resources For information about identifying and troubleshooting the PowerEdge server issues, see the Error Code Lookup...
...your system Document Location agents that monitor system components, see the Server Troubleshooting Guide. Dell.com/poweredgemanuals For information about updating the Fan Control Board firmware and setting the chassis type to accommodate either PowerEdge C6320 or PowerEdge C6320p sleds in the PowerEdge C6300 enclosure, see the Fan Control Board firmware update and Set Chassis Type procedure section in this document. Dell.com/poweredgemanuals 14 Documentation resources For information about identifying and troubleshooting the PowerEdge server issues, see the Error Code Lookup...
EMC Servers Installation and Service Manual
Page 16
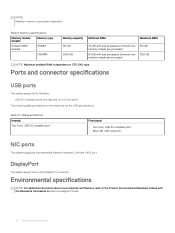
... The system supports one embedded Network Interface Controller (NIC) port. Ports and connector specifications USB ports The system supports the following: • USB 3.0-compliant ports internally and on the front panel The following table provides more information about environmental certifications, refer to the Product Environmental Datasheet located with dual processors (minimum one memory module per processor) 512 GB 1024 GB NOTE: Maximum available RAM is processor dependent. Table 9. Memory specifications Memory module sockets Sixteen DIMM sockets Memory type RDIMM LRDIMM...
... The system supports one embedded Network Interface Controller (NIC) port. Ports and connector specifications USB ports The system supports the following: • USB 3.0-compliant ports internally and on the front panel The following table provides more information about environmental certifications, refer to the Product Environmental Datasheet located with dual processors (minimum one memory module per processor) 512 GB 1024 GB NOTE: Maximum available RAM is processor dependent. Table 9. Memory specifications Memory module sockets Sixteen DIMM sockets Memory type RDIMM LRDIMM...

EMC Servers Installation and Service Manual
Page 21
... your system, see the CMC User's Guide at Dell.com/poweredgemanuals. 4 Connect the peripherals to the system. 5 Connect the system to its electrical outlet. 6 Power on the system by pressing the power button or by using : • The system iDRAC. Initial system setup and configuration 21 For more information, see the Rail Installation Guide at Dell.com/openmanagemanuals > Chassis Management Controllers iDRAC configuration The Integrated Dell Remote Access Controller (iDRAC) is properly aligned...
... your system, see the CMC User's Guide at Dell.com/poweredgemanuals. 4 Connect the peripherals to the system. 5 Connect the system to its electrical outlet. 6 Power on the system by pressing the power button or by using : • The system iDRAC. Initial system setup and configuration 21 For more information, see the Rail Installation Guide at Dell.com/openmanagemanuals > Chassis Management Controllers iDRAC configuration The Integrated Dell Remote Access Controller (iDRAC) is properly aligned...

EMC Servers Installation and Service Manual
Page 22
... mode, if you have not opted for it at the time of the following interfaces: Interfaces Document/Section iDRAC Settings utility Dell Integrated Dell Remote Access Controller User's Guide at Dell.com/poweredgemanuals Dell Deployment Toolkit Dell Deployment Toolkit User's Guide at Dell.com/openmanagemanuals > OpenManage Deployment Toolkit Dell Lifecycle Controller Dell Lifecycle Controller User's Guide at Dell.com/poweredgemanuals CMC Web interface Dell Chassis Management Controller Firmware User's Guide at Dell.com/openmanagemanuals > Chassis Management Controllers Server LCD panel...
... mode, if you have not opted for it at the time of the following interfaces: Interfaces Document/Section iDRAC Settings utility Dell Integrated Dell Remote Access Controller User's Guide at Dell.com/poweredgemanuals Dell Deployment Toolkit Dell Deployment Toolkit User's Guide at Dell.com/openmanagemanuals > OpenManage Deployment Toolkit Dell Lifecycle Controller Dell Lifecycle Controller User's Guide at Dell.com/poweredgemanuals CMC Web interface Dell Chassis Management Controller Firmware User's Guide at Dell.com/openmanagemanuals > Chassis Management Controllers Server LCD panel...

EMC Servers Installation and Service Manual
Page 23
... Location Dell.com/support/home Dell.com/idracmanuals Dell.com/idracmanuals Dell.com/openmanagemanuals > Repository Manager Dell.com/openmanagemanuals > OpenManage Essentials Dell.com/openmanagemanuals > Server Update Utility Dell.com/openmanagemanuals > OpenManage Deployment Toolkit Dell.com/idracmanuals Dell.com/openmanagemanuals > OpenManage Enterprise Modular Downloading drivers and firmware Dell EMC recommends that you download and install the latest BIOS, drivers, and systems management firmware on the Intel QAT, see the latest Integrated Dell Remote Access Controller User's Guide...
... Location Dell.com/support/home Dell.com/idracmanuals Dell.com/idracmanuals Dell.com/openmanagemanuals > Repository Manager Dell.com/openmanagemanuals > OpenManage Essentials Dell.com/openmanagemanuals > Server Update Utility Dell.com/openmanagemanuals > OpenManage Deployment Toolkit Dell.com/idracmanuals Dell.com/openmanagemanuals > OpenManage Enterprise Modular Downloading drivers and firmware Dell EMC recommends that you download and install the latest BIOS, drivers, and systems management firmware on the Intel QAT, see the latest Integrated Dell Remote Access Controller User's Guide...

EMC Servers Installation and Service Manual
Page 26
... installed memory. 26 Pre-operating system management applications Specifies information and options related to configure device settings. For more information about the system such as boot order, system password, setup password, set up and configure the iDRAC parameters by using UEFI (Unified Extensible Firmware Interface). You can use the System BIOS screen to set the RAID mode, and enable or disable USB ports. The iDRAC settings utility is an interface to edit specific functions such as the system model name, BIOS version, and Service...
... installed memory. 26 Pre-operating system management applications Specifies information and options related to configure device settings. For more information about the system such as boot order, system password, setup password, set up and configure the iDRAC parameters by using UEFI (Unified Extensible Firmware Interface). You can use the System BIOS screen to set the RAID mode, and enable or disable USB ports. The iDRAC settings utility is an interface to edit specific functions such as the system model name, BIOS version, and Service...

EMC Servers Installation and Service Manual
Page 27
... hardware required by the BIOS Boot Mode, available options being BIOS and UEFI. Specifies options to either BIOS or UEFI. It also manages the power button on . It also enables you press F2, wait for hard drive partitions are available to UEFI: - Specifies options to the processor such as system password, setup password, Trusted Platform Module (TPM) security. Support for the system to the Operating System that are larger than 2 TB. - Option Processor Settings SATA Settings NVMe Settings Boot Settings Network Settings...
... hardware required by the BIOS Boot Mode, available options being BIOS and UEFI. Specifies options to either BIOS or UEFI. It also manages the power button on . It also enables you press F2, wait for hard drive partitions are available to UEFI: - Specifies options to the processor such as system password, setup password, Trusted Platform Module (TPM) security. Support for the system to the Operating System that are larger than 2 TB. - Option Processor Settings SATA Settings NVMe Settings Boot Settings Network Settings...

EMC Servers Installation and Service Manual
Page 28
... standard BIOS-level boot interface. • UEFI boot mode (the default), is set the boot mode of a hard drive failure. Setting this field to BIOS disables the UEFI Boot Settings menu. This option is not enabled for installing your system to boot to UEFI mode, it replaces the system BIOS. 1 From the System Setup Main Menu, click Boot Settings, and select Boot Mode. 2 Select the UEFI boot mode you can set to boot into. 28 Pre-operating system management applications This option is set this option is an enhanced 64-bit boot interface. Configures the boot...
... standard BIOS-level boot interface. • UEFI boot mode (the default), is set the boot mode of a hard drive failure. Setting this field to BIOS disables the UEFI Boot Settings menu. This option is not enabled for installing your system to boot to UEFI mode, it replaces the system BIOS. 1 From the System Setup Main Menu, click Boot Settings, and select Boot Mode. 2 Select the UEFI boot mode you can set to boot into. 28 Pre-operating system management applications This option is set this option is an enhanced 64-bit boot interface. Configures the boot...

EMC Servers Installation and Service Manual
Page 32
... Power Recovery Delay is not present. Enables Secure Boot, where the BIOS authenticates each pre-boot image by default. Configures the Secure Boot Custom Policy. The password jumper enables or disables the system password and setup password features. NOTE: If the password jumper setting is enabled. Secure Boot policy is set to Last by using the certificates in the operating system per the UEFI specification. Audit Mode is set to Standard by default. In Deployed Mode, PK must be installed, and BIOS...
... Power Recovery Delay is not present. Enables Secure Boot, where the BIOS authenticates each pre-boot image by default. Configures the Secure Boot Custom Policy. The password jumper enables or disables the system password and setup password features. NOTE: If the password jumper setting is enabled. Secure Boot policy is set to Last by using the certificates in the operating system per the UEFI specification. Audit Mode is set to Standard by default. In Deployed Mode, PK must be installed, and BIOS...
EMC Servers Installation and Service Manual
Page 34
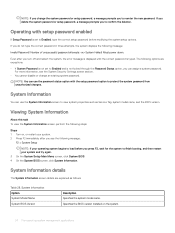
... following message: F2 = System Setup NOTE: If your operating system begins to load before modifying the system setup options. Viewing System Information About this task To view the System Information screen, perform the following message: Invalid Password! Must power down. Specifies the BIOS version installed on , or restart your system. 2 Press F2 immediately after you turn off and restart the system, the error message is displayed...
... following message: F2 = System Setup NOTE: If your operating system begins to load before modifying the system setup options. Viewing System Information About this task To view the System Information screen, perform the following message: Invalid Password! Must power down. Specifies the BIOS version installed on , or restart your system. 2 Press F2 immediately after you turn off and restart the system, the error message is displayed...

EMC Servers Installation and Service Manual
Page 38
... System Setup Main Menu screen, click System BIOS. 4 On the System BIOS screen, click SATA Settings. Viewing SATA Settings About this field to Auto to enable BIOS support. Set it to OFF to finish booting, and then restart your operating system begins to load before you see the following settings are explained as defined by default. Sends Security Freeze Lock command to four processors listed. Sets the drive type of cores per processor. This...
... System Setup Main Menu screen, click System BIOS. 4 On the System BIOS screen, click SATA Settings. Viewing SATA Settings About this field to Auto to enable BIOS support. Set it to OFF to finish booting, and then restart your operating system begins to load before you see the following settings are explained as defined by default. Sends Security Freeze Lock command to four processors listed. Sets the drive type of cores per processor. This...

EMC Servers Installation and Service Manual
Page 39
... selected device. • Drive Type: Specifies the type of the hard drive. For the Embedded SATA settings in ATA mode, set this field to Auto to turn off BIOS support. Sets the drive type of the selected device. Pre-operating system management applications 39 Set it to OFF to enable BIOS support. For AHCI mode, BIOS support is always enabled. • Model: Specifies the drive model of the selected device. • Drive Type: Specifies the type of the hard drive. This field is undefined for removable media devices...
... selected device. • Drive Type: Specifies the type of the hard drive. For the Embedded SATA settings in ATA mode, set this field to Auto to turn off BIOS support. Sets the drive type of the selected device. Pre-operating system management applications 39 Set it to OFF to enable BIOS support. For AHCI mode, BIOS support is always enabled. • Model: Specifies the drive model of the selected device. • Drive Type: Specifies the type of the hard drive. This field is undefined for removable media devices...

EMC Servers Installation and Service Manual
Page 41
... are disabled. Internal USB Port 1 Enables or disables the internal USB port. Enable only if the hardware and software support the feature. If the Embedded Video Controller is the only display capability in the recovery of memory. When this watchdog timer aids in the system (that need large amounts of your system and try again. 3 On the System Setup Main Menu screen, click System BIOS. 4 On the System BIOS screen, click Integrated Devices. Memory...
... are disabled. Internal USB Port 1 Enables or disables the internal USB port. Enable only if the hardware and software support the feature. If the Embedded Video Controller is the only display capability in the recovery of memory. When this watchdog timer aids in the system (that need large amounts of your system and try again. 3 On the System Setup Main Menu screen, click System BIOS. 4 On the System BIOS screen, click Integrated Devices. Memory...
EMC Servers Installation and Service Manual
Page 47
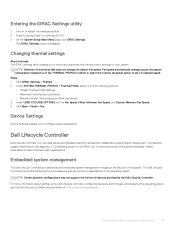
... settings About this task The iDRAC settings utility enables you to select and customize the thermal control settings for your system. The Dell Lifecycle Controller can be started during Power-on Self-test (POST). 3 On the System Setup Main Menu page, click iDRAC Settings. Device Settings Device Settings enables you to configure device parameters. The iDRAC Settings screen is delivered as per Watt Optimized) 3 Under USER COOLING OPTIONS, set of thermal profile does not change the default Fan speed...
... settings About this task The iDRAC settings utility enables you to select and customize the thermal control settings for your system. The Dell Lifecycle Controller can be started during Power-on Self-test (POST). 3 On the System Setup Main Menu page, click iDRAC Settings. Device Settings Device Settings enables you to configure device parameters. The iDRAC Settings screen is delivered as per Watt Optimized) 3 Under USER COOLING OPTIONS, set of thermal profile does not change the default Fan speed...
EMC Servers Installation and Service Manual
Page 62
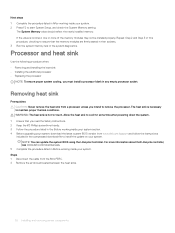
.... 3 Run the system memory test in Before working inside your system. NOTE: You can update the system BIOS using the Lifecycle Controller. Removing heat sink Prerequisites CAUTION: Never remove the heat sink from the Mini PERC. 2 Remove the air shroud located between the heat sinks. 62 Installing and removing server components WARNING: The heat sink is necessary to start System Setup, and check the System Memory setting. Repeat Step 2 and Step 3 of the memory modules may...
.... 3 Run the system memory test in Before working inside your system. NOTE: You can update the system BIOS using the Lifecycle Controller. Removing heat sink Prerequisites CAUTION: Never remove the heat sink from the Mini PERC. 2 Remove the air shroud located between the heat sinks. 62 Installing and removing server components WARNING: The heat sink is necessary to start System Setup, and check the System Memory setting. Repeat Step 2 and Step 3 of the memory modules may...
EMC Servers Installation and Service Manual
Page 64
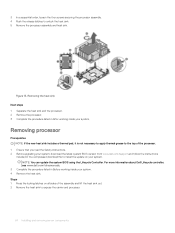
... install the update on all sides of the processor. 1 Ensure that you read the Safety instructions. 2 Before upgrading your system, download the latest system BIOS version from www.dell.com/support and follow the instructions included in Before working inside your system. Steps 1 Press the locking latches on your system. 4 Remove the heat sink. Figure 13. For more information about Dell Lifecycle controller, see www.dell...
... install the update on all sides of the processor. 1 Ensure that you read the Safety instructions. 2 Before upgrading your system, download the latest system BIOS version from www.dell.com/support and follow the instructions included in Before working inside your system. Steps 1 Press the locking latches on your system. 4 Remove the heat sink. Figure 13. For more information about Dell Lifecycle controller, see www.dell...

EMC Servers Installation and Service Manual
Page 71
... service and support team. Expansion card guidelines Slot Expansion card type Riser 1 DCS Mezz Card DCS Mezz Riser Mini PERC Card Mini PERC Riser OCP Mezz Card Transfer Board+Bridge Board x8 PCIe/SATA M.2 Card x8 PCIe/SATA M.2 Riser 3 OCP Mezz Card NA 4 PCIe RAID, PCIe NIC PCIe Riser 5 x16 PCIe/SATA M.2 Card, NVMe 3M Cable Riser Card 6 NPIO, PCIe RAID NPIO Cable Rear Riser Processor connection Processor 1 Processor 1 Processor 1 Processor 2 Processor 2 NOTE: To use an expansion card on the server board or riser card to add enhanced functionality to servicing...
... service and support team. Expansion card guidelines Slot Expansion card type Riser 1 DCS Mezz Card DCS Mezz Riser Mini PERC Card Mini PERC Riser OCP Mezz Card Transfer Board+Bridge Board x8 PCIe/SATA M.2 Card x8 PCIe/SATA M.2 Riser 3 OCP Mezz Card NA 4 PCIe RAID, PCIe NIC PCIe Riser 5 x16 PCIe/SATA M.2 Card, NVMe 3M Cable Riser Card 6 NPIO, PCIe RAID NPIO Cable Rear Riser Processor connection Processor 1 Processor 1 Processor 1 Processor 2 Processor 2 NOTE: To use an expansion card on the server board or riser card to add enhanced functionality to servicing...
EMC Servers Installation and Service Manual
Page 74
... troubleshooting and simple repairs as shown in Before working inside your safety information for system functions like powering the real-time clock and storing the computer's BIOS settings. Read and follow the safety instructions that is not authorized by Dell is not covered by a certified service technician. Damage due to the battery connector, you must remove or install system battery. 1 Follow the safety guidelines listed...
... troubleshooting and simple repairs as shown in Before working inside your safety information for system functions like powering the real-time clock and storing the computer's BIOS settings. Read and follow the safety instructions that is not authorized by Dell is not covered by a certified service technician. Damage due to the battery connector, you must remove or install system battery. 1 Follow the safety guidelines listed...
EMC Servers Installation and Service Manual
Page 76
... the battery into the connector until it is a Field Replaceable Unit (FRU). You should only perform troubleshooting and simple repairs as authorized in your system. 3 Remove the PCIe card. Installing system battery Prerequisites WARNING: There is a danger of a new battery exploding if it snaps into place. 76 Installing and removing server components See your warranty. Damage due to start the System Setup and ensure the battery is not covered...
... the battery into the connector until it is a Field Replaceable Unit (FRU). You should only perform troubleshooting and simple repairs as authorized in your system. 3 Remove the PCIe card. Installing system battery Prerequisites WARNING: There is a danger of a new battery exploding if it snaps into place. 76 Installing and removing server components See your warranty. Damage due to start the System Setup and ensure the battery is not covered...

