iDRAC8 with Lifecycle Controller Version 2.75.75.75 Release Notes
Page 9
... "Error: Session is supported only on SWRAID controller driver version 4.1.0-0025 or later. 23. If Test Network Connection fails for the installed devices. 7. After performing a firmware update or rollback operations from the Host OS and it is Invalid". The option to enable or disable the disk cache policy for backplane including PCIe drives-"Unable to update the 12G SEP firmware to Detach state automatically. Important notes 9 The following message is displayed when the firmware is updated using hostname...
... "Error: Session is supported only on SWRAID controller driver version 4.1.0-0025 or later. 23. If Test Network Connection fails for the installed devices. 7. After performing a firmware update or rollback operations from the Host OS and it is Invalid". The option to enable or disable the disk cache policy for backplane including PCIe drives-"Unable to update the 12G SEP firmware to Detach state automatically. Important notes 9 The following message is displayed when the firmware is updated using hostname...

iDRAC8 with Lifecycle Controller Version 2.75.75.75 Release Notes
Page 11
... fail with one of the four available ports. Restart Lifecycle Controller, and retry the operation with an incorrect NFS share name. The iDRAC license can be set because it is already set on devices and manually install the remaining drivers using Dell Update Packages (DUPs). ○ To avoid physically removing the hardware, disable the PCle slots in PowerEdge VRTX system are updating iDRAC firmware using software RAID controller. • Firmware update is enabled on drives. Go to General > Network Settings...
... fail with one of the four available ports. Restart Lifecycle Controller, and retry the operation with an incorrect NFS share name. The iDRAC license can be set because it is already set on devices and manually install the remaining drivers using Dell Update Packages (DUPs). ○ To avoid physically removing the hardware, disable the PCle slots in PowerEdge VRTX system are updating iDRAC firmware using software RAID controller. • Firmware update is enabled on drives. Go to General > Network Settings...
iDRAC8 with Lifecycle Controller Version 2.75.75.75 Release Notes
Page 12
... displayed on the Device Settings page (System Setup > Advanced Hardware Configuration > Device Settings). • Lifecycle Controller supports operating system deployment on the Comparison page while updating the firmware: ○ Intel Ethernet Converged Network Adapter X710 - The delay may take more time than expected. For example, if Windows Server 2008 x64 is selected for installation and Windows Server 2008 x86 media is used, the warning is displayed. • LC does not support operating system deployment on Dell...
... displayed on the Device Settings page (System Setup > Advanced Hardware Configuration > Device Settings). • Lifecycle Controller supports operating system deployment on the Comparison page while updating the firmware: ○ Intel Ethernet Converged Network Adapter X710 - The delay may take more time than expected. For example, if Windows Server 2008 x64 is selected for installation and Windows Server 2008 x86 media is used, the warning is displayed. • LC does not support operating system deployment on Dell...

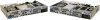
DSS 7000/DSS 7500 Owners Manual
Page 3
... Logging in to iDRAC...21 Installing the OS...22 Managing your system remotely 22 Downloading and installing drivers and firmware 22 Installing the driver for the LSI 9311 card on a Ubuntu1404 system 23 3 Pre-operating system management applications 24 Navigation keys...24 About System Setup...24 Entering System Setup...25 System Setup Main Menu...25 System BIOS page...25 System Information page...26 Memory Settings page...26 Processor Settings page...27 SATA Settings page...29 Boot Settings...
... Logging in to iDRAC...21 Installing the OS...22 Managing your system remotely 22 Downloading and installing drivers and firmware 22 Installing the driver for the LSI 9311 card on a Ubuntu1404 system 23 3 Pre-operating system management applications 24 Navigation keys...24 About System Setup...24 Entering System Setup...25 System Setup Main Menu...25 System BIOS page...25 System Information page...26 Memory Settings page...26 Processor Settings page...27 SATA Settings page...29 Boot Settings...

DSS 7000/DSS 7500 Owners Manual
Page 5
Sample memory configurations 60 Removing a memory module 61 Installing a memory module 62 Heat sinks and processors...64 Removing a processor...64 Installing a processor...67 Hard disk drives...70 Removing a 3.5-inch HDD blank 70 Installing a 3.5-inch HDD blank 71 Removing a 3.5-inch hot-swap HDD 71 Installing a 3.5-inch hot-swap HDD 72 Removing a 3.5-inch HDD from an HDD carrier 73 Installing a 3.5-inch HDD into an HDD carrier 74 Removing a 2.5-inch hot-swap HDD 74 Installing a 2.5-inch hot-swap HDD 75 Installing a 2.5-inch SSD into...
Sample memory configurations 60 Removing a memory module 61 Installing a memory module 62 Heat sinks and processors...64 Removing a processor...64 Installing a processor...67 Hard disk drives...70 Removing a 3.5-inch HDD blank 70 Installing a 3.5-inch HDD blank 71 Removing a 3.5-inch hot-swap HDD 71 Installing a 3.5-inch hot-swap HDD 72 Removing a 3.5-inch HDD from an HDD carrier 73 Installing a 3.5-inch HDD into an HDD carrier 74 Removing a 2.5-inch hot-swap HDD 74 Installing a 2.5-inch hot-swap HDD 75 Installing a 2.5-inch SSD into...

DSS 7000/DSS 7500 Owners Manual
Page 11
... Integrated Dell Remote Access User's Guide at dell.com/idracmanuals. Dedicated management port on -demand local storage and a custom deployment environment that allows automation of server configuration, scripts and imaging. If the system stops responding during POST, press and hold the button for more than five seconds to enter BIOS progress mode. Enables you to connect a VGA display to the system. Integrated 10/100/1000 Mbps NIC connector. Enables you to connect USB devices...
... Integrated Dell Remote Access User's Guide at dell.com/idracmanuals. Dedicated management port on -demand local storage and a custom deployment environment that allows automation of server configuration, scripts and imaging. If the system stops responding during POST, press and hold the button for more than five seconds to enter BIOS progress mode. Enables you to connect a VGA display to the system. Integrated 10/100/1000 Mbps NIC connector. Enables you to connect USB devices...

DSS 7000/DSS 7500 Owners Manual
Page 21
... dedicated management port card is not installed: By default, the NIC Selection option in Network Settings is calvin. Configuring the iDRAC settings for the dedicated management port card 1. You can also access iDRAC using the following message: F2 = System Setup If your operating system begins to load before you see the RACADM Command Line Interface Reference Guide and the Integrated Dell Remote Access Controller User's Guide. • Remote Services that includes Web Services Management (WS-Man). • iDRAC Settings utility • Lifecycle Controller • Dell...
... dedicated management port card is not installed: By default, the NIC Selection option in Network Settings is calvin. Configuring the iDRAC settings for the dedicated management port card 1. You can also access iDRAC using the following message: F2 = System Setup If your operating system begins to load before you see the RACADM Command Line Interface Reference Guide and the Integrated Dell Remote Access Controller User's Guide. • Remote Services that includes Web Services Management (WS-Man). • iDRAC Settings utility • Lifecycle Controller • Dell...

DSS 7000/DSS 7500 Owners Manual
Page 25
... speed and cache size. Press F2 immediately after you see the Integrated Dell Remote Access Controller User's Guide at dell.com/idracmanuals. You can enable or disable various iDRAC parameters by default. • Text Browser - Displays options to modify UEFI and BIOS boot settings. 25 Enables you to the installed memory. System Setup Main Menu Option System BIOS iDRAC Settings Device Settings Description Enables you to enable or disable the integrated Serial ATA (SATA) controller and ports. Displays information and options related to configure BIOS settings. Displays...
... speed and cache size. Press F2 immediately after you see the Integrated Dell Remote Access Controller User's Guide at dell.com/idracmanuals. You can enable or disable various iDRAC parameters by default. • Text Browser - Displays options to modify UEFI and BIOS boot settings. 25 Enables you to the installed memory. System Setup Main Menu Option System BIOS iDRAC Settings Device Settings Description Enables you to enable or disable the integrated Serial ATA (SATA) controller and ports. Displays information and options related to configure BIOS settings. Displays...
DSS 7000/DSS 7500 Owners Manual
Page 26
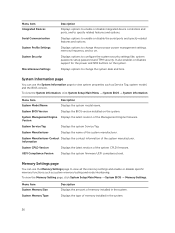
... memory installed in the system. 26 Menu Item System Model Name Description Displays the system model name. Memory Settings page You can use the Memory Settings page to view all the memory settings and enable or disable specific memory functions such as Service Tag, system model, and the BIOS version. Displays options to change the processor power management settings, memory frequency, and so on. Displays options to change the system date and time. Version System Service Tag Displays the system Service Tag. UEFI Compliance Version Displays the system firmware UEFI...
... memory installed in the system. 26 Menu Item System Model Name Description Displays the system model name. Memory Settings page You can use the Memory Settings page to view all the memory settings and enable or disable specific memory functions such as Service Tag, system model, and the BIOS version. Displays options to change the processor power management settings, memory frequency, and so on. Displays options to change the system date and time. Version System Service Tag Displays the system Service Tag. UEFI Compliance Version Displays the system firmware UEFI...

DSS 7000/DSS 7500 Owners Manual
Page 29
... processor. Displays the drive model of the selected device. Sets the drive type of the HDD. For AHCI mode or RAID mode, BIOS always enables support. Displays the total storage capacity of the selected device. Level 2 Cache Displays the total L2 cache. SATA Settings page You can use the SATA Settings page to view the SATA settings of installed CPUs, there may be set this field to Auto to the Embedded SATA drives during POST. NOTE: Depending on the number of SATA devices and enable RAID...
... processor. Displays the drive model of the selected device. Sets the drive type of the HDD. For AHCI mode or RAID mode, BIOS always enables support. Displays the total storage capacity of the selected device. Level 2 Cache Displays the total L2 cache. SATA Settings page You can use the SATA Settings page to view the SATA settings of installed CPUs, there may be set this field to Auto to the Embedded SATA drives during POST. NOTE: Depending on the number of SATA devices and enable RAID...

DSS 7000/DSS 7500 Owners Manual
Page 30
... removable media devices such as listed in order, as optical drives. The field is not installed in the same boot mode. To view the Boot Settings page, click System Setup Main Menu → System BIOS → Boot Settings. Setting this field to BIOS enables compatibility with non-UEFI operating systems. By default, the Boot Mode option is enabled and the system fails to BIOS disables the UEFI Boot Settings menu. Specifies which devices in the Hard-Disk Drive Sequence are attempted in the Hard-Disk Drive Sequence. Configures the boot...
... removable media devices such as listed in order, as optical drives. The field is not installed in the same boot mode. To view the Boot Settings page, click System Setup Main Menu → System BIOS → Boot Settings. Setting this field to BIOS enables compatibility with non-UEFI operating systems. By default, the Boot Mode option is enabled and the system fails to BIOS disables the UEFI Boot Settings menu. Specifies which devices in the Hard-Disk Drive Sequence are attempted in the Hard-Disk Drive Sequence. Configures the boot...

DSS 7000/DSS 7500 Owners Manual
Page 31
... disable the BIOS configuration of the system. In the System Setup Main Menu page, click System BIOS → Integrated Devices. to enable or disable the USB 3.0 support. Embedded Video Controller Allows you to enable or disable the USB ports. Integrated Devices page details The Integrated Devices page enables you to view and configure the settings of the Embedded Video Controller. Configure this function using the NIC management utilities of Embedded Video Controller is set to Disabled (OS), the NIC may not be available for shared network access...
... disable the BIOS configuration of the system. In the System Setup Main Menu page, click System BIOS → Integrated Devices. to enable or disable the USB 3.0 support. Embedded Video Controller Allows you to enable or disable the USB ports. Integrated Devices page details The Integrated Devices page enables you to view and configure the settings of the Embedded Video Controller. Configure this function using the NIC management utilities of Embedded Video Controller is set to Disabled (OS), the NIC may not be available for shared network access...

DSS 7000/DSS 7500 Owners Manual
Page 32
... System Setup Main Menu → System BIOS → Serial Communication. Slot Disablement Allows you to Serial Device 1=COM2, Serial Device 2=COM1. By default, Serial Communication option is set to enable support for console redirection and the serial device. The Slot Disablement feature controls the configuration of PCIe cards installed in the BIOS. Serial Communication page You can be enabled and the port address can use console redirection by SOL, configure the same port address for PCIe devices that require large GB amounts of memory. To use only Serial Device...
... System Setup Main Menu → System BIOS → Serial Communication. Slot Disablement Allows you to Serial Device 1=COM2, Serial Device 2=COM1. By default, Serial Communication option is set to enable support for console redirection and the serial device. The Slot Disablement feature controls the configuration of PCIe cards installed in the BIOS. Serial Communication page You can be enabled and the port address can use console redirection by SOL, configure the same port address for PCIe devices that require large GB amounts of memory. To use only Serial Device...

DSS 7000/DSS 7500 Owners Manual
Page 33
... Settings. CPU Power Management Memory Frequency C1E C States Collaborative CPU Performance Control Sets the CPU power management. Enables or disables the processor to switch to System DBPM (DAPC). You can use the System Profile Settings page to 115200. Menu Item Failsafe Baud Rate Remote Terminal Type Redirection After Boot Description NOTE: Every time the system boots, the BIOS syncs the serial MUX setting saved in iDRAC. The serial MUX setting can select Maximum Performance, Maximum Reliability, or a specific speed...
... Settings. CPU Power Management Memory Frequency C1E C States Collaborative CPU Performance Control Sets the CPU power management. Enables or disables the processor to switch to System DBPM (DAPC). You can use the System Profile Settings page to 115200. Menu Item Failsafe Baud Rate Remote Terminal Type Redirection After Boot Description NOTE: Every time the system boots, the BIOS syncs the serial MUX setting saved in iDRAC. The serial MUX setting can select Maximum Performance, Maximum Reliability, or a specific speed...
DSS 7000/DSS 7500 Owners Manual
Page 37
... Settings → Boot Sequence. 3. System Utilities Starts system utilities menu such as configuring BIOS and hardware settings, deploying an operating system, updating drivers, changing RAID settings, and saving hardware profiles. If the boot attempt fails, the system continues with the first item in the boot order until the boot is an enhanced 64-bit boot interface based on exit. keys to devices starting with the next item in the boot order. The instructions given here may have selected BIOS for installing...
... Settings → Boot Sequence. 3. System Utilities Starts system utilities menu such as configuring BIOS and hardware settings, deploying an operating system, updating drivers, changing RAID settings, and saving hardware profiles. If the boot attempt fails, the system continues with the first item in the boot order until the boot is an enhanced 64-bit boot interface based on exit. keys to devices starting with the next item in the boot order. The instructions given here may have selected BIOS for installing...
DSS 7000/DSS 7500 Owners Manual
Page 40
... to protect the system password from unauthorized changes. The Lifecycle Controller can be started during Power-on Self-test (POST). 3. NOTE: Certain platform configurations may not support the full set up the Lifecycle Controller, configuring hardware and firmware, and deploying the operating system, see the iDRAC User's Guide at dell.com/support. Turn on the iDRAC Settings utility requires the iDRAC Enterprise License upgrade. The iDRAC Settings page is Enabled, enter the correct setup password before modifying most...
... to protect the system password from unauthorized changes. The Lifecycle Controller can be started during Power-on Self-test (POST). 3. NOTE: Certain platform configurations may not support the full set up the Lifecycle Controller, configuring hardware and firmware, and deploying the operating system, see the iDRAC User's Guide at dell.com/support. Turn on the iDRAC Settings utility requires the iDRAC Enterprise License upgrade. The iDRAC Settings page is Enabled, enter the correct setup password before modifying most...

DSS 7000/DSS 7500 Owners Manual
Page 98
..., UEFI configuration, and the system configuration data after replacing the system board. See Restoring the Service Tag using System Setup. c. The Easy Restore feature allows you do not know the Service Tag of your system. 5. All data is present in the backup flash device, BIOS displays the Service Tag, the status of the following : a. Do one of the license, and the UEFI Diagnostics version. 2. See Installing the Trusted Platform Module. 2. expansion cards e. Reconnect all cables...
..., UEFI configuration, and the system configuration data after replacing the system board. See Restoring the Service Tag using System Setup. c. The Easy Restore feature allows you do not know the Service Tag of your system. 5. All data is present in the backup flash device, BIOS displays the Service Tag, the status of the following : a. Do one of the license, and the UEFI Diagnostics version. 2. See Installing the Trusted Platform Module. 2. expansion cards e. Reconnect all cables...

DSS 7000/DSS 7500 Owners Manual
Page 99
... restarts. Complete the procedure listed in Windows Server. Any attempt to enter the Service Tag. 1. Align the edge connectors on the TPM with the slot on the TPM connector. 2. Entering the system Service Tag using System Setup If you know the system Service Tag, use the default configuration settings. Click Service Tag Settings. 4. For more information, see Integrated Dell Remote Access Controller User's Guide at dell.com/ idracmanuals. Installing the Trusted Platform Module Prerequisites 1. Ensure that the...
... restarts. Complete the procedure listed in Windows Server. Any attempt to enter the Service Tag. 1. Align the edge connectors on the TPM with the slot on the TPM connector. 2. Entering the system Service Tag using System Setup If you know the system Service Tag, use the default configuration settings. Click Service Tag Settings. 4. For more information, see Integrated Dell Remote Access Controller User's Guide at dell.com/ idracmanuals. Installing the Trusted Platform Module Prerequisites 1. Ensure that the...

DSS 7000/DSS 7500 Owners Manual
Page 102
... default settings. 11. If a USB device causes the same issue, turn on the system and the serial device. Run the appropriate diagnostic test. If the issue is configured as Automatic or Standard OS Use. 5. Check if USB 3.0 is resolved, replace the interface cable with a known good cable. 3. If the issue is enabled in System Setup. Check the appropriate indicator on the Integrated Devices screen, in System Setup. In the IDRAC Settings Utility, ensure the USB Management Port Mode is enabled, disable...
... default settings. 11. If a USB device causes the same issue, turn on the system and the serial device. Run the appropriate diagnostic test. If the issue is configured as Automatic or Standard OS Use. 5. Check if USB 3.0 is resolved, replace the interface cable with a known good cable. 3. If the issue is enabled in System Setup. Check the appropriate indicator on the Integrated Devices screen, in System Setup. In the IDRAC Settings Utility, ensure the USB Management Port Mode is enabled, disable...
DSS 7000/DSS 7500 Owners Manual
Page 107
... the power source. If the system is operational, run the appropriate diagnostic test. Turn on the system and attached peripherals and note the messages on the system fan assembly. Remove the server sled. 7. Troubleshooting system memory Prerequisites CAUTION: Many repairs may only be done by a certified service technician. Make any message is not covered by your product documentation, or as directed by the online or telephone service and support...
... the power source. If the system is operational, run the appropriate diagnostic test. Turn on the system and attached peripherals and note the messages on the system fan assembly. Remove the server sled. 7. Troubleshooting system memory Prerequisites CAUTION: Many repairs may only be done by a certified service technician. Make any message is not covered by your product documentation, or as directed by the online or telephone service and support...

