

User's Guide
Page 4
... number of remaining pages 94 Ordering supplies...94 Storing supplies...95 Replacing supplies...95 Moving the printer...99 Managing the printer 101 Managing printer messages...101 Accessing Status Monitor Center...101 Checking the virtual display...101 Viewing reports...102 Configuring ...113 [x]‑page jam, open tray [x]. [24y.xx]...114 [x]‑page jam, clear manual feeder. [25y.xx 115 Troubleshooting 117 Understanding the printer messages...117 Solving printer problems...127 Solving print problems...133 Embedded Web Server does not open 156 Contacting technical support...158
... number of remaining pages 94 Ordering supplies...94 Storing supplies...95 Replacing supplies...95 Moving the printer...99 Managing the printer 101 Managing printer messages...101 Accessing Status Monitor Center...101 Checking the virtual display...101 Viewing reports...102 Configuring ...113 [x]‑page jam, open tray [x]. [24y.xx]...114 [x]‑page jam, clear manual feeder. [25y.xx 115 Troubleshooting 117 Understanding the printer messages...117 Solving printer problems...127 Solving print problems...133 Embedded Web Server does not open 156 Contacting technical support...158
User's Guide
Page 15
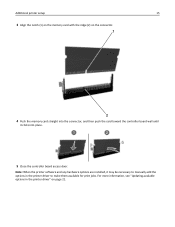
For more information, see "Updating available options in the printer driver to make them available for print jobs. Note: When the printer software and any hardware options are installed, it may be necessary to manually add the options in the printer driver" on the connector. 1 2 4 Push the memory card straight into the connector, and then push the card toward the controller board wall until it clicks into place. 1 2 5 Close the controller board access door. Additional printer setup 15 3 Align the notch (1) on the memory card with the ridge (2) on page 21.
For more information, see "Updating available options in the printer driver to make them available for print jobs. Note: When the printer software and any hardware options are installed, it may be necessary to manually add the options in the printer driver" on the connector. 1 2 4 Push the memory card straight into the connector, and then push the card toward the controller board wall until it clicks into place. 1 2 5 Close the controller board access door. Additional printer setup 15 3 Align the notch (1) on the memory card with the ridge (2) on page 21.

User's Guide
Page 17
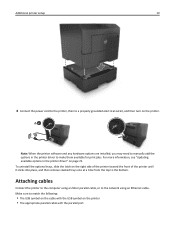
... shown in the printer driver to manually add the options in the illustration. Additional printer setup 17 4 Push the card firmly into the printer. Warning-Potential Damage: Improper installation of the connector on page 21. For more information, see "Updating available options in the printer driver" on the...other devices attached to the card and the controller board. If you are installed, it may cause damage to the printer, then turn the printer off as well, and unplug any hardware options are accessing the controller board or installing optional hardware or memory devices ...
... shown in the printer driver to manually add the options in the illustration. Additional printer setup 17 4 Push the card firmly into the printer. Warning-Potential Damage: Improper installation of the connector on page 21. For more information, see "Updating available options in the printer driver" on the...other devices attached to the card and the controller board. If you are installed, it may cause damage to the printer, then turn the printer off as well, and unplug any hardware options are accessing the controller board or installing optional hardware or memory devices ...
User's Guide
Page 19
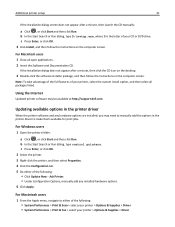
...; The appropriate parallel cable with the USB symbol on the printer. 1 2 Note: When the printer software and any hardware options are installed, you may need to manually add the options in the printer driver" on the right side of the printer toward the front of the printer until it clicks into place, and then remove stacked...
...; The appropriate parallel cable with the USB symbol on the printer. 1 2 Note: When the printer software and any hardware options are installed, you may need to manually add the options in the printer driver" on the right side of the printer toward the front of the printer until it clicks into place, and then remove stacked...
User's Guide
Page 21
... to either of the following : • Click Update Now ‑ Ask Printer. • Under Configuration Options, manually add any hardware options are installed, you may be available at http://support.dell.com. a Click , or click Start and then click Run. For Macintosh users 1 From the ...not appear after a minute, then launch the CD manually: a Click , or click Start and then click Run. b In the Start Search or Run dialog, type control printers. c Press Enter, or click OK. 2 Select the printer. 3 Right‑click the printer, and then select Properties. 4 Click the Configuration tab...
... to either of the following : • Click Update Now ‑ Ask Printer. • Under Configuration Options, manually add any hardware options are installed, you may be available at http://support.dell.com. a Click , or click Start and then click Run. For Macintosh users 1 From the ...not appear after a minute, then launch the CD manually: a Click , or click Start and then click Run. b In the Start Search or Run dialog, type control printers. c Press Enter, or click OK. 2 Select the printer. 3 Right‑click the printer, and then select Properties. 4 Click the Configuration tab...

User's Guide
Page 22
... Equivalent Privacy (WEP), Wi-Fi Protected Access (WPA), WPA2, and 802.1X - Installing the printer on the computer screen. If the installation dialog does not appear after a minute, then launch the CD manually: a Click , or click Start and then click Run. Networking Notes: • Purchase a ...wireless network adapter first before you begin: Note: If your printer on a network. Use a new network cable when possible to do ...
... Equivalent Privacy (WEP), Wi-Fi Protected Access (WPA), WPA2, and 802.1X - Installing the printer on the computer screen. If the installation dialog does not appear after a minute, then launch the CD manually: a Click , or click Start and then click Run. Networking Notes: • Purchase a ...wireless network adapter first before you begin: Note: If your printer on a network. Use a new network cable when possible to do ...

User's Guide
Page 53
... size loaded in Tray 1 and the multipurpose feeder. Custom Type [x] is supported only in each tray. Understanding the printer menus 53 Paper menu Default Source menu Use Default Source Tray [x] MP Feeder Manual Paper Manual Envelope To Set a default paper source for all other trays. • If available, a user‑defined name will...
... size loaded in Tray 1 and the multipurpose feeder. Custom Type [x] is supported only in each tray. Understanding the printer menus 53 Paper menu Default Source menu Use Default Source Tray [x] MP Feeder Manual Paper Manual Envelope To Set a default paper source for all other trays. • If available, a user‑defined name will...

User's Guide
Page 55
... the Paper menu, set Configure MP to "Manual" for Manual Paper Type to appear as a menu. Manual Envelope Type Envelope Rough Envelope Custom Type [x] Specify the envelope type being manually loaded. Understanding the printer menus 55 Use To Manual Paper Size A4 A5 A6 JIS B5 Letter... Legal Executive Oficio (Mexico) Folio Statement Universal Specify the paper size being manually loaded. Manual Envelope Size 7 3/4 Envelope 9 Envelope ...
... the Paper menu, set Configure MP to "Manual" for Manual Paper Type to appear as a menu. Manual Envelope Type Envelope Rough Envelope Custom Type [x] Specify the envelope type being manually loaded. Understanding the printer menus 55 Use To Manual Paper Size A4 A5 A6 JIS B5 Letter... Legal Executive Oficio (Mexico) Folio Statement Universal Specify the paper size being manually loaded. Manual Envelope Size 7 3/4 Envelope 9 Envelope ...

User's Guide
Page 56
Notes: • All Listed is supported. Cassette configures the multipurpose feeder as the automatic paper source. • Manual sets the multipurpose feeder only for manual‑feed print jobs. • First configures the multipurpose feeder as the primary paper source. Notes: • ...substitutions are allowed. • Setting a size substitution lets the print job continue without Change Paper appearing. Understanding the printer menus 56 Configure MP menu Use Configure MP Cassette Manual First To Determine when the printer selects paper from the multipurpose feeder.
Notes: • All Listed is supported. Cassette configures the multipurpose feeder as the automatic paper source. • Manual sets the multipurpose feeder only for manual‑feed print jobs. • First configures the multipurpose feeder as the primary paper source. Notes: • ...substitutions are allowed. • Setting a size substitution lets the print job continue without Change Paper appearing. Understanding the printer menus 56 Configure MP menu Use Configure MP Cassette Manual First To Determine when the printer selects paper from the multipurpose feeder.

User's Guide
Page 64
... it takes for a network print job to be changed only from the Embedded Web Server. • The host name is available only in network printers or printers connected to Off on systems that support BOOTP and RARP. TCP/IP menu To access the menu, navigate to any of the following : •...View Card Speed View the speed of 1-9 is selected, then the setting is the factory default setting. Notes: • This setting can be canceled. Note: Manually setting the IP address sets the Enable DHCP and Enable Auto IP settings to either of the network card. View or change the current TCP...
... it takes for a network print job to be changed only from the Embedded Web Server. • The host name is available only in network printers or printers connected to Off on systems that support BOOTP and RARP. TCP/IP menu To access the menu, navigate to any of the following : •...View Card Speed View the speed of 1-9 is selected, then the setting is the factory default setting. Notes: • This setting can be canceled. Note: Manually setting the IP address sets the Enable DHCP and Enable Auto IP settings to either of the network card. View or change the current TCP...

User's Guide
Page 71
... 71 Set Date and Time menu Use Current Date and Time Manually Set Date and Time [input date/time] Time Zone [list of devices on a network. Notes: • For touch‑screen printer models, date and time are set the date and time. Enable Network Time Protocol, which synchronizes the ... time sets Enable NTP to use the applicable daylight saving time (DST) start and end times associated with the printer Time Zone setting. Set the printer to No. • For non‑touch‑screen printer models, the wizard lets you manually set in YYYY‑MM‑DD‑HH:MM format.
... 71 Set Date and Time menu Use Current Date and Time Manually Set Date and Time [input date/time] Time Zone [list of devices on a network. Notes: • For touch‑screen printer models, date and time are set the date and time. Enable Network Time Protocol, which synchronizes the ... time sets Enable NTP to use the applicable daylight saving time (DST) start and end times associated with the printer Time Zone setting. Set the printer to No. • For non‑touch‑screen printer models, the wizard lets you manually set in YYYY‑MM‑DD‑HH:MM format.

User's Guide
Page 83
Understanding the printer menus 83 Use Tray Renumber Assign MP Feeder Off None 0-199 Assign Tray [x] Off None 0-199 Assign Manual Paper Off None 0-199 Assign Manual Env Off None 0-199 Tray Renumber View Factory Defaults MPF Default = 8 T1 Default = 1 T1 Default = 4 T1 Default = 5 T1 Default... = 20 T1 Default = 21 Env Default = 6 MPaper Default = 2 MEnv Default = 3 Tray Renumber Restore Defaults Yes No To Configure the printer...
Understanding the printer menus 83 Use Tray Renumber Assign MP Feeder Off None 0-199 Assign Tray [x] Off None 0-199 Assign Manual Paper Off None 0-199 Assign Manual Env Off None 0-199 Tray Renumber View Factory Defaults MPF Default = 8 T1 Default = 1 T1 Default = 4 T1 Default = 5 T1 Default... = 20 T1 Default = 21 Env Default = 6 MPaper Default = 2 MEnv Default = 3 Tray Renumber Restore Defaults Yes No To Configure the printer...

User's Guide
Page 107
...feeder, and then remove the jammed paper. Clearing jams 107 1 2 6 5 Area 1 Standard bin 2 Rear door 3 Tray 1 4 Tray [x] 5 Multipurpose feeder 6 Front door 3 4 Printer control panel message [x]‑page jam, clear standard bin. [20y.xx] [x]‑page jam, open rear door. [20y.xx] [x]‑page jam, remove tray 1 to... clear duplex. [23y.xx] [x]‑page jam, remove tray [x]. [24y.xx] [x]‑page jam, clear manual feeder. [250.xx] [x]‑page jam, open the rear door to do Remove the jammed paper. Open the rear door, and then remove the jammed...
...feeder, and then remove the jammed paper. Clearing jams 107 1 2 6 5 Area 1 Standard bin 2 Rear door 3 Tray 1 4 Tray [x] 5 Multipurpose feeder 6 Front door 3 4 Printer control panel message [x]‑page jam, clear standard bin. [20y.xx] [x]‑page jam, open rear door. [20y.xx] [x]‑page jam, remove tray 1 to... clear duplex. [23y.xx] [x]‑page jam, remove tray [x]. [24y.xx] [x]‑page jam, clear manual feeder. [250.xx] [x]‑page jam, open the rear door to do Remove the jammed paper. Open the rear door, and then remove the jammed...

User's Guide
Page 115
Do not fold or crease the paper. Note: Make sure all paper fragments are removed. 2 Flex the sheets of paper back and forth to clear the message and continue [x]‑page jam, clear manual feeder. [25y.xx] 1 From the multipurpose feeder, firmly grasp the jammed paper on a level surface. Straighten the edges on each side, and then gently pull it out. Clearing jams 115 3 Insert the tray. 4 From the printer control panel, select Next > printing. > Clear the jam, press OK > to loosen them, and then fan them.
Do not fold or crease the paper. Note: Make sure all paper fragments are removed. 2 Flex the sheets of paper back and forth to clear the message and continue [x]‑page jam, clear manual feeder. [25y.xx] 1 From the multipurpose feeder, firmly grasp the jammed paper on a level surface. Straighten the edges on each side, and then gently pull it out. Clearing jams 115 3 Insert the tray. 4 From the printer control panel, select Next > printing. > Clear the jam, press OK > to loosen them, and then fan them.

User's Guide
Page 121
...one or more of the following : • Load the tray or feeder with the correct size and type of paper. • From the printer control panel, press to clear the message and continue printing. Troubleshooting 121 • Cancel the current job. Note: If no paper is loaded... in the feeder, then the printer manually overrides the request, and then prints from the default paper source. • Cancel the current job. Load [paper source] with [custom type ...
...one or more of the following : • Load the tray or feeder with the correct size and type of paper. • From the printer control panel, press to clear the message and continue printing. Troubleshooting 121 • Cancel the current job. Note: If no paper is loaded... in the feeder, then the printer manually overrides the request, and then prints from the default paper source. • Cancel the current job. Load [paper source] with [custom type ...

User's Guide
Page 122
... If no paper is loaded in the feeder, then the printer manually overrides the request, and then prints from an automatically selected tray. • Cancel the current job. Contact technical support or your Dell printer dealer, and then report the message. Maintenance kit nearly low... [80.xy] For more information, contact technical support or your Dell printer dealer. Load Manual Feeder with [paper size] [orientation] Try one or more of...
... If no paper is loaded in the feeder, then the printer manually overrides the request, and then prints from an automatically selected tray. • Cancel the current job. Contact technical support or your Dell printer dealer, and then report the message. Maintenance kit nearly low... [80.xy] For more information, contact technical support or your Dell printer dealer. Load Manual Feeder with [paper size] [orientation] Try one or more of...

User's Guide
Page 130
... on the tray. • If you are aligned with the tray. Reinstall the tray. Is the tray listed in the printer driver to manually add the internal option in the menu settings page? Step 4 a Check if the internal option is installed and recognized by the... printer. Is the tray working ? Is the tray working ? For more information, see "Updating available options in the printer driver" on . The problem is below...
... on the tray. • If you are aligned with the tray. Reinstall the tray. Is the tray listed in the printer driver to manually add the internal option in the menu settings page? Step 4 a Check if the internal option is installed and recognized by the... printer. Is the tray working ? Is the tray working ? For more information, see "Updating available options in the printer driver" on . The problem is below...

User's Guide
Page 131
...Action Yes Step 1 Go to step 5. Go to high humidity. For more of the following: • Make sure paper lies flat in the printer driver" on page 21. The problem is solved. Do paper jams still occur frequently? No The problem is solved. Is the tray available in ...print jobs. Step 2 a Load paper from a fresh package. Note: Paper absorbs moisture due to step 3. No Manually add the tray in the printer driver? Is the tray working? Store paper in the printer driver. b Resend the print job. Check if the tray is selected. Step 5 Check if the option is ...
...Action Yes Step 1 Go to step 5. Go to high humidity. For more of the following: • Make sure paper lies flat in the printer driver" on page 21. The problem is solved. Do paper jams still occur frequently? No The problem is solved. Is the tray available in ...print jobs. Step 2 a Load paper from a fresh package. Note: Paper absorbs moisture due to step 3. No Manually add the tray in the printer driver? Is the tray working? Store paper in the printer driver. b Resend the print job. Check if the tray is selected. Step 5 Check if the option is ...

User's Guide
Page 138
..., and the number of pages in the job. Unexpected page breaks occur Action Step 1 Adjust the print timeout settings. Step 2 a Check the original file for manual page breaks. Go to : Settings > General Settings > Timeouts > Print Timeout b Select a higher setting, and then press . c Resend the print job. Contact technical ... collate correctly? Did the file print correctly? b Resend the print job. Print quality problems Yes No The problem is solved. a From the printer control panel, navigate to step 2. Troubleshooting 138 Action Yes No Step 3 The problem is solved.
..., and the number of pages in the job. Unexpected page breaks occur Action Step 1 Adjust the print timeout settings. Step 2 a Check the original file for manual page breaks. Go to : Settings > General Settings > Timeouts > Print Timeout b Select a higher setting, and then press . c Resend the print job. Contact technical ... collate correctly? Did the file print correctly? b Resend the print job. Print quality problems Yes No The problem is solved. a From the printer control panel, navigate to step 2. Troubleshooting 138 Action Yes No Step 3 The problem is solved.

User's Guide
Page 161
Index 161 Index Numerics 250‑sheet tray installing 17 550‑sheet tray installing 17 Symbols [x]‑page jam, clear manual feeder. [25y.xx] 115 [x]‑page jam, clear standard bin. [20y.xx] 112 [x]‑page jam, open front door. [20y.xx] 108 [x]‑page ...] 117 Change [paper source] to [paper size] load [orientation] 118 Change [paper source] to [paper type] [paper size] load [orientation] 118 checking an unresponsive printer 127 checking status of parts and supplies 93 checking the status of parts and supplies 93 checking the virtual display using the Embedded Web Server...
Index 161 Index Numerics 250‑sheet tray installing 17 550‑sheet tray installing 17 Symbols [x]‑page jam, clear manual feeder. [25y.xx] 115 [x]‑page jam, clear standard bin. [20y.xx] 112 [x]‑page jam, open front door. [20y.xx] 108 [x]‑page ...] 117 Change [paper source] to [paper size] load [orientation] 118 Change [paper source] to [paper type] [paper size] load [orientation] 118 checking an unresponsive printer 127 checking status of parts and supplies 93 checking the status of parts and supplies 93 checking the virtual display using the Embedded Web Server...


