User Guide
Page 4
Push down blue flap. [23y.xx 109 Jam, tray [x] [24y.xx]...111 Jam, MP feeder [250.xx]...111 Troubleshooting 113 Understanding the printer messages...113 Solving printer problems...121 Solving print problems...127 Embedded Web Server does not open 149 Contacting technical support...150 ...
Push down blue flap. [23y.xx 109 Jam, tray [x] [24y.xx]...111 Jam, MP feeder [250.xx]...111 Troubleshooting 113 Understanding the printer messages...113 Solving printer problems...121 Solving print problems...127 Embedded Web Server does not open 149 Contacting technical support...150 ...
User Guide
Page 7
...are available on the Software and Documentation CD. For updates, visit our Web site at http://support.dell.com. Click to an Ethernet network • Troubleshooting printer connection problems Help using the printer software The latest supplemental information, updates, and technical support: &#... using the printer software • Configuring the printer on a network • Caring for and maintaining the printer • Troubleshooting and solving problems Instructions for Printer and Software Documentation under the Pubs folder. Networking Guide-Open the Software and Documentation CD, ...
...are available on the Software and Documentation CD. For updates, visit our Web site at http://support.dell.com. Click to an Ethernet network • Troubleshooting printer connection problems Help using the printer software The latest supplemental information, updates, and technical support: &#... using the printer software • Configuring the printer on a network • Caring for and maintaining the printer • Troubleshooting and solving problems Instructions for Printer and Software Documentation under the Pubs folder. Networking Guide-Open the Software and Documentation CD, ...
User Guide
Page 113
... non‑MICR supplies. Remove the paper stack from the standard bin. From the printer control panel, navigate to clear the message and continue printing. Troubleshooting 113 Troubleshooting Understanding the printer messages Bin full.
... non‑MICR supplies. Remove the paper stack from the standard bin. From the printer control panel, navigate to clear the message and continue printing. Troubleshooting 113 Troubleshooting Understanding the printer messages Bin full.
User Guide
Page 114
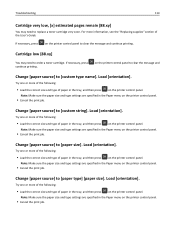
.... Note: Make sure the paper size and type settings are specified in the Paper menu on the printer control panel. • Cancel the print job. Troubleshooting 114 Cartridge very low, [x] estimated pages remain [88.xy] You may need to [custom type name]. Try one or more of the following : • Load...
.... Note: Make sure the paper size and type settings are specified in the Paper menu on the printer control panel. • Cancel the print job. Troubleshooting 114 Cartridge very low, [x] estimated pages remain [88.xy] You may need to [custom type name]. Try one or more of the following : • Load...

User Guide
Page 115
to order an imaging unit. Imaging unit low [84.xy] You may need to stop the defragmentation and continue printing. Troubleshooting 115 Close front door Close the front door of the User's Guide. Flash memory unformatted [53] Try one or more of the following: • Replace ...
to order an imaging unit. Imaging unit low [84.xy] You may need to stop the defragmentation and continue printing. Troubleshooting 115 Close front door Close the front door of the User's Guide. Flash memory unformatted [53] Try one or more of the following: • Replace ...
User Guide
Page 116
... type of paper. • From the printer control panel, press to clear the message and continue printing. Note: If the printer finds a tray that tray. Troubleshooting 116 If necessary, press on the printer control panel to clear the message and continue printing. Note: If the printer finds a tray that has the...
... type of paper. • From the printer control panel, press to clear the message and continue printing. Note: If the printer finds a tray that tray. Troubleshooting 116 If necessary, press on the printer control panel to clear the message and continue printing. Note: If the printer finds a tray that has the...
User Guide
Page 117
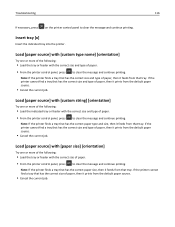
... is loaded in the feeder, then the printer manually overrides the request, and then prints from an automatically selected tray. • Cancel the current job. Troubleshooting 117 Load [paper source] with [paper type] [paper size] [orientation] Try one or more of the following: • Load the tray or feeder with the...
... is loaded in the feeder, then the printer manually overrides the request, and then prints from an automatically selected tray. • Cancel the current job. Troubleshooting 117 Load [paper source] with [paper type] [paper size] [orientation] Try one or more of the following: • Load the tray or feeder with the...
User Guide
Page 118
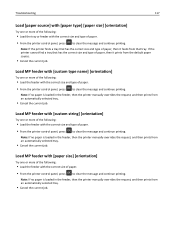
... printer control panel, press to clear the message and continue printing. to clear the message. to disable Resource Save, clear the message, and continue printing. Troubleshooting 118 Load MP feeder with [paper type] [paper size] [orientation] Try one or more of the following: • From the printer control panel, press •...
... printer control panel, press to clear the message and continue printing. to clear the message. to disable Resource Save, clear the message, and continue printing. Troubleshooting 118 Load MP feeder with [paper type] [paper size] [orientation] Try one or more of the following: • From the printer control panel, press •...
User Guide
Page 119
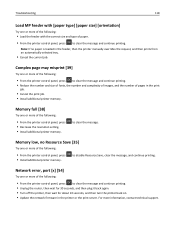
...'s Guide [33.xy] Note: The supply type can affect warranty coverage. Note: For the list of the User's Guide or visit http://support.dell.com. Troubleshooting 119 Network error, standard port [54] Try one or more information, contact technical support. For more of the following : • From the ... of third-party supplies or parts are used. For example, if the MP Feeder Size is set . The printer has detected a non‑Dell supply or part installed in your printer, press and printing. on . • Update the network firmware in the Paper menu on the printer...
...'s Guide [33.xy] Note: The supply type can affect warranty coverage. Note: For the list of the User's Guide or visit http://support.dell.com. Troubleshooting 119 Network error, standard port [54] Try one or more information, contact technical support. For more of the following : • From the ... of third-party supplies or parts are used. For example, if the MP Feeder Size is set . The printer has detected a non‑Dell supply or part installed in your printer, press and printing. on . • Update the network firmware in the Paper menu on the printer...
User Guide
Page 120
... USB port. • From the printer control panel, set Parallel Buffer to clear the message and continue printing. Troubleshooting 120 Parallel port disabled [56] Try one or more information, visit http://support.dell.com or contact technical support. For more information, see the instruction sheet that came with the supply or see...
... USB port. • From the printer control panel, set Parallel Buffer to clear the message and continue printing. Troubleshooting 120 Parallel port disabled [56] Try one or more information, visit http://support.dell.com or contact technical support. For more information, see the instruction sheet that came with the supply or see...
User Guide
Page 121
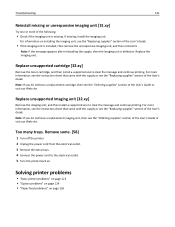
... the "Ordering supplies" section of the User's Guide. • If the imaging unit is installed, then remove the unresponsive imaging unit, and then reinstall it. Troubleshooting 121 Reinstall missing or unresponsive imaging unit [31.xy] Try one to clear the message and continue printing. If missing, install the imaging unit. Note...
... the "Ordering supplies" section of the User's Guide. • If the imaging unit is installed, then remove the unresponsive imaging unit, and then reinstall it. Troubleshooting 121 Reinstall missing or unresponsive imaging unit [31.xy] Try one to clear the message and continue printing. If missing, install the imaging unit. Note...

User Guide
Page 122
... Go to step 3. Step 7 Connect the printer Check if the printer is plugged into the printer and a properly grounded electrical outlet? a properly grounded electrical outlet. Troubleshooting 122 Basic printer problems The printer is not responding Action Step 1 Make sure the printer is in Sleep mode or Hibernate mode. Step 2 Check if...
... Go to step 3. Step 7 Connect the printer Check if the printer is plugged into the printer and a properly grounded electrical outlet? a properly grounded electrical outlet. Troubleshooting 122 Basic printer problems The printer is not responding Action Step 1 Make sure the printer is in Sleep mode or Hibernate mode. Step 2 Check if...
User Guide
Page 123
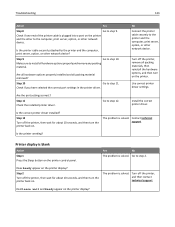
... the printer display? Turn off the printer, then wait for about 10 seconds, and then turn on . The problem is solved. Printer display is solved. Troubleshooting 123 Action Yes Step 8 Go to step 10. The problem is blank Action Step 1 Press the Sleep button on the printer and the other to...
... the printer display? Turn off the printer, then wait for about 10 seconds, and then turn on . The problem is solved. Printer display is solved. Troubleshooting 123 Action Yes Step 8 Go to step 10. The problem is blank Action Step 1 Press the Sleep button on the printer and the other to...
User Guide
Page 124
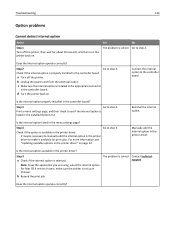
... internal option operate correctly? It may be necessary to see "Updating available options in Chooser. The problem is set up in the printer driver" on . Troubleshooting 124 Option problems Cannot detect internal option Action Step 1 Turn off the printer. c Make sure the internal option is installed in the appropriate connector in...
... internal option operate correctly? It may be necessary to see "Updating available options in Chooser. The problem is set up in the printer driver" on . Troubleshooting 124 Option problems Cannot detect internal option Action Step 1 Turn off the printer. c Make sure the internal option is installed in the appropriate connector in...
User Guide
Page 125
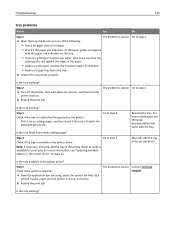
... jobs. b Check if the tray closes properly. Go to step 5. Step 4 Go to step 3. Step 5 Check if the option is solved. Is the tray working? Troubleshooting 125 Tray problems Action Yes No Step 1 The problem is selected. Manually add the tray in the Installed Features list. Print a menu settings page, and...
... jobs. b Check if the tray closes properly. Go to step 5. Step 4 Go to step 3. Step 5 Check if the option is solved. Is the tray working? Troubleshooting 125 Tray problems Action Yes No Step 1 The problem is selected. Manually add the tray in the Installed Features list. Print a menu settings page, and...
User Guide
Page 126
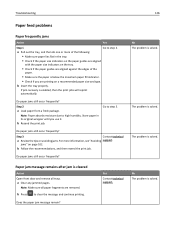
... then do one or more information, see "Avoiding support. Note: Make sure all trays. Note: Paper absorbs moisture due to step 2. a Clear any jammed pages. Troubleshooting 126 Paper feed problems Paper frequently jams Action Yes Step 1 Go to high humidity.
... then do one or more information, see "Avoiding support. Note: Make sure all trays. Note: Paper absorbs moisture due to step 2. a Clear any jammed pages. Troubleshooting 126 Paper feed problems Paper frequently jams Action Yes Step 1 Go to high humidity.
User Guide
Page 127
... 1 The problem is solved. Go to print after clearing the message. Do the jobs print? Go to step 4. b Resend the print job. Go to step 2. Troubleshooting 127 Jammed pages are trying to print. Do the jobs print? b Resend the print job.
... 1 The problem is solved. Go to print after clearing the message. Do the jobs print? Go to step 4. b Resend the print job. Go to step 2. Troubleshooting 127 Jammed pages are trying to print. Do the jobs print? b Resend the print job.
User Guide
Page 128
Troubleshooting 128 Action Step 4 a Check if the ports (USB, serial, or Ethernet) are working and if the cables are securely connected to step 5. Go to the ... Place letter‑ or A4‑size paper in the tray, and then resend the print job. support. Note: For more information, visit http://support.dell.com. Note: For more information, see "Installing the printer software" on . b Resend the print job. Step 5 a Turn off the printer, then wait for long periods...
Troubleshooting 128 Action Step 4 a Check if the ports (USB, serial, or Ethernet) are working and if the cables are securely connected to step 5. Go to the ... Place letter‑ or A4‑size paper in the tray, and then resend the print job. support. Note: For more information, visit http://support.dell.com. Note: For more information, see "Installing the printer software" on . b Resend the print job. Step 5 a Turn off the printer, then wait for long periods...

User Guide
Page 129
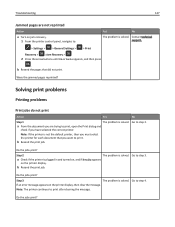
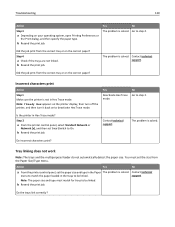
... correct tray or on paper that is solved. a From the Paper menu on the correct paper? Step 2 Disable the Page Protect feature. Go to step 2. Troubleshooting 129 Print job takes longer than expected Action Step 1 Reduce the number and size of fonts, the number and complexity of images, and the number...
... correct tray or on paper that is solved. a From the Paper menu on the correct paper? Step 2 Disable the Page Protect feature. Go to step 2. Troubleshooting 129 Print job takes longer than expected Action Step 1 Reduce the number and size of fonts, the number and complexity of images, and the number...
User Guide
Page 130
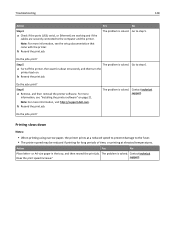
... or Network [x], and then set the size from the Paper Size/Type menu. Contact technical menu to match the paper loaded in Hex Trace mode? Troubleshooting 130 Action Step 3 a Depending on to be linked. Did the job print from the correct tray or on the correct paper? No Go to step...
... or Network [x], and then set the size from the Paper Size/Type menu. Contact technical menu to match the paper loaded in Hex Trace mode? Troubleshooting 130 Action Step 3 a Depending on to be linked. Did the job print from the correct tray or on the correct paper? No Go to step...