
Owner's Manual
Page 5
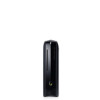
About Your Computer Front View 1 2 7 6 3 5 4 1 power button 3 optical drive 5 microphone port 7 USB 3.0 ports (2) 2 optical-drive eject button 4 rotatable AlienHead 6 headphone port NOTE: Your Alienware X51 R2 computer supports dual orientation. About Your Computer | 5 The rotatable AlienHead allows you to change the direction of the AlienHead depending on the orientation of your computer vertically or horizontally. You can place your computer.
About Your Computer Front View 1 2 7 6 3 5 4 1 power button 3 optical drive 5 microphone port 7 USB 3.0 ports (2) 2 optical-drive eject button 4 rotatable AlienHead 6 headphone port NOTE: Your Alienware X51 R2 computer supports dual orientation. About Your Computer | 5 The rotatable AlienHead allows you to change the direction of the AlienHead depending on the orientation of your computer vertically or horizontally. You can place your computer.
Owner's Manual
Page 6
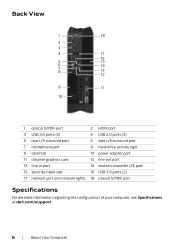
... 13 line-in port 15 security-cable slot 17 network port and network lights 2 HDMI port 4 USB 2.0 ports (2) 6 side L/R surround port 8 hard-drive activity light 10 power adapter port 12 line-out port 14 center/subwoofer LFE port 16 USB 3.0 ports (2) 18 coaxial S/PDIF port Specifications For detailed information regarding the configuration of your computer, see Specifications at dell.com/support...
... 13 line-in port 15 security-cable slot 17 network port and network lights 2 HDMI port 4 USB 2.0 ports (2) 6 side L/R surround port 8 hard-drive activity light 10 power adapter port 12 line-out port 14 center/subwoofer LFE port 16 USB 3.0 ports (2) 18 coaxial S/PDIF port Specifications For detailed information regarding the configuration of your computer, see Specifications at dell.com/support...
Owner's Manual
Page 8
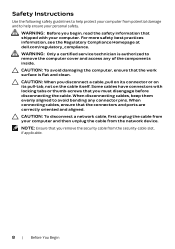
..., keep them evenly aligned to help protect your computer from the security-cable slot, if applicable. 8 | Before You Begin NOTE: Ensure that the connectors and ports are correctly oriented and aligned. Safety Instructions Use the following safety guidelines to help ensure your personal safety. CAUTION: When you remove the security cable... connectors with your computer and then unplug the cable from the network device. For more safety best practices information, see the Regulatory Compliance Homepage at dell.com/regulatory_compliance.
..., keep them evenly aligned to help protect your computer from the security-cable slot, if applicable. 8 | Before You Begin NOTE: Ensure that the connectors and ports are correctly oriented and aligned. Safety Instructions Use the following safety guidelines to help ensure your personal safety. CAUTION: When you remove the security cable... connectors with your computer and then unplug the cable from the network device. For more safety best practices information, see the Regulatory Compliance Homepage at dell.com/regulatory_compliance.
Quick Start Guide
Page 1
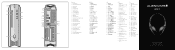
...25509;埠 (2) 6 6 10 8. HDMI ポート 11. Optical drive 2 3 2 3. 光碟機 2 2 4. Headphone port 6 6 5 5 7. USB 3.0 端口(2 个) 7. USB 3.0 端口(2 个) 14. Discrete graphics card... 포트 24 20 23 LFE ポート X51 24 Quick Start Guide AlienHead 4. USB 2.0 ports (2) 10. Side L/R surround port 16 16. 側 L/R 14. Coaxial S/PDIF port 8. 同轴 S/PDIF 端口 8. 同&#...
...25509;埠 (2) 6 6 10 8. HDMI ポート 11. Optical drive 2 3 2 3. 光碟機 2 2 4. Headphone port 6 6 5 5 7. USB 3.0 端口(2 个) 7. USB 3.0 端口(2 个) 14. Discrete graphics card... 포트 24 20 23 LFE ポート X51 24 Quick Start Guide AlienHead 4. USB 2.0 ports (2) 10. Side L/R surround port 16 16. 側 L/R 14. Coaxial S/PDIF port 8. 同轴 S/PDIF 端口 8. 同&#...


