
Mobile Manual
Page 98
... orientation. Switch the video image: If your computer. Reseat the memory modules if applicable (see "Upgrading or Replacing Memory" on startup •• Check memory modules for more information, see "CONTACTING ALIENWARE" on the keyboard or press the power button to the display. 96 CHAPTER 5: TROUBLESHOOTING Memory Memory errors detected on page 74...
... orientation. Switch the video image: If your computer. Reseat the memory modules if applicable (see "Upgrading or Replacing Memory" on startup •• Check memory modules for more information, see "CONTACTING ALIENWARE" on the keyboard or press the power button to the display. 96 CHAPTER 5: TROUBLESHOOTING Memory Memory errors detected on page 74...

Service Manual (English Only)
Page 5
11 Processor Module 45 Removing the Processor Module 45 Replacing the Processor Module 46 12 Center Control Cover 49 Removing the Center Control Cover 49 Replacing the Center Control Cover 52 13 Keyboard 55 Removing the Keyboard 55 Replacing the Keyboard 57 14 Wireless Mini-Card 59 Removing the Mini-Card 59 Replacing the Mini-Card 61 15 WirelessHD Card (Optional 63 Removing the WirelessHD Card 63 Replacing the WirelessHD Card 64 16 Power Button Board 67 Removing the Power Button Board 67 Contents 5
11 Processor Module 45 Removing the Processor Module 45 Replacing the Processor Module 46 12 Center Control Cover 49 Removing the Center Control Cover 49 Replacing the Center Control Cover 52 13 Keyboard 55 Removing the Keyboard 55 Replacing the Keyboard 57 14 Wireless Mini-Card 59 Removing the Mini-Card 59 Replacing the Mini-Card 61 15 WirelessHD Card (Optional 63 Removing the WirelessHD Card 63 Replacing the WirelessHD Card 64 16 Power Button Board 67 Removing the Power Button Board 67 Contents 5

Service Manual (English Only)
Page 28
... Center Control Cover" on page 52). 6 Replace the compartment door (see "Replacing the Compartment Door" on page 16). 7 Replace the battery pack (see "Replacing the Keyboard" on page 14). 28 Memory Module(s) c Replace the keyboard (see "Replacing the Battery Pack" on page 57). 3 2 1 1 memory-module connector 3 notch 2 tab 4 If you have replaced memory mobule(s) in connectors DIMM 3 and DIMM...
... Center Control Cover" on page 52). 6 Replace the compartment door (see "Replacing the Compartment Door" on page 16). 7 Replace the battery pack (see "Replacing the Keyboard" on page 14). 28 Memory Module(s) c Replace the keyboard (see "Replacing the Battery Pack" on page 57). 3 2 1 1 memory-module connector 3 notch 2 tab 4 If you have replaced memory mobule(s) in connectors DIMM 3 and DIMM...

Service Manual (English Only)
Page 55
...page 49). 5 Remove the five screws that secure the keyboard to servicing that shipped with your computer. 13 Keyboard WARNING: Before working inside your computer, read the safety information that is not authorized by Dell is not covered by periodically touching an unpainted metal surface ... 13) before working inside the computer. Be careful when removing and handling the keyboard. Keyboard 55 CAUTION: To help prevent damage to replace. CAUTION: Be extremely careful when removing and handling the keyboard. Failure to do so could result in "Before You Begin" on page 9....
...page 49). 5 Remove the five screws that secure the keyboard to servicing that shipped with your computer. 13 Keyboard WARNING: Before working inside your computer, read the safety information that is not authorized by Dell is not covered by periodically touching an unpainted metal surface ... 13) before working inside the computer. Be careful when removing and handling the keyboard. Keyboard 55 CAUTION: To help prevent damage to replace. CAUTION: Be extremely careful when removing and handling the keyboard. Failure to do so could result in "Before You Begin" on page 9....

Service Manual (English Only)
Page 57
... palm rest assembly and lower the keyboard into place. 4 Replace the five screws that secure the keyboard to the computer base. 5 Replace the center control cover (see "Replacing the Center Control Cover" on page 52). 6 Replace the compartment door (see "Replacing the Compartment Door" on page 16). 7 Replace the battery pack (see "Replacing the Battery Pack" on page 14...
... palm rest assembly and lower the keyboard into place. 4 Replace the five screws that secure the keyboard to the computer base. 5 Replace the center control cover (see "Replacing the Center Control Cover" on page 52). 6 Replace the compartment door (see "Replacing the Compartment Door" on page 16). 7 Replace the battery pack (see "Replacing the Battery Pack" on page 14...

Service Manual (English Only)
Page 58
CAUTION: Before turning on the computer, replace all screws and ensure that no stray screws remain inside the computer. Failure to do so may result in damage to the computer. 58 Keyboard
CAUTION: Before turning on the computer, replace all screws and ensure that no stray screws remain inside the computer. Failure to do so may result in damage to the computer. 58 Keyboard
Service Manual (English Only)
Page 62
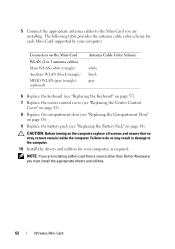
NOTE: If you are installing a Mini-card from a source other than Dell or Alienware, you are installing. Failure to do so may result in damage to the Mini-Card you must install the appropriate drivers and utilities.... Scheme white black gray 6 Replace the keyboard (see "Replacing the Keyboard" on page 57). 7 Replace the center control cover (see "Replacing the Center Control Cover" on page 52). 8 Replace the compartment door (see "Replacing the Compartment Door" on page 16). 9 Replace the battery pack (see "Replacing the Battery Pack" on the computer, replace all screws and ensure that ...
NOTE: If you are installing a Mini-card from a source other than Dell or Alienware, you are installing. Failure to do so may result in damage to the Mini-Card you must install the appropriate drivers and utilities.... Scheme white black gray 6 Replace the keyboard (see "Replacing the Keyboard" on page 57). 7 Replace the center control cover (see "Replacing the Center Control Cover" on page 52). 8 Replace the compartment door (see "Replacing the Compartment Door" on page 16). 9 Replace the battery pack (see "Replacing the Battery Pack" on the computer, replace all screws and ensure that ...

Service Manual (English Only)
Page 64
... other end of the wirelessHD card down into place. CAUTION: The connectors are keyed to the connector on the wirelessHD card. 6 Replace the keyboard (see "Replacing the Keyboard" on page 57). 64 WirelessHD Card (Optional) CAUTION: Use firm and even pressure to slide the card into the slot on the... system board and replace the screw that secures the wirelessHD card to the system board. 5 Connect the wirelessHD card cable to ...
... other end of the wirelessHD card down into place. CAUTION: The connectors are keyed to the connector on the wirelessHD card. 6 Replace the keyboard (see "Replacing the Keyboard" on page 57). 64 WirelessHD Card (Optional) CAUTION: Use firm and even pressure to slide the card into the slot on the... system board and replace the screw that secures the wirelessHD card to the system board. 5 Connect the wirelessHD card cable to ...

Service Manual (English Only)
Page 68
... board cable to the connector on the system board. 5 Replace the keyboard (see "Replacing the Keyboard" on page 57). 6 Replace the center control cover (see "Replacing the Center Control Cover" on page 52). 7 Replace the compartment door (see "Replacing the Compartment Door" on page 16). 8 Replace the battery pack (see "Replacing the Battery Pack" on page 14). 68 Power Button...
... board cable to the connector on the system board. 5 Replace the keyboard (see "Replacing the Keyboard" on page 57). 6 Replace the center control cover (see "Replacing the Center Control Cover" on page 52). 7 Replace the compartment door (see "Replacing the Compartment Door" on page 16). 8 Replace the battery pack (see "Replacing the Battery Pack" on page 14). 68 Power Button...

Service Manual (English Only)
Page 74
... the Mini-Card (see "Replacing the Mini-Card" on page 61). 9 Replace the keyboard (see "Replacing the Keyboard" on page 57). 10 Replace the center control cover (see "Replacing the Center Control Cover" on page 52). 11 Replace the compartment door (see "Replacing the Compartment Door" on page 16). 12 Replace the battery pack (see "Replacing the Battery Pack" on page...
... the Mini-Card (see "Replacing the Mini-Card" on page 61). 9 Replace the keyboard (see "Replacing the Keyboard" on page 57). 10 Replace the center control cover (see "Replacing the Center Control Cover" on page 52). 11 Replace the compartment door (see "Replacing the Compartment Door" on page 16). 12 Replace the battery pack (see "Replacing the Battery Pack" on page...

Service Manual (English Only)
Page 76
... Align the slots on the status light board with the alignment posts on the palm rest assembly and secure the status light board in place. 3 Replace the two screws that secure the status light board to the palm rest assembly. 4 Route the status light board cable through the routing guides on... the palm rest assembly. 5 Connect the status light board cable to the connector on the system board. 6 Replace the display assembly (see "Replacing the Display Assembly" on page 73). 7 Replace the keyboard (see "Replacing the Keyboard" on page 57). 76 Status Light Board
... Align the slots on the status light board with the alignment posts on the palm rest assembly and secure the status light board in place. 3 Replace the two screws that secure the status light board to the palm rest assembly. 4 Route the status light board cable through the routing guides on... the palm rest assembly. 5 Connect the status light board cable to the connector on the system board. 6 Replace the display assembly (see "Replacing the Display Assembly" on page 73). 7 Replace the keyboard (see "Replacing the Keyboard" on page 57). 76 Status Light Board

Service Manual (English Only)
Page 82
... connectors on the system board. 5 Replace the status light board (see "Replacing the Status Light Board" on page 76). 6 Replace the display assembly (see "Replacing the Display Assembly" on page 73). 7 Replace the power button board (see "Replacing the Power Button Board" on page 68). 8 Replace the keyboard (see "Replacing the Keyboard" on page 57). 9 Replace the center control cover (see...
... connectors on the system board. 5 Replace the status light board (see "Replacing the Status Light Board" on page 76). 6 Replace the display assembly (see "Replacing the Display Assembly" on page 73). 7 Replace the power button board (see "Replacing the Power Button Board" on page 68). 8 Replace the keyboard (see "Replacing the Keyboard" on page 57). 9 Replace the center control cover (see...

Service Manual (English Only)
Page 85
... Board" on page 76). 7 Replace the display assembly (see "Replacing the Display Assembly" on page 73). 8 Replace the power button board (see "Replacing the Power Button Board" on page 68). 9 Replace the keyboard (see "Replacing the Keyboard" on page 57). 10 Replace the center control cover (see "Replacing the Center Control Cover" on page 52). 11 Replace the compartment door (see...
... Board" on page 76). 7 Replace the display assembly (see "Replacing the Display Assembly" on page 73). 8 Replace the power button board (see "Replacing the Power Button Board" on page 68). 9 Replace the keyboard (see "Replacing the Keyboard" on page 57). 10 Replace the center control cover (see "Replacing the Center Control Cover" on page 52). 11 Replace the compartment door (see...

Service Manual (English Only)
Page 89
... status light board (see "Replacing the Status Light Board" on page 76). 8 Replace the display assembly (see "Replacing the Display Assembly" on page 73). 9 Replace the power button board (see "Replacing the Power Button Board" on page 68). 10 Replace the keyboard (see "Replacing the Keyboard" on page 57). 11 Replace the center control cover (see "Replacing the Center Control Cover...
... status light board (see "Replacing the Status Light Board" on page 76). 8 Replace the display assembly (see "Replacing the Display Assembly" on page 73). 9 Replace the power button board (see "Replacing the Power Button Board" on page 68). 10 Replace the keyboard (see "Replacing the Keyboard" on page 57). 11 Replace the center control cover (see "Replacing the Center Control Cover...

Service Manual (English Only)
Page 94
... Power Button Board" on page 68). 12 Replace the keyboard (see "Replacing the Keyboard" on page 57). 13 Replace the center control cover (see "Replacing the Center Control Cover" on page 52). 14 Replace the compartment door (see "Replacing the Compartment Door" on page 16). 15 Replace the battery pack (see "Replacing the Battery Pack" on computer chassis and secure...
... Power Button Board" on page 68). 12 Replace the keyboard (see "Replacing the Keyboard" on page 57). 13 Replace the center control cover (see "Replacing the Center Control Cover" on page 52). 14 Replace the compartment door (see "Replacing the Compartment Door" on page 16). 15 Replace the battery pack (see "Replacing the Battery Pack" on computer chassis and secure...

Service Manual (English Only)
Page 98
..." on page 61). 13 Replace the memory module(s) (see "Replacing the Memory Module(s)" on page 27). 14 Replace the keyboard (see "Replacing the Keyboard" on page 57). 15 Replace the center control cover (see "Replacing the Center Control Cover" on page 52). 16 Replace the processor module (see "Replacing the Processor Module" on page 46). 17 Replace the processor heat-sink...
..." on page 61). 13 Replace the memory module(s) (see "Replacing the Memory Module(s)" on page 27). 14 Replace the keyboard (see "Replacing the Keyboard" on page 57). 15 Replace the center control cover (see "Replacing the Center Control Cover" on page 52). 16 Replace the processor module (see "Replacing the Processor Module" on page 46). 17 Replace the processor heat-sink...


