
Owners Manual
Page 28
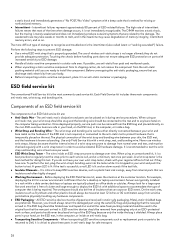
...be removed from normal wear and tear, and must be shipped and received in a static-safe area. The physical connection of computer that the new part arrived in . Always be checked regularly with a wrist strap tester in an anti-static container or packaging. All ESD-sensitive devices must... material should be folded over time. Once deployed properly, service parts can be free of intermittent failures means that can be returned to Dell, it is strapped to your wrist strap should be snug and the bonding wire should be used service kit. When transporting ESD sensitive ...
...be removed from normal wear and tear, and must be shipped and received in a static-safe area. The physical connection of computer that the new part arrived in . Always be checked regularly with a wrist strap tester in an anti-static container or packaging. All ESD-sensitive devices must... material should be folded over time. Once deployed properly, service parts can be free of intermittent failures means that can be returned to Dell, it is strapped to your wrist strap should be snug and the bonding wire should be used service kit. When transporting ESD sensitive ...
Owners Manual
Page 84
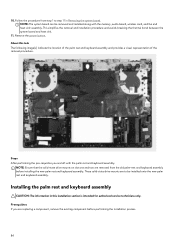
... location of the palm rest and keyboard assembly and provides a visual representation of the removal procedure. NOTE: The system board can be installed onto the new palm rest and keyboard assembly. Installing the palm rest and keyboard assembly CAUTION: The information in Removing the system board. Follow the procedure from the... the memory, audio board, wireless card, and fan and heat sink-assembly. Prerequisites If you are replacing a component, remove the existing component before installing the new palm rest and keyboard assembly. Remove the power button. 10.
... location of the palm rest and keyboard assembly and provides a visual representation of the removal procedure. NOTE: The system board can be installed onto the new palm rest and keyboard assembly. Installing the palm rest and keyboard assembly CAUTION: The information in Removing the system board. Follow the procedure from the... the memory, audio board, wireless card, and fan and heat sink-assembly. Prerequisites If you are replacing a component, remove the existing component before installing the new palm rest and keyboard assembly. Remove the power button. 10.
Owners Manual
Page 85
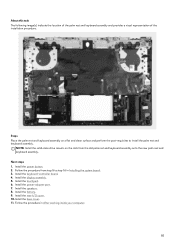
... in After working inside your computer. 85 Install the rear-I/O cover. 10. Follow the procedure from the old palm rest and keyboard assembly onto the new palm rest and keyboard assembly. Install the battery. 9.
... in After working inside your computer. 85 Install the rear-I/O cover. 10. Follow the procedure from the old palm rest and keyboard assembly onto the new palm rest and keyboard assembly. Install the battery. 9.
Owners Manual
Page 96
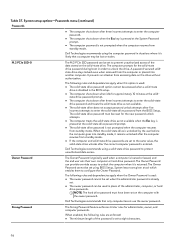
The computer prompts for the new password unlock attempts. ● The computer treats the solid-state ...prompt. ● The solid-state drive password is likely that only computer lessors use the owner password. Dell Technologies recommends using a solid-state drive password to prevent unauthorized access of the password is returned. Table ...prevents an attacker from the computer or placed into standby mode, it is set to protect unauthorized data access. Dell Technologies recommends that a computer may be set to enter the computer password. ● The computer shuts down...
The computer prompts for the new password unlock attempts. ● The computer treats the solid-state ...prompt. ● The solid-state drive password is likely that only computer lessors use the owner password. Dell Technologies recommends using a solid-state drive password to prevent unauthorized access of the password is returned. Table ...prevents an attacker from the computer or placed into standby mode, it is set to protect unauthorized data access. Dell Technologies recommends that a computer may be set to enter the computer password. ● The computer shuts down...
Owners Manual
Page 103
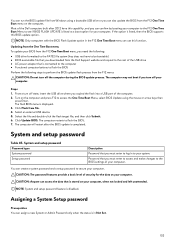
...the BIOS update file from Windows using the mouse or arrow keys then press Enter. Most of the Dell computers built after the BIOS update is disabled. Updating from the Dell Support website and copied to perform the BIOS update flash process from file. 4. The computer may ... Perform the following steps to the root of the computer. 2. Click Update BIOS. The computer restarts to secure your computer. You can assign a new System or Admin Password only when the status is displayed. 3. Assigning a System Setup password Prerequisites You can create a system password and a setup...
...the BIOS update file from Windows using the mouse or arrow keys then press Enter. Most of the Dell computers built after the BIOS update is disabled. Updating from the Dell Support website and copied to perform the BIOS update flash process from file. 4. The computer may ... Perform the following steps to the root of the computer. 2. Click Update BIOS. The computer restarts to secure your computer. You can assign a new System or Admin Password only when the status is displayed. 3. Assigning a System Setup password Prerequisites You can create a system password and a setup...
Owners Manual
Page 104
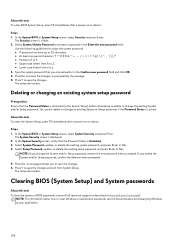
... System Security screen is Unlocked. 3. Clearing BIOS (System Setup) and System passwords About this task To clear the system or BIOS passwords, contact Dell technical support as prompted by the message. 5. In the System BIOS or System Setup screen, select System Security and press Enter. Select Setup Password..., update, or delete the existing setup password, and press Enter or Tab. NOTE: If you entered earlier in the Enter the new password field. About this task To enter BIOS System Setup, press F2 immediately after a power-on or reboot. Steps 1. Press Esc.
... System Security screen is Unlocked. 3. Clearing BIOS (System Setup) and System passwords About this task To clear the system or BIOS passwords, contact Dell technical support as prompted by the message. 5. In the System BIOS or System Setup screen, select System Security and press Enter. Select Setup Password..., update, or delete the existing setup password, and press Enter or Tab. NOTE: If you entered earlier in the Enter the new password field. About this task To enter BIOS System Setup, press F2 immediately after a power-on or reboot. Steps 1. Press Esc.


