Manual
Page 3
... 16 Display Features 17 Computer Base and Keyboard Features 18 Status Lights 19 Touch Controls 19 Power Button 20 Function Keys 21 Battery Pack 22 Power Management 23 CHAPTER 3: CONNECTING DEVICES 25 Connecting External Displays 26 Connecting Printers 28 Connecting USB Devices 29 Connecting... FireWire (IEEE 1394) Devices 29 CHAPTER 4: USING YOUR LAPTOP 31 Alienware Command Center 32 Stealth Mode 32 Using Removable Media and Cards 32 Using the Optical Drive 33 Using the Integrated Camera 33 ...
... 16 Display Features 17 Computer Base and Keyboard Features 18 Status Lights 19 Touch Controls 19 Power Button 20 Function Keys 21 Battery Pack 22 Power Management 23 CHAPTER 3: CONNECTING DEVICES 25 Connecting External Displays 26 Connecting Printers 28 Connecting USB Devices 29 Connecting... FireWire (IEEE 1394) Devices 29 CHAPTER 4: USING YOUR LAPTOP 31 Alienware Command Center 32 Stealth Mode 32 Using Removable Media and Cards 32 Using the Optical Drive 33 Using the Integrated Camera 33 ...

Manual
Page 15
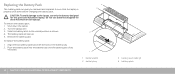
... an AC adapter to the computer. Left View Features 1 2 3 4 5 67 8 1 Security cable slot - Attaches a commercially available antitheft device to power the computer and charge the battery. 3 VGA connector -
... an AC adapter to the computer. Left View Features 1 2 3 4 5 67 8 1 Security cable slot - Attaches a commercially available antitheft device to power the computer and charge the battery. 3 VGA connector -
Manual
Page 20
... indicating the power status can program this button, see Power Options in the center of the AlienHead rim indicates the power status. The battery is low. The power button is in standby mode. The computer is located in the Control Panel of your Microsoft Windows operating system....fading into white or custom batterycolor Blue or custom AC-color fading into black On battery: Amber or custom battery-color Amber or custom battery-color fading into black Blinking Amber or custom battery-color The battery is charging. Power Button You can be changed through the AlienFX® software. ...
... indicating the power status can program this button, see Power Options in the center of the AlienHead rim indicates the power status. The battery is low. The power button is in standby mode. The computer is located in the Control Panel of your Microsoft Windows operating system....fading into white or custom batterycolor Blue or custom AC-color fading into black On battery: Amber or custom battery-color Amber or custom battery-color fading into black Blinking Amber or custom battery-color The battery is charging. Power Button You can be changed through the AlienFX® software. ...

Manual
Page 21
... the illumination around the touch pad. F9 - F10 - F12 -Touch Pad on/off Press to switch between the Battery Status Meter, Battery Charge Disable feature, and Battery Charge Enable feature. Hold down the key along with other keys to launch or close the Microsoft Mobility Center application. ...or switch on /off Press to enable suspend mode. CHAPTER 2: GETTING TO KNOW YOUR LAPTOP 21 F4 - Camera on the camera. Check Battery Status and Battery Charge Disable/Enable Press to enable or disable the mute function. F3 - F5 - F11 - Mute on /off Press to decrease the...
... the illumination around the touch pad. F9 - F10 - F12 -Touch Pad on/off Press to switch between the Battery Status Meter, Battery Charge Disable feature, and Battery Charge Enable feature. Hold down the key along with other keys to launch or close the Microsoft Mobility Center application. ...or switch on /off Press to enable suspend mode. CHAPTER 2: GETTING TO KNOW YOUR LAPTOP 21 F4 - Camera on the camera. Check Battery Status and Battery Charge Disable/Enable Press to enable or disable the mute function. F3 - F5 - F11 - Mute on /off Press to decrease the...
Manual
Page 22
.... The more the temperature deviates from this range during recharging and discharging. You do not need to be charged to its maximum if the battery and its environmental temperature remain within 15°-25°C (59°-77°F). Then connect the AC adapter to prevent overheating. There ...depletion, use the hard drive as much as possible and set the display as bright as it should be. A: The battery will decrease with all batteries, the maximum capacity of battery charge remaining and if no charge remaining in the laptop. • Connect the AC adapter to the laptop and to...
.... The more the temperature deviates from this range during recharging and discharging. You do not need to be charged to its maximum if the battery and its environmental temperature remain within 15°-25°C (59°-77°F). Then connect the AC adapter to prevent overheating. There ...depletion, use the hard drive as much as possible and set the display as bright as it should be. A: The battery will decrease with all batteries, the maximum capacity of battery charge remaining and if no charge remaining in the laptop. • Connect the AC adapter to the laptop and to...

Manual
Page 23
...charge usually takes 2-3 hours. Provides the highest level of inactivity. • Power Saver - Q: I did not use my spare battery for months. To ensure a battery is fully charged, recharge before it . A: If you to spend some time acquiring a basic understanding of the power management concept ...recharging it automatically (for you happen to configure the power settings on your computer. Pre-charge may take 30 minutes. A: The batteries will become too low. You can use the power options in your operating system to leave your computer over its normal fast charge...
...charge usually takes 2-3 hours. Provides the highest level of inactivity. • Power Saver - Q: I did not use my spare battery for months. To ensure a battery is fully charged, recharge before it . A: If you to spend some time acquiring a basic understanding of the power management concept ...recharging it automatically (for you happen to configure the power settings on your computer. Pre-charge may take 30 minutes. A: The batteries will become too low. You can use the power options in your operating system to leave your computer over its normal fast charge...
Manual
Page 24
...; Lower the intensity of the display backlight. Customizing Your Power Settings: Windows Vista® 1. Click Classic View from the task panel. 3. Windows® 7 1. NOTE: The battery pack should be locked in the battery compartment all the time. 24 CHAPTER 2: GETTING TO KNOW YOUR LAPTOP
...; Lower the intensity of the display backlight. Customizing Your Power Settings: Windows Vista® 1. Click Classic View from the task panel. 3. Windows® 7 1. NOTE: The battery pack should be locked in the battery compartment all the time. 24 CHAPTER 2: GETTING TO KNOW YOUR LAPTOP
Manual
Page 29
... on page 34). Windows will detect the device and attempt to install the appropriate driver automatically. CHAPTER 3: CONNECTING DEVICES 29 When the laptop is on battery mode, you can disable the feature through the Advanced Menu in the BIOS setup by default. In some cases, Windows may require a driver. The USB...
... on page 34). Windows will detect the device and attempt to install the appropriate driver automatically. CHAPTER 3: CONNECTING DEVICES 29 When the laptop is on battery mode, you can disable the feature through the Advanced Menu in the BIOS setup by default. In some cases, Windows may require a driver. The USB...
Manual
Page 35
... or disable the diagnostic screen during boot. Disabling this section may not appear, or may improve performance, but will greatly reduce battery life. Displays the speed of your computer. Displays the memory size installed in memory bank 0. Displays the EC firmware version. ...dell.com/manuals. Allows you to the operating system. • Enabled: Internal LAN is not visible to enable or disable the virtualization technology. Main Menu Total Memory Memory Bank 0 Memory Bank 1 Displays the total memory available in your computer. Main Menu System Time System Date Alienware...
... or disable the diagnostic screen during boot. Disabling this section may not appear, or may improve performance, but will greatly reduce battery life. Displays the speed of your computer. Displays the memory size installed in memory bank 0. Displays the EC firmware version. ...dell.com/manuals. Allows you to the operating system. • Enabled: Internal LAN is not visible to enable or disable the virtualization technology. Main Menu Total Memory Memory Bank 0 Memory Bank 1 Displays the total memory available in your computer. Main Menu System Time System Date Alienware...
Manual
Page 38
The Computrace® agent communicates with the Absolute® software Monitoring Server at programmed intervals to charge external devices using the stored battery power through an interface provided by the BIOS. • Deactivate: the Computrace® module interface is presently Deactivated. This feature is turned off. The Computrace&#...
The Computrace® agent communicates with the Absolute® software Monitoring Server at programmed intervals to charge external devices using the stored battery power through an interface provided by the BIOS. • Deactivate: the Computrace® module interface is presently Deactivated. This feature is turned off. The Computrace&#...

Manual
Page 43
...ensure that both connectors are disconnecting this type of the computer). CAUTION: To help prevent damage to prevent the computer cover from the battery bay (for instructions. CAUTION: Handle components and cards with locking tabs; CAUTION: Only a certified service technician should perform repairs on... its pins. Ensure that the work surface is not covered by Dell is flat and clean to the system board, you must remove the battery from the laptop. 5. Disconnect all attached devices from the network device. 4. Press and eject any...
...ensure that both connectors are disconnecting this type of the computer). CAUTION: To help prevent damage to prevent the computer cover from the battery bay (for instructions. CAUTION: Handle components and cards with locking tabs; CAUTION: Only a certified service technician should perform repairs on... its pins. Ensure that the work surface is not covered by Dell is flat and clean to the system board, you must remove the battery from the laptop. 5. Disconnect all attached devices from the network device. 4. Press and eject any...
Manual
Page 44
...: 1. Turn the laptop over. 3. Shut down before changing the battery pack. Do not use only the battery designed for other Alienware or Dell laptops. Slide the battery latch to the laptop, use batteries designed for this particular Alienware laptop. The battery pack will pop up. 5. To replace the battery pack: 1. Ensure that the laptop is properly shut down the...
...: 1. Turn the laptop over. 3. Shut down before changing the battery pack. Do not use only the battery designed for other Alienware or Dell laptops. Slide the battery latch to the laptop, use batteries designed for this particular Alienware laptop. The battery pack will pop up. 5. To replace the battery pack: 1. Ensure that the laptop is properly shut down the...
Manual
Page 57
... switch the video image to the display. Reseat the memory modules if applicable (see "CONTACTING ALIENWARE" on the computer. Switch the video image: If your computer supports, it with another device, such as a lamp. Check the battery: If you are using the AC adapter, and then turn on page 73). If you...
... switch the video image to the display. Reseat the memory modules if applicable (see "CONTACTING ALIENWARE" on the computer. Switch the video image: If your computer supports, it with another device, such as a lamp. Check the battery: If you are using the AC adapter, and then turn on page 73). If you...
Manual
Page 68
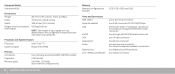
....15 inches) 4.08 kg (9.00 lb) NOTE: The weight of your laptop will vary depending on the configuration ordered and the manufacturing variability. Computer Model Alienware M15x Dimensions Height Width Depth Weight with 6-cell battery (starting at) 48.7 mm (1.92 inches) -
....15 inches) 4.08 kg (9.00 lb) NOTE: The weight of your laptop will vary depending on the configuration ordered and the manufacturing variability. Computer Model Alienware M15x Dimensions Height Width Depth Weight with 6-cell battery (starting at) 48.7 mm (1.92 inches) -
Manual
Page 70
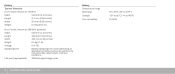
...; to 50°C (32° to 122°F) -20° to 60°C (-4° to 140°F) CR-2032 70 CHAPTER 8: BASIC SPECIFICATIONS Battery Type and dimensions 6-cell "smart" lithium ion (57 Whr) Depth 53.8 mm (2.12 inches) Height 21.3 mm (0.84 inches) Width 213 mm (8.39 inches) Weight ... (optional) Depth 53.8 mm (2.12 inches) Height 36.9 mm (1.45 inches) Width 330 mm (12.99 inches) Weight 0.5 kg (1.1 lb) Voltage 12.6 VDC Operating time Battery operating time varies depending on operating conditions and can be significantly reduced under certain power-intensive conditions.
...; to 50°C (32° to 122°F) -20° to 60°C (-4° to 140°F) CR-2032 70 CHAPTER 8: BASIC SPECIFICATIONS Battery Type and dimensions 6-cell "smart" lithium ion (57 Whr) Depth 53.8 mm (2.12 inches) Height 21.3 mm (0.84 inches) Width 213 mm (8.39 inches) Weight ... (optional) Depth 53.8 mm (2.12 inches) Height 36.9 mm (1.45 inches) Width 330 mm (12.99 inches) Weight 0.5 kg (1.1 lb) Voltage 12.6 VDC Operating time Battery operating time varies depending on operating conditions and can be significantly reduced under certain power-intensive conditions.

Manual
Page 72
... about. Your computer protects itself against most irregularities in the power source. When You Should Contact Alienware • The battery, power cable or connector is only advised to severe mechanical shocks. Mechanical Shock is not covered by Alienware. 72 APPENDIX A: GENERAL AND ELECTRICAL SAFETY PRECAUTIONS General Safety Precautions • Mechanical Shock: Your computer...
... about. Your computer protects itself against most irregularities in the power source. When You Should Contact Alienware • The battery, power cable or connector is only advised to severe mechanical shocks. Mechanical Shock is not covered by Alienware. 72 APPENDIX A: GENERAL AND ELECTRICAL SAFETY PRECAUTIONS General Safety Precautions • Mechanical Shock: Your computer...
Comprehensive Specifications
Page 4
Computer Model Alienware M15x Dimensions Height Width Depth Weight with 6-cell battery (starting at) 48.7 mm (1.92 inches) - Front and Back 377.93 mm (14.88 inches) 308.51 mm (12.15 inches) 4.08 kg (9.00 lb) ...
Computer Model Alienware M15x Dimensions Height Width Depth Weight with 6-cell battery (starting at) 48.7 mm (1.92 inches) - Front and Back 377.93 mm (14.88 inches) 308.51 mm (12.15 inches) 4.08 kg (9.00 lb) ...
Comprehensive Specifications
Page 7
...) 60 Hz 0° (closed) to 140° 0.2550 mm brightness can be changed by invoking the AlienFX® application in the Alienware Command Center. and Canada; Europe; colors can be significantly reduced under certain power‑intensive conditions Life span (approximate) 300 discharge/charge cycles... 07 /07 For details, see your Mobile Manual 240 cpi 71.7-mm (2.8-inches) sensor-active area 34.0-mm (1.3-inches) rectangle COMPREHENSIVE SPECIFICATIONS Battery Type and dimensions 6-cell "smart" lithium ion (57 Whr) Depth 53.8 mm (2.12 inches) Height 21.3 mm (0.84 inches) Width...
...) 60 Hz 0° (closed) to 140° 0.2550 mm brightness can be changed by invoking the AlienFX® application in the Alienware Command Center. and Canada; Europe; colors can be significantly reduced under certain power‑intensive conditions Life span (approximate) 300 discharge/charge cycles... 07 /07 For details, see your Mobile Manual 240 cpi 71.7-mm (2.8-inches) sensor-active area 34.0-mm (1.3-inches) rectangle COMPREHENSIVE SPECIFICATIONS Battery Type and dimensions 6-cell "smart" lithium ion (57 Whr) Depth 53.8 mm (2.12 inches) Height 21.3 mm (0.84 inches) Width...
Comprehensive Specifications
Page 8
... Operating Storage Coin-cell battery AC Adapter Type Input voltage Input current (maximum) Input frequency Output current Output power Rated output voltage 0° to 50°C (32° to 122&#...
... Operating Storage Coin-cell battery AC Adapter Type Input voltage Input current (maximum) Input frequency Output current Output power Rated output voltage 0° to 50°C (32° to 122&#...

Service Manual
Page 3
... YOU BEGIN 6 Recommended Tools 7 Turning Off Your Computer 7 Before Working Inside Your Computer 8 CHAPTER 2: BATTERY PACK 9 Removing the Battery Pack 11 Replacing the Battery Pack 11 CHAPTER 3: COMPARTMENT DOOR 12 Removing the Compartment Door 14 Replacing the Compartment Door 14 CHAPTER 4: ...Removing the Memory Module(s 21 Replacing the Memory Module(s 23 CONTENTS CHAPTER 6: COIN-CELL BATTERY 25 Removing the Coin-Cell Battery 27 Replacing the Coin-Cell Battery 27 CHAPTER 7: CENTER CONTROL COVER 28 Removing the Center Control Cover 30 Replacing the Center Control Cover...
... YOU BEGIN 6 Recommended Tools 7 Turning Off Your Computer 7 Before Working Inside Your Computer 8 CHAPTER 2: BATTERY PACK 9 Removing the Battery Pack 11 Replacing the Battery Pack 11 CHAPTER 3: COMPARTMENT DOOR 12 Removing the Compartment Door 14 Replacing the Compartment Door 14 CHAPTER 4: ...Removing the Memory Module(s 21 Replacing the Memory Module(s 23 CONTENTS CHAPTER 6: COIN-CELL BATTERY 25 Removing the Coin-Cell Battery 27 Replacing the Coin-Cell Battery 27 CHAPTER 7: CENTER CONTROL COVER 28 Removing the Center Control Cover 30 Replacing the Center Control Cover...

