Manual
Page 68
... connector one 20-pin connector one microphone connector, two stereo headphone/speaker connectors one ExpressCard/54 connector one combo connector Computer Model Alienware M15x Dimensions Height Width Depth Weight with 6-cell battery (starting at) 48.7 mm (1.92 inches) - Front and Back 377.93 mm (14.88 inches) 308.51 mm (12.15 inches) 4.08...
... connector one 20-pin connector one microphone connector, two stereo headphone/speaker connectors one ExpressCard/54 connector one combo connector Computer Model Alienware M15x Dimensions Height Width Depth Weight with 6-cell battery (starting at) 48.7 mm (1.92 inches) - Front and Back 377.93 mm (14.88 inches) 308.51 mm (12.15 inches) 4.08...
Manual
Page 70
...(approximate) 300 discharge/charge cycles Battery Temperature range Operating Storage Coin-cell battery 0° to 50°C (32° to 122°F) -20° to 60°C (-4° to 140°F) CR-2032 70 CHAPTER 8: BASIC SPECIFICATIONS Battery Type and dimensions 6-cell "smart" lithium ion (57 Whr...) Depth 53.8 mm (2.12 inches) Height 21.3 mm (0.84 inches) Width 213 mm (8.39 inches) Weight 0.33 kg (0.72 lb) 9-cell "smart" lithium ion (86 Whr) (optional)...
...(approximate) 300 discharge/charge cycles Battery Temperature range Operating Storage Coin-cell battery 0° to 50°C (32° to 122°F) -20° to 60°C (-4° to 140°F) CR-2032 70 CHAPTER 8: BASIC SPECIFICATIONS Battery Type and dimensions 6-cell "smart" lithium ion (57 Whr...) Depth 53.8 mm (2.12 inches) Height 21.3 mm (0.84 inches) Width 213 mm (8.39 inches) Weight 0.33 kg (0.72 lb) 9-cell "smart" lithium ion (86 Whr) (optional)...
Comprehensive Specifications
Page 4
... SDRAM bus width one or two 64-bit channels of your laptop will vary depending on the configuration ordered and the manufacturing variability. Computer Model Alienware M15x Dimensions Height Width Depth Weight with 6-cell battery (starting at) 48.7 mm (1.92 inches) -
... SDRAM bus width one or two 64-bit channels of your laptop will vary depending on the configuration ordered and the manufacturing variability. Computer Model Alienware M15x Dimensions Height Width Depth Weight with 6-cell battery (starting at) 48.7 mm (1.92 inches) -
Comprehensive Specifications
Page 7
... by invoking the AlienFX® application in the Alienware Command Center. For details, see your Mobile Manual 240 cpi 71.7-mm (2.8-inches) sensor-active area 34.0-mm (1.3-inches) rectangle COMPREHENSIVE SPECIFICATIONS Battery Type and dimensions 6-cell "smart" lithium ion (57 Whr) Depth 53....8 mm (2.12 inches) Height 21.3 mm (0.84 inches) Width 213 mm (8.39 inches) Weight 0.33 kg (0.72 lb) 9-cell "smart" lithium ion (86 Whr) (optional...
... by invoking the AlienFX® application in the Alienware Command Center. For details, see your Mobile Manual 240 cpi 71.7-mm (2.8-inches) sensor-active area 34.0-mm (1.3-inches) rectangle COMPREHENSIVE SPECIFICATIONS Battery Type and dimensions 6-cell "smart" lithium ion (57 Whr) Depth 53....8 mm (2.12 inches) Height 21.3 mm (0.84 inches) Width 213 mm (8.39 inches) Weight 0.33 kg (0.72 lb) 9-cell "smart" lithium ion (86 Whr) (optional...
Comprehensive Specifications
Page 8
C13 08 /08 Battery Temperature range Operating Storage Coin-cell battery AC Adapter Type Input voltage Input current (maximum) Input frequency Output current Output power Rated output voltage 0° to 50°C (32° to 122&#...
C13 08 /08 Battery Temperature range Operating Storage Coin-cell battery AC Adapter Type Input voltage Input current (maximum) Input frequency Output current Output power Rated output voltage 0° to 50°C (32° to 122&#...

Service Manual
Page 3
...YOU BEGIN 6 Recommended Tools 7 Turning Off Your Computer 7 Before Working Inside Your Computer 8 CHAPTER 2: BATTERY PACK 9 Removing the Battery Pack 11 Replacing the Battery Pack 11 CHAPTER 3: COMPARTMENT DOOR 12 Removing the Compartment Door 14 Replacing the Compartment Door 14 CHAPTER ...19 Removing the Memory Module(s 21 Replacing the Memory Module(s 23 CONTENTS CHAPTER 6: COIN-CELL BATTERY 25 Removing the Coin-Cell Battery 27 Replacing the Coin-Cell Battery 27 CHAPTER 7: CENTER CONTROL COVER 28 Removing the Center Control Cover 30 Replacing the Center Control Cover...
...YOU BEGIN 6 Recommended Tools 7 Turning Off Your Computer 7 Before Working Inside Your Computer 8 CHAPTER 2: BATTERY PACK 9 Removing the Battery Pack 11 Replacing the Battery Pack 11 CHAPTER 3: COMPARTMENT DOOR 12 Removing the Compartment Door 14 Replacing the Compartment Door 14 CHAPTER ...19 Removing the Memory Module(s 21 Replacing the Memory Module(s 23 CONTENTS CHAPTER 6: COIN-CELL BATTERY 25 Removing the Coin-Cell Battery 27 Replacing the Coin-Cell Battery 27 CHAPTER 7: CENTER CONTROL COVER 28 Removing the Center Control Cover 30 Replacing the Center Control Cover...
Service Manual
Page 26
... help prevent damage to servicing that shipped with your warranty. CHAPTER 6: COIN-CELL BATTERY 026 /026 Damage due to the system board, remove the main battery (see the Regulatory Compliance Homepage at www.dell.com/regulatory_compliance. CAUTION: To avoid electrostatic discharge, ground yourself by using a ... and the computer, and remove any other external cables from the computer. Coin-Cell Battery WARNING: Before working inside your computer, read the safety information that is not authorized by Dell™ is not covered by periodically touching an unpainted metal surface (such as ...
... help prevent damage to servicing that shipped with your warranty. CHAPTER 6: COIN-CELL BATTERY 026 /026 Damage due to the system board, remove the main battery (see the Regulatory Compliance Homepage at www.dell.com/regulatory_compliance. CAUTION: To avoid electrostatic discharge, ground yourself by using a ... and the computer, and remove any other external cables from the computer. Coin-Cell Battery WARNING: Before working inside your computer, read the safety information that is not authorized by Dell™ is not covered by periodically touching an unpainted metal surface (such as ...
Service Manual
Page 27
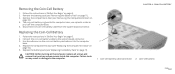
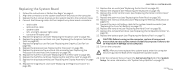
... page 6. 2. CHAPTER 6: COIN-CELL BATTERY 1 2 1 coin-cell battery cable connector 2 coin-cell battery 027 /027 Remove the battery pack (see "Replacing the Battery Pack" on page 14). 4. Disconnect the coin-cell battery cable from the system board connector. Replacing the Coin-Cell Battery 1. Use the adhesive on page 11). 3. Replace the battery pack (see "Removing the Battery Pack" on the coin-cell battery and adhere it...
... page 6. 2. CHAPTER 6: COIN-CELL BATTERY 1 2 1 coin-cell battery cable connector 2 coin-cell battery 027 /027 Remove the battery pack (see "Replacing the Battery Pack" on page 14). 4. Disconnect the coin-cell battery cable from the system board connector. Replacing the Coin-Cell Battery 1. Use the adhesive on page 11). 3. Replace the battery pack (see "Removing the Battery Pack" on the coin-cell battery and adhere it...
Service Manual
Page 102
...Removing the Hard Drive" on page 27). 6. Remove the keyboard (see "Removing the Coin-Cell Battery on page 17). 5. Follow the instructions in "Before You Begin" on page 11). 3. Disconnect the coin-cell battery cable from the system board connector (see "Removing the Keyboard" on page 69). 20. ...Remove the battery pack (see "Removing the Graphics Card" on page 34). 10. Lift the system board ...
...Removing the Hard Drive" on page 27). 6. Remove the keyboard (see "Removing the Coin-Cell Battery on page 17). 5. Follow the instructions in "Before You Begin" on page 11). 3. Disconnect the coin-cell battery cable from the system board connector (see "Removing the Keyboard" on page 69). 20. ...Remove the battery pack (see "Removing the Graphics Card" on page 34). 10. Lift the system board ...
Service Manual
Page 104
...Mini-Card (see "Replacing the Processor" on page 27). 20. Replace the air vents (see "Replacing the Coin-Cell Battery" on page 58). 9. Connect the coin-cell battery cable to the system board connector (see "Replacing the Air Vents" on the computer, replace all screws and ensure ...the Magnesium Cover" on page 18). 21. Follow the instructions in damage to the computer base. 4. Replace the magnesium cover (see "Replacing the Battery Pack" on page 75). 13. Failure to their respective system board connectors: • audio cable • optical-drive cable • speaker cable...
...Mini-Card (see "Replacing the Processor" on page 27). 20. Replace the air vents (see "Replacing the Coin-Cell Battery" on page 58). 9. Connect the coin-cell battery cable to the system board connector (see "Replacing the Air Vents" on the computer, replace all screws and ensure ...the Magnesium Cover" on page 18). 21. Follow the instructions in damage to the computer base. 4. Replace the magnesium cover (see "Replacing the Battery Pack" on page 75). 13. Failure to their respective system board connectors: • audio cable • optical-drive cable • speaker cable...


