
Mobile Manual
Page 4
CONTENTS CHAPTER 3: USING YOUR LAPTOP 35 Alienware Command Center 36 Using Removable Media and Cards 39 Using the Wireless Control 40 Battery Pack 40 Power Management 41 Configuring the BIOS 43 CHAPTER 4: INSTALLING AND REPLACING COMPONENTS 55 Before You Begin 56 Replacing the Battery Pack 60 Upgrading or Replacing Memory 63 Upgrading or Replacing the Hard Drive Assembly 65 CHAPTER 5: TROUBLESHOOTING 69 Basic Hints and Tips 70 Backup and General Maintenance 71 Software Diagnostic Tools 73 Answers to Common Problems 76 4
CONTENTS CHAPTER 3: USING YOUR LAPTOP 35 Alienware Command Center 36 Using Removable Media and Cards 39 Using the Wireless Control 40 Battery Pack 40 Power Management 41 Configuring the BIOS 43 CHAPTER 4: INSTALLING AND REPLACING COMPONENTS 55 Before You Begin 56 Replacing the Battery Pack 60 Upgrading or Replacing Memory 63 Upgrading or Replacing the Hard Drive Assembly 65 CHAPTER 5: TROUBLESHOOTING 69 Basic Hints and Tips 70 Backup and General Maintenance 71 Software Diagnostic Tools 73 Answers to Common Problems 76 4
Mobile Manual
Page 65
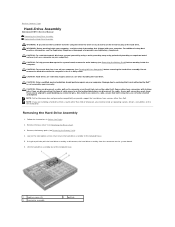
... before you need to disconnect it from the system board connector. 65 Remove the battery (see "Replacing the Battery Pack" on the hard drive assembly. 4. Follow the instructions in "Before You Begin" on page 56. 2. Upgrading or Replacing the Hard Drive Assembly Your laptop is not installed properly, the computer may not boot. NOTE: If the...
... before you need to disconnect it from the system board connector. 65 Remove the battery (see "Replacing the Battery Pack" on the hard drive assembly. 4. Follow the instructions in "Before You Begin" on page 56. 2. Upgrading or Replacing the Hard Drive Assembly Your laptop is not installed properly, the computer may not boot. NOTE: If the...

Mobile Manual
Page 66
Remove the four screws that secure the hard drive to the illustration. 66 CHAPTER 4: INSTALLING AND REPLACING COMPONENTS 2 1 1 pull-tab 2 hard drive 5. Lift the hard drive bracket of the hard drive according to the hard drive bracket. 6.
Remove the four screws that secure the hard drive to the illustration. 66 CHAPTER 4: INSTALLING AND REPLACING COMPONENTS 2 1 1 pull-tab 2 hard drive 5. Lift the hard drive bracket of the hard drive according to the hard drive bracket. 6.

Mobile Manual
Page 67
CHAPTER 4: INSTALLING AND REPLACING COMPONENTS 2 3 1 1 hard drive bracket 2 screws (4) 3 hard drive 67
CHAPTER 4: INSTALLING AND REPLACING COMPONENTS 2 3 1 1 hard drive bracket 2 screws (4) 3 hard drive 67

Mobile Manual
Page 68
CHAPTER 4: INSTALLING AND REPLACING COMPONENTS 7. Remove the interposer from the hard drive. 1 2 1 hard drive 2 interposer To replace the hard drive, perform the removal steps in reverse order. 68
CHAPTER 4: INSTALLING AND REPLACING COMPONENTS 7. Remove the interposer from the hard drive. 1 2 1 hard drive 2 interposer To replace the hard drive, perform the removal steps in reverse order. 68
MOBILE MANUAL
Page 4
CONTENTS CHAPTER 3: USING YOUR LAPTOP 35 Alienware Command Center 36 Using Removable Media and Cards 39 Using the Wireless Control 40 Battery Pack 40 Power Management 41 Configuring the BIOS 43 CHAPTER 4: INSTALLING AND REPLACING COMPONENTS 55 Before You Begin 56 Replacing the Battery Pack 60 Upgrading or Replacing Memory 63 Upgrading or Replacing the Hard Drive Assembly 65 CHAPTER 5: TROUBLESHOOTING 69 Basic Hints and Tips 70 Backup and General Maintenance 71 Software Diagnostic Tools 73 Answers to Common Problems 76 4
CONTENTS CHAPTER 3: USING YOUR LAPTOP 35 Alienware Command Center 36 Using Removable Media and Cards 39 Using the Wireless Control 40 Battery Pack 40 Power Management 41 Configuring the BIOS 43 CHAPTER 4: INSTALLING AND REPLACING COMPONENTS 55 Before You Begin 56 Replacing the Battery Pack 60 Upgrading or Replacing Memory 63 Upgrading or Replacing the Hard Drive Assembly 65 CHAPTER 5: TROUBLESHOOTING 69 Basic Hints and Tips 70 Backup and General Maintenance 71 Software Diagnostic Tools 73 Answers to Common Problems 76 4

MOBILE MANUAL
Page 65
... install a memory module in "Before You Begin" on the hard drive assembly. 4. CHAPTER 4: INSTALLING AND REPLACING COMPONENTS NOTE: If you need to disconnect it from the system board connector. 65 Remove the battery (see "Replacing the Battery Pack" on page 60). 3. Upgrading or Replacing the Hard Drive Assembly Your laptop is not installed properly, the computer may...
... install a memory module in "Before You Begin" on the hard drive assembly. 4. CHAPTER 4: INSTALLING AND REPLACING COMPONENTS NOTE: If you need to disconnect it from the system board connector. 65 Remove the battery (see "Replacing the Battery Pack" on page 60). 3. Upgrading or Replacing the Hard Drive Assembly Your laptop is not installed properly, the computer may...

MOBILE MANUAL
Page 66
CHAPTER 4: INSTALLING AND REPLACING COMPONENTS 2 1 1 pull-tab 2 hard drive 5. Lift the hard drive bracket of the hard drive according to the hard drive bracket. 6. Remove the four screws that secure the hard drive to the illustration. 66
CHAPTER 4: INSTALLING AND REPLACING COMPONENTS 2 1 1 pull-tab 2 hard drive 5. Lift the hard drive bracket of the hard drive according to the hard drive bracket. 6. Remove the four screws that secure the hard drive to the illustration. 66

MOBILE MANUAL
Page 67
CHAPTER 4: INSTALLING AND REPLACING COMPONENTS 2 3 1 1 hard drive bracket 2 screws (4) 3 hard drive 67
CHAPTER 4: INSTALLING AND REPLACING COMPONENTS 2 3 1 1 hard drive bracket 2 screws (4) 3 hard drive 67

MOBILE MANUAL
Page 68
Remove the interposer from the hard drive. 1 2 1 hard drive 2 interposer To replace the hard drive, perform the removal steps in reverse order. 68 CHAPTER 4: INSTALLING AND REPLACING COMPONENTS 7.
Remove the interposer from the hard drive. 1 2 1 hard drive 2 interposer To replace the hard drive, perform the removal steps in reverse order. 68 CHAPTER 4: INSTALLING AND REPLACING COMPONENTS 7.
Service Manual
Page 15
... pull-tab, pull the hard-drive assembly to disconnect the hard-drive assembly from a source other than Dell or Alienware, you need to install an operating system, drivers, and utilities on the new hard drive. Back to Contents Page Hard-Drive Assembly Alienware® M11x Service Manual Removing the Hard-Drive Assembly Replacing the Hard-Drive Assembly WARNING: If you remove the hard drive from the computer when the...
... pull-tab, pull the hard-drive assembly to disconnect the hard-drive assembly from a source other than Dell or Alienware, you need to install an operating system, drivers, and utilities on the new hard drive. Back to Contents Page Hard-Drive Assembly Alienware® M11x Service Manual Removing the Hard-Drive Assembly Replacing the Hard-Drive Assembly WARNING: If you remove the hard drive from the computer when the...

Service Manual
Page 16
... the computer. Tighten the two captive screws that secure the hard drive to Contents Page Place the hard drive in Before You Begin. 2. Install the operating system for your computer, as needed . Back to the hard-drive bracket. 5. Replacing the Hard-Drive Assembly 1. Use the pull-tab to push the hard drive assembly and connect it in protective antistatic packaging (see...
... the computer. Tighten the two captive screws that secure the hard drive to Contents Page Place the hard drive in Before You Begin. 2. Install the operating system for your computer, as needed . Back to the hard-drive bracket. 5. Replacing the Hard-Drive Assembly 1. Use the pull-tab to push the hard drive assembly and connect it in protective antistatic packaging (see...
Service Manual
Page 36
... practices information, see Removing the Hard-Drive Assembly). 6. CAUTION: To help prevent damage to the system board, remove the main battery (see Removing the Hinge Cover). 9. The replacement kit for the system board includes a CD that is not authorized by Dell™ is also visible on ...hinge cover (see Removing the Battery Pack) before working inside the computer. Back to Contents Page System Board Alienware® M11x Service Manual Removing the System Board Replacing the System Board Entering the Service Tag in the BIOS WARNING: Before working inside your computer, read the...
... practices information, see Removing the Hard-Drive Assembly). 6. CAUTION: To help prevent damage to the system board, remove the main battery (see Removing the Hinge Cover). 9. The replacement kit for the system board includes a CD that is not authorized by Dell™ is also visible on ...hinge cover (see Removing the Battery Pack) before working inside the computer. Back to Contents Page System Board Alienware® M11x Service Manual Removing the System Board Replacing the System Board Entering the Service Tag in the BIOS WARNING: Before working inside your computer, read the...

Service Manual
Page 37
... remain inside the computer. Replace the coin-cell battery (see Replacing the Memory Module(s)). 13. Replace the memory module(s) (see Replacing the Coin-Cell Battery). 8. Replace the base cover (see Replacing the Display Assembly). 7. Replace the display assembly (see Replacing the Base Cover). 17. Replace the hinge cover (see Replacing the Hard-Drive Assembly). 15. Replace the hard-drive assembly (see Replacing the Hinge Cover). 12...
... remain inside the computer. Replace the coin-cell battery (see Replacing the Memory Module(s)). 13. Replace the memory module(s) (see Replacing the Coin-Cell Battery). 8. Replace the base cover (see Replacing the Display Assembly). 7. Replace the display assembly (see Replacing the Base Cover). 17. Replace the hinge cover (see Replacing the Hard-Drive Assembly). 15. Replace the hard-drive assembly (see Replacing the Hinge Cover). 12...


