

Comprehensive Specifications
Page 4
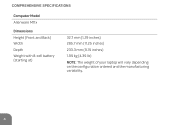
COMPREHENSIVE SPECIFICATIONS Computer Model Alienware M11x Dimensions Height (Front and Back) Width Depth Weight with 8-cell battery (starting at) 32.7 mm (1.29 inches) 285.7 mm (11.25 inches) 233.3 mm (9.19 inches) 1.99 kg (4.39 lb) NOTE: The weight of your laptop will vary depending on the configuration ordered and the manufacturing variability. 4
COMPREHENSIVE SPECIFICATIONS Computer Model Alienware M11x Dimensions Height (Front and Back) Width Depth Weight with 8-cell battery (starting at) 32.7 mm (1.29 inches) 285.7 mm (11.25 inches) 233.3 mm (9.19 inches) 1.99 kg (4.39 lb) NOTE: The weight of your laptop will vary depending on the configuration ordered and the manufacturing variability. 4

Comprehensive Specifications
Page 12
COMPREHENSIVE SPECIFICATIONS Battery 8-cell "smart" lithium ion (63 Whr) Height Width Depth 11.2 mm (0.44 inches) 173 mm (6.81 inches) 109.4 mm (4.31 inches) Weight 0.43 kg (0.94 lb) Voltage Operating time Life span (approximate) Temperature range Operating Storage Coin-cell battery 14.8 V battery operating time varies depending on operating conditions and can be significantly reduced under certain power-intensive conditions. 300 discharge/charge cycles 0° to 50°C (32° to 122°F) -20° to 60°C (-4° to 140°F) CR-2032 12
COMPREHENSIVE SPECIFICATIONS Battery 8-cell "smart" lithium ion (63 Whr) Height Width Depth 11.2 mm (0.44 inches) 173 mm (6.81 inches) 109.4 mm (4.31 inches) Weight 0.43 kg (0.94 lb) Voltage Operating time Life span (approximate) Temperature range Operating Storage Coin-cell battery 14.8 V battery operating time varies depending on operating conditions and can be significantly reduced under certain power-intensive conditions. 300 discharge/charge cycles 0° to 50°C (32° to 122°F) -20° to 60°C (-4° to 140°F) CR-2032 12
COMPREHENSIVE SPECIFICATIONS
Page 4
COMPREHENSIVE SPECIFICATIONS Computer Model Alienware M11x Dimensions Height (Front and Back) Width Depth Weight with 8-cell battery (starting at) 32.7 mm (1.29 inches) 285.7 mm (11.25 inches) 233.3 mm (9.19 inches) 1.99 kg (4.39 lb) NOTE: The weight of your laptop will vary depending on the configuration ordered and the manufacturing variability. 4
COMPREHENSIVE SPECIFICATIONS Computer Model Alienware M11x Dimensions Height (Front and Back) Width Depth Weight with 8-cell battery (starting at) 32.7 mm (1.29 inches) 285.7 mm (11.25 inches) 233.3 mm (9.19 inches) 1.99 kg (4.39 lb) NOTE: The weight of your laptop will vary depending on the configuration ordered and the manufacturing variability. 4

COMPREHENSIVE SPECIFICATIONS
Page 12
COMPREHENSIVE SPECIFICATIONS Battery 8-cell "smart" lithium ion (63 Whr) Height Width Depth 11.2 mm (0.44 inches) 173 mm (6.81 inches) 109.4 mm (4.31 inches) Weight 0.43 kg (0.94 lb) Voltage Operating time Life span (approximate) Temperature range Operating Storage Coin-cell battery 14.8 V battery operating time varies depending on operating conditions and can be significantly reduced under certain power-intensive conditions. 300 discharge/charge cycles 0° to 50°C (32° to 122°F) -20° to 60°C (-4° to 140°F) CR-2032 12
COMPREHENSIVE SPECIFICATIONS Battery 8-cell "smart" lithium ion (63 Whr) Height Width Depth 11.2 mm (0.44 inches) 173 mm (6.81 inches) 109.4 mm (4.31 inches) Weight 0.43 kg (0.94 lb) Voltage Operating time Life span (approximate) Temperature range Operating Storage Coin-cell battery 14.8 V battery operating time varies depending on operating conditions and can be significantly reduced under certain power-intensive conditions. 300 discharge/charge cycles 0° to 50°C (32° to 122°F) -20° to 60°C (-4° to 140°F) CR-2032 12

Mobile Manual
Page 4
CONTENTS CHAPTER 3: USING YOUR LAPTOP 35 Alienware Command Center 36 Using Removable Media and Cards 39 Using the Wireless Control 40 Battery Pack 40 Power Management 41 Configuring the BIOS 43 CHAPTER 4: INSTALLING AND REPLACING COMPONENTS 55 Before You Begin 56 Replacing the Battery Pack 60 Upgrading or Replacing Memory 63 Upgrading or Replacing the Hard Drive Assembly 65 CHAPTER 5: TROUBLESHOOTING 69 Basic Hints and Tips 70 Backup and General Maintenance 71 Software Diagnostic Tools 73 Answers to Common Problems 76 4
CONTENTS CHAPTER 3: USING YOUR LAPTOP 35 Alienware Command Center 36 Using Removable Media and Cards 39 Using the Wireless Control 40 Battery Pack 40 Power Management 41 Configuring the BIOS 43 CHAPTER 4: INSTALLING AND REPLACING COMPONENTS 55 Before You Begin 56 Replacing the Battery Pack 60 Upgrading or Replacing Memory 63 Upgrading or Replacing the Hard Drive Assembly 65 CHAPTER 5: TROUBLESHOOTING 69 Basic Hints and Tips 70 Backup and General Maintenance 71 Software Diagnostic Tools 73 Answers to Common Problems 76 4

Mobile Manual
Page 21
..., external drive, or MP3 player. CHAPTER 2: GETTING TO KNOW YOUR LAPTOP 1 Security cable slot - In such cases, turn off when only 10% of the total battery life remains. 4 Network connector - NOTE: The USB PowerShare is automatically shut off your computer to the computer. NOTE: Before you turn on your computer. 2 VGA...
..., external drive, or MP3 player. CHAPTER 2: GETTING TO KNOW YOUR LAPTOP 1 Security cable slot - In such cases, turn off when only 10% of the total battery life remains. 4 Network connector - NOTE: The USB PowerShare is automatically shut off your computer to the computer. NOTE: Before you turn on your computer. 2 VGA...
Mobile Manual
Page 24
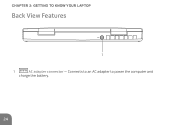
CHAPTER 2: GETTING TO KNOW YOUR LAPTOP Back View Features 1 1 AC adapter connector - Connects to an AC adapter to power the computer and charge the battery. 24
CHAPTER 2: GETTING TO KNOW YOUR LAPTOP Back View Features 1 1 AC adapter connector - Connects to an AC adapter to power the computer and charge the battery. 24
Mobile Manual
Page 31
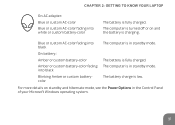
... fading into black The computer is in the Control Panel of your Microsoft Windows operating system. 31 Blinking Amber or custom batterycolor The battery charge is fully charged. The computer is in standby mode. CHAPTER 2: GETTING TO KNOW YOUR LAPTOP On AC adapter: Blue or custom AC-color ...Blue or custom AC-color fading into white or custom battery-color The battery is low. For more details on and the battery is turned off or on standby and hibernate mode, see the Power Options in standby mode. The computer is ...
... fading into black The computer is in the Control Panel of your Microsoft Windows operating system. 31 Blinking Amber or custom batterycolor The battery charge is fully charged. The computer is in standby mode. CHAPTER 2: GETTING TO KNOW YOUR LAPTOP On AC adapter: Blue or custom AC-color ...Blue or custom AC-color fading into white or custom battery-color The battery is low. For more details on and the battery is turned off or on standby and hibernate mode, see the Power Options in standby mode. The computer is ...

Mobile Manual
Page 32
Extend Desktop Press to switch between the Battery Status Meter, Battery Charge Disable feature, and Battery Charge Enable feature. F2 - Check Battery Status and Battery Charge Disable/Enable Press to activate certain functions. F4 - Increase Display Brightness Press to enable or disable the wireless function. Wireless Control - Switch wireless communications ...
Extend Desktop Press to switch between the Battery Status Meter, Battery Charge Disable feature, and Battery Charge Enable feature. F2 - Check Battery Status and Battery Charge Disable/Enable Press to activate certain functions. F4 - Increase Display Brightness Press to enable or disable the wireless function. Wireless Control - Switch wireless communications ...
Mobile Manual
Page 40
... again returns your laptop configuration, model, applications installed, power management settings, and features used. The battery meter lights on the battery pack indicate the charge level of battery charge remaining and if no lights turn on , there is no charge remaining in before you pressed the...radios on your wireless radios to their respective states they were in the battery. 40 Press to turn on all batteries, the maximum capacity of this battery will vary depending on an airplane flight. Battery life will decrease with a high-energy rechargeable lithium ion prismatic (Li-...
... again returns your laptop configuration, model, applications installed, power management settings, and features used. The battery meter lights on the battery pack indicate the charge level of battery charge remaining and if no lights turn on , there is no charge remaining in before you pressed the...radios on your wireless radios to their respective states they were in the battery. 40 Press to turn on all batteries, the maximum capacity of this battery will vary depending on an airplane flight. Battery life will decrease with a high-energy rechargeable lithium ion prismatic (Li-...
Mobile Manual
Page 41
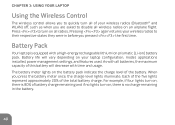
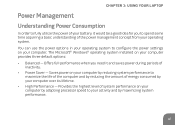
CHAPTER 3: USING YOUR LAPTOP Power Management Understanding Power Consumption In order to fully utilize the power of your battery, it and saves power during periods of system performance on your computer. Saves power on your computer by adapting processor speed to configure the power ...
CHAPTER 3: USING YOUR LAPTOP Power Management Understanding Power Consumption In order to fully utilize the power of your battery, it and saves power during periods of system performance on your computer. Saves power on your computer by adapting processor speed to configure the power ...
Mobile Manual
Page 42
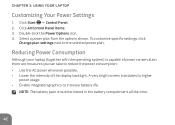
... should be locked in the battery compartment all the time. 42 A very bright screen translates to higher power usage. • Enable integrated graphics to reduce the power consumption: • Use the ... Items. 3. Reducing Power Consumption Although your laptop (together with the operating system) is capable of power conservation, there are measures you can take to increase battery life. Select a power plan from the options shown. Double-click the Power Options icon. 4. To customize specific settings, click Change plan settings next to the...
... should be locked in the battery compartment all the time. 42 A very bright screen translates to higher power usage. • Enable integrated graphics to reduce the power consumption: • Use the ... Items. 3. Reducing Power Consumption Although your laptop (together with the operating system) is capable of power conservation, there are measures you can take to increase battery life. Select a power plan from the options shown. Double-click the Power Options icon. 4. To customize specific settings, click Change plan settings next to the...
Mobile Manual
Page 47
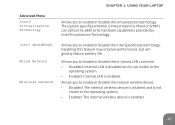
... SpeedStep® Wired Network Wireless Network Allows you to enable or disable the virtualization technology. Disabling this feature may improve performance, but will greatly reduce battery life. CHAPTER 3: USING YOUR LAPTOP Advanced Menu Intel® Virtualization Technology Allows you to enable or disable the Intel SpeedStep technology. Allows you to enable...
... SpeedStep® Wired Network Wireless Network Allows you to enable or disable the virtualization technology. Disabling this feature may improve performance, but will greatly reduce battery life. CHAPTER 3: USING YOUR LAPTOP Advanced Menu Intel® Virtualization Technology Allows you to enable or disable the Intel SpeedStep technology. Allows you to enable...

Mobile Manual
Page 53
Boot Menu Use the plus (+) or minus (-) keys to charge external devices using the stored battery power through the USB PowerShare connector on the laptop, even while the laptop is always enabled on external AC Power mode. You can choose from: &#... device priority. NOTE: USB Powershare is turned off. For more information on USB PowerShare connector see "Left View Features" on the supported USB port in battery power mode. CHAPTER 3: USING YOUR LAPTOP Power Menu USB PowerShare Allows you to enable or disable the USB PowerShare feature on page 20.
Boot Menu Use the plus (+) or minus (-) keys to charge external devices using the stored battery power through the USB PowerShare connector on the laptop, even while the laptop is always enabled on external AC Power mode. You can choose from: &#... device priority. NOTE: USB Powershare is turned off. For more information on USB PowerShare connector see "Left View Features" on the supported USB port in battery power mode. CHAPTER 3: USING YOUR LAPTOP Power Menu USB PowerShare Allows you to enable or disable the USB PowerShare feature on page 20.
Mobile Manual
Page 59
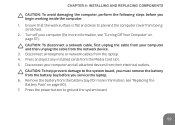
...3. CAUTION: To help prevent damage to the system board, you must remove the battery from the battery bay (for more information, see "Turning Off Your Computer" on page 60). 7. Remove the battery from the battery bay before you service the laptop. 6. CAUTION: To disconnect a network cable, ...Press and eject any installed cards from being scratched. 2. Disconnect all attached devices from your computer (for more information, see "Replacing the Battery Pack" on page 57). Press the power button to prevent the computer cover from the Media Card slot. 5. CHAPTER 4: INSTALLING AND ...
...3. CAUTION: To help prevent damage to the system board, you must remove the battery from the battery bay (for more information, see "Turning Off Your Computer" on page 60). 7. Remove the battery from the battery bay before you service the laptop. 6. CAUTION: To disconnect a network cable, ...Press and eject any installed cards from being scratched. 2. Disconnect all attached devices from your computer (for more information, see "Replacing the Battery Pack" on page 57). Press the power button to prevent the computer cover from the Media Card slot. 5. CHAPTER 4: INSTALLING AND ...
Mobile Manual
Page 60
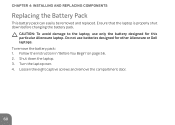
... and remove the compartment door. 60 To remove the battery pack: 1. CAUTION: To avoid damage to the laptop, use batteries designed for this particular Alienware laptop. Do not use only the battery designed for other Alienware or Dell laptops. CHAPTER 4: INSTALLING AND REPLACING COMPONENTS Replacing the Battery Pack This battery pack can easily be removed and replaced. Shut...
... and remove the compartment door. 60 To remove the battery pack: 1. CAUTION: To avoid damage to the laptop, use batteries designed for this particular Alienware laptop. Do not use only the battery designed for other Alienware or Dell laptops. CHAPTER 4: INSTALLING AND REPLACING COMPONENTS Replacing the Battery Pack This battery pack can easily be removed and replaced. Shut...

Mobile Manual
Page 61
Disconnect the battery pack cable from the connector on the system board. 7. Lift and slide the battery pack out of the computer. 61 CHAPTER 4: INSTALLING AND REPLACING COMPONENTS 2 1 1 captive screws (8) 2 compartment door 5. Loosen the two captive screws that secure the battery pack to the computer base. 6.
Disconnect the battery pack cable from the connector on the system board. 7. Lift and slide the battery pack out of the computer. 61 CHAPTER 4: INSTALLING AND REPLACING COMPONENTS 2 1 1 captive screws (8) 2 compartment door 5. Loosen the two captive screws that secure the battery pack to the computer base. 6.

Mobile Manual
Page 62
CHAPTER 4: INSTALLING AND REPLACING COMPONENTS 3 1 2 1 battery pack 2 captive screws (2) 3 battery pack cable To replace the battery pack, perform the removal steps in reverse order. 62
CHAPTER 4: INSTALLING AND REPLACING COMPONENTS 3 1 2 1 battery pack 2 captive screws (2) 3 battery pack cable To replace the battery pack, perform the removal steps in reverse order. 62
Mobile Manual
Page 63
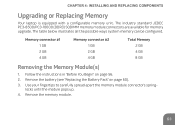
... Memory Module(s) 1. Follow the instructions in "Before You Begin" on page 60). 3. Remove the memory module. 63 locks until the module pops up. 4. Remove the battery (see "Replacing the Battery Pack" on page 56. 2. The table below illustrates all the possible ways system memory can be configured.
... Memory Module(s) 1. Follow the instructions in "Before You Begin" on page 60). 3. Remove the memory module. 63 locks until the module pops up. 4. Remove the battery (see "Replacing the Battery Pack" on page 56. 2. The table below illustrates all the possible ways system memory can be configured.
Mobile Manual
Page 65
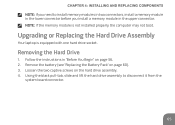
... system board connector. 65 Upgrading or Replacing the Hard Drive Assembly Your laptop is not installed properly, the computer may not boot. Remove the battery (see "Replacing the Battery Pack" on page 60). 3. CHAPTER 4: INSTALLING AND REPLACING COMPONENTS NOTE: If you install a memory module in the upper connector. NOTE: If the memory...
... system board connector. 65 Upgrading or Replacing the Hard Drive Assembly Your laptop is not installed properly, the computer may not boot. Remove the battery (see "Replacing the Battery Pack" on page 60). 3. CHAPTER 4: INSTALLING AND REPLACING COMPONENTS NOTE: If you install a memory module in the upper connector. NOTE: If the memory...

