
Mobile Manual
Page 6
CONTENTS CHAPTER 3: USING YOUR LAPTOP 37 Alienware Command Center 38 FastAccess Facial Recognition (Optional 42 Battery Pack 42 Using the Wireless Control 44 Power Management 45 NVIDIA Optimus Technology 47 Configuring the BIOS 49 CHAPTER 4: INSTALLING AND REPLACING COMPONENTS 59 Before You Begin 60 Replacing the Battery Pack 64 Upgrading or Replacing Memory 67 Upgrading or Replacing the Hard Drive Assembly 70 CHAPTER 5: TROUBLESHOOTING 75 Basic Hints and Tips 76 Backup and General Maintenance 77 Software Diagnostic Tools 79 Answers to Common Problems 81 4
CONTENTS CHAPTER 3: USING YOUR LAPTOP 37 Alienware Command Center 38 FastAccess Facial Recognition (Optional 42 Battery Pack 42 Using the Wireless Control 44 Power Management 45 NVIDIA Optimus Technology 47 Configuring the BIOS 49 CHAPTER 4: INSTALLING AND REPLACING COMPONENTS 59 Before You Begin 60 Replacing the Battery Pack 64 Upgrading or Replacing Memory 67 Upgrading or Replacing the Hard Drive Assembly 70 CHAPTER 5: TROUBLESHOOTING 75 Basic Hints and Tips 76 Backup and General Maintenance 77 Software Diagnostic Tools 79 Answers to Common Problems 81 4

Mobile Manual
Page 17
... screens will need to complete. Doing so may take you set up Microsoft Windows. 15 NOTE: For optimal performance of your computer available at support.dell.com. CHAPTER 1: SETTING UP YOUR LAPTOP Set Up Microsoft Windows Your computer is recommended that you create a full system backup as soon as you through..., setting preferences, and setting up an Internet connection. These steps are mandatory and may render your computer unusable and you download and install the latest BIOS and drivers for the first time, follow the instructions on the operating system and features, see support...
... screens will need to complete. Doing so may take you set up Microsoft Windows. 15 NOTE: For optimal performance of your computer available at support.dell.com. CHAPTER 1: SETTING UP YOUR LAPTOP Set Up Microsoft Windows Your computer is recommended that you create a full system backup as soon as you through..., setting preferences, and setting up an Internet connection. These steps are mandatory and may render your computer unusable and you download and install the latest BIOS and drivers for the first time, follow the instructions on the operating system and features, see support...

Mobile Manual
Page 25
... video signals. In such cases, turn off your computer to charge USB devices when the computer is powered off or in sleep mode through the BIOS settings. Connects your computer while charging a USB device, the device stops charging. To continue charging, disconnect the USB device and connect it again. Connects to...
... video signals. In such cases, turn off your computer to charge USB devices when the computer is powered off or in sleep mode through the BIOS settings. Connects your computer while charging a USB device, the device stops charging. To continue charging, disconnect the USB device and connect it again. Connects to...

Mobile Manual
Page 51
... of hard drive installed. Before you use System Setup, it is recommended that you are an expert computer user. CHAPTER 3: USING YOUR LAPTOP Configuring the BIOS System Setup The System Setup options allow you to work incorrectly. 49
... of hard drive installed. Before you use System Setup, it is recommended that you are an expert computer user. CHAPTER 3: USING YOUR LAPTOP Configuring the BIOS System Setup The System Setup options allow you to work incorrectly. 49

Mobile Manual
Page 52
...down for your laptop. Key functions appear at the bottom of time. System Setup Screens The BIOS Setup Utility window displays current or changeable configuration information for extended periods of the BIOS Setup Utility window and lists keys and their functions within the active field. 50 While the .... If an error occurs during Power On Self Test (POST), you wait too long and the operating system logo appears, continue to access the BIOS Setup Utility. CHAPTER 3: USING YOUR LAPTOP Entering System Setup 1. NOTE: If you may result when a key on (or restart) your laptop and...
...down for your laptop. Key functions appear at the bottom of time. System Setup Screens The BIOS Setup Utility window displays current or changeable configuration information for extended periods of the BIOS Setup Utility window and lists keys and their functions within the active field. 50 While the .... If an error occurs during Power On Self Test (POST), you wait too long and the operating system logo appears, continue to access the BIOS Setup Utility. CHAPTER 3: USING YOUR LAPTOP Entering System Setup 1. NOTE: If you may result when a key on (or restart) your laptop and...

Mobile Manual
Page 53
...version. Displays the processor cache size. 51 Main Menu System Time System Date Alienware Service Tag BIOS Version EC Version ME version CPU CPU Frequency CPU L3 Cache Displays the system time. Displays the BIOS version. Displays the EC firmware version. NOTE: For the updated system setup ...information, see the Service Manual at support.dell.com/manuals. Displays the system date. Displays the type of your computer...
...version. Displays the processor cache size. 51 Main Menu System Time System Date Alienware Service Tag BIOS Version EC Version ME version CPU CPU Frequency CPU L3 Cache Displays the system time. Displays the BIOS version. Displays the EC firmware version. NOTE: For the updated system setup ...information, see the Service Manual at support.dell.com/manuals. Displays the system date. Displays the type of your computer...

Mobile Manual
Page 55
... cannot boot any type of a USB-aware operating system, handles USB devices. USB PowerShare NOTE: If USB Powershare is off. This feature defines how the BIOS, in battery mode. CHAPTER 3: USING YOUR LAPTOP Advanced Menu USB Emulation Allows you to the USB Powershare connector may not wake the computer.
... cannot boot any type of a USB-aware operating system, handles USB devices. USB PowerShare NOTE: If USB Powershare is off. This feature defines how the BIOS, in battery mode. CHAPTER 3: USING YOUR LAPTOP Advanced Menu USB Emulation Allows you to the USB Powershare connector may not wake the computer.

Mobile Manual
Page 57
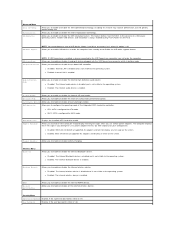
... warning messages when you use a A/C adapter that has too little capacity for your configuration. •• Disabled: BIOS will not detect unsupported A/C adapters and will not display any message to screen. •• Enabled: BIOS will detect unsupported A/C adapters and display an error to screen. The computer displays these messages if you...
... warning messages when you use a A/C adapter that has too little capacity for your configuration. •• Disabled: BIOS will not detect unsupported A/C adapters and will not display any message to screen. •• Enabled: BIOS will detect unsupported A/C adapters and display an error to screen. The computer displays these messages if you...

Mobile Manual
Page 79
... as network, dialup, mail and Internet settings. 77 You may schedule these programs to note the serial numbers if you are not using your computer's BIOS and operating system. •• Document vital settings such as you choose to do so. •• Write down your passwords and keep copies of...
... as network, dialup, mail and Internet settings. 77 You may schedule these programs to note the serial numbers if you are not using your computer's BIOS and operating system. •• Document vital settings such as you choose to do so. •• Write down your passwords and keep copies of...

Mobile Manual
Page 99
System Information System chipset SDRAM bus width Processor address bus width Processor data width BIOS EPROM Graphics bus Memory Connectors Capacities Memory type Memory configurations supported CHAPTER 7: SPECIFICATIONS Mobile Intel QS67 Express Chipset one or two 64-bit channels of DDR3 memory up to 1333 MHz 32 bits 64 bits 32 Mbit PCIe x16 Gen2 two internally-accessible DDR3 SODIMM sockets 1 GB, 2 GB, 4 GB, and 8 GB up to 1333 MHz, unbuffered non-ECC, dual‑channel DDR3 configuration 2 GB, 3 GB, 4 GB, 8 GB, and 16 GB 97
System Information System chipset SDRAM bus width Processor address bus width Processor data width BIOS EPROM Graphics bus Memory Connectors Capacities Memory type Memory configurations supported CHAPTER 7: SPECIFICATIONS Mobile Intel QS67 Express Chipset one or two 64-bit channels of DDR3 memory up to 1333 MHz 32 bits 64 bits 32 Mbit PCIe x16 Gen2 two internally-accessible DDR3 SODIMM sockets 1 GB, 2 GB, 4 GB, and 8 GB up to 1333 MHz, unbuffered non-ECC, dual‑channel DDR3 configuration 2 GB, 3 GB, 4 GB, 8 GB, and 16 GB 97
Service Manual
Page 1
...computer. Trademarks used in trademarks and trade names other countries. disclaims any manner whatsoever without notice. © 2011 Dell Inc. Alienware® M11x R3 Service Manual Before You Begin Base Cover Battery Pack Hard Drive Memory Module(s) Wireless Mini-Card(s) Hinge Cover Keyboard... Board System Board Speakers System Setup Flashing the BIOS Regulatory model: P06T series Regulatory type: P06T003 Notes, Cautions, and Warnings NOTE: A NOTE indicates important information that helps you make better use of Dell Inc. All rights reserved. Other trademarks and trade...
...computer. Trademarks used in trademarks and trade names other countries. disclaims any manner whatsoever without notice. © 2011 Dell Inc. Alienware® M11x R3 Service Manual Before You Begin Base Cover Battery Pack Hard Drive Memory Module(s) Wireless Mini-Card(s) Hinge Cover Keyboard... Board System Board Speakers System Setup Flashing the BIOS Regulatory model: P06T series Regulatory type: P06T003 Notes, Cautions, and Warnings NOTE: A NOTE indicates important information that helps you make better use of Dell Inc. All rights reserved. Other trademarks and trade...
Service Manual
Page 4
...Before Working Inside Your Computer Use the following tools: l Small flat-blade screwdriver l Phillips screwdriver l Plastic scribe l BIOS executable update program at support.dell.com Turning Off Your Computer CAUTION: To avoid losing data, save and close all open files and exit all open ...its pins. if you are turned off . Back to Contents Page Before You Begin Alienware® M11x R3 Service Manual Recommended Tools Turning Off Your Computer Before Working Inside Your Computer Contacting Alienware This manual provides procedures for at least 8 to 10 seconds until the computer turns off...
...Before Working Inside Your Computer Use the following tools: l Small flat-blade screwdriver l Phillips screwdriver l Plastic scribe l BIOS executable update program at support.dell.com Turning Off Your Computer CAUTION: To avoid losing data, save and close all open files and exit all open ...its pins. if you are turned off . Back to Contents Page Before You Begin Alienware® M11x R3 Service Manual Recommended Tools Turning Off Your Computer Before Working Inside Your Computer Contacting Alienware This manual provides procedures for at least 8 to 10 seconds until the computer turns off...
Service Manual
Page 6
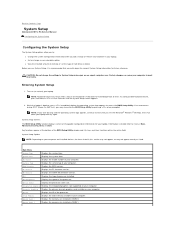
.... Turn on (or restart) your laptop. Information is recommended that you write down for future reference. Back to Contents Page System Setup Alienware® M11x R3 Service Manual Configuring the System Setup Configuring the System Setup The System Setup options allow you to wait until the System Setup screen appears.... listed in even intervals until you see the Microsoft® Windows® desktop, then shut down your laptop and try again. BIOS Version Displays the BIOS version. CPU Frequency Displays the speed of hard drive installed. CPU ID Displays the ID of time.
.... Turn on (or restart) your laptop. Information is recommended that you write down for future reference. Back to Contents Page System Setup Alienware® M11x R3 Service Manual Configuring the System Setup Configuring the System Setup The System Setup options allow you to wait until the System Setup screen appears.... listed in even intervals until you see the Microsoft® Windows® desktop, then shut down your laptop and try again. BIOS Version Displays the BIOS version. CPU Frequency Displays the speed of hard drive installed. CPU ID Displays the ID of time.
Service Manual
Page 7
...the internal high definition audio device. l Enabled: Internal LAN is configured for ATA mode. l ATA: SATA is enabled. l Enabled: BIOS will detect unsupported AC adapters and display an error on -board LAN controller. l Disabled: The internal Bluetooth device is disabled and is ...configured for your configuration. Wireless Network Allows you to the operating system. l AHCI: SATA is clear or set . l Disabled: BIOS will not detect unsupported AC adapters and will greatly reduce battery life. SATA Hard Drive Adapter Warnings Displays the installed SATA hard drive...
...the internal high definition audio device. l Enabled: Internal LAN is configured for ATA mode. l ATA: SATA is enabled. l Enabled: BIOS will detect unsupported AC adapters and display an error on -board LAN controller. l Disabled: The internal Bluetooth device is disabled and is ...configured for your configuration. Wireless Network Allows you to the operating system. l AHCI: SATA is clear or set . l Disabled: BIOS will not detect unsupported AC adapters and will greatly reduce battery life. SATA Hard Drive Adapter Warnings Displays the installed SATA hard drive...

Service Manual
Page 17
...Confirm. 4. If you have your desktop. Select the type of the menu. c. d. The file downloads to Contents Page Flashing the BIOS Alienware® M11x R3 Service Manual 1. Double-click the file icon on the desktop and follow the instructions on your computer's Service Tag: a. b. Enter your...Service Tag: a. If you do not have your computer is titled the same as the downloaded BIOS update file. 8. A list of the computer. Click Download Now to support.dell.com/support/downloads. 3. The File Download window appears. 6. The file icon appears on the ...
...Confirm. 4. If you have your desktop. Select the type of the menu. c. d. The file downloads to Contents Page Flashing the BIOS Alienware® M11x R3 Service Manual 1. Double-click the file icon on the desktop and follow the instructions on your computer's Service Tag: a. b. Enter your...Service Tag: a. If you do not have your computer is titled the same as the downloaded BIOS update file. 8. A list of the computer. Click Download Now to support.dell.com/support/downloads. 3. The File Download window appears. 6. The file icon appears on the ...
Service Manual
Page 40
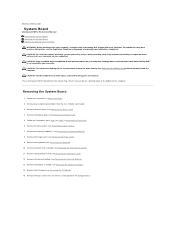
... that secure the system board to the computer base. Damage due to servicing that is not authorized by Dell™ is also visible on a barcode label at www.dell.com/regulatory_compliance. Follow the instructions in -1 Media Card reader. 3. Remove the coin-cell battery (see Removing... information, see Removing the Memory Module(s)). 8. Back to Contents Page System Board Alienware® M11x R3 Service Manual Removing the System Board Replacing the System Board Entering the Service Tag in the BIOS WARNING: Before working inside your computer, read the safety information that shipped with ...
... that secure the system board to the computer base. Damage due to servicing that is not authorized by Dell™ is also visible on a barcode label at www.dell.com/regulatory_compliance. Follow the instructions in -1 Media Card reader. 3. Remove the coin-cell battery (see Removing... information, see Removing the Memory Module(s)). 8. Back to Contents Page System Board Alienware® M11x R3 Service Manual Removing the System Board Replacing the System Board Entering the Service Tag in the BIOS WARNING: Before working inside your computer, read the safety information that shipped with ...

Service Manual
Page 41
... card (see Replacing the Hinge Cover). 11. Replace any cards or blank that secure the system board to do so may result in the BIOS). Replace the keyboard (see Replacing the Mini-Card(s)). 13. Replace the Mini-Card(s) (see Replacing the Keyboard). 10. Follow the instructions from...assembly (see Replacing the Memory Module(s)). 12. Replace the four screws that you have replaced the system board, enter the computer Service Tag into the BIOS of the slots in Before You Begin. 2. NOTE: After you removed from step 6 to the computer. 17. Replace the memory module(s) (...
... card (see Replacing the Hinge Cover). 11. Replace any cards or blank that secure the system board to do so may result in the BIOS). Replace the keyboard (see Replacing the Mini-Card(s)). 13. Replace the Mini-Card(s) (see Replacing the Keyboard). 10. Follow the instructions from...assembly (see Replacing the Memory Module(s)). 12. Replace the four screws that you have replaced the system board, enter the computer Service Tag into the BIOS of the slots in Before You Begin. 2. NOTE: After you removed from step 6 to the computer. 17. Replace the memory module(s) (...

Service Manual
Page 42
Back to the security tab and enter the service tag in the Set Service Tag field. Ensure that the AC adapter is plugged in the BIOS 1. Navigate to Contents Page Press during POST to enter the system setup program. 4. Entering the Service Tag in and that the main battery is installed properly. 2. Turn on the computer. 3.
Back to the security tab and enter the service tag in the Set Service Tag field. Ensure that the AC adapter is plugged in the BIOS 1. Navigate to Contents Page Press during POST to enter the system setup program. 4. Entering the Service Tag in and that the main battery is installed properly. 2. Turn on the computer. 3.


