Mobile Manual
Page 4
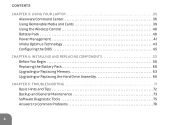
CONTENTS CHAPTER 3: USING YOUR LAPTOP 35 Alienware Command Center 36 Using Removable Media and Cards 39 Using the Wireless Control 40 Battery Pack 40 Power Management 41 nVidia Optimus Technology 43 Configuring the BIOS 45 CHAPTER 4: INSTALLING AND REPLACING COMPONENTS 55 Before You Begin 56 Replacing the Battery Pack 60 Upgrading or Replacing Memory 63 Upgrading or Replacing the Hard Drive Assembly 66 CHAPTER 5: TROUBLESHOOTING 71 Basic Hints and Tips 72 Backup and General Maintenance 73 Software Diagnostic Tools 75 Answers to Common Problems 78 4
CONTENTS CHAPTER 3: USING YOUR LAPTOP 35 Alienware Command Center 36 Using Removable Media and Cards 39 Using the Wireless Control 40 Battery Pack 40 Power Management 41 nVidia Optimus Technology 43 Configuring the BIOS 45 CHAPTER 4: INSTALLING AND REPLACING COMPONENTS 55 Before You Begin 56 Replacing the Battery Pack 60 Upgrading or Replacing Memory 63 Upgrading or Replacing the Hard Drive Assembly 66 CHAPTER 5: TROUBLESHOOTING 71 Basic Hints and Tips 72 Backup and General Maintenance 73 Software Diagnostic Tools 75 Answers to Common Problems 78 4
Mobile Manual
Page 36
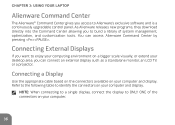
... allowing you access to ONLY ONE of system management, optimization, and customization tools. NOTE: When connecting to a single display, connect the display to Alienware's exclusive software and is a continuously upgradable control panel. You can connect an external display such as a standalone monitor, an LCD TV, or a projector. Refer to the following table...
... allowing you access to ONLY ONE of system management, optimization, and customization tools. NOTE: When connecting to a single display, connect the display to Alienware's exclusive software and is a continuously upgradable control panel. You can connect an external display such as a standalone monitor, an LCD TV, or a projector. Refer to the following table...

Mobile Manual
Page 56
..., each procedure assumes that shipped with specific replacement instructions. NOTE: See the Service Manual at www.dell.com or www.alienware.com. You can be replaced or-if purchased separately-installed by upgrading equipment. Parts purchased from Dell and Alienware will ship with your laptop. CHAPTER 4: INSTALLING AND REPLACING COMPONENTS This chapter provides guidelines and...
..., each procedure assumes that shipped with specific replacement instructions. NOTE: See the Service Manual at www.dell.com or www.alienware.com. You can be replaced or-if purchased separately-installed by upgrading equipment. Parts purchased from Dell and Alienware will ship with your laptop. CHAPTER 4: INSTALLING AND REPLACING COMPONENTS This chapter provides guidelines and...

Mobile Manual
Page 63
CHAPTER 4: INSTALLING AND REPLACING COMPONENTS Upgrading or Replacing Memory Your laptop is equipped with a configurable memory unit. The industry standard JEDEC PC3‑8500/PC3-10600 (DDR3) SODIMM memory module connectors are available for memory upgrade. The table below illustrates all the possible ways system memory can be configured. Memory connector #1 1 GB 1 GB 2 GB 4 GB Memory connector #2 1 GB 2 GB 2 GB 4 GB Total memory 2 GB 3 GB 4 GB 8 GB 63
CHAPTER 4: INSTALLING AND REPLACING COMPONENTS Upgrading or Replacing Memory Your laptop is equipped with a configurable memory unit. The industry standard JEDEC PC3‑8500/PC3-10600 (DDR3) SODIMM memory module connectors are available for memory upgrade. The table below illustrates all the possible ways system memory can be configured. Memory connector #1 1 GB 1 GB 2 GB 4 GB Memory connector #2 1 GB 2 GB 2 GB 4 GB Total memory 2 GB 3 GB 4 GB 8 GB 63
Mobile Manual
Page 66
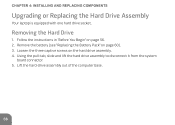
Removing the Hard Drive 1. Follow the instructions in "Before You Begin" on the hard drive assembly. 4. Lift the hard-drive assembly out of the computer base. 66 Loosen the three captive screws on page 56. 2. Using the pull-tab, slide and lift the hard drive assembly to disconnect it from the system board connector. 5. Remove the battery (see "Replacing the Battery Pack" on page 60). 3. CHAPTER 4: INSTALLING AND REPLACING COMPONENTS Upgrading or Replacing the Hard Drive Assembly Your laptop is equipped with one hard drive socket.
Removing the Hard Drive 1. Follow the instructions in "Before You Begin" on the hard drive assembly. 4. Lift the hard-drive assembly out of the computer base. 66 Loosen the three captive screws on page 56. 2. Using the pull-tab, slide and lift the hard drive assembly to disconnect it from the system board connector. 5. Remove the battery (see "Replacing the Battery Pack" on page 60). 3. CHAPTER 4: INSTALLING AND REPLACING COMPONENTS Upgrading or Replacing the Hard Drive Assembly Your laptop is equipped with one hard drive socket.

Mobile Manual
Page 81
.... • If necessary, uninstall and then reinstall the program. 81 Use an anti-virus program that includes anti-spyware protection (your program may require an upgrade) to run successfully, the error condition is installed and configured properly. • Verify that the program is related to the Internet, your computer meets the...
.... • If necessary, uninstall and then reinstall the program. 81 Use an anti-virus program that includes anti-spyware protection (your program may require an upgrade) to run successfully, the error condition is installed and configured properly. • Verify that the program is related to the Internet, your computer meets the...

Mobile Manual
Page 83
...computer supports, it is blank NOTE: If you attach an external monitor to the display. 83 If you require assistance, contact Alienware Technical Support (for correct seating and orientation. Display If the display is recommended that memory modules be in pairs. CHAPTER 5: ... Memory errors detected on the keyboard or press the power button to resume normal operation. Reseat the memory modules if applicable (see "CONTACTING ALIENWARE" on page 63). • Computers using a dual-channel memory configuration require that you are using a program that requires a higher resolution...
...computer supports, it is blank NOTE: If you attach an external monitor to the display. 83 If you require assistance, contact Alienware Technical Support (for correct seating and orientation. Display If the display is recommended that memory modules be in pairs. CHAPTER 5: ... Memory errors detected on the keyboard or press the power button to resume normal operation. Reseat the memory modules if applicable (see "CONTACTING ALIENWARE" on page 63). • Computers using a dual-channel memory configuration require that you are using a program that requires a higher resolution...


