Dell Inspiron 3420 Support Question
Dell Inspiron 3420 Support Question
Find answers below for this question about Dell Inspiron 3420.Need a Dell Inspiron 3420 manual? We have 2 online manuals for this item!
Question posted by drkhizarhayat97 on April 8th, 2013
Ram Upgrade.
can i upgrade my ram from 2gb to 4 or 6 gb on dell corei3 inspiron 3420,if yes how..??
Current Answers

Answer #2: Posted by TommyKervz on April 8th, 2013 8:26 AM
TommyKervz

Member since:
January 10th, 2013 Points: 17,776,813

Member since:
January 10th, 2013 Points: 17,776,813
Greeting - If it is Dell Inpiron 14 (3420), then it is said to take upto 8gb of ram size. It is only recommended to plug in 4gb on each of the two ram slot. The rams' slots can be accessed at the base of the laptop (you may have to screw out one or two screw ot access in. Switch off you laptop before you do so.
Related Dell Inspiron 3420 Manual Pages
Specifications (SWF/PDF) - Page 1
Dell Inspiron M4040/ 14-N4050 Owner's Manual
Regulatory model: P22G
Regulatory type: P22G001; P22G002
Specifications (SWF/PDF) - Page 2
..., personal injury, or death. Notes, Cautions, and Warnings
NOTE: A NOTE indicates important information that helps you make better use of these materials in this text: Dell™, the DELL logo, and Inspiron™ are not followed. Reproduction of your computer. Bluetooth® is a registered trademark owned by Bluetooth SIG, Inc.; A00
Specifications (SWF/PDF) - Page 5
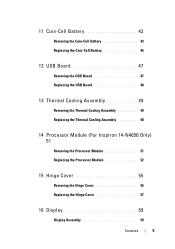
... the USB Board 48
13 Thermal Cooling Assembly 49
Removing the Thermal Cooling Assembly 49 Replacing the Thermal Cooling Assembly 50
14 Processor Module (For Inspiron 14-N4050 Only) 51
Removing the Processor Module 51 Replacing the Processor Module 52
15 Hinge Cover 55
Removing the Hinge Cover 55 Replacing the...
Specifications (SWF/PDF) - Page 9
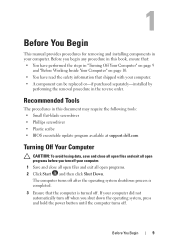
... document may require the following tools: • Small flat-blade screwdriver • Phillips screwdriver • Plastic scribe • BIOS executable update program available at support.dell.com
Turning Off Your Computer
CAUTION: To avoid losing data, save and close all open files and exit all open programs. 2 Click Start and then...
Specifications (SWF/PDF) - Page 10
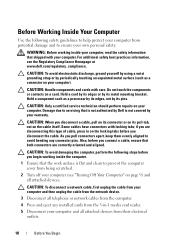
... computer, read the safety information that the work surface is not covered by Dell is flat and clean to prevent the computer cover from being scratched.
2 Turn off your computer... (see the Regulatory Compliance Homepage at www.dell.com/regulatory_compliance. For additional safety best practices information, see "Turning Off Your Computer" on...
Specifications (SWF/PDF) - Page 13

.... CAUTION: To avoid damage to the unlock position until it over. 3 Slide the battery lock latch to the computer, use batteries designed for this particular Dell computer. Removing the Battery
1 Follow the instructions in "Before You Begin" on page 9. 2 Turn off the computer and turn it clicks into place. 4 Slide and...
Specifications (SWF/PDF) - Page 15

...You Begin" on page 9. 2 Remove the battery (see the Regulatory Compliance Homepage at www.dell.com/regulatory_compliance. Be careful when removing and handling the keyboard. 3 Turn the computer over and ...computer.
Keyboard
15
CAUTION: To help prevent damage to servicing that is not authorized by Dell is not covered by periodically touching an unpainted metal surface (such as possible. 4 ...
Specifications (SWF/PDF) - Page 19
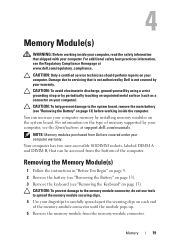
... Before working inside your computer, read the safety information that is not authorized by Dell is not covered by your computer. CAUTION: To avoid electrostatic discharge, ground yourself...Removing the Battery" on page 13). 3 Remove the keyboard (see the Specifications at www.dell.com/regulatory_compliance.
Your computer has two user-accessible SODIMM sockets, labeled DIMM A and DIMM...
Specifications (SWF/PDF) - Page 23
... (such as a connector on page 15). 4 Remove the screw that is not authorized by Dell is not covered by your computer.
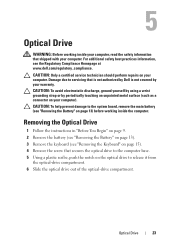
Optical Drive
23 Removing the Optical Drive
1 Follow the instructions...the system board, remove the main battery (see the Regulatory Compliance Homepage at www.dell.com/regulatory_compliance. Damage due to servicing that secures the optical drive to the computer base....
Specifications (SWF/PDF) - Page 25

...should perform repairs on page 13). 3 Remove the eight screws that is not authorized by Dell is not covered by periodically touching an unpainted metal surface (such as a connector on page... system board, remove the main battery (see the Regulatory Compliance Homepage at www.dell.com/regulatory_compliance.
For additional safety best practices information, see "Removing the Battery" on ...
Specifications (SWF/PDF) - Page 31
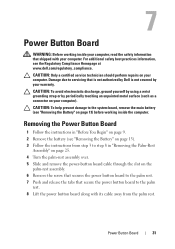
... button board to the palm rest. 7 Push and release the tabs that is not authorized by Dell is not covered by your computer). Power Button Board
31
Removing the Power Button Board
1 Follow ... You Begin" on page 9. 2 Remove the battery (see the Regulatory Compliance Homepage at www.dell.com/regulatory_compliance.
Damage due to servicing that secure the power button board to the palm
rest. ...
Specifications (SWF/PDF) - Page 33
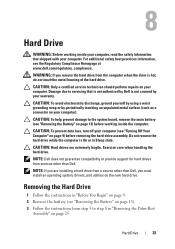
...CAUTION: Only a certified service technician should perform repairs on page 25.
NOTE: Dell does not guarantee compatibility or provide support for hard drives from step 3 to the... system board, remove the main battery (see the Regulatory Compliance Homepage at www.dell.com/regulatory_compliance. For additional safety best practices information, see "Removing the Battery" on ...
Specifications (SWF/PDF) - Page 37
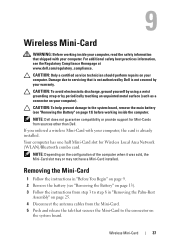
... to the system board, remove the main battery (see the Regulatory Compliance Homepage at www.dell.com/regulatory_compliance. Removing the Mini-Card
1 Follow the instructions in "Removing the Palm-Rest
...Removing the Battery" on page 25. 4 Disconnect the antenna cables from sources other than Dell. NOTE: Depending on your computer, the card is not covered by periodically touching an...
Specifications (SWF/PDF) - Page 43
... should perform repairs on the system board and remove the audio-board cable.
For Inspiron 14-N4050:
a Lift the connector latch that secures the audio-board cable to ...Cell Battery
WARNING: Before working inside your computer, read the safety information that is not authorized by Dell is not covered by periodically touching an unpainted metal surface (such as a connector on your computer....
Specifications (SWF/PDF) - Page 44
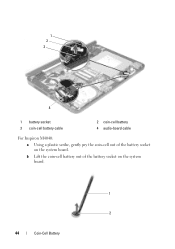
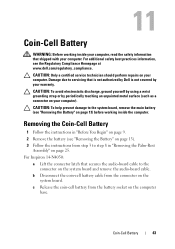
b Lift the coin-cell battery out of the battery socket on the system board.
1
2
44
Coin-Cell Battery 1 2
3
4
1 battery socket 3 coin-cell battery cable
2 coin-cell battery 4 audio-board cable
For Inspiron M4040: a Using a plastic scribe, gently pry the coin-cell out of the battery socket on the system board.
Specifications (SWF/PDF) - Page 45
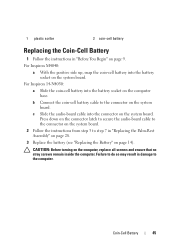
... Follow the instructions from step 3 to the computer.
CAUTION: Before turning on the computer base. For Inspiron M4040:
a With the positive side up, snap the coin-cell battery into the connector on the system ... do so may result in damage to step 7 in "Before You Begin" on page 9. For Inspiron 14-N4050: a Slide the coin-cell battery into the battery socket on the computer, replace all ...
Specifications (SWF/PDF) - Page 51
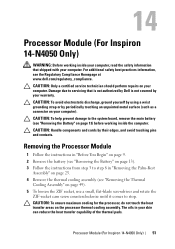
...(see "Removing the Battery" on page 13) before working inside the computer. Processor Module (For Inspiron 14-N4050 Only)
51 CAUTION: To ensure maximum cooling for the processor, do not touch the ... pads.
14
Processor Module (For Inspiron 14-N4050 Only)
WARNING: Before working inside your computer, read the safety information that is not authorized by Dell is not covered by their edges,...
Specifications (SWF/PDF) - Page 52
... the Processor Module
1 Follow the instructions in "Before You Begin" on page 9. Be careful not to illustrate proper installation is shipped.
52
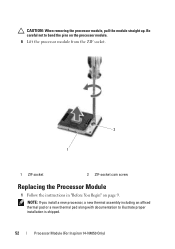
Processor Module (For Inspiron 14-N4050 Only)
Specifications (SWF/PDF) - Page 53
... than the others, the module is properly seated, all screws and ensure that aligns with the pin-1 corner of the ZIF socket. Processor Module (For Inspiron 14-N4050 Only)
53
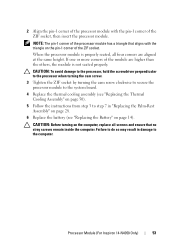
2 Align the pin-1 corner of the processor module with the triangle on the pin-1 corner of the ZIF socket, then insert...
Specifications (SWF/PDF) - Page 54

54
Processor Module (For Inspiron 14-N4050 Only)
Similar Questions

How I Cam Download The Dell Inspiron 3420 Network Controller Driver?
network controller driver
network controller driver
(Posted by sifatmohmand 9 years ago)

Solw
my dell laptop inspiron 3420 core i5 is very slow i am using window 7,which window i should use to s...
my dell laptop inspiron 3420 core i5 is very slow i am using window 7,which window i should use to s...
(Posted by matiullah134 9 years ago)
Can Ram Upgrade To 8gb Dell Laptop # Inspiron 1090 Or Inspiron Duo
(Posted by rz73vesku 10 years ago)

My Dell Inspiron 3420 Laptop Is Not Turnibg Off. What To Do???????????
(Posted by lifeisnothavy 11 years ago)
Dell Laptop Inspiron N5050 Drivers For Windows Xp
dell laptop Inspiron N5050 drivers for windows xp
dell laptop Inspiron N5050 drivers for windows xp
(Posted by Umeshb1986 11 years ago)