
User's Guide
Page 1
...Trademarks used in the United States and/or other than its own. Microsoft, Windows, and Windows Vista are trademarks of your monitor. Dell Inc. November 2009 Rev. All rights reserved. Reproduction of Microsoft Corporation in this document is subject to avoid the problem. CAUTION...document to refer to hardware or loss of data and tells you make better use of Dell Inc.; Information in trademarks and trade names other countries; and other countries. Alienware OptX™ AW2310 User's Guide About Your Monitor Setting for property damage, personal injury or death.
...Trademarks used in the United States and/or other than its own. Microsoft, Windows, and Windows Vista are trademarks of your monitor. Dell Inc. November 2009 Rev. All rights reserved. Reproduction of Microsoft Corporation in this document is subject to avoid the problem. CAUTION...document to refer to hardware or loss of data and tells you make better use of Dell Inc.; Information in trademarks and trade names other countries; and other countries. Alienware OptX™ AW2310 User's Guide About Your Monitor Setting for property damage, personal injury or death.
User's Guide
Page 2
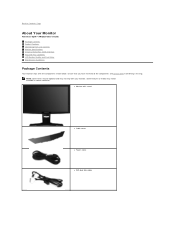
...Dell if something is missing. NOTE: Some items may be optional and may not be available in certain countries. l Monitor with the components shown below. Some features or media may not ship with your monitor. Back to Contents Page About Your Monitor Alienware OptX™ AW2310... User's Guide Package Contents Product Features Identifying Parts and Controls Monitor Specifications Universal Serial Bus (USB) Interface Plug and Play Capability LCD Monitor Quality and Pixel Policy Maintenance ...
...Dell if something is missing. NOTE: Some items may be optional and may not be available in certain countries. l Monitor with the components shown below. Some features or media may not ship with your monitor. Back to Contents Page About Your Monitor Alienware OptX™ AW2310... User's Guide Package Contents Product Features Identifying Parts and Controls Monitor Specifications Universal Serial Bus (USB) Interface Plug and Play Capability LCD Monitor Quality and Pixel Policy Maintenance ...
User's Guide
Page 3
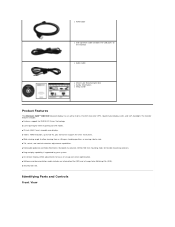
.... ■ On-Screen Display (OSD) adjustments for intense gaming (on the monitor) l Audio cable l Drivers and Documentation disc l Safety Information l Setup Guide Product Features The Alienware OptX™ AW2310 flat panel display has an active matrix, thin-film transistor (TFT), liquid crystal... display (LCD), and CCFL backlight. Identifying Parts and Controls Front View The monitor features include: ■ Features support for NVIDIA 3D ...
.... ■ On-Screen Display (OSD) adjustments for intense gaming (on the monitor) l Audio cable l Drivers and Documentation disc l Safety Information l Setup Guide Product Features The Alienware OptX™ AW2310 flat panel display has an active matrix, thin-film transistor (TFT), liquid crystal... display (LCD), and CCFL backlight. Identifying Parts and Controls Front View The monitor features include: ■ Features support for NVIDIA 3D ...
User's Guide
Page 4
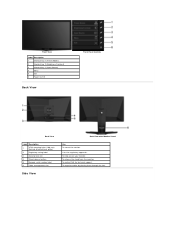
To help secure your monitor. To contact Dell for technical support. To organize cables by placing them through the slot. Front View Label Description 1 Shortcut key 1 (Preset Modes) 2 Shortcut key 2 (Brightness/Contrast) 3 Shortcut ...) 1 (behind attached base plate) 2 Regulatory rating label 3 Security lock slot 4 Stand release button 5 Barcode serial number label 6 Cable management slot Side View Back View with Monitor Stand Use To mount the monitor. To release the stand from the...
To help secure your monitor. To contact Dell for technical support. To organize cables by placing them through the slot. Front View Label Description 1 Shortcut key 1 (Preset Modes) 2 Shortcut key 2 (Brightness/Contrast) 3 Shortcut ...) 1 (behind attached base plate) 2 Regulatory rating label 3 Security lock slot 4 Stand release button 5 Barcode serial number label 6 Cable management slot Side View Back View with Monitor Stand Use To mount the monitor. To release the stand from the...

User's Guide
Page 8
Physical Characteristics Connector type DVI-D, white connector; HDMI, black connector Signal cable type Digital: Detachable, DVI-D, Solid pins, shipped detached from the monitor High Deinition Multimedia Interface: Detachable, HDMI, 19 pins Dimensions (with stand) Height (Compressed) 14.87 inches (377.7 mm) Height (Extended) 18.41 inches (467.7 mm) ...
Physical Characteristics Connector type DVI-D, white connector; HDMI, black connector Signal cable type Digital: Detachable, DVI-D, Solid pins, shipped detached from the monitor High Deinition Multimedia Interface: Detachable, HDMI, 19 pins Dimensions (with stand) Height (Compressed) 14.87 inches (377.7 mm) Height (Extended) 18.41 inches (467.7 mm) ...

User's Guide
Page 9
... (maximum) 187.79 BTU/hour (typical) Power Management Modes If you have VESA's DPM™ compliance display card or software installed in your computer, the monitor can automatically reduce its power consumption when not in use. If the computer detects input from keyboard, mouse, or other input devices, the computer automatically...
... (maximum) 187.79 BTU/hour (typical) Power Management Modes If you have VESA's DPM™ compliance display card or software installed in your computer, the monitor can automatically reduce its power consumption when not in use. If the computer detects input from keyboard, mouse, or other input devices, the computer automatically...

User's Guide
Page 10
Pin Assignments DVI Connector Pin 24-pin Side of the Connected Signal Cable Number 1 TMDS RX2- 2 TMDS RX2+ 3 TMDS Ground 4 TMDS RX4- 5 TMDS RX4+ 6 DDC Clock 7 DDC Data 8 Floating Activate the computer and the monitor to gain access to the OSD. * Zero power consumption in OFF mode can only be achieved by disconnecting the main cable from the monitor.
Pin Assignments DVI Connector Pin 24-pin Side of the Connected Signal Cable Number 1 TMDS RX2- 2 TMDS RX2+ 3 TMDS Ground 4 TMDS RX4- 5 TMDS RX4+ 6 DDC Clock 7 DDC Data 8 Floating Activate the computer and the monitor to gain access to the OSD. * Zero power consumption in OFF mode can only be achieved by disconnecting the main cable from the monitor.

User's Guide
Page 13
Go to http://support.dell.com, enter your service tag, and download the latest driver for your graphics card, attempt to set the resolution to 1920x1080, contact Dell for information about graphics card that supports these resolutions. Back to Contents Page After installing the drivers for your graphics card. 2. NOTE: If you have an Alienware™ desktop or an Alienware™ portable computer with internet access 1. Back to Contents Page Setting Up Your Monitor Alienware OptX™ AW2310 If you are unable to set the resolution to 1920x1080 again.
Go to http://support.dell.com, enter your service tag, and download the latest driver for your graphics card, attempt to set the resolution to 1920x1080, contact Dell for information about graphics card that supports these resolutions. Back to Contents Page After installing the drivers for your graphics card. 2. NOTE: If you have an Alienware™ desktop or an Alienware™ portable computer with internet access 1. Back to Contents Page Setting Up Your Monitor Alienware OptX™ AW2310 If you are unable to set the resolution to 1920x1080 again.
User's Guide
Page 14
... the desktop and click Personalization. 2. Click Change Display Settings. 3. NVIDIA, ATI, Intel etc.). 5. Click Advanced Settings. 4. Back to Contents Page Setting Up Your Monitor Alienware OptX™ AW2310 If you are unable to set the resolution to 1920x1080, please contact the manufacturer of your computer or consider purchasing a graphics adapter that supports...
... the desktop and click Personalization. 2. Click Change Display Settings. 3. NVIDIA, ATI, Intel etc.). 5. Click Advanced Settings. 4. Back to Contents Page Setting Up Your Monitor Alienware OptX™ AW2310 If you are unable to set the resolution to 1920x1080, please contact the manufacturer of your computer or consider purchasing a graphics adapter that supports...
User's Guide
Page 15
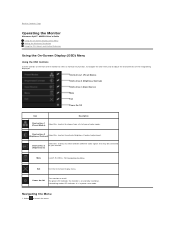
... Exit the On-Screen Display menu. Select to adjust the characteristics of the image being displayed. Back to Contents Page Operating the Monitor Alienware OptX™ AW2310 User's Guide Using the On-Screen Display (OSD) Menu Setting the Maximum Resolution Using the Tilt, Swivel, and Vertical Extension Using... the On-Screen Display (OSD) Menu Using the OSD Controls Use the controls on the front of the monitor to select a shortcut key ...
... Exit the On-Screen Display menu. Select to adjust the characteristics of the image being displayed. Back to Contents Page Operating the Monitor Alienware OptX™ AW2310 User's Guide Using the On-Screen Display (OSD) Menu Setting the Maximum Resolution Using the Tilt, Swivel, and Vertical Extension Using... the On-Screen Display (OSD) Menu Using the OSD Controls Use the controls on the front of the monitor to select a shortcut key ...

User's Guide
Page 16
Select 5. Select 7. See Menu Options for a complete list of all the options available for adjusting the value of the setting. Select to the Sub-menu. 4. Select or to move to move between the setting options. As you move between the setting options. to return to another, the option name is highlighted. 2. Select or , to access the slider bar for the monitor. 3. to adjust the value of the setting. 6. Select or to move from one icon to the sub-menu.
Select 5. Select 7. See Menu Options for a complete list of all the options available for adjusting the value of the setting. Select to the Sub-menu. 4. Select or to move to move between the setting options. As you move between the setting options. to return to another, the option name is highlighted. 2. Select or , to access the slider bar for the monitor. 3. to adjust the value of the setting. 6. Select or to move from one icon to the sub-menu.

User's Guide
Page 18
The Contrast function adjusts the degree of the backlight. Adjust Brightness first, and then adjust Contrast only if further adjustment is necessary. Input Source Use the Input Source menu to select between darkness and lightness on the monitor screen. Brightness Contrast Brightness adjusts the luminance of difference between different video signals that may be connected to your monitor.
The Contrast function adjusts the degree of the backlight. Adjust Brightness first, and then adjust Contrast only if further adjustment is necessary. Input Source Use the Input Source menu to select between darkness and lightness on the monitor screen. Brightness Contrast Brightness adjusts the luminance of difference between different video signals that may be connected to your monitor.
User's Guide
Page 20
... Custom (RGB): Allows you are enjoying video movies on your computer, DVD player, or Game Console is connected to your monitor changes. l YPbPr: Select this mode if your monitor is using the HDMI or DVI cable to connect to the display. For DVD playback, selecting this option if your display.... In the Graphics mode, you can set the color to the following preset values: l Standard: Loads the monitor's default color settings. This is the default preset mode. The screen appears warmer with a blue tint. In the Video mode, you can set...
... Custom (RGB): Allows you are enjoying video movies on your computer, DVD player, or Game Console is connected to your monitor changes. l YPbPr: Select this mode if your monitor is using the HDMI or DVI cable to connect to the display. For DVD playback, selecting this option if your display.... In the Graphics mode, you can set the color to the following preset values: l Standard: Loads the monitor's default color settings. This is the default preset mode. The screen appears warmer with a blue tint. In the Video mode, you can set...

User's Guide
Page 21
... is available only for video input. Decrease the value of the Saturation, increases the monochrome appearance of the video image. Reset Color Settings Resets your monitor's color settings to adjust the desired flesh tone color. Hue This feature can adjust the color saturation of the video image. NOTE: Saturation adjustment is...
... is available only for video input. Decrease the value of the Saturation, increases the monochrome appearance of the video image. Reset Color Settings Resets your monitor's color settings to adjust the desired flesh tone color. Hue This feature can adjust the color saturation of the video image. NOTE: Saturation adjustment is...

User's Guide
Page 23
... Source menu to select between different audio signals that may be connected to the original factory setting. Reset Audio Settings Reset the audio to your monitor.
... Source menu to select between different audio signals that may be connected to the original factory setting. Reset Audio Settings Reset the audio to your monitor.

User's Guide
Page 24
DDC/CI DDC/CI (Display Data Channel/Command Interface) allows your monitor parameters (brightness, color balance, etc.) to turn on your computer. Button Sound This function is used to be adjustable using software on /off the button sound.
DDC/CI DDC/CI (Display Data Channel/Command Interface) allows your monitor parameters (brightness, color balance, etc.) to turn on your computer. Button Sound This function is used to be adjustable using software on /off the button sound.

User's Guide
Page 25
... the Microsoft® Windows® operating systems, set the display resolution to 1920x1080. 4. Click Change Display Settings. 3. Back to Contents Page Setting Up Your Monitor Alienware OptX™ AW2310 Setting the display resolution to 1920x1080(maximum) For maximum display performance with internet access. 2: If you may need to update your graphics driver.
... the Microsoft® Windows® operating systems, set the display resolution to 1920x1080. 4. Click Change Display Settings. 3. Back to Contents Page Setting Up Your Monitor Alienware OptX™ AW2310 Setting the display resolution to 1920x1080(maximum) For maximum display performance with internet access. 2: If you may need to update your graphics driver.
User's Guide
Page 27
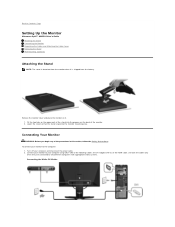
... 2. Use both the cables only when they are connected to the computer: 1. Connecting Your Monitor WARNING: Before you begin any of the monitor. 2. Remove the monitor cover and place the monitor on the back of the procedures in this section, follow the Safety Instructions. To connect your...the factory. Lower the stand so that the stand snap onto the monitor mounting area. Back to Contents Page Setting Up the Monitor Alienware OptX™ AW2310 User's Guide Attaching the Stand Connecting the Monitor Organizing the Cables and Attaching the Cable Cover Removing the Stand Wall Mounting...
... 2. Use both the cables only when they are connected to the computer: 1. Connecting Your Monitor WARNING: Before you begin any of the monitor. 2. Remove the monitor cover and place the monitor on the back of the procedures in this section, follow the Safety Instructions. To connect your...the factory. Lower the stand so that the stand snap onto the monitor mounting area. Back to Contents Page Setting Up the Monitor Alienware OptX™ AW2310 User's Guide Attaching the Stand Connecting the Monitor Organizing the Cables and Attaching the Cable Cover Removing the Stand Wall Mounting...

User's Guide
Page 28
... computer and the other end to the USB upstream port (see Connecting Your Monitor for the purpose of your monitor. Connecting the USB Cable Connect one end of the USB cable that shipped with your monitor to an availble USB port on your computer may vary. Appearance of illustration ...only. Organizing the Cables and Attaching the Cable Cover After attaching all necessary cables to your monitor and computer (see bottom view) on your monitor, and the other end to the audio in connector on your Alienware display to organize all cables as shown below....
... computer and the other end to the USB upstream port (see Connecting Your Monitor for the purpose of your monitor. Connecting the USB Cable Connect one end of the USB cable that shipped with your monitor to an availble USB port on your computer may vary. Appearance of illustration ...only. Organizing the Cables and Attaching the Cable Cover After attaching all necessary cables to your monitor and computer (see bottom view) on your monitor, and the other end to the audio in connector on your Alienware display to organize all cables as shown below....

User's Guide
Page 29
Lift the stand up and away from the monitor . To remove the stand: 1. Wall Mounting (Optional) Attaching the Cable Cover Attach the cable cover to the monitor after making the required cable connections to the monitor. Press and hold the stand release button. 2. Removing the Stand NOTE: To prevent scratches on the LCD screen while removing the stand, ensure that the monitor is placed on a clean surface.
Lift the stand up and away from the monitor . To remove the stand: 1. Wall Mounting (Optional) Attaching the Cable Cover Attach the cable cover to the monitor after making the required cable connections to the monitor. Press and hold the stand release button. 2. Removing the Stand NOTE: To prevent scratches on the LCD screen while removing the stand, ensure that the monitor is placed on a clean surface.


