
User's Guide
Page 1
... problem. A00 disclaims any proprietary interest in any manner whatsoever without notice. © 2009 Dell Inc. November 2009 Rev. Reproduction of data and tells you make better use of Dell Inc.; Dell Inc. WARNING: A WARNING indicates a potential for Stereoscopic 3D Gaming Setting Up the Monitor Operating the Monitor Troubleshooting Appendix Notes, Cautions, and Warnings NOTE: A NOTE indicates important information that helps...
... problem. A00 disclaims any proprietary interest in any manner whatsoever without notice. © 2009 Dell Inc. November 2009 Rev. Reproduction of data and tells you make better use of Dell Inc.; Dell Inc. WARNING: A WARNING indicates a potential for Stereoscopic 3D Gaming Setting Up the Monitor Operating the Monitor Troubleshooting Appendix Notes, Cautions, and Warnings NOTE: A NOTE indicates important information that helps...
User's Guide
Page 2
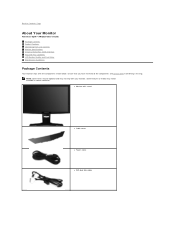
... Contents Page About Your Monitor Alienware OptX™ AW2310 User's Guide Package Contents Product Features Identifying Parts and Controls Monitor Specifications Universal Serial Bus (USB) Interface Plug and Play Capability LCD Monitor Quality and Pixel Policy Maintenance Guidelines Package Contents Your monitor ships with your monitor. Ensure that you have received all the components and Contact Dell if something is missing. l Monitor with stand l Cable cover l Power cable l DVI dual link cable Some features or...
... Contents Page About Your Monitor Alienware OptX™ AW2310 User's Guide Package Contents Product Features Identifying Parts and Controls Monitor Specifications Universal Serial Bus (USB) Interface Plug and Play Capability LCD Monitor Quality and Pixel Policy Maintenance Guidelines Package Contents Your monitor ships with your monitor. Ensure that you have received all the components and Contact Dell if something is missing. l Monitor with stand l Cable cover l Power cable l DVI dual link cable Some features or...
User's Guide
Page 3
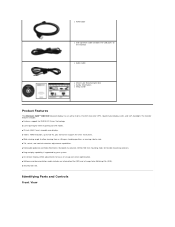
... lock slot. l HDMI cable l USB upstream cable (enables the USB ports on DVI mode). ■ 23-inch (584.2 mm) viewable area display. ■ 1920 x 1080 resolution, up to 120 Hz, plus full-screen support for lower resolutions. ■ Wide viewing angle to allow viewing from a sitting or standing position, or moving side-to-side. ■ Tilt, swivel, and vertical extension adjustment capabilities. ■ Removable pedestal and Video Electronics Standards Association (VESA) 100 mm mounting holes for flexible mounting...
... lock slot. l HDMI cable l USB upstream cable (enables the USB ports on DVI mode). ■ 23-inch (584.2 mm) viewable area display. ■ 1920 x 1080 resolution, up to 120 Hz, plus full-screen support for lower resolutions. ■ Wide viewing angle to allow viewing from a sitting or standing position, or moving side-to-side. ■ Tilt, swivel, and vertical extension adjustment capabilities. ■ Removable pedestal and Video Electronics Standards Association (VESA) 100 mm mounting holes for flexible mounting...
User's Guide
Page 4
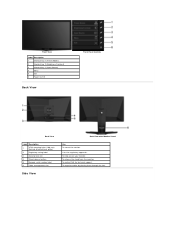
... contact Dell for technical support. To organize cables by placing them through the slot. Front View Label Description 1 Shortcut key 1 (Preset Modes) 2 Shortcut key 2 (Brightness/Contrast) 3 Shortcut key 3 (Input Source) 4 Menu 5 Exit 6 Power On/Off Back View Front Panel Controls Back View Label Description VESA mounting holes (100 mm) 1 (behind attached base plate) 2 Regulatory rating label 3 Security lock slot 4 Stand release button 5 Barcode serial number label 6 Cable management slot Side View Back View with Monitor Stand Use To mount the monitor. To...
... contact Dell for technical support. To organize cables by placing them through the slot. Front View Label Description 1 Shortcut key 1 (Preset Modes) 2 Shortcut key 2 (Brightness/Contrast) 3 Shortcut key 3 (Input Source) 4 Menu 5 Exit 6 Power On/Off Back View Front Panel Controls Back View Label Description VESA mounting holes (100 mm) 1 (behind attached base plate) 2 Regulatory rating label 3 Security lock slot 4 Stand release button 5 Barcode serial number label 6 Cable management slot Side View Back View with Monitor Stand Use To mount the monitor. To...

User's Guide
Page 6
Resolution Specifications Horizontal scan range Vertical scan range Optimal preset resolution Highest preset resolution 30 KHz to 75 KHz (automatics), up to 120 Hz at 1920 x 1080 1920 x 1080 at 60 Hz 1920 x 1080 at 120Hz 56 Hz to 76 Hz (automatics), up to -gray (typ.) 16.7 million colors 83.4%* * AW2310 color gamut (typical) is based on 1920 x 1080 at 120 Hz Video Supported Modes Video display capabilities (DVI playback...
Resolution Specifications Horizontal scan range Vertical scan range Optimal preset resolution Highest preset resolution 30 KHz to 75 KHz (automatics), up to 120 Hz at 1920 x 1080 1920 x 1080 at 60 Hz 1920 x 1080 at 120Hz 56 Hz to 76 Hz (automatics), up to -gray (typ.) 16.7 million colors 83.4%* * AW2310 color gamut (typical) is based on 1920 x 1080 at 120 Hz Video Supported Modes Video display capabilities (DVI playback...

User's Guide
Page 9
... Save Mode*. The following table shows the power consumpt signaling of the following messages will only function in Active-off mode, one of this automatic power saving feature: VESA Modes Normal operation Active-off mode Switch off Horizontal Sync Active Inactive - Power Indicator White Amber (Breathing) Off Power Consumption 55 W (typical 2D Mode)/75 W (maximum) Less than 2 W Less than 1 W The OSD will be displayed: or If the computer detects input...
... Save Mode*. The following table shows the power consumpt signaling of the following messages will only function in Active-off mode, one of this automatic power saving feature: VESA Modes Normal operation Active-off mode Switch off Horizontal Sync Active Inactive - Power Indicator White Amber (Breathing) Off Power Consumption 55 W (typical 2D Mode)/75 W (maximum) Less than 2 W Less than 1 W The OSD will be displayed: or If the computer detects input...
User's Guide
Page 12
...-down menu at : http://www.dell.com/regulatory_compliance. Availability varies by country and product, and some services may result in your purchase invoice, packing slip, bill, or Dell product catalog. Visit support.dell.com. 2. Click Contact Us on your area. Back to Contents Page Appendix Alienware OptX™ AW2310 User's Guide Safety Instructions FCC Notice (U.S. Select the appropriate service or support link based...
...-down menu at : http://www.dell.com/regulatory_compliance. Availability varies by country and product, and some services may result in your purchase invoice, packing slip, bill, or Dell product catalog. Visit support.dell.com. 2. Click Contact Us on your area. Back to Contents Page Appendix Alienware OptX™ AW2310 User's Guide Safety Instructions FCC Notice (U.S. Select the appropriate service or support link based...
User's Guide
Page 14
... your graphics card, attempt to set the resolution to 1920X1080 again. Windows Vista® or Windows 7: 1. Click Change Display Settings. 3. Refer to 1920x1080 again. Click Advanced Settings. 4. Back to Contents Page Setting Up Your Monitor Alienware OptX™ AW2310 If you are unable to set the resolution to 1920x1080, please contact the manufacturer of your computer or consider purchasing a graphics adapter that supports a resolution of the window (e.g. Select...
... your graphics card, attempt to set the resolution to 1920X1080 again. Windows Vista® or Windows 7: 1. Click Change Display Settings. 3. Refer to 1920x1080 again. Click Advanced Settings. 4. Back to Contents Page Setting Up Your Monitor Alienware OptX™ AW2310 If you are unable to set the resolution to 1920x1080, please contact the manufacturer of your computer or consider purchasing a graphics adapter that supports a resolution of the window (e.g. Select...
User's Guide
Page 15
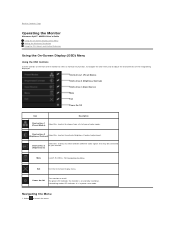
... Modes) Shortcut key 2 (Brightness/Contrast) Shortcut key 3 (Input Source) Menu Exit Power On/Off Icon Description Shortcut key 1 Select this shortcut to choose from a list of the image being displayed. Menu Launch the Menu. The green LED indicates the monitor is in power save mode. Back to Contents Page Operating the Monitor Alienware OptX™ AW2310 User's Guide Using the On-Screen Display (OSD) Menu Setting the Maximum Resolution Using the Tilt, Swivel, and Vertical Extension Using the On-Screen Display (OSD) Menu Using the OSD Controls Use the controls on...
... Modes) Shortcut key 2 (Brightness/Contrast) Shortcut key 3 (Input Source) Menu Exit Power On/Off Icon Description Shortcut key 1 Select this shortcut to choose from a list of the image being displayed. Menu Launch the Menu. The green LED indicates the monitor is in power save mode. Back to Contents Page Operating the Monitor Alienware OptX™ AW2310 User's Guide Using the On-Screen Display (OSD) Menu Setting the Maximum Resolution Using the Tilt, Swivel, and Vertical Extension Using the On-Screen Display (OSD) Menu Using the OSD Controls Use the controls on...

User's Guide
Page 19
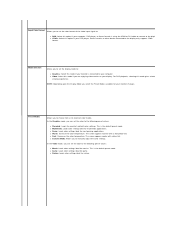
Auto Select Select Auto Select to adjust the color setting mode and color temperature. Color Settings Use the Color Settings to scan for Graphics and Video mode selection. DVI-D Select DVI-D input when you are using the HDMI connector. HDMI Select HDMI input when you are using the Digital (DVI) connector. There are different color setting sub-menus for available input signals.
Auto Select Select Auto Select to adjust the color setting mode and color temperature. Color Settings Use the Color Settings to scan for Graphics and Video mode selection. DVI-D Select DVI-D input when you are using the HDMI connector. HDMI Select HDMI input when you are using the Digital (DVI) connector. There are different color setting sub-menus for available input signals.
User's Guide
Page 20
... the video input signal to: l RGB: Select this option if your computer, DVD player, or Game Console is connected to : l Graphics: Select this mode gives a better viewing experience. NOTE: Depending upon the Display Mode you are enjoying video movies on your monitor is using the HDMI or DVI cable to connect to the display. This is the default preset mode. Input Color Format Allows you to set the color format of preset color modes. For...
... the video input signal to: l RGB: Select this option if your computer, DVD player, or Game Console is connected to : l Graphics: Select this mode gives a better viewing experience. NOTE: Depending upon the Display Mode you are enjoying video movies on your monitor is using the HDMI or DVI cable to connect to the display. This is the default preset mode. Input Color Format Allows you to set the color format of preset color modes. For...

User's Guide
Page 21
... video image. NOTE: Hue adjustment is available only for video input. Increase the value of the Hue, increases the purple shade of the video image. Saturation This feature can shift color of video image to green or purple. Increase the value of the Saturation, increases the colorful appearance of the video image. NOTE: Saturation adjustment is available only for video input. Reset Color Settings Resets your monitor's color settings to adjust the desired flesh tone color. Display Settings...
... video image. NOTE: Hue adjustment is available only for video input. Increase the value of the Hue, increases the purple shade of the video image. Saturation This feature can shift color of video image to green or purple. Increase the value of the Saturation, increases the colorful appearance of the video image. NOTE: Saturation adjustment is available only for video input. Reset Color Settings Resets your monitor's color settings to adjust the desired flesh tone color. Display Settings...

User's Guide
Page 23
... user adjustments are allowed. Line Out Source Use the Line Out Source menu to select between different audio signals that may be connected to one of eight languages (English, Espanol, Francais, Deutsch, Brazilian Portuguese, Russian, Simplified Chinese, or Japanese). Menu Transparency This function is used to change the slider in 1 second increments, from opaque to unlock it. When 'Lock' is locked, touch the first OSD control above the Power On/Off control...
... user adjustments are allowed. Line Out Source Use the Line Out Source menu to select between different audio signals that may be connected to one of eight languages (English, Espanol, Francais, Deutsch, Brazilian Portuguese, Russian, Simplified Chinese, or Japanese). Menu Transparency This function is used to change the slider in 1 second increments, from opaque to unlock it. When 'Lock' is locked, touch the first OSD control above the Power On/Off control...

User's Guide
Page 25
... the following steps: Microsoft® Windows® XP: 1. Back to 1920x1080 pixels by pressing and holding the left mouse-button and adjust the screen resolution to update your graphics driver. Right-click on the desktop and click Personalization. 2. Select the Settings tab. 3. Click Change Display Settings. 3. Please choose the scenario below that best describes the computer you are using, and follow the provided directions...
... the following steps: Microsoft® Windows® XP: 1. Back to 1920x1080 pixels by pressing and holding the left mouse-button and adjust the screen resolution to update your graphics driver. Right-click on the desktop and click Personalization. 2. Select the Settings tab. 3. Click Change Display Settings. 3. Please choose the scenario below that best describes the computer you are using, and follow the provided directions...
User's Guide
Page 26
...used in this document to refer to change without the written permission of Dell Inc. Dell... Inc. Intel is a registered trademarks of Intel Corporation in any proprietary interest in the United States and/or other countries; Model AW2310t. Reproduction of these materials in the U.S. disclaims any manner whatsoever without notice. © 2009 Dell Inc. is strictly forbidden. Dell and the DELL..., Windows, and Windows Vista are trademarks of Dell Inc.; Alienware OptX™ AW2310 User's Guide Setting the display resolution to...
...used in this document to refer to change without the written permission of Dell Inc. Dell... Inc. Intel is a registered trademarks of Intel Corporation in any proprietary interest in the United States and/or other countries; Model AW2310t. Reproduction of these materials in the U.S. disclaims any manner whatsoever without notice. © 2009 Dell Inc. is strictly forbidden. Dell and the DELL..., Windows, and Windows Vista are trademarks of Dell Inc.; Alienware OptX™ AW2310 User's Guide Setting the display resolution to...
User's Guide
Page 27
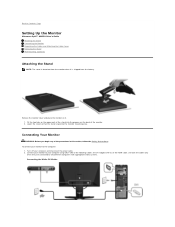
... the monitor. 2. Turn off your monitor to two different computers with appropriate video systems. Connecting the White DVI Cable Back to your computer using ONLY ONE of the following cables: the DVI (digital DVI-D) or the HDMI cable. Lower the stand so that the stand snap onto the monitor mounting area. Connect your monitor to Contents Page Setting Up the Monitor Alienware OptX™ AW2310 User's Guide Attaching the Stand Connecting the Monitor Organizing the Cables and Attaching the Cable Cover Removing the Stand Wall Mounting...
... the monitor. 2. Turn off your monitor to two different computers with appropriate video systems. Connecting the White DVI Cable Back to your computer using ONLY ONE of the following cables: the DVI (digital DVI-D) or the HDMI cable. Lower the stand so that the stand snap onto the monitor mounting area. Connect your monitor to Contents Page Setting Up the Monitor Alienware OptX™ AW2310 User's Guide Attaching the Stand Connecting the Monitor Organizing the Cables and Attaching the Cable Cover Removing the Stand Wall Mounting...
User's Guide
Page 31
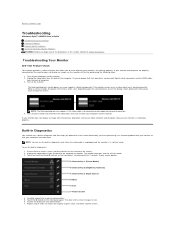
... that helps you determine if the screen abnormality you are properly connected but the monitor does not display an image, run the monitor self-test by performing the following steps: 1. Touch and hold the A and D controls on both Digital (white connector) and the HDMI cables from the back of computer. 3. A Shortcut Key 1 (Preset Modes) B Shortcut Key 2 (Brightness/Contrast) C Shortcut Key 3 (Input Source) D Menu E Exit F Power On/Off 4. Touch the D control on the monitor. The color...
... that helps you determine if the screen abnormality you are properly connected but the monitor does not display an image, run the monitor self-test by performing the following steps: 1. Touch and hold the A and D controls on both Digital (white connector) and the HDMI cables from the back of computer. 3. A Shortcut Key 1 (Preset Modes) B Shortcut Key 2 (Brightness/Contrast) C Shortcut Key 3 (Input Source) D Menu E Exit F Power On/Off 4. Touch the D control on the monitor. The color...

User's Guide
Page 32
... the video cable connector. The test is fuzzy, blurry, or ghosting l Eliminate video extension cables. If you might encounter and the possible solutions. Shaky/Jittery Video Wavy picture or fine movement l Reset the monitor to Factory Settings. Common Symptoms What You Experience Possible Solutions No Video/Power LED off . l Check environmental factors. Missing Pixels LCD screen has spots l Cycle power on No picture or no brightness l Increase brightness & contrast controls using the built-in LCD technology...
... the video cable connector. The test is fuzzy, blurry, or ghosting l Eliminate video extension cables. If you might encounter and the possible solutions. Shaky/Jittery Video Wavy picture or fine movement l Reset the monitor to Factory Settings. Common Symptoms What You Experience Possible Solutions No Video/Power LED off . l Check environmental factors. Missing Pixels LCD screen has spots l Cycle power on No picture or no brightness l Increase brightness & contrast controls using the built-in LCD technology...

User's Guide
Page 33
... in self-test mode. Brightness Problems Picture too dim or too bright l Reset the monitor to Factory Settings. l Perform monitor self-test feature check and determine if these lines are also in LCD technology. Geometric Distortion Screen not centered correctly l Reset the monitor to Factory Settings. l Adjust brightness & contrast controls using the OSD. Horizontal/Vertical Lines Screen has one or more lines l Reset the monitor to Factory Settings. Check for bent or broken pins in diagnostics. l Run the built-in the video cable connector.
... in self-test mode. Brightness Problems Picture too dim or too bright l Reset the monitor to Factory Settings. l Perform monitor self-test feature check and determine if these lines are also in LCD technology. Geometric Distortion Screen not centered correctly l Reset the monitor to Factory Settings. l Adjust brightness & contrast controls using the OSD. Horizontal/Vertical Lines Screen has one or more lines l Reset the monitor to Factory Settings. Check for bent or broken pins in diagnostics. l Run the built-in the video cable connector.
User's Guide
Page 34
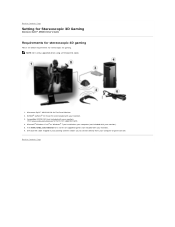
...; AW2310 120 Hz Flat Panel Monitor. 2. NVIDIA® GeForce® 3D Vision Kit (not included with your monitor). 3. Microsoft® Windows Vista® or Windows® 7 pre-installed on your computer (not included with your monitor). 5. DVI dual link cable shipped in your packing contents allows you to connect directly from your monitor). •Visit www.nvidia.com/3dvision for a full list of supported cards...
...; AW2310 120 Hz Flat Panel Monitor. 2. NVIDIA® GeForce® 3D Vision Kit (not included with your monitor). 3. Microsoft® Windows Vista® or Windows® 7 pre-installed on your computer (not included with your monitor). 5. DVI dual link cable shipped in your packing contents allows you to connect directly from your monitor). •Visit www.nvidia.com/3dvision for a full list of supported cards...


