User Guide
Page 17
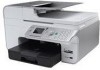
... time between those attempts if the fax cannot be sent on the first try. If you are applicable to set on the printer. Click ® Programs. b. For Windows Vista: a. Select Dell Fax Setup Utility. The Dell Fax Setup Utility Wizard Query dialog box opens. 3. Set the ring volume. Enter a dial prefix.... 1. For more information, see Fax Setup Menu. For Windows XP and Windows 2000: Click Start® Programs or All Programs® Dell Printers® Dell 968 AIO Printer. 2. Choose whether to scan the entire document before the machine receives the incoming fax.
... time between those attempts if the fax cannot be sent on the first try. If you are applicable to set on the printer. Click ® Programs. b. For Windows Vista: a. Select Dell Fax Setup Utility. The Dell Fax Setup Utility Wizard Query dialog box opens. 3. Set the ring volume. Enter a dial prefix.... 1. For more information, see Fax Setup Menu. For Windows XP and Windows 2000: Click Start® Programs or All Programs® Dell Printers® Dell 968 AIO Printer. 2. Choose whether to scan the entire document before the machine receives the incoming fax.

User Guide
Page 54
... the color of your sent fax. Speed Dial Number The lowest available speed dial number is turned off . Use the keypad to specify the time when you would like to turn Auto Answer off , incoming faxes must be applicable to enter the Name Search menu. They will only be... information, see Name Search Menu. When Auto Answer is assigned to send a cover page with your subsequent faxes. Black & White* Color Quality Specify the scan quality of your fax. When Auto Answer is automatically assigned. Name Search Press the Select button to the fax job that you are sending...
... the color of your sent fax. Speed Dial Number The lowest available speed dial number is turned off . Use the keypad to specify the time when you would like to turn Auto Answer off , incoming faxes must be applicable to enter the Name Search menu. They will only be... information, see Name Search Menu. When Auto Answer is assigned to send a cover page with your subsequent faxes. Black & White* Color Quality Specify the scan quality of your fax. When Auto Answer is automatically assigned. Name Search Press the Select button to the fax job that you are sending...

User Guide
Page 127
...Insert Paper Tray, then press printing. again. Make sure your computer has the necessary applications to print the selected file. The printer could not scan the proof sheet. Proof Sheet Error More than one selection was Reprint the proof sheet, and then try again. Turn the camera off .... The computer failed to find an application to retrieve the File from the Mass Storage ...
...Insert Paper Tray, then press printing. again. Make sure your computer has the necessary applications to print the selected file. The printer could not scan the proof sheet. Proof Sheet Error More than one selection was Reprint the proof sheet, and then try again. Turn the camera off .... The computer failed to find an application to retrieve the File from the Mass Storage ...

User Guide
Page 135
... 2000: Click Start® Programs or All Programs® Dell Printers® Dell 968 AIO Printer. 2. The Dell All-In-One Center opens. 3. The Advanced Scan Settings dialog box opens. 4. to choose another application if scanning to Scan, and then press 2. The Dell All-In-One Center opens. 3. Select Dell All-In-One Center. From Scan To, press the left or right Arrow button Using...
... 2000: Click Start® Programs or All Programs® Dell Printers® Dell 968 AIO Printer. 2. The Dell All-In-One Center opens. 3. The Advanced Scan Settings dialog box opens. 4. to choose another application if scanning to Scan, and then press 2. The Dell All-In-One Center opens. 3. Select Dell All-In-One Center. From Scan To, press the left or right Arrow button Using...
User Guide
Page 136
...application. Make sure your computer is connected to your program to Dialing and Sending, and then press the 4. From the main menu, press the up or down Arrow button to scroll to Scan... . The Dell All-In-One Center opens. 3. Press the up modem when trying to fax using your phone cord. Click Dell 968 AIO Printer. From the Send scanned images to...scan the original documents after dialing. 1. For more information. c. Gently wipe the scanner glass, as well as the thin strip of glass beside it is turned on your computer modem. When sending color pages, set the printer...
...application. Make sure your computer is connected to your program to Dialing and Sending, and then press the 4. From the main menu, press the up or down Arrow button to scroll to Scan... . The Dell All-In-One Center opens. 3. Press the up modem when trying to fax using your phone cord. Click Dell 968 AIO Printer. From the Send scanned images to...scan the original documents after dialing. 1. For more information. c. Gently wipe the scanner glass, as well as the thin strip of glass beside it is turned on your computer modem. When sending color pages, set the printer...
User Guide
Page 160
...application. c. In Windows XP and Windows 2000: Click Start® Programs or All Programs® Dell Printers® Dell 968 AIO Printer. 4. From the Send scanned image to use is complete, click No. Click OK. 10. dialog box appears. 11. Turn on your computer and printer.... Load your scan. 7. Scanning Multiple-Page Documents NOTE: Some programs do not support multiple-page scanning. 1. The Dell All-In-One Center opens. 5. Click Dell Printers. On the Scan tab, select the Scan multiple items before output check box. 9. Click Dell 968 AIO Printer. Place the ...
...application. c. In Windows XP and Windows 2000: Click Start® Programs or All Programs® Dell Printers® Dell 968 AIO Printer. 4. From the Send scanned image to use is complete, click No. Click OK. 10. dialog box appears. 11. Turn on your computer and printer.... Load your scan. 7. Scanning Multiple-Page Documents NOTE: Some programs do not support multiple-page scanning. 1. The Dell All-In-One Center opens. 5. Click Dell Printers. On the Scan tab, select the Scan multiple items before output check box. 9. Click Dell 968 AIO Printer. Place the ...

User Guide
Page 161
... XP and Windows 2000: Click Start® Programs or All Programs® Dell Printers® Dell 968 AIO Printer. 4. The printer scans all scanned pages is not listed, select Search for more in the selected application. Click See More Scan Settings to the list. 6. NOTE: Dell™ printers can only be attached to use is created in the drop-down menu...
... XP and Windows 2000: Click Start® Programs or All Programs® Dell Printers® Dell 968 AIO Printer. 4. The printer scans all scanned pages is not listed, select Search for more in the selected application. Click See More Scan Settings to the list. 6. NOTE: Dell™ printers can only be attached to use is created in the drop-down menu...
User Guide
Page 162
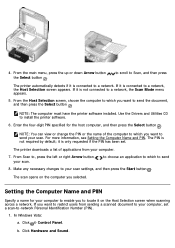
NOTE: The computer must have the printer software installed. NOTE: You can view or change the PIN or the name of applications from sending a scanned document to your scan. For more information, see Setting the Computer Name and PIN. From Scan to send your computer, set . If it is connected to...PIN is only requested if the PIN has been set a scan-to install the printer software. 6. Setting the Computer Name and PIN Specify a name for the host computer, and then press the Select button . to choose an application to which you want to send the document, and then press...
NOTE: The computer must have the printer software installed. NOTE: You can view or change the PIN or the name of applications from sending a scanned document to your scan. For more information, see Setting the Computer Name and PIN. From Scan to send your computer, set . If it is connected to...PIN is only requested if the PIN has been set a scan-to install the printer software. 6. Setting the Computer Name and PIN Specify a name for the host computer, and then press the Select button . to choose an application to which you want to send the document, and then press...

User Guide
Page 166
... attached document, and then send it is not required by default; NOTE: Dell printers can view or change the PIN or the name of applications from your scan. Make any necessary changes to your computer and printer are both attached to accompany the attached document, and then send it. Click... installed. From the Productivity Tools section, click E-mail an image or document. 6. Resizing Images or Documents 1. The Dell All-In-One Center opens. 5. From the printer operator panel, press the up or down Arrow button then press the Select button . From the Host Selection screen, choose ...
... attached document, and then send it is not required by default; NOTE: Dell printers can view or change the PIN or the name of applications from your scan. Make any necessary changes to your computer and printer are both attached to accompany the attached document, and then send it. Click... installed. From the Productivity Tools section, click E-mail an image or document. 6. Resizing Images or Documents 1. The Dell All-In-One Center opens. 5. From the printer operator panel, press the up or down Arrow button then press the Select button . From the Host Selection screen, choose ...

User Guide
Page 170
Click OK. 8. Reduce the background noise on your blurry images. Sharpen your color document. 7. Adjust the brightness of your image. Adjust the color correction curve (gamma) of your image. Smooth the conversion of applications to send scans to a black-and-white dot pattern. Remove image patterns from magazines or newspapers (descreen). Straighten images after scan (deskew). Image Enhancements Image Patterns Update the list of a gray image to . After customizing your settings, click Scan Now. Update the default fax driver.
Click OK. 8. Reduce the background noise on your blurry images. Sharpen your color document. 7. Adjust the brightness of your image. Adjust the color correction curve (gamma) of your image. Smooth the conversion of applications to send scans to a black-and-white dot pattern. Remove image patterns from magazines or newspapers (descreen). Straighten images after scan (deskew). Image Enhancements Image Patterns Update the list of a gray image to . After customizing your settings, click Scan Now. Update the default fax driver.


