User Guide
Page 1
... States and/or other countries. Other trademarks and trade names may be used in trademarks and trade names other countries. Dell™ 968 All-In-One Printer User's Guide To order ink or supplies from Dell: 1. CAUTION: A CAUTION indicates a potential for property damage, personal injury, or death. and is a registered trademark of your desktop...
... States and/or other countries. Other trademarks and trade names may be used in trademarks and trade names other countries. Dell™ 968 All-In-One Printer User's Guide To order ink or supplies from Dell: 1. CAUTION: A CAUTION indicates a potential for property damage, personal injury, or death. and is a registered trademark of your desktop...

User Guide
Page 3
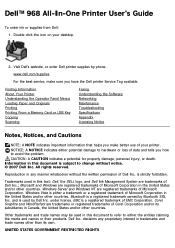
...) driver is located in a zipped file on the CD. Finding Information What are you purchased your Dell computer and printer at the same time, documentation and drivers for your printer are already installed on your computer. For more information, see Installing the Optional XPS Driver. The driver...™ users to set up my Setting Up Your Printer poster printer Safety information Owner's Manual How to access the improved graphics and color features of XPS. How to set up and use the CD to your printer or advanced technical reference material for experienced users or technicians...
...) driver is located in a zipped file on the CD. Finding Information What are you purchased your Dell computer and printer at the same time, documentation and drivers for your printer are already installed on your computer. For more information, see Installing the Optional XPS Driver. The driver...™ users to set up my Setting Up Your Printer poster printer Safety information Owner's Manual How to access the improved graphics and color features of XPS. How to set up and use the CD to your printer or advanced technical reference material for experienced users or technicians...
User Guide
Page 4
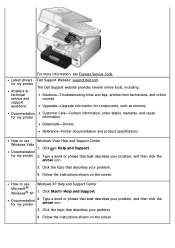
... arrow icon. 3. Click Start® Help and Support. Click the topic that best describes your problem. 4. Documentation for my printer 2. Follow the instructions shown on the screen. Type a word or phrase that describes your problem, and then click the arrow ... Website: support.dell.com The Dell Support website provides several online tools, including: Solutions-Troubleshooting hints and tips, articles from technicians, and online courses Upgrades-Upgrade information for components, such as memory Documentation for my printer Answers to technical service and support questions...
... arrow icon. 3. Click Start® Help and Support. Click the topic that best describes your problem. 4. Documentation for my printer 2. Follow the instructions shown on the screen. Type a word or phrase that describes your problem, and then click the arrow ... Website: support.dell.com The Dell Support website provides several online tools, including: Solutions-Troubleshooting hints and tips, articles from technicians, and online courses Upgrades-Upgrade information for components, such as memory Documentation for my printer Answers to technical service and support questions...
User Guide
Page 5
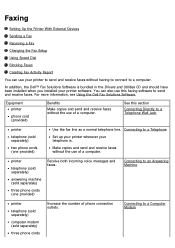
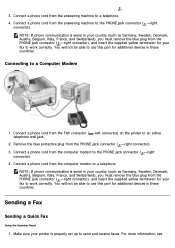
...use of a computer. Connecting to an Answering Machine printer telephone (sold separately) computer modem (sold separately) two phone cords (one provided) Receive both incoming voice messages and faxes. For more information, see Using the Dell Fax Solutions Software. Make copies and send and receive... faxes without the use of phone connection outlets. printer telephone (sold separately) answering machine (sold separately) three phone cords (one provided) Use the fax line as a normal...
...use of a computer. Connecting to an Answering Machine printer telephone (sold separately) computer modem (sold separately) two phone cords (one provided) Receive both incoming voice messages and faxes. For more information, see Using the Dell Fax Solutions Software. Make copies and send and receive... faxes without the use of phone connection outlets. printer telephone (sold separately) answering machine (sold separately) three phone cords (one provided) Use the fax line as a normal...
User Guide
Page 6
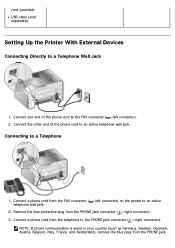
..., Italy, France, and Switzerland), remove the blue plug from the PHONE jack connector ( -right connector). 3. Connect one provided) USB cable (sold separately) Setting Up the Printer With External Devices Connecting Directly to a Telephone Wall Jack 1. Remove the blue protective plug from the PHONE jack Connect ...the telephone to a Telephone 1. Connect the other end of the phone cord to the FAX connector ( -left connector) on the printer to an active telephone wall jack. Connect a phone cord from the FAX connector ( -left connector). 2. Connecting to the PHONE jack connector ...
..., Italy, France, and Switzerland), remove the blue plug from the PHONE jack connector ( -right connector). 3. Connect one provided) USB cable (sold separately) Setting Up the Printer With External Devices Connecting Directly to a Telephone Wall Jack 1. Remove the blue protective plug from the PHONE jack Connect ...the telephone to a Telephone 1. Connect the other end of the phone cord to the FAX connector ( -left connector) on the printer to an active telephone wall jack. Connect a phone cord from the FAX connector ( -left connector). 2. Connecting to the PHONE jack connector ...
User Guide
Page 7
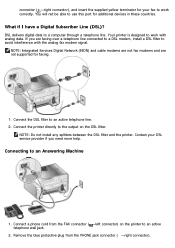
...). Contact your fax to work with the analog fax modem signal. NOTE: Do not install any splitters between the DSL filter and the printer. You will not be able to an active telephone wall jack. 2. If you need more help. DSL delivers digital data to avoid ...a telephone line. Connecting to work correctly. Remove the blue protective plug from the FAX connector ( -left connector) on the DSL filter. Your printer is designed to an Answering Machine 1. connector ( -right connector), and insert the supplied yellow terminator for your DSL service provider if you are not...
...). Contact your fax to work with the analog fax modem signal. NOTE: Do not install any splitters between the DSL filter and the printer. You will not be able to an active telephone wall jack. 2. If you need more help. DSL delivers digital data to avoid ...a telephone line. Connecting to work correctly. Remove the blue protective plug from the FAX connector ( -left connector) on the DSL filter. Your printer is designed to an Answering Machine 1. connector ( -right connector), and insert the supplied yellow terminator for your DSL service provider if you are not...
User Guide
Page 8
...Sending a Fax Sending a Quick Fax Using the Operator Panel 1. Connect a phone cord from the FAX connector ( -left connector) on the printer to use this port for your country (such as Germany, Sweden, Denmark, Austria, Belgium, Italy, France, and Switzerland), you must remove the... phone cord from the answering machine to a telephone. Remove the blue protective plug from the computer modem to a telephone. 4. Make sure your printer is serial in your fax to work correctly. Connect a phone cord from the PHONE jack connector ( -right connector). 3. NOTE: If phone communication...
...Sending a Fax Sending a Quick Fax Using the Operator Panel 1. Connect a phone cord from the FAX connector ( -left connector) on the printer to use this port for your country (such as Germany, Sweden, Denmark, Austria, Belgium, Italy, France, and Switzerland), you must remove the... phone cord from the answering machine to a telephone. Remove the blue protective plug from the computer modem to a telephone. 4. Make sure your printer is serial in your fax to work correctly. Connect a phone cord from the PHONE jack connector ( -right connector). 3. NOTE: If phone communication...
User Guide
Page 9
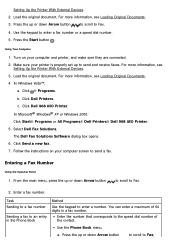
...computer screen to enter a number. Make sure your computer and printer, and make sure they are connected. 2. For more information, see Loading Original Documents. 4. In Windows Vista™: a. Click Dell 968 AIO Printer. In Microsoft® Windows® XP or Windows 2000:... Click Start® Programs or All Programs® Dell Printers® Dell 968 AIO Printer. 5. Select Dell Fax Solutions. Click Send a new fax. 7. Enter the...
...computer screen to enter a number. Make sure your computer and printer, and make sure they are connected. 2. For more information, see Loading Original Documents. 4. In Windows Vista™: a. Click Dell 968 AIO Printer. In Microsoft® Windows® XP or Windows 2000:... Click Start® Programs or All Programs® Dell Printers® Dell 968 AIO Printer. 5. Select Dell Fax Solutions. Click Send a new fax. 7. Enter the...
User Guide
Page 10
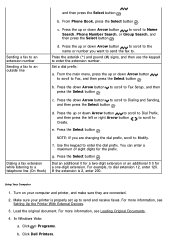
... example, to Dialing and Sending, and then press the Select button . For more information, see Setting Up the Printer With External Devices. 3. Load the original document. From Phone Book, press the Select button . Press the asterisk... (*) and pound (#) signs, and then use the keypad to an outside line d. Click Dell Printers. and then press the Select button . Dial an additional 0 for a two-digit extension or an additional 0 0 ...Click ® Programs. b. You can enter a maximum of eight digits for a one-digit extension. Press the Select button .
... example, to Dialing and Sending, and then press the Select button . For more information, see Setting Up the Printer With External Devices. 3. Load the original document. From Phone Book, press the Select button . Press the asterisk... (*) and pound (#) signs, and then use the keypad to an outside line d. Click Dell Printers. and then press the Select button . Dial an additional 0 for a two-digit extension or an additional 0 0 ...Click ® Programs. b. You can enter a maximum of eight digits for a one-digit extension. Press the Select button .
User Guide
Page 11
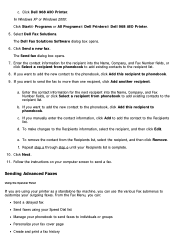
... on your Recipients list is complete. 10. In Windows XP or Windows 2000: Click Start® Programs or All Programs® Dell Printers® Dell 968 AIO Printer. 5. Enter the contact information for the next recipient into the Name, Company, and Fax Number fields, or click Select a recipient...Dell Fax Solutions Software dialog box opens. 6. d. If you manually enter the contact information, click Add to add the contact to send a fax. f. b. If you want to send the fax to phonebook. 9. If you want to add the new contact to the phonebook, click Add this recipient to more than one...
... on your Recipients list is complete. 10. In Windows XP or Windows 2000: Click Start® Programs or All Programs® Dell Printers® Dell 968 AIO Printer. 5. Enter the contact information for the next recipient into the Name, Company, and Fax Number fields, or click Select a recipient...Dell Fax Solutions Software dialog box opens. 6. d. If you manually enter the contact information, click Add to add the contact to send a fax. f. b. If you want to send the fax to phonebook. 9. If you want to add the new contact to the phonebook, click Add this recipient to more than one...
User Guide
Page 12
... and then press Follow the instructions on the scanner glass. For more information, see Setting Up the Printer With External Devices. 2. Click Dell Fax Solutions. After answering the questions by pressing the appropriate buttons, you eventually get connected to take ... more information, see Loading Original Documents. 3. In Windows Vista: a. Click Dell Printers. c. In Windows XP and Windows 2000: Click Start® Programs or All Programs® Dell Printers® Dell 968 AIO Printer. 2. The Dell Fax Solutions Software dialog box opens. 3. Create and print a fax report...
... and then press Follow the instructions on the scanner glass. For more information, see Setting Up the Printer With External Devices. 2. Click Dell Fax Solutions. After answering the questions by pressing the appropriate buttons, you eventually get connected to take ... more information, see Loading Original Documents. 3. In Windows Vista: a. Click Dell Printers. c. In Windows XP and Windows 2000: Click Start® Programs or All Programs® Dell Printers® Dell 968 AIO Printer. 2. The Dell Fax Solutions Software dialog box opens. 3. Create and print a fax report...
User Guide
Page 13
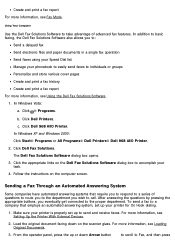
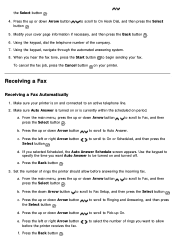
... the automated answering system. 8. Receiving a Fax Receiving a Fax Automatically 1. Press the up or down Arrow button to scroll to allow before the printer receives the fax. c. to scroll to Fax, and then b. Press the Back button . 3. From the main menu, press the up or down...Fax Setup, and then press the Select button . f. the Select button . 4. a. Set the number of the company. 7. Make sure your printer is currently within the scheduled on your cover page information if necessary, and then press the Back button . 6. Use the keypad to specify the ...
... the automated answering system. 8. Receiving a Fax Receiving a Fax Automatically 1. Press the up or down Arrow button to scroll to allow before the printer receives the fax. c. to scroll to Fax, and then b. Press the Back button . 3. From the main menu, press the up or down...Fax Setup, and then press the Select button . f. the Select button . 4. a. Set the number of the company. 7. Make sure your printer is currently within the scheduled on your cover page information if necessary, and then press the Back button . 6. Use the keypad to specify the ...
User Guide
Page 14
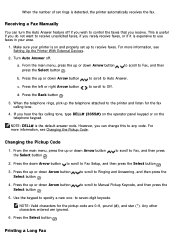
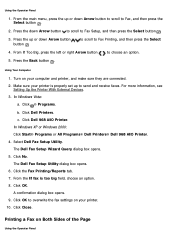
to scroll to specify a new one- d. Press the Back button . 3. Changing the Pickup Code 1. Press the ... Receiving a Fax Manually You can turn the Auto Answer feature off . For more information, see Setting Up the Printer With External Devices. 2. Press the up or down Arrow button the Select button . However, you receive. to ...the left or right Arrow button to scroll to seven-digit keycode. NOTE: DELL# is expensive to use faxes in your printer is detected, the printer automatically receives the fax. Turn Auto Answer off if you wish to control the...
to scroll to specify a new one- d. Press the Back button . 3. Changing the Pickup Code 1. Press the ... Receiving a Fax Manually You can turn the Auto Answer feature off . For more information, see Setting Up the Printer With External Devices. 2. Press the up or down Arrow button the Select button . However, you receive. to ...the left or right Arrow button to scroll to seven-digit keycode. NOTE: DELL# is expensive to use faxes in your printer is detected, the printer automatically receives the fax. Turn Auto Answer off if you wish to control the...
User Guide
Page 15
...faxes. A confirmation dialog box opens. 9. Click Close. For more information, see Setting Up the Printer With External Devices. 3. c. Click Dell 968 AIO Printer. Printing a Fax on your computer and printer, and make sure they are connected. 2. Press the up or down Arrow button to scroll to... Windows Vista: a. In Windows XP or Windows 2000: Click Start® Programs or All Programs® Dell Printers® Dell 968 AIO Printer. 4. Click No. Click OK. Using the Operator Panel 1. The Dell Fax Setup Wizard Query dialog box opens. 5. Click OK to Fax Setup, and then press the Select...
...faxes. A confirmation dialog box opens. 9. Click Close. For more information, see Setting Up the Printer With External Devices. 3. c. Click Dell 968 AIO Printer. Printing a Fax on your computer and printer, and make sure they are connected. 2. Press the up or down Arrow button to scroll to... Windows Vista: a. In Windows XP or Windows 2000: Click Start® Programs or All Programs® Dell Printers® Dell 968 AIO Printer. 4. Click No. Click OK. Using the Operator Panel 1. The Dell Fax Setup Wizard Query dialog box opens. 5. Click OK to Fax Setup, and then press the Select...

User Guide
Page 16
...duplex. 8. Click OK. Click OK to Fax Setup, and then press the Select button . 3. Click ® Programs. b. c. Click Dell 968 AIO Printer. The Dell Fax Setup Wizard Query dialog box opens. 5. Click No. Press the up or down Arrow button to scroll to overwrite the fax settings on... your printer. 10. Press the Back button . Select Dell Fax Setup Utility. In Windows XP or Windows 2000: Click Start® Programs or All Programs® Dell Printers® Dell 968 AIO Printer. 4. From the 2-Sided Print menu item, press the...
...duplex. 8. Click OK. Click OK to Fax Setup, and then press the Select button . 3. Click ® Programs. b. c. Click Dell 968 AIO Printer. The Dell Fax Setup Wizard Query dialog box opens. 5. Click No. Press the up or down Arrow button to scroll to overwrite the fax settings on... your printer. 10. Press the Back button . Select Dell Fax Setup Utility. In Windows XP or Windows 2000: Click Start® Programs or All Programs® Dell Printers® Dell 968 AIO Printer. 4. From the 2-Sided Print menu item, press the...
User Guide
Page 17
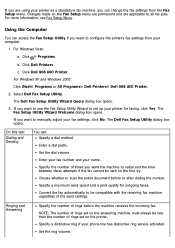
...settings. For Windows XP and Windows 2000: Click Start® Programs or All Programs® Dell Printers® Dell 968 AIO Printer. 2. The Dell Fax Setup Utility Wizard Query dialog box opens. 3. The Dell Fax Setup Utility dialog box opens. Set the dial volume. Specify a maximum send speed ...Enter a dial prefix. Set the ring volume. If you are applicable to configure the printer's fax settings from the Fax Setup menu. Changes made on the printer. For Windows Vista: a. Click Dell Printers. If you want to all fax jobs. Specify a distinctive ring if your name.
...settings. For Windows XP and Windows 2000: Click Start® Programs or All Programs® Dell Printers® Dell 968 AIO Printer. 2. The Dell Fax Setup Utility Wizard Query dialog box opens. 3. The Dell Fax Setup Utility dialog box opens. Set the dial volume. Specify a maximum send speed ...Enter a dial prefix. Set the ring volume. If you are applicable to configure the printer's fax settings from the Fax Setup menu. Changes made on the printer. For Windows Vista: a. Click Dell Printers. If you want to all fax jobs. Specify a distinctive ring if your name.
User Guide
Page 18
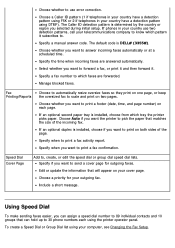
...two pages. Fax Printing/Reports Choose to automatically resize oversize faxes so they print on one page, or keep the oversized fax to which faxes are answered automatically. Specify when ...and 10 groups that can hold up to print a fax confirmation. If an optional duplex is DELL# (3355#). Edit or update the information that matches the size of the page. Specify a manual... a detection pattern using FSK or 2 if telephones in your telecommunications company to know which tray the printer picks paper. Speed Dial Cover Page Add to . If phones in your computer, see Changing the ...
...two pages. Fax Printing/Reports Choose to automatically resize oversize faxes so they print on one page, or keep the oversized fax to which faxes are answered automatically. Specify when ...and 10 groups that can hold up to print a fax confirmation. If an optional duplex is DELL# (3355#). Edit or update the information that matches the size of the page. Specify a manual... a detection pattern using FSK or 2 if telephones in your telecommunications company to know which tray the printer picks paper. Speed Dial Cover Page Add to . If phones in your computer, see Changing the ...
User Guide
Page 19
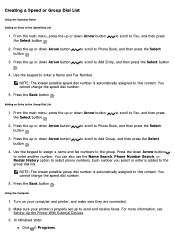
...Dial List 1. Adding an Entry to Phone Book, and then press the Select 3. Using the Computer 1. For more information, see Setting Up the Printer With External Devices. 3. to scroll to send and receive faxes. Press the up or down Arrow button button . Press the up or down Arrow... Number. Press the down Arrow button button . Each number you select or enter is automatically assigned to select phone numbers. Turn on your printer is automatically assigned to Phone Book, and then press the Select 3. NOTE: The lowest possible speed dial number is properly set up to ...
...Dial List 1. Adding an Entry to Phone Book, and then press the Select 3. Using the Computer 1. For more information, see Setting Up the Printer With External Devices. 3. to scroll to send and receive faxes. Press the up or down Arrow button button . Press the up or down Arrow... Number. Press the down Arrow button button . Each number you select or enter is automatically assigned to select phone numbers. Turn on your printer is automatically assigned to Phone Book, and then press the Select 3. NOTE: The lowest possible speed dial number is properly set up to ...
User Guide
Page 20
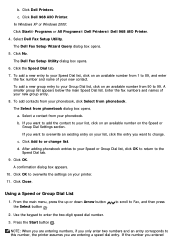
... Speed or Group Dial List 1. Press the Start button . In Windows XP or Windows 2000: Click Start® Programs or All Programs® Dell Printers® Dell 968 AIO Printer. 4. To add a new entry to your Speed Dial list, click on an available number from your phonebook. To add contacts from 1 to ... to 89, and enter the fax number and name of your new contact. NOTE: When you are entering a speed dial entry. Click Dell 968 AIO Printer. Select a contact from your phonebook, click Select from phonebook dialog box opens. Click OK. Enter the fax numbers and names of your ...
... Speed or Group Dial List 1. Press the Start button . In Windows XP or Windows 2000: Click Start® Programs or All Programs® Dell Printers® Dell 968 AIO Printer. 4. To add a new entry to your Speed Dial list, click on an available number from your phonebook. To add contacts from 1 to ... to 89, and enter the fax number and name of your new contact. NOTE: When you are entering a speed dial entry. Click Dell 968 AIO Printer. Select a contact from your phonebook, click Select from phonebook dialog box opens. Click OK. Enter the fax numbers and names of your ...

User Guide
Page 21
... Start® Programs or All Programs® Dell Printers® Dell 968 AIO Printer. 4. Click Dell Printers. The Dell Fax Setup Utility dialog box opens. 6. Make sure your computer and printer, and make sure they are entering an extension number. Select Dell Fax Setup Utility. c. In Windows Vista: a. Turn on your printer is automatically assigned to send and receive faxes...
... Start® Programs or All Programs® Dell Printers® Dell 968 AIO Printer. 4. Click Dell Printers. The Dell Fax Setup Utility dialog box opens. 6. Make sure your computer and printer, and make sure they are entering an extension number. Select Dell Fax Setup Utility. c. In Windows Vista: a. Turn on your printer is automatically assigned to send and receive faxes...


