
Owner's Manual
Page 3
... This software and documentation are registered trademarks of Dell Inc.; is subject to hardware or loss of your printer. Microsoft and Windows are provided with RESTRICTED RIGHTS. disclaims any manner whatsoever without notice. © 2005 Dell Inc. All rights reserved. Reproduction in any ... the Rights in Technical Data and Computer Software clause at DFARS 252.227-7013 and in this text: Dell and the DELL logo, Dell Picture Studio, and Dell Ink Management System are trademarks of Microsoft Corporation. NOTICE: A NOTICE indicates either the entities claiming the marks...
... This software and documentation are registered trademarks of Dell Inc.; is subject to hardware or loss of your printer. Microsoft and Windows are provided with RESTRICTED RIGHTS. disclaims any manner whatsoever without notice. © 2005 Dell Inc. All rights reserved. Reproduction in any ... the Rights in Technical Data and Computer Software clause at DFARS 252.227-7013 and in this text: Dell and the DELL logo, Dell Picture Studio, and Dell Ink Management System are trademarks of Microsoft Corporation. NOTICE: A NOTICE indicates either the entities claiming the marks...

Owner's Manual
Page 17
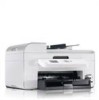
NOTE: The Dell Photo AIO Printer 964 is present. right side connector) to a wall jack. Press Select to notify you that power is an analog device that only works when directly connected ..., date, language, and country settings after initial setup by accessing the Setup menu. Setting Up Your Printer NOTE: The Dell Photo All-In-One Printer 964 supports Microsoft® Windows® 2000, Windows XP, and Windows XP Professional X64 Edition. If you power on the printer for details. If you plug it back in the...
NOTE: The Dell Photo AIO Printer 964 is present. right side connector) to a wall jack. Press Select to notify you that power is an analog device that only works when directly connected ..., date, language, and country settings after initial setup by accessing the Setup menu. Setting Up Your Printer NOTE: The Dell Photo All-In-One Printer 964 supports Microsoft® Windows® 2000, Windows XP, and Windows XP Professional X64 Edition. If you power on the printer for details. If you plug it back in the...
Owner's Manual
Page 21
In Windows 2000, click Start→ Settings→ Printers. 2 Right-click the Dell Photo AIO Printer 964 icon. 3 Click Printing Preferences. 4 Click the Print Setup tab. 5 Select the paper type from the Media Type drop-down menu. 6 Click OK. To turn off ... Media Type drop-down menu. 5 Click OK. About Your Printer 21 Unless you turn off the automatic paper type sensor for all print jobs: 1 In Windows XP, click Start→ Control Panel→ Printers and Other Hardware→ Printers and Faxes.
In Windows 2000, click Start→ Settings→ Printers. 2 Right-click the Dell Photo AIO Printer 964 icon. 3 Click Printing Preferences. 4 Click the Print Setup tab. 5 Select the paper type from the Media Type drop-down menu. 6 Click OK. To turn off ... Media Type drop-down menu. 5 Click OK. About Your Printer 21 Unless you turn off the automatic paper type sensor for all print jobs: 1 In Windows XP, click Start→ Control Panel→ Printers and Other Hardware→ Printers and Faxes.
Owner's Manual
Page 43
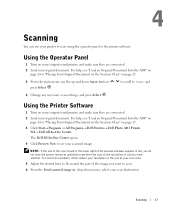
...Turn on page 25. 3 From the main menu, use your printer to see your scanned image. Scanning 43 The Dell All-In-One Center opens. 4 Click Preview Now to scan using the operator panel or the printer software. NOTE...are connected. 2 Load your scan area. 5 Adjust the dotted lines to fit around the part of the preview window) appears in the lower right of the image you have selected. For help , see "Load an Original Document Into... Panel 1 Turn on page 25. 3 Click Start→ Programs or All Programs→ Dell Printers→ Dell Photo AIO Printer 964→ Dell All-In-One Center.
...Turn on page 25. 3 From the main menu, use your printer to see your scanned image. Scanning 43 The Dell All-In-One Center opens. 4 Click Preview Now to scan using the operator panel or the printer software. NOTE...are connected. 2 Load your scan area. 5 Adjust the dotted lines to fit around the part of the preview window) appears in the lower right of the image you have selected. For help , see "Load an Original Document Into... Panel 1 Turn on page 25. 3 Click Start→ Programs or All Programs→ Dell Printers→ Dell Photo AIO Printer 964→ Dell All-In-One Center.
Owner's Manual
Page 44
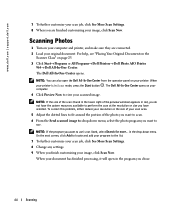
... are finished customizing your image, click Scan Now. The Dell All-In-One Center opens on your printer. Scanning Photos 1 Turn on page 25. 3 Click Start→ Programs or All Programs→ Dell Printers→ Dell Photo AIO Printer 964→ Dell All-In-One Center. NOTE: If the size of ...the scan (found in the lower right of the preview window) appears in the drop-down menu, select the photo program you want ...
... are finished customizing your image, click Scan Now. The Dell All-In-One Center opens on your printer. Scanning Photos 1 Turn on page 25. 3 Click Start→ Programs or All Programs→ Dell Printers→ Dell Photo AIO Printer 964→ Dell All-In-One Center. NOTE: If the size of ...the scan (found in the lower right of the preview window) appears in the drop-down menu, select the photo program you want ...
Owner's Manual
Page 49
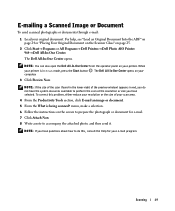
... an image or document. 5 From the What is in red, you do this problem, either reduce your resolution or the size of the preview window) appears in Scan mode, press the Start button . E-mailing a Scanned Image or Document To send scanned photographs or documents through e-mail: 1 ...Load your printer. When your computer. 3 Click Preview Now. The Dell All-In-One Center opens on page 25. 2 Click Start→ Programs or All Programs→ Dell Printers→ Dell Photo AIO Printer 964→ Dell All-In-One Center. The Dell All-In-One Center opens.
... an image or document. 5 From the What is in red, you do this problem, either reduce your resolution or the size of the preview window) appears in Scan mode, press the Start button . E-mailing a Scanned Image or Document To send scanned photographs or documents through e-mail: 1 ...Load your printer. When your computer. 3 Click Preview Now. The Dell All-In-One Center opens on page 25. 2 Click Start→ Programs or All Programs→ Dell Printers→ Dell Photo AIO Printer 964→ Dell All-In-One Center. The Dell All-In-One Center opens.
Owner's Manual
Page 50
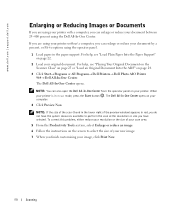
... window) appears in red, you do not have selected. For help , see "Placing Your Original Document on the Scanner Glass" on page 25 or "Load an Original Document Into the ADF" on page 24. 3 Click Start→ Programs or All Programs→ Dell Printers→ Dell Photo AIO Printer 964→ Dell ...All-In-One Center. The Dell All-In-One Center opens. To correct this problem, either reduce your resolution or the size of your new ...
... window) appears in red, you do not have selected. For help , see "Placing Your Original Document on the Scanner Glass" on page 25 or "Load an Original Document Into the ADF" on page 24. 3 Click Start→ Programs or All Programs→ Dell Printers→ Dell Photo AIO Printer 964→ Dell ...All-In-One Center. The Dell All-In-One Center opens. To correct this problem, either reduce your resolution or the size of your new ...

Owner's Manual
Page 55
... scans your document and sends your document on the printer. 2 Load your fax to enter the fax number. The numbers display in the Fax Number Window. After the transmission is complete, the printer beeps to let you entered.
... scans your document and sends your document on the printer. 2 Load your fax to enter the fax number. The numbers display in the Fax Number Window. After the transmission is complete, the printer beeps to let you entered.

Owner's Manual
Page 56
... on the scanner glass or into the ADF. If the printer is added to the fax list until the list has been completed. www.dell.com | support.dell.com Send a Broadcast Fax A broadcast fax allows you initiate the fax, the printer dials the first number, establishes a connection, sends the fax, breaks the... list. You can also use the up to 30 different numbers. 1 Make sure your document on the number of retries specified in the Fax Number Window. For help, see "Placing Your Original Document on the Scanner Glass" on page 25 or "Load an Original Document Into the ADF" on , and an...
... on the scanner glass or into the ADF. If the printer is added to the fax list until the list has been completed. www.dell.com | support.dell.com Send a Broadcast Fax A broadcast fax allows you initiate the fax, the printer dials the first number, establishes a connection, sends the fax, breaks the... list. You can also use the up to 30 different numbers. 1 Make sure your document on the number of retries specified in the Fax Number Window. For help, see "Placing Your Original Document on the Scanner Glass" on page 25 or "Load an Original Document Into the ADF" on , and an...

Owner's Manual
Page 62
.... 62 Faxing c Enter your computer modem, use Fax Console (Windows XP Only) or Fax Service Management (Windows 2000 Only) to send and receive faxes: • Use Fax Console or Fax Service Management to print and receive files as faxes, or • Use the Dell All-In-One Center to first scan a document to...
.... 62 Faxing c Enter your computer modem, use Fax Console (Windows XP Only) or Fax Service Management (Windows 2000 Only) to send and receive faxes: • Use Fax Console or Fax Service Management to print and receive files as faxes, or • Use the Dell All-In-One Center to first scan a document to...
Owner's Manual
Page 63
..., select Fax. 4 Click Print. 5 Follow the instructions on page 24. 3 Click Start→ Programs or All Programs→ Dell Printers→ Dell Photo AIO Printer 964→ Dell All-In-One Center. 4 Place the document you want to fax face down under the lid of this field to send your... the Scanner Glass" on page 25 or "Load an Original Document Into the ADF" on the computer screen to select Dell Photo AIO Printer 964. Configure Fax Service Management (Windows 2000 Only) 1 Click Start→ Programs→ Accessories→ Communications→ Fax→ Fax Service Management. The ...
..., select Fax. 4 Click Print. 5 Follow the instructions on page 24. 3 Click Start→ Programs or All Programs→ Dell Printers→ Dell Photo AIO Printer 964→ Dell All-In-One Center. 4 Place the document you want to fax face down under the lid of this field to send your... the Scanner Glass" on page 25 or "Load an Original Document Into the ADF" on the computer screen to select Dell Photo AIO Printer 964. Configure Fax Service Management (Windows 2000 Only) 1 Click Start→ Programs→ Accessories→ Communications→ Fax→ Fax Service Management. The ...

Owner's Manual
Page 71
... scroll to Fax Setup, and press Select . 3 Use the up and down Arrow buttons to scroll to seven-digit keycode. Faxing 71 The Pickup Code window opens. 5 Using the keypad, specify a new one- to Ringing and Answering, and press Select . Any other characters entered are 0-9, pound (#), and star (*). The Ringing and...
... scroll to Fax Setup, and press Select . 3 Use the up and down Arrow buttons to scroll to seven-digit keycode. Faxing 71 The Pickup Code window opens. 5 Using the keypad, specify a new one- to Ringing and Answering, and press Select . Any other characters entered are 0-9, pound (#), and star (*). The Ringing and...
Owner's Manual
Page 76
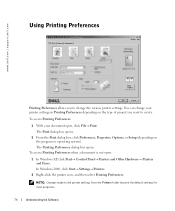
...76 Understanding the Software NOTE: Changes made to change your document open : 1 In Windows XP, click Start→ Control Panel→ Printers and Other Hardware→ Printers and Faxes. www.dell.com | support.dell.com Using Printing Preferences Printing Preferences allows you want to create. The Printing Preferences dialog... on the program or operating system). To access Printing Preferences when a document is not open , click File→ Print. In Windows 2000, click Start→ Settings→ Printers. 2 Right-click the printer icon, and then select Printing Preferences.
...76 Understanding the Software NOTE: Changes made to change your document open : 1 In Windows XP, click Start→ Control Panel→ Printers and Other Hardware→ Printers and Faxes. www.dell.com | support.dell.com Using Printing Preferences Printing Preferences allows you want to create. The Printing Preferences dialog... on the program or operating system). To access Printing Preferences when a document is not open , click File→ Print. In Windows 2000, click Start→ Settings→ Printers. 2 Right-click the printer icon, and then select Printing Preferences.
Owner's Manual
Page 79
... the memory card slot or a USB key into the PictBridge port on the front of your ink cartridges are empty, the Reserve Tank window appears on your screen when you try to print. After the card is read, the printer automatically switches to Photo mode. 2 Use ... more information on using MCM, see "Replacing Ink Cartridges" on your computer by clicking Start→ Programs or All Programs→ Dell Printers→ Dell Photo AIO Printer 964→ Activate Memory Card Manager. You can be given. The number of pages remaining changes as you install a new ink cartridge....
... the memory card slot or a USB key into the PictBridge port on the front of your ink cartridges are empty, the Reserve Tank window appears on your screen when you try to print. After the card is read, the printer automatically switches to Photo mode. 2 Use ... more information on using MCM, see "Replacing Ink Cartridges" on your computer by clicking Start→ Programs or All Programs→ Dell Printers→ Dell Photo AIO Printer 964→ Activate Memory Card Manager. You can be given. The number of pages remaining changes as you install a new ink cartridge....
Owner's Manual
Page 81
...the printer software. 1 Click Start→ Programs or All Programs→ Dell Printers→ Dell Photo AIO Printer 964→ Uninstall Dell Photo AIO Printer 964. 2 Follow the instructions on the computer screen to remove the printer ...software. 3 Restart your computer before installing the software again. 4 Insert the Drivers and Utilities CD, and then follow the instructions on your desktop. Understanding the Software 81 In Windows...
...the printer software. 1 Click Start→ Programs or All Programs→ Dell Printers→ Dell Photo AIO Printer 964→ Uninstall Dell Photo AIO Printer 964. 2 Follow the instructions on the computer screen to remove the printer ...software. 3 Restart your computer before installing the software again. 4 Insert the Drivers and Utilities CD, and then follow the instructions on your desktop. Understanding the Software 81 In Windows...
Owner's Manual
Page 87
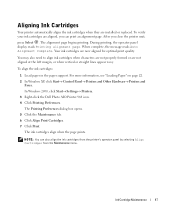
...left margin, or when vertical or straight lines appear wavy. Your ink cartridges are installed or replaced. In Windows 2000, click Start→ Settings→ Printers. 3 Right-click the Dell Photo AIO Printer 964 icon. 4 Click Printing Preferences. NOTE: You can print an alignment page. Ink Cartridge Maintenance 87 Aligning ...message reads Auto Alignment Complete. The ink cartridges align when the page prints. For more information, see "Loading Paper" on page 22. 2 In Windows XP, click Start→ Control Panel→ Printers and Other Hardware→ Printers and Faxes.
...left margin, or when vertical or straight lines appear wavy. Your ink cartridges are installed or replaced. In Windows 2000, click Start→ Settings→ Printers. 3 Right-click the Dell Photo AIO Printer 964 icon. 4 Click Printing Preferences. NOTE: You can print an alignment page. Ink Cartridge Maintenance 87 Aligning ...message reads Auto Alignment Complete. The ink cartridges align when the page prints. For more information, see "Loading Paper" on page 22. 2 In Windows XP, click Start→ Control Panel→ Printers and Other Hardware→ Printers and Faxes.
Owner's Manual
Page 88
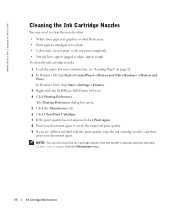
... appear jagged or edges appear rough. To clean the ink cartridge nozzles: 1 Load the paper. In Windows 2000, click Start→ Settings→ Printers. 3 Right-click the Dell Photo AIO Printer 964 icon. 4 Click Printing Preferences. For more information, see "Loading Paper" on page 22. 2 In... Windows XP, click Start→ Control Panel→ Printers and Other Hardware→ Printers and Faxes. The ...
... appear jagged or edges appear rough. To clean the ink cartridge nozzles: 1 Load the paper. In Windows 2000, click Start→ Settings→ Printers. 3 Right-click the Dell Photo AIO Printer 964 icon. 4 Click Printing Preferences. For more information, see "Loading Paper" on page 22. 2 In... Windows XP, click Start→ Control Panel→ Printers and Other Hardware→ Printers and Faxes. The ...

Owner's Manual
Page 89
.... For more information, see "Removing and Reinstalling Software" on the "Setting Up Your Printer" poster, and then restart the computer. The Dell Photo AIO Printer 964 supports Windows 2000, Windows XP, and Windows XP Professional x64 Edition. VERIFY YOUR COMPUTER MEETS THE MINIMUM SYSTEM REQUIREMENTS FOR YOUR OPERATING SYSTEM. Click Start→ Programs or All...
.... For more information, see "Removing and Reinstalling Software" on the "Setting Up Your Printer" poster, and then restart the computer. The Dell Photo AIO Printer 964 supports Windows 2000, Windows XP, and Windows XP Professional x64 Edition. VERIFY YOUR COMPUTER MEETS THE MINIMUM SYSTEM REQUIREMENTS FOR YOUR OPERATING SYSTEM. Click Start→ Programs or All...
Owner's Manual
Page 90
...CD-ROM drive icon. Windows XP 1 Click Start→ Control Panel→ Printers and Other Hardware→ Printers and Faxes. 2 Right-click Dell Photo AIO Printer 964, and select Set as Default. 90 Troubleshooting www.dell.com | support.dell.com IF THE SOFTWARE INSTALLATION...U T ER. • Remove the USB cable from your printer and your screen to complete the installation. Windows 2000 1 Click Start→ Settings→ Printers. 2 Right-click Dell Photo AIO Printer 964, and select Set as Default. Reconnect the printer power cable to your printer and your computer. In...
...CD-ROM drive icon. Windows XP 1 Click Start→ Control Panel→ Printers and Other Hardware→ Printers and Faxes. 2 Right-click Dell Photo AIO Printer 964, and select Set as Default. 90 Troubleshooting www.dell.com | support.dell.com IF THE SOFTWARE INSTALLATION...U T ER. • Remove the USB cable from your printer and your screen to complete the installation. Windows 2000 1 Click Start→ Settings→ Printers. 2 Right-click Dell Photo AIO Printer 964, and select Set as Default. Reconnect the printer power cable to your printer and your computer. In...
Owner's Manual
Page 91
For more information, see "Loading Paper" on page 97. Windows 2000 1 Click Start→ Settings→ Printers. 2 Double-click Dell Photo AIO Printer 964, and then click Printer. 3 Make sure a check mark is next to Pause Printing. Printer Problems ENSURE THAT THE... 91 CH EC K F O R F L AS H I N G L I G HT S ON T H E P RI N T ER. Windows XP 1 Click Start→ Control Panel→ Printers and Other Hardware→ Printers and Faxes. 2 Double-click Dell Photo AIO Printer 964, and then click Printer. 3 Make sure a check mark is next to Pause Printing, click Pause...
For more information, see "Loading Paper" on page 97. Windows 2000 1 Click Start→ Settings→ Printers. 2 Double-click Dell Photo AIO Printer 964, and then click Printer. 3 Make sure a check mark is next to Pause Printing. Printer Problems ENSURE THAT THE... 91 CH EC K F O R F L AS H I N G L I G HT S ON T H E P RI N T ER. Windows XP 1 Click Start→ Control Panel→ Printers and Other Hardware→ Printers and Faxes. 2 Double-click Dell Photo AIO Printer 964, and then click Printer. 3 Make sure a check mark is next to Pause Printing, click Pause...


