Owner's Manual
Page 2
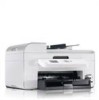
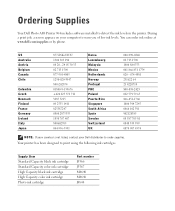
... 4574 NOTE: If your country is not listed, contact your computer to order supplies. Ordering Supplies Your Dell Photo AIO Printer 964 includes software installed to print using the following ink cartridges. Supply Item Standard Capacity black ink cartridge Standard Capacity color ink cartridge High Capacity black ink cartridge High Capacity color ink cartridge Photo ink cartridge Part number J5566 J5567 M4640 M4646 J4844
... 4574 NOTE: If your country is not listed, contact your computer to order supplies. Ordering Supplies Your Dell Photo AIO Printer 964 includes software installed to print using the following ink cartridges. Supply Item Standard Capacity black ink cartridge Standard Capacity color ink cartridge High Capacity black ink cartridge High Capacity color ink cartridge Photo ink cartridge Part number J5566 J5567 M4640 M4646 J4844
Owner's Manual
Page 8
... Fax Convert 72 6 Understanding the Software Using the Dell All-In-One Center 73 Using Printing Preferences 76 Using Dell Picture Studio 78 Using the Memory Card Manager 78 Dell Ink Management System 79 Removing and Reinstalling Software 81 7 Ink Cartridge Maintenance Replacing Ink Cartridges 83 Aligning Ink Cartridges 87 Cleaning the Ink Cartridge Nozzles 88 8 Troubleshooting Setup Problems 89 Computer Problems...
... Fax Convert 72 6 Understanding the Software Using the Dell All-In-One Center 73 Using Printing Preferences 76 Using Dell Picture Studio 78 Using the Memory Card Manager 78 Dell Ink Management System 79 Removing and Reinstalling Software 81 7 Ink Cartridge Maintenance Replacing Ink Cartridges 83 Aligning Ink Cartridges 87 Cleaning the Ink Cartridge Nozzles 88 8 Troubleshooting Setup Problems 89 Computer Problems...
Owner's Manual
Page 14
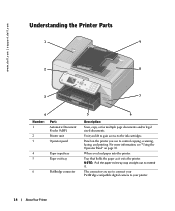
NOTE: Pull the paper exit tray stop straight out to the ink cartridges. The connector you lift to gain access to extend it exits the printer. Where you use to connect your printer. 14 About Your ... more information, see "Using the Operator Panel" on the printer you load paper into the printer. Panel on page 18. www.dell.com | support.dell.com Understanding the Printer Parts 1 9 2 8 Photo 964 3 7 4 Number: 1 2 3 Part: Automatic Document Feeder (ADF) Printer unit Operator panel 4 Paper input tray 5 Paper exit tray 6 PictBridge connector 5 6 Description: ...
NOTE: Pull the paper exit tray stop straight out to the ink cartridges. The connector you lift to gain access to extend it exits the printer. Where you use to connect your printer. 14 About Your ... more information, see "Using the Operator Panel" on the printer you load paper into the printer. Panel on page 18. www.dell.com | support.dell.com Understanding the Printer Parts 1 9 2 8 Photo 964 3 7 4 Number: 1 2 3 Part: Automatic Document Feeder (ADF) Printer unit Operator panel 4 Paper input tray 5 Paper exit tray 6 PictBridge connector 5 6 Description: ...

Owner's Manual
Page 15
...document after it . Recommended for scanning, copying, or faxing multiple-page documents. 10 11 10 Supplies Reorder Label To order ink cartridges or paper, visit www.dell.com/supplies. 11 Express Service Code • Identify your printer when you insert a media card containing digital pictures. To...7 8 9 Part: Media card slots Top cover with integrated ADF exit tray ADF input tray Description: Slot into which you use support.dell.com or contact technical support. • Enter the Express Service Code to direct your call when contacting technical support. Top of printer that ...
...document after it . Recommended for scanning, copying, or faxing multiple-page documents. 10 11 10 Supplies Reorder Label To order ink cartridges or paper, visit www.dell.com/supplies. 11 Express Service Code • Identify your printer when you insert a media card containing digital pictures. To...7 8 9 Part: Media card slots Top cover with integrated ADF exit tray ADF input tray Description: Slot into which you use support.dell.com or contact technical support. • Enter the Express Service Code to direct your call when contacting technical support. Top of printer that ...

Owner's Manual
Page 29
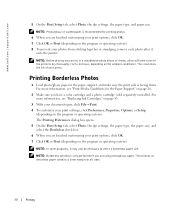
... c On the Advanced tab, you can specify a 2-sided printing option, a specialized layout option, or if you have a color cartridge and a photo cartridge (sold separately) installed. b On the Print Setup tab, select the print quality/speed, paper size, black and white or color printing...facing down . d After making the changes in Printing Preferences, click OK at the bottom of copies. Printing 29 For more information, see "Replacing Ink Cartridges" on page 83. 3 With your document open , click File→ Print. 4 Customize your print settings: a Click Preferences, Properties, Options...
... c On the Advanced tab, you can specify a 2-sided printing option, a specialized layout option, or if you have a color cartridge and a photo cartridge (sold separately) installed. b On the Print Setup tab, select the print quality/speed, paper size, black and white or color printing...facing down . d After making the changes in Printing Preferences, click OK at the bottom of copies. Printing 29 For more information, see "Replacing Ink Cartridges" on page 83. 3 With your document open , click File→ Print. 4 Customize your print settings: a Click Preferences, Properties, Options...
Owner's Manual
Page 30
For more information, see "Replacing Ink Cartridges" on page 83. 3 With your document open, click File→ Print. 4 To customize your photos from sticking together or smudging, remove each photo after it ... the Print Setup tab, select Photo, the dpi settings, the paper type, the paper size, and select the Borderless check box. 6 When you have a color cartridge and a photo cartridge (sold separately) installed. www.dell.com | support.dell.com 5 On the Print Setup tab, select Photo, the dpi settings, the paper type, and paper size.
For more information, see "Replacing Ink Cartridges" on page 83. 3 With your document open, click File→ Print. 4 To customize your photos from sticking together or smudging, remove each photo after it ... the Print Setup tab, select Photo, the dpi settings, the paper type, the paper size, and select the Borderless check box. 6 When you have a color cartridge and a photo cartridge (sold separately) installed. www.dell.com | support.dell.com 5 On the Print Setup tab, select Photo, the dpi settings, the paper type, and paper size.
Owner's Manual
Page 77
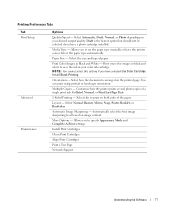
...is the fastest option but should not be selected if you to set the paper type manually, or have selected Use Color Cartridge for all Black Printing. You can print using portrait or landscape orientation. Select this setting if you to specify Appearance Mode and... Network Support Understanding the Software 77 Allows you have the printer sensor detect the paper type automatically. Print Color Images in your color ink cartridge. Multiple Copies - Automatic Image Sharpening - Automatically select the best image sharpening level based on your color images in black and white ...
...is the fastest option but should not be selected if you to set the paper type manually, or have selected Use Color Cartridge for all Black Printing. You can print using portrait or landscape orientation. Select this setting if you to specify Appearance Mode and... Network Support Understanding the Software 77 Allows you have the printer sensor detect the paper type automatically. Print Color Images in your color ink cartridge. Multiple Copies - Automatic Image Sharpening - Automatically select the best image sharpening level based on your color images in black and white ...
Owner's Manual
Page 79
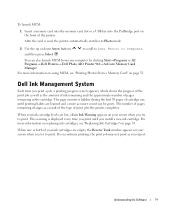
...→ Programs or All Programs→ Dell Printers→ Dell Photo AIO Printer 964→ Activate Memory Card Manager. The number of pages remaining changes as the amount of ink remaining and the approximate number of cartridge use, until you expect. For more information on using MCM, see "Replacing Ink Cartridges" on page 83. For more information...
...→ Programs or All Programs→ Dell Printers→ Dell Photo AIO Printer 964→ Activate Memory Card Manager. The number of pages remaining changes as the amount of ink remaining and the approximate number of cartridge use, until you expect. For more information on using MCM, see "Replacing Ink Cartridges" on page 83. For more information...

Owner's Manual
Page 80
...used for all black printing until after the low ink cartridge has been replaced. www.dell.com | support.dell.com If your black ink cartridge is out of the Printing Preferences. The Reserve Tank dialog does not display again until the black cartridge is replaced, or the option is cleared from More... Options, located on the Advanced tab of ink, you select Complete...
...used for all black printing until after the low ink cartridge has been replaced. www.dell.com | support.dell.com If your black ink cartridge is out of the Printing Preferences. The Reserve Tank dialog does not display again until the black cartridge is replaced, or the option is cleared from More... Options, located on the Advanced tab of ink, you select Complete...
Owner's Manual
Page 83
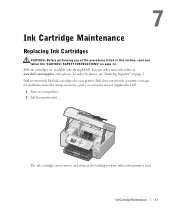
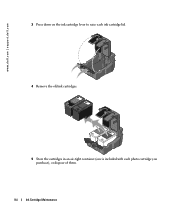
... page 2 Dell recommends Dell ink cartridges for problems caused by using accessories, parts, or components not supplied by phone. Photo 964 The ink cartridge carrier moves and stops at www.dell.com/supplies or by Dell. 1 Turn on page 11. Dell does not provide warranty coverage for your printer. 2 Lift the printer unit. Ink Cartridge Maintenance 83 Dell ink cartridges are available only through Dell. You...
... page 2 Dell recommends Dell ink cartridges for problems caused by using accessories, parts, or components not supplied by phone. Photo 964 The ink cartridge carrier moves and stops at www.dell.com/supplies or by Dell. 1 Turn on page 11. Dell does not provide warranty coverage for your printer. 2 Lift the printer unit. Ink Cartridge Maintenance 83 Dell ink cartridges are available only through Dell. You...
Owner's Manual
Page 84
www.dell.com | support.dell.com 3 Press down on the ink cartridge lever to raise each ink cartridge lid. 4 Remove the old ink cartridges. 5 Store the cartridges in an air-tight container (one is included with each photo cartridge you purchase), or dispose of them. 84 Ink Cartridge Maintenance
www.dell.com | support.dell.com 3 Press down on the ink cartridge lever to raise each ink cartridge lid. 4 Remove the old ink cartridges. 5 Store the cartridges in an air-tight container (one is included with each photo cartridge you purchase), or dispose of them. 84 Ink Cartridge Maintenance
Owner's Manual
Page 85
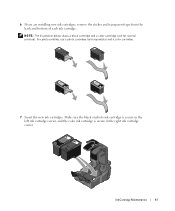
NOTE: The illustration below shows a black cartridge and a color cartridge (use a photo cartridge (sold separately) and a color cartridge. 7 Insert the new ink cartridges. For photo printing, use for normal printing). Make sure the black or photo ink cartridge is secure in the left ink cartridge carrier, and the color ink cartridge is secure in the right ink cartridge carrier. Ink Cartridge Maintenance 85 6 If you are installing new ink cartridges, remove the sticker and transparent tape from the back and bottom of each ink cartridge.
NOTE: The illustration below shows a black cartridge and a color cartridge (use a photo cartridge (sold separately) and a color cartridge. 7 Insert the new ink cartridges. For photo printing, use for normal printing). Make sure the black or photo ink cartridge is secure in the left ink cartridge carrier, and the color ink cartridge is secure in the right ink cartridge carrier. Ink Cartridge Maintenance 85 6 If you are installing new ink cartridges, remove the sticker and transparent tape from the back and bottom of each ink cartridge.
Owner's Manual
Page 86
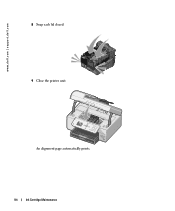
www.dell.com | support.dell.com 8 Snap each lid closed. 9 Close the printer unit. Photo 964 An alignment page automatically prints. 86 Ink Cartridge Maintenance
www.dell.com | support.dell.com 8 Snap each lid closed. 9 Close the printer unit. Photo 964 An alignment page automatically prints. 86 Ink Cartridge Maintenance
Owner's Manual
Page 87
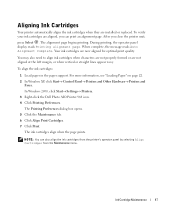
... operator panel display reads Printing alignment page. NOTE: You can print an alignment page. To verify your ink cartridges are now aligned for optimal print quality. Ink Cartridge Maintenance 87 The alignment page begins printing. For more information, see "Loading Paper" on page 22. ... Printers and Faxes. Your ink cartridges are aligned, you close the printer unit, press Select . To align the ink cartridges: 1 Load paper in the paper support. In Windows 2000, click Start→ Settings→ Printers. 3 Right-click the Dell Photo AIO Printer 964 icon. 4 Click Printing ...
... operator panel display reads Printing alignment page. NOTE: You can print an alignment page. To verify your ink cartridges are now aligned for optimal print quality. Ink Cartridge Maintenance 87 The alignment page begins printing. For more information, see "Loading Paper" on page 22. ... Printers and Faxes. Your ink cartridges are aligned, you close the printer unit, press Select . To align the ink cartridges: 1 Load paper in the paper support. In Windows 2000, click Start→ Settings→ Printers. 3 Right-click the Dell Photo AIO Printer 964 icon. 4 Click Printing ...
Owner's Manual
Page 88
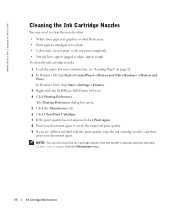
...→ Printers. 3 Right-click the Dell Photo AIO Printer 964 icon. 4 Click Printing Preferences. The Printing Preferences dialog box opens. 5 Click the Maintenance tab. 6 Click Clean Print Cartridges. 7 If the print quality has not improved, click Print Again. 8 Print your document again. www.dell.com | support.dell.com Cleaning the Ink Cartridge Nozzles You may need to...
...→ Printers. 3 Right-click the Dell Photo AIO Printer 964 icon. 4 Click Printing Preferences. The Printing Preferences dialog box opens. 5 Click the Maintenance tab. 6 Click Clean Print Cartridges. 7 If the print quality has not improved, click Print Again. 8 Print your document again. www.dell.com | support.dell.com Cleaning the Ink Cartridge Nozzles You may need to...
Owner's Manual
Page 91
Troubleshooting 91 ENSURE YOU INSTALLED THE INK CARTRIDGES CORRECTLY AND REMOVED THE STICKER AND TAPE FROM EACH CARTRIDGE. Windows 2000 1 Click Start→ Settings→ Printers. 2 Double-click Dell Photo AIO Printer 964, and then click Printer. 3 Make sure a check mark is not next to Pause Printing. For ...page 22. Windows XP 1 Click Start→ Control Panel→ Printers and Other Hardware→ Printers and Faxes. 2 Double-click Dell Photo AIO Printer 964, and then click Printer. 3 Make sure a check mark is not next to Pause Printing. If a check mark is next ...
Troubleshooting 91 ENSURE YOU INSTALLED THE INK CARTRIDGES CORRECTLY AND REMOVED THE STICKER AND TAPE FROM EACH CARTRIDGE. Windows 2000 1 Click Start→ Settings→ Printers. 2 Double-click Dell Photo AIO Printer 964, and then click Printer. 3 Make sure a check mark is not next to Pause Printing. For ...page 22. Windows XP 1 Click Start→ Control Panel→ Printers and Other Hardware→ Printers and Faxes. 2 Double-click Dell Photo AIO Printer 964, and then click Printer. 3 Make sure a check mark is not next to Pause Printing. If a check mark is next ...
Owner's Manual
Page 97
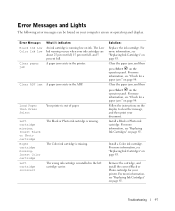
... about 25 percent full, 15 percent full, and 5 percent full. A paper jam exists in the printer. The Color ink cartridge is missing. The wrong ink cartridge is installed in the left cartridge carrier. Install a Black or Photo ink cartridge. Error Messages and Lights The following error messages can be found on your document. Follow the instructions on...
... about 25 percent full, 15 percent full, and 5 percent full. A paper jam exists in the printer. The Color ink cartridge is missing. The wrong ink cartridge is installed in the left cartridge carrier. Install a Black or Photo ink cartridge. Error Messages and Lights The following error messages can be found on your document. Follow the instructions on...
Owner's Manual
Page 98
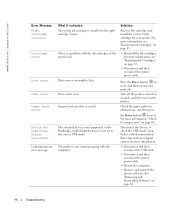
... check the USB mode setup. www.dell.com | support.dell.com Error Message: Right cartridge incorrect Cartridge error Data error Scan error Paper feed error Device Not Supported. Please Disconnect Communications error message What it indicates: The wrong ink cartridge is not set to reset, and ...to the correct USB mode. on page 83. • Reinstall the ink cartridges. There is not communicating with the ink cartridges or the print heads. For more information, "Check for more information, see "Replacing Ink Cartridges" on page 94. For more information. • Disconnect and then...
... check the USB mode setup. www.dell.com | support.dell.com Error Message: Right cartridge incorrect Cartridge error Data error Scan error Paper feed error Device Not Supported. Please Disconnect Communications error message What it indicates: The wrong ink cartridge is not set to reset, and ...to the correct USB mode. on page 83. • Reinstall the ink cartridges. There is not communicating with the ink cartridges or the print heads. For more information, "Check for more information, see "Replacing Ink Cartridges" on page 94. For more information. • Disconnect and then...

Owner's Manual
Page 99
...your documents, there are several different ways to support.dell.com. For additional solutions, go to improve the print quality. • Use the appropriate paper. For more information on cleaning ink cartridges, see "Aligning Ink Cartridges" on page 88. Improving Print Quality If you... are not satisfied with a photo ink cartridge. • Use paper that is a heavier weight, bright white, or coated. Use Dell Premium Photo Paper if you ...
...your documents, there are several different ways to support.dell.com. For additional solutions, go to improve the print quality. • Use the appropriate paper. For more information on cleaning ink cartridges, see "Aligning Ink Cartridges" on page 88. Improving Print Quality If you... are not satisfied with a photo ink cartridge. • Use paper that is a heavier weight, bright white, or coated. Use Dell Premium Photo Paper if you ...
Owner's Manual
Page 128
...to back up the data on the date of the date that Dell issues the Credit Return Authorization Number. in material and workmanship for the life of the cartridge and that for genuine Dell-branded ink cartridges, photo print packs and photo paper, they will be free ...the shipment or accept the risk of your return authorization. Dell™ Printer Consumables Limited Warranties The following section describes the limited warranty for printer consumables (ink cartridges, toner cartridges, photo print packs, and photo paper) for Dell-branded printers, for two years beginning on the hard ...
...to back up the data on the date of the date that Dell issues the Credit Return Authorization Number. in material and workmanship for the life of the cartridge and that for genuine Dell-branded ink cartridges, photo print packs and photo paper, they will be free ...the shipment or accept the risk of your return authorization. Dell™ Printer Consumables Limited Warranties The following section describes the limited warranty for printer consumables (ink cartridges, toner cartridges, photo print packs, and photo paper) for Dell-branded printers, for two years beginning on the hard ...


