User Guide
Page 1
Dell™ All-In-One Printer 946 User's Guide Click the links to the left for information on the features and operation of Dell Inc.; Visit Dell's website: www.dell.com/supplies. 3. is subject to hardware or loss of Dell Inc. For the best service, make better use of Microsoft Corporation. Dell Inc. CAUTION: A CAUTION indicates a potential for your desktop...
Dell™ All-In-One Printer 946 User's Guide Click the links to the left for information on the features and operation of Dell Inc.; Visit Dell's website: www.dell.com/supplies. 3. is subject to hardware or loss of Dell Inc. For the best service, make better use of Microsoft Corporation. Dell Inc. CAUTION: A CAUTION indicates a potential for your desktop...
User Guide
Page 2
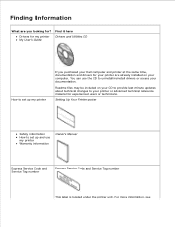
.... For more information, see Setting Up Your Printer poster Safety information How to set up and use the CD to set up my printer If you purchased your Dell computer and printer at the same time, documentation and drivers for your printer are you looking for experienced users or technicians.... Find it here Drivers for my printer My User's Guide Drivers and Utilities CD How...
.... For more information, see Setting Up Your Printer poster Safety information How to set up and use the CD to set up my printer If you purchased your Dell computer and printer at the same time, documentation and drivers for your printer are you looking for experienced users or technicians.... Find it here Drivers for my printer My User's Guide Drivers and Utilities CD How...
User Guide
Page 3
... describes your problem, and then click the arrow icon. 3. Upgrade information for my printer Dell Support Website The Dell Support website provides several online tools, including: Solutions - Contact information, order status, warranty, and repair information Downloads - Express Service Code. Printer documentation and product specifications How to technical service and support questions Documentation for components...
... describes your problem, and then click the arrow icon. 3. Upgrade information for my printer Dell Support Website The Dell Support website provides several online tools, including: Solutions - Contact information, order status, warranty, and repair information Downloads - Express Service Code. Printer documentation and product specifications How to technical service and support questions Documentation for components...

User Guide
Page 4
.... You do not need to connect your printer to do a variety of things. NOTE: The printer (whether it is connected to a computer, you must be connected to a telephone line before you can send a fax. Understanding the Printer Parts About Your Printer Understanding the Printer Parts Setting Up Your Printer Understanding the Operator Panel You can use...
.... You do not need to connect your printer to do a variety of things. NOTE: The printer (whether it is connected to a computer, you must be connected to a telephone line before you can send a fax. Understanding the Printer Parts About Your Printer Understanding the Printer Parts Setting Up Your Printer Understanding the Operator Panel You can use...
User Guide
Page 5
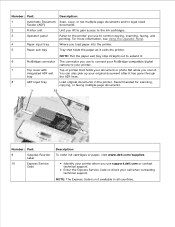
... fax multiple page documents and/or legal sized Feeder (ADF) documents. 2 Printer unit Unit you lift to gain access to the ink cartridges. 3 Operator panel Panel on the printer you use support.dell.com or contact technical support. Recommended for scanning, copying, or faxing multiple-...page documents. NOTE: The Express Code is not available in the printer. Enter the Express Service Code to extend it....
... fax multiple page documents and/or legal sized Feeder (ADF) documents. 2 Printer unit Unit you lift to gain access to the ink cartridges. 3 Operator panel Panel on the printer you use support.dell.com or contact technical support. Recommended for scanning, copying, or faxing multiple-...page documents. NOTE: The Express Code is not available in the printer. Enter the Express Service Code to extend it....
User Guide
Page 6
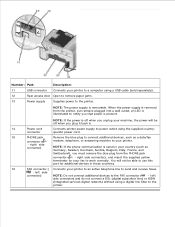
... from the PHONE jack connector ( - right side connector), and insert the supplied yellow terminator for additional devices in . 14 Power cord Connects printer power supply to the FAX connector ( - left side connector) and do not connect a DSL (digital subscriber line) or ISDN (integrated services...additional devices, such as Germany, Sweden, Denmark, Austria, Belgium, Italy, France, and Switzerland), you must remove the blue plug from the printer, but remains plugged into a wall outlet, an LED is illuminated to notify you plug it back in these countries. 16 FAX connector (...
... from the PHONE jack connector ( - right side connector), and insert the supplied yellow terminator for additional devices in . 14 Power cord Connects printer power supply to the FAX connector ( - left side connector) and do not connect a DSL (digital subscriber line) or ISDN (integrated services...additional devices, such as Germany, Sweden, Denmark, Austria, Belgium, Italy, France, and Switzerland), you must remove the blue plug from the printer, but remains plugged into a wall outlet, an LED is illuminated to notify you plug it back in these countries. 16 FAX connector (...
User Guide
Page 7
...steps. and initiate a scan, copy, or fax using the Select button , and left and right Arrow buttons ; Setting Up Your Printer NOTE: Your printer supports Microsoft® Windows® 2000, Windows XP, and Windows XP Professional X64 Edition. If you encounter problems during setup, see ..., fax documents, and print photos from a PictBridge-enabled camera without connecting to a computer. For more information, see Troubleshooting. Contact your printer, follow the steps on when Power is an analog device that only works when directly connected to the PHONE jack connector ( - Initial ...
...steps. and initiate a scan, copy, or fax using the Select button , and left and right Arrow buttons ; Setting Up Your Printer NOTE: Your printer supports Microsoft® Windows® 2000, Windows XP, and Windows XP Professional X64 Edition. If you encounter problems during setup, see ..., fax documents, and print photos from a PictBridge-enabled camera without connecting to a computer. For more information, see Troubleshooting. Contact your printer, follow the steps on when Power is an analog device that only works when directly connected to the PHONE jack connector ( - Initial ...

User Guide
Page 8
... on the display. Number Part: 1 Power 2 Error message light 3 Back 4 Left arrow 5 Cancel 6 Select 7 Right arrow 8 Pause 9 A keypad number or symbol Purpose: To turn your printer on the display. Increase a number on or off. To choose the option that appears on the display. Insert a three-second pause in progress. NOTE: Enter... navigating through a list on the display. In copy mode, select the number of errors such as paper out or a paper jam. Decrease a number on the printer display.
... on the display. Number Part: 1 Power 2 Error message light 3 Back 4 Left arrow 5 Cancel 6 Select 7 Right arrow 8 Pause 9 A keypad number or symbol Purpose: To turn your printer on the display. Increase a number on or off. To choose the option that appears on the display. Insert a three-second pause in progress. NOTE: Enter... navigating through a list on the display. In copy mode, select the number of errors such as paper out or a paper jam. Decrease a number on the printer display.
User Guide
Page 10
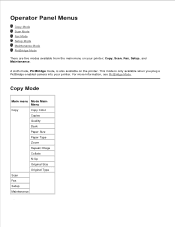
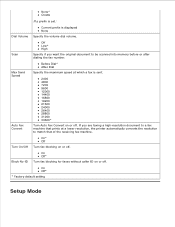
... Panel Menus Copy Mode Scan Mode Fax Mode Setup Mode Maintenance Mode PictBridge Mode There are five modes available from the main menu on the printer. Copy Mode Main menu Mode Main Menu Copy Copy Color Copies Quality Dark Paper Size Paper Type Zoom Repeat Image Collate N-Up Original Size Original... Type Scan Fax Setup Maintenance 1. 2. A sixth mode, PictBridge mode, is only available when you plug a PictBridge-enabled camera into your printer: Copy, Scan, Fax, Setup, and Maintenance. For more information, see PictBridge Mode.
... Panel Menus Copy Mode Scan Mode Fax Mode Setup Mode Maintenance Mode PictBridge Mode There are five modes available from the main menu on the printer. Copy Mode Main menu Mode Main Menu Copy Copy Color Copies Quality Dark Paper Size Paper Type Zoom Repeat Image Collate N-Up Original Size Original... Type Scan Fax Setup Maintenance 1. 2. A sixth mode, PictBridge mode, is only available when you plug a PictBridge-enabled camera into your printer: Copy, Scan, Fax, Setup, and Maintenance. For more information, see PictBridge Mode.
User Guide
Page 13
... Color Scan To Quality Original Size Fax Setup Maintenance 1. If you are working over a network, make sure your computer and printer, and make sure they are copying. Turn on your printer is connected to Scan, and then 3. From the main menu, use the use the left and right Arrow buttons to scroll...
... Color Scan To Quality Original Size Fax Setup Maintenance 1. If you are working over a network, make sure your computer and printer, and make sure they are copying. Turn on your printer is connected to Scan, and then 3. From the main menu, use the use the left and right Arrow buttons to scroll...
User Guide
Page 14
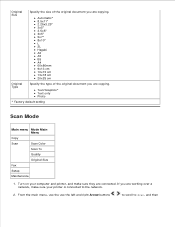
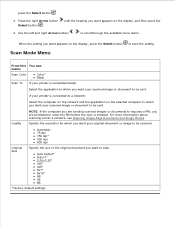
... dpi 600 dpi Original Size Specify the size of the original document you are sending scanned images or documents to requires a PIN, you want your printer is connected to a network: Select the computer on the network and the application on the selected computer to which you want appears on the display... a network, see Scanning Single-Page Documents and Single Photos. Scan Mode Menu From this You can: menu: Scan Color Color* Black Scan To If your printer is initiated. Specify the resolution for which you want your scanned image or document to be sent. 2.
... dpi 600 dpi Original Size Specify the size of the original document you are sending scanned images or documents to requires a PIN, you want your printer is connected to a network: Select the computer on the network and the application on the selected computer to which you want appears on the display... a network, see Scanning Single-Page Documents and Single Photos. Scan Mode Menu From this You can: menu: Scan Color Color* Black Scan To If your printer is initiated. Specify the resolution for which you want your scanned image or document to be sent. 2.
User Guide
Page 16
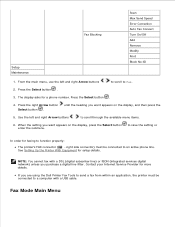
...the Select button . 4. Press the right Arrow button Select button . When the setting you are using the Dell Printer Fax Tools to send a fax from within an application, the printer must be connected to a computer with a DSL (digital subscriber line) or ISDN (integrated services digital network)... buttons to scroll to scroll through the available menu items. 6. See Setting Up the Printer With Equipment for a phone number. right side connector) must be connected to function properly: The printer's FAX connector ( - If you want appears on the display, press the Select button...
...the Select button . 4. Press the right Arrow button Select button . When the setting you are using the Dell Printer Fax Tools to send a fax from within an application, the printer must be connected to a computer with a DSL (digital subscriber line) or ISDN (integrated services digital network)... buttons to scroll to scroll through the available menu items. 6. See Setting Up the Printer With Equipment for a phone number. right side connector) must be connected to function properly: The printer's FAX connector ( - If you want appears on the display, press the Select button...

User Guide
Page 17
... buttons setting is the default). Turn the Auto Answer feature on any of the fax being sent. Press the Select button if you want the printer to a Telephone Line (On Hook Dial). Quality On* Scheduled Off Specify the quality (resolution) of the options listed under the Fax Setup heading, see Manually...
... buttons setting is the default). Turn the Auto Answer feature on any of the fax being sent. Press the Select button if you want the printer to a Telephone Line (On Hook Dial). Quality On* Scheduled Off Specify the quality (resolution) of the options listed under the Fax Setup heading, see Manually...

User Guide
Page 18
...You can: Reports Specify the type of the options listed under the Fax Printing heading, see Additional Fax Options. Set various options controlling how your printer sends faxes. If you want to print. Your Fax Number - When the heading you would like to scroll through the available menus items. ...change more information on any of the options listed under the Ringing and Answering heading, see Additional Fax Options. Set the settings for your printer's fax settings. use the left and right Arrow buttons to set print settings for. Paper Size Paper Type Fit Fax to scroll through...
...You can: Reports Specify the type of the options listed under the Fax Printing heading, see Additional Fax Options. Set various options controlling how your printer sends faxes. If you want to print. Your Fax Number - When the heading you would like to scroll through the available menus items. ...change more information on any of the options listed under the Ringing and Answering heading, see Additional Fax Options. Set the settings for your printer's fax settings. use the left and right Arrow buttons to set print settings for. Paper Size Paper Type Fit Fax to scroll through...

User Guide
Page 20
... want to use fax blocking you must have two or more rings selected. Specify a type of ring for All Print Reports Specify which the printer will only answer incoming calls with that ring. Pattern 1* Pattern 2 Pattern n Error Correction NOTE: The number of the ringer from the built... List Specify the volume of patterns shown is based on the printer. After 1 Ring After 2 Rings After 3 Rings* After 4 Rings Ring Pattern NOTE: In order to occur before the printer answers the fax if the printer is selected the printer answers all incoming calls. Fax Forward Single Double Triple Any*...
... want to use fax blocking you must have two or more rings selected. Specify a type of ring for All Print Reports Specify which the printer will only answer incoming calls with that ring. Pattern 1* Pattern 2 Pattern n Error Correction NOTE: The number of the ringer from the built... List Specify the volume of patterns shown is based on the printer. After 1 Ring After 2 Rings After 3 Rings* After 4 Rings Ring Pattern NOTE: In order to occur before the printer answers the fax if the printer is selected the printer answers all incoming calls. Fax Forward Single Double Triple Any*...
User Guide
Page 21
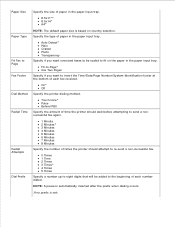
... paper input tray. 8.5x11"* 8.5x14" A4* NOTE: The default paper size is based on the paper in the paper input tray. On* Off Specify the printer dialing method. Auto Detect* Plain Coated Photo Transparency Specify if you want oversized faxes to be added to the beginning of times the... printer should attempt to re-send a non-successful fax. 0 Times 1 Time 2 Times 3 Times* 4 Times 5 Times Specify a number up to eight digits that will be scaled to ...
... paper input tray. 8.5x11"* 8.5x14" A4* NOTE: The default paper size is based on the paper in the paper input tray. On* Off Specify the printer dialing method. Auto Detect* Plain Coated Photo Transparency Specify if you want oversized faxes to be added to the beginning of times the... printer should attempt to re-send a non-successful fax. 0 Times 1 Time 2 Times 3 Times* 4 Times 5 Times Specify a number up to eight digits that will be scaled to ...
User Guide
Page 22
... displayed None Specify the volume dial volume. Max Send Speed Auto Fax Convert Before Dial* After Dial Specify the maximum speed at a lower resolution, the printer automatically converts the resolution to be scanned into memory before or after dialing the fax number. Block No-ID On Off* Turn fax blocking for...
... displayed None Specify the volume dial volume. Max Send Speed Auto Fax Convert Before Dial* After Dial Specify the maximum speed at a lower resolution, the printer automatically converts the resolution to be scanned into memory before or after dialing the fax number. Block No-ID On Off* Turn fax blocking for...

User Guide
Page 25
... NOTE: The default paper size is reset to the defaults. Button Beep Allow* Block Specify if you want to allow the printer fax settings to be reconfigured from the Printer Setup Utility software. Clear Settings Timeout Never After 60 min After 30 min* After 10 min Now Select how much time you... want to elapse before the printer switches to Power Save mode. Host Fax Settings Specify if you want to hear a beep when you press buttons on the operator panel or not...
... NOTE: The default paper size is reset to the defaults. Button Beep Allow* Block Specify if you want to allow the printer fax settings to be reconfigured from the Printer Setup Utility software. Clear Settings Timeout Never After 60 min After 30 min* After 10 min Now Select how much time you... want to elapse before the printer switches to Power Save mode. Host Fax Settings Specify if you want to hear a beep when you press buttons on the operator panel or not...

User Guide
Page 27
...to print. 2.25x3.25" 3.5x5" 4x6"* Mode Mode Main Menu Pictbridge Paper Size Photo Size Layout Quality Paper Type 1. When your printer, the printer automatically switches to PictBridge mode. until the heading 2. PictBridge Mode Menu From this menu: Paper Size Photo Size You can: Specify the ...want appears on the display, and then press the Select button . PictBridge Mode When you plug your PictBridge-enabled camera into your printer changes to PictBridge mode, press the right Arrow button you want appears on the display, press the Select button to save the setting...
...to print. 2.25x3.25" 3.5x5" 4x6"* Mode Mode Main Menu Pictbridge Paper Size Photo Size Layout Quality Paper Type 1. When your printer, the printer automatically switches to PictBridge mode. until the heading 2. PictBridge Mode Menu From this menu: Paper Size Photo Size You can: Specify the ...want appears on the display, and then press the Select button . PictBridge Mode When you plug your PictBridge-enabled camera into your printer changes to PictBridge mode, press the right Arrow button you want appears on the display, press the Select button to save the setting...

User Guide
Page 30
Extend the paper exit tray stop to 50 sheets of the paper. 5. NOTE: The paper exit tray can hold up to catch paper as it exits the printer. Lower the paper exit tray. 6. NOTE: Do not force the paper into the printer. 4. Squeeze and slide the paper guides to rest against the edges of paper. 3.
Extend the paper exit tray stop to 50 sheets of the paper. 5. NOTE: The paper exit tray can hold up to catch paper as it exits the printer. Lower the paper exit tray. 6. NOTE: Do not force the paper into the printer. 4. Squeeze and slide the paper guides to rest against the edges of paper. 3.


