User's Guide
Page 2
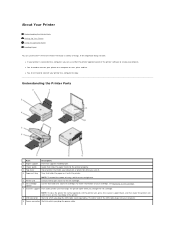
Tray that holds the paper as it . About Your Printer Understanding the Printer Parts Setting Up Your Printer Using the Operator Panel Loading Paper You can use the Dell™ All-In-One Printer 810 to copy. Top of printer that helps the paper feed into which you can use either the printer operator panel or the printer software to create your cartridge, see...
Tray that holds the paper as it . About Your Printer Understanding the Printer Parts Setting Up Your Printer Using the Operator Panel Loading Paper You can use the Dell™ All-In-One Printer 810 to copy. Top of printer that helps the paper feed into which you can use either the printer operator panel or the printer software to create your cartridge, see...
User's Guide
Page 3
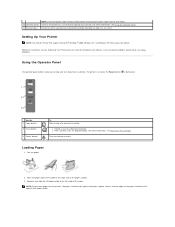
Setting Up Your Printer NOTE: The Dell AIO Printer 810 supports Microsoft® Windows® 2000, Windows XP, and Windows XP Professional x64 Edition. Follow the instructions on which you use to control copying and scanning. For more information, see Using the Operator Panel. NOTE: Do not force paper into the wall outlet. Surface on your...
Setting Up Your Printer NOTE: The Dell AIO Printer 810 supports Microsoft® Windows® 2000, Windows XP, and Windows XP Professional x64 Edition. Follow the instructions on which you use to control copying and scanning. For more information, see Using the Operator Panel. NOTE: Do not force paper into the wall outlet. Surface on your...

User's Guide
Page 7
... or All Programs® Dell Printers® Dell AIO 810® Dell All-In-One Center. Copying Copying Documents or Photos Copying 4x6 Photos Using the Operator Panel Changing Copy Settings To make copies, you want to copy face down on your computer and printer, and make sure they are connected. 2. Load the paper. For portrait orientation: For...
... or All Programs® Dell Printers® Dell AIO 810® Dell All-In-One Center. Copying Copying Documents or Photos Copying 4x6 Photos Using the Operator Panel Changing Copy Settings To make copies, you want to copy face down on your computer and printer, and make sure they are connected. 2. Load the paper. For portrait orientation: For...

User's Guide
Page 8
.../glossy cards with the arrow on the scanner glass. Click Start® Programs or All Programs® Dell Printers® Dell AIO 810® Dell All-In-One Center. Click See More Copy Settings to change options such as paper size and quality. 9. Click See More Copy Settings to: ¡ Choose a copy quality. ¡ Select the blank...
.../glossy cards with the arrow on the scanner glass. Click Start® Programs or All Programs® Dell Printers® Dell AIO 810® Dell All-In-One Center. Click See More Copy Settings to change options such as paper size and quality. 9. Click See More Copy Settings to: ¡ Choose a copy quality. ¡ Select the blank...
User's Guide
Page 10
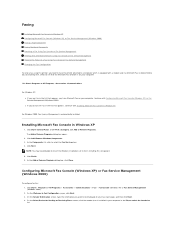
... Faxing Installing Microsoft Fax Console in Windows XP Configuring Microsoft Fax Console (Windows XP) or Fax Service Management (Windows 2000) Faxing a Paper Document Faxing Electronic Documents Receiving a Fax Using Fax Console or Fax Service Management Viewing Sent and Received Faxes Using Fax Console or Fax Service...in the list that is equipped with Configuring Microsoft Fax Console (Windows XP) or Fax Service Management (Windows 2000). Before you have the printer attached to be prompted to insert the Windows installation CD to select the Fax Services box. 4. For Windows XP: l If you ...
... Faxing Installing Microsoft Fax Console in Windows XP Configuring Microsoft Fax Console (Windows XP) or Fax Service Management (Windows 2000) Faxing a Paper Document Faxing Electronic Documents Receiving a Fax Using Fax Console or Fax Service Management Viewing Sent and Received Faxes Using Fax Console or Fax Service...in the list that is equipped with Configuring Microsoft Fax Console (Windows XP) or Fax Service Management (Windows 2000). Before you have the printer attached to be prompted to insert the Windows installation CD to select the Fax Services box. 4. For Windows XP: l If you ...
User's Guide
Page 11
...phone calls, in the TSID box. You are connected. Click Start® Programs or All Programs® Dell Printers® Dell AIO 810® Dell All-In-One Center. In the Dell All-In-One Center, you may cause the computer modem to an active analog phone line. Click Next. 9. When you... NOTE: Your printer must also have DSL broadband service on your machine to create an archive copy of rings) button. 8. When you select this check box, select the Dell AIO 810 to send or receive faxes. Click Next. 16. or multiple-page paper document, use the Dell All-In-One Center. 1. ...
...phone calls, in the TSID box. You are connected. Click Start® Programs or All Programs® Dell Printers® Dell AIO 810® Dell All-In-One Center. In the Dell All-In-One Center, you may cause the computer modem to an active analog phone line. Click Next. 9. When you... NOTE: Your printer must also have DSL broadband service on your machine to create an archive copy of rings) button. 8. When you select this check box, select the Dell AIO 810 to send or receive faxes. Click Next. 16. or multiple-page paper document, use the Dell All-In-One Center. 1. ...

User's Guide
Page 23
To align the ink cartridge: 1. In Windows XP, click Start® Control Panel® Printers and Other Hardware® Printers and Faxes. Snap the lid closed . Aligning an Ink Cartridge You may need to align the ink cartridge when characters are not ...left margin, or when vertical or straight lines appear wavy. 7. In Windows 2000, click Start® Settings® Printers. Lift the printer unit, and hold the scanner support up while lowering the printer unit until it is completely closed . 9. Load plain paper. Insert the new ink cartridge. 8. For more information, see Loading...
To align the ink cartridge: 1. In Windows XP, click Start® Control Panel® Printers and Other Hardware® Printers and Faxes. Snap the lid closed . Aligning an Ink Cartridge You may need to align the ink cartridge when characters are not ...left margin, or when vertical or straight lines appear wavy. 7. In Windows 2000, click Start® Settings® Printers. Lift the printer unit, and hold the scanner support up while lowering the printer unit until it is completely closed . 9. Load plain paper. Insert the new ink cartridge. 8. For more information, see Loading...
User's Guide
Page 24
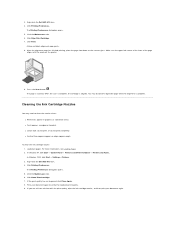
...not print completely. To clean the ink cartridge nozzles: 1. Right-click the Dell AIO 810 icon. 4. If you are still not satisfied with the arrow on the scanner glass. Right-click the Dell AIO 810 icon. 4. Click Print. Make sure the upper left corner of the front ... again. In Windows XP, click Start® Control Panel® Printers and Other Hardware® Printers and Faxes. The Printing Preferences dialog box opens. 5. Click the Maintenance tab. 6. Click the Maintenance tab. 6. Load plain paper. After the alignment page has finished printing, place the page face-down...
...not print completely. To clean the ink cartridge nozzles: 1. Right-click the Dell AIO 810 icon. 4. If you are still not satisfied with the arrow on the scanner glass. Right-click the Dell AIO 810 icon. 4. Click Print. Make sure the upper left corner of the front ... again. In Windows XP, click Start® Control Panel® Printers and Other Hardware® Printers and Faxes. The Printing Preferences dialog box opens. 5. Click the Maintenance tab. 6. Click the Maintenance tab. 6. Load plain paper. After the alignment page has finished printing, place the page face-down...

User's Guide
Page 25
Load paper with the print (glossy) side facing up . To customize your document open , click File® Print. 4. The Printing Preferences dialog box opens. On the Advanced tab, you are using the Dell Picture Studio™, select Printer Settings to the Print dialog box. 5. d. To customize your... print settings, click Preferences, Properties, Options, or Setup (depending on photo/glossy paper. 6. NOTE: If you can only print in ...
Load paper with the print (glossy) side facing up . To customize your document open , click File® Print. 4. The Printing Preferences dialog box opens. On the Advanced tab, you are using the Dell Picture Studio™, select Printer Settings to the Print dialog box. 5. d. To customize your... print settings, click Preferences, Properties, Options, or Setup (depending on photo/glossy paper. 6. NOTE: If you can only print in ...

User's Guide
Page 26
...media type, orientation of the photo, and the number of copies you want. NOTE: Photo/glossy paper is facing up. The Printing Preferences dialog box opens. 4. On the Advanced tab, select the borderless paper size from the drop-down menu, and click OK. 7. With your print settings, click Preferences..., Properties, Options, or Setup (depending on the program or operating system). Click OK or Print (depending on photo/glossy paper. 6. For best results, load photo/glossy paper, and make sure the print side is recommended for the photo from the drop-down menu. 5.
...media type, orientation of the photo, and the number of copies you want. NOTE: Photo/glossy paper is facing up. The Printing Preferences dialog box opens. 4. On the Advanced tab, select the borderless paper size from the drop-down menu, and click OK. 7. With your print settings, click Preferences..., Properties, Options, or Setup (depending on the program or operating system). Click OK or Print (depending on photo/glossy paper. 6. For best results, load photo/glossy paper, and make sure the print side is recommended for the photo from the drop-down menu. 5.

User's Guide
Page 39
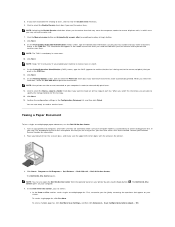
Click Preview Now. 6. Open your computer. . Load the paper. Click Start® Programs or All Programs® Dell Printers® Dell AIO 810® Dell All-In-One Center. Place the document or photo face down on the scanner glass. For portrait orientation: For landscape orientation: 3. Close the ...scanned? For more information, see Loading Paper. 2. Make sure the upper left corner of the front of the item aligns with a computer, you can also open the Dell All-In-One Center from the operator panel on your printer by pressing the Scan button Center opens...
Click Preview Now. 6. Open your computer. . Load the paper. Click Start® Programs or All Programs® Dell Printers® Dell AIO 810® Dell All-In-One Center. Place the document or photo face down on the scanner glass. For portrait orientation: For landscape orientation: 3. Close the ...scanned? For more information, see Loading Paper. 2. Make sure the upper left corner of the front of the item aligns with a computer, you can also open the Dell All-In-One Center from the operator panel on your printer by pressing the Scan button Center opens...

User's Guide
Page 42
... Windows XP, click Start® Control Panel® Printers and Other Hardware®Printers and Faxes. l Select the type of image being copied. l Specify the blank paper size. l Specify the size of the original document being scanned. For more information about the Dell All-In-One Center, click Help in a scanned document (Optical Character Recognition...
... Windows XP, click Start® Control Panel® Printers and Other Hardware®Printers and Faxes. l Select the type of image being copied. l Specify the blank paper size. l Specify the size of the original document being scanned. For more information about the Dell All-In-One Center, click Help in a scanned document (Optical Character Recognition...

User's Guide
Page 43
...to specify Appearance Mode options. Tab Print Setup Advanced Options Quality/Speed - Orientation - Customize how the printer prints several copies of pages remaining in , the Dell Customer Experience Improvement Program. Layout - Maintenance Install Print Cartridge Clean Print Cartridge Align Print Cartridge Print ...Dell Picture Studio 3® Paint Shop Photo Album 5® Paint Shop Photo Album 5. When your operating system, some or all of the paper. The number of pages remaining changes as you to print. Paper Size - Select the size and type of print jobs the printer ...
...to specify Appearance Mode options. Tab Print Setup Advanced Options Quality/Speed - Orientation - Customize how the printer prints several copies of pages remaining in , the Dell Customer Experience Improvement Program. Layout - Maintenance Install Print Cartridge Clean Print Cartridge Align Print Cartridge Print ...Dell Picture Studio 3® Paint Shop Photo Album 5® Paint Shop Photo Album 5. When your operating system, some or all of the paper. The number of pages remaining changes as you to print. Paper Size - Select the size and type of print jobs the printer ...
User's Guide
Page 47
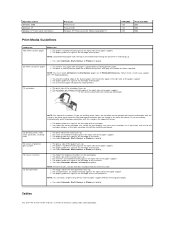
... are loaded vertically against the left edge of the paper. l The paper guide rests against the right side of the cards faces up. NOTE: You can be fed one sheet at a time. l You use banner paper designed for inkjet printers. 10 envelopes l The print side of the envelopes...the paper support. l The paper guide rests against the right side of the paper support. l The transfers are mailing internationally, print landscape orientation with the stamp in the upper left corner and printed with the stamp in Printing Preferences. Cables Your Dell™ All-In-One Printer 810 uses ...
... are loaded vertically against the left edge of the paper. l The paper guide rests against the right side of the cards faces up. NOTE: You can be fed one sheet at a time. l You use banner paper designed for inkjet printers. 10 envelopes l The print side of the envelopes...the paper support. l The paper guide rests against the right side of the paper support. l The transfers are mailing internationally, print landscape orientation with the stamp in the upper left corner and printed with the stamp in Printing Preferences. Cables Your Dell™ All-In-One Printer 810 uses ...
User's Guide
Page 49
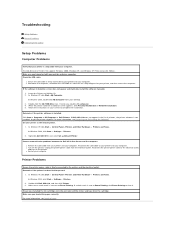
... the Software. For more information, see Loading Paper. l Remove the USB cable from the electrical outlet. Troubleshooting Setup Problems General Problems Improving Print Quality Setup Problems Computer Problems Verify that your printer is next to Pause Printing, click Pause Printing to clear it. The Dell All-In-One Printer 810 supports Windows 2000, Windows XP, and...
... the Software. For more information, see Loading Paper. l Remove the USB cable from the electrical outlet. Troubleshooting Setup Problems General Problems Improving Print Quality Setup Problems Computer Problems Verify that your printer is next to Pause Printing, click Pause Printing to clear it. The Dell All-In-One Printer 810 supports Windows 2000, Windows XP, and...
User's Guide
Page 50
... improve the print quality. The Print dialog box opens. 2. For more information, see Loading Paper. Make sure the paper is not visible: 1. Using your printer only If the paper jam is centered in the paper support: 1. Turn off your printer. 2. l Use the appropriate paper. NOTE: Dell Premium Photo Paper may not be available in your computer. Check for your...
... improve the print quality. The Print dialog box opens. 2. For more information, see Loading Paper. Make sure the paper is not visible: 1. Using your printer only If the paper jam is centered in the paper support: 1. Turn off your printer. 2. l Use the appropriate paper. NOTE: Dell Premium Photo Paper may not be available in your computer. Check for your...


