

Setup Guide
Page 5
... 13 Using Your Inspiron Desktop 16 Front View Features 16 Back View Features 18 Back Panel Connectors 20 Software Features 22 Dell Dock 23 Dell DataSafe Online Backup 24 Solving Problems 25 Beep Codes 25 Network Problems 26 Power Problems 27 Memory Problems 29 Lockups and Software Problems 30 Using Support Tools 32...
... 13 Using Your Inspiron Desktop 16 Front View Features 16 Back View Features 18 Back Panel Connectors 20 Software Features 22 Dell Dock 23 Dell DataSafe Online Backup 24 Solving Problems 25 Beep Codes 25 Network Problems 26 Power Problems 27 Memory Problems 29 Lockups and Software Problems 30 Using Support Tools 32...

Setup Guide
Page 7
...your computer. WARNING: Before you begin any of 5.1 cm (2 inches) on . 5 To prevent overheating ensure that you allow easy access to a power source, adequate ventilation, and a level surface to overheat. Restricting airflow around your Inspiron™ desktop. You should never place your computer in this ...section, read the safety information that you leave at least 10.2 cm (4 inches) at www.dell.com/regulatory_compliance. INSPIRON Setting Up Your Inspiron Desktop This section provides information about setting up your computer may cause it is...
...your computer. WARNING: Before you begin any of 5.1 cm (2 inches) on . 5 To prevent overheating ensure that you allow easy access to a power source, adequate ventilation, and a level surface to overheat. Restricting airflow around your Inspiron™ desktop. You should never place your computer in this ...section, read the safety information that you leave at least 10.2 cm (4 inches) at www.dell.com/regulatory_compliance. INSPIRON Setting Up Your Inspiron Desktop This section provides information about setting up your computer may cause it is...

Setup Guide
Page 12
Setting Up Your Inspiron Desktop Connect the Power Cable CAUTION: To help avoid damaging your computer, ensure that the voltage selector switch is set for the voltage that most closely matches the AC power available in your location. To locate the voltage selector switch, see "Back View Features" on page 18. 10
Setting Up Your Inspiron Desktop Connect the Power Cable CAUTION: To help avoid damaging your computer, ensure that the voltage selector switch is set for the voltage that most closely matches the AC power available in your location. To locate the voltage selector switch, see "Back View Features" on page 18. 10
Setup Guide
Page 13
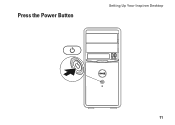
Press the Power Button Setting Up Your Inspiron Desktop 11
Press the Power Button Setting Up Your Inspiron Desktop 11

Setup Guide
Page 15
Ensure that the power cable is connected and the computer is not part of your original order, you need an external modem or network connection and an Internet service ..., connect the telephone cable to the optional modem and to the Internet, you can purchase one at www.dell.com. Click Start → Programs→ Dell DataSafe Local Backup. 4. To create a system recovery media: 1. NOTE: Dell DataSafe Local Backup does not support rewritable discs. Insert the disc or USB key in "Setting Up...
Ensure that the power cable is connected and the computer is not part of your original order, you need an external modem or network connection and an Internet service ..., connect the telephone cable to the optional modem and to the Internet, you can purchase one at www.dell.com. Click Start → Programs→ Dell DataSafe Local Backup. 4. To create a system recovery media: 1. NOTE: Dell DataSafe Local Backup does not support rewritable discs. Insert the disc or USB key in "Setting Up...

Setup Guide
Page 18
Connects to headphones. 5 NOTE: To connect to USB devices that are connected 2 3 occasionally such as memory keys, digital 7 cameras, and MP3 players. 4 3 Headphone connector - Front View Features 9 1 1 Optical drive eject buttons (2) - Eject the optical drive tray when pressed. 2 USB 2.0 connectors (2) - INSPIRON Using Your Inspiron Desktop This section provides information about the 10 features available on the back of your Inspiron™ desktop. Connect 8 to a powered 6 speaker or sound system, use the audio connectors on your computer. 16
Connects to headphones. 5 NOTE: To connect to USB devices that are connected 2 3 occasionally such as memory keys, digital 7 cameras, and MP3 players. 4 3 Headphone connector - Front View Features 9 1 1 Optical drive eject buttons (2) - Eject the optical drive tray when pressed. 2 USB 2.0 connectors (2) - INSPIRON Using Your Inspiron Desktop This section provides information about the 10 features available on the back of your Inspiron™ desktop. Connect 8 to a powered 6 speaker or sound system, use the audio connectors on your computer. 16
Setup Guide
Page 19
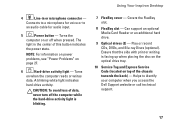
...- Covers the FlexBay slot. 8 FlexBay slot - Helps to an audio cable for audio input. 5 Power button - Connects to a microphone for voice or to identify your computer when you access the Dell Support website or call technical support. 17 Can support an optional Media Card Reader or an additional hard...side with print or writing is blinking. 7 FlexBay cover - Using Your Inspiron Desktop 4 Line-in the center of this button indicates the power state. Turns the computer on or off the computer while the hard-drive activity light is facing up when placing the disc on the optical...
...- Covers the FlexBay slot. 8 FlexBay slot - Helps to an audio cable for audio input. 5 Power button - Connects to a microphone for voice or to identify your computer when you access the Dell Support website or call technical support. 17 Can support an optional Media Card Reader or an additional hard...side with print or writing is blinking. 7 FlexBay cover - Using Your Inspiron Desktop 4 Line-in the center of this button indicates the power state. Turns the computer on or off the computer while the hard-drive activity light is facing up when placing the disc on the optical...
Setup Guide
Page 21
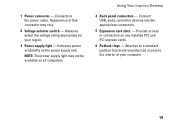
... a standard padlock to prevent unauthorized access to select the voltage rating appropriate for your computer. 19 Appearance of your region. 3 Power supply light - Allows to the interior of this connector may not be available on all computers. Using Your Inspiron Desktop 4 Back... panel connectors - Provide access to the power cable. 1 Power connector - Connect USB, audio, and other devices into the appropriate connectors. 5 Expansion card slots - NOTE: The power supply light may vary. 2 Voltage selector switch - Connects to connectors ...
... a standard padlock to prevent unauthorized access to select the voltage rating appropriate for your computer. 19 Appearance of your region. 3 Power supply light - Allows to the interior of this connector may not be available on all computers. Using Your Inspiron Desktop 4 Back... panel connectors - Provide access to the power cable. 1 Power connector - Connect USB, audio, and other devices into the appropriate connectors. 5 Expansion card slots - NOTE: The power supply light may vary. 2 Voltage selector switch - Connects to connectors ...
Setup Guide
Page 28
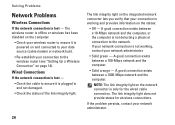
... your connection to the network. Solving Problems Network Problems Wireless Connections If the network connection is lost - • Check the cable to ensure it is powered on and connected to your data source (cable modem or network hub). • Re-establish your connection is working , contact your network administrator. 26 Wired...
... your connection to the network. Solving Problems Network Problems Wireless Connections If the network connection is lost - • Check the cable to ensure it is powered on and connected to your data source (cable modem or network hub). • Re-establish your connection is working , contact your network administrator. 26 Wired...
Setup Guide
Page 29
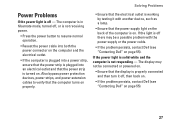
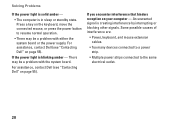
...is in hibernate mode, turned off , then back on. • If the problem persists, contact Dell (see "Contacting Dell" on page 55). 27 Also bypass power protection devices, power strips, and power extension cables to verify that the computer turns on properly. • Ensure that the electrical outlet is... is on . The display may be connected or powered on. • Ensure that the display is properly connected and then turn it with the power supply or the power cable. • If the problem persists, contact Dell (see "Contacting Dell" on page 55). If the light is not responding...
...is in hibernate mode, turned off , then back on. • If the problem persists, contact Dell (see "Contacting Dell" on page 55). 27 Also bypass power protection devices, power strips, and power extension cables to verify that the computer turns on properly. • Ensure that the electrical outlet is... is on . The display may be connected or powered on. • Ensure that the display is properly connected and then turn it with the power supply or the power cable. • If the problem persists, contact Dell (see "Contacting Dell" on page 55). If the light is not responding...
Setup Guide
Page 30
... interrupting or blocking other signals. For assistance, contact Dell (see "Contacting Dell" on page 55). Press a key on your computer - For assistance, contact Dell (see "Contacting Dell" on page 55). If you encounter interference that hinders reception on the keyboard, move the connected mouse, or press the power button to the same electrical outlet. 28
... interrupting or blocking other signals. For assistance, contact Dell (see "Contacting Dell" on page 55). Press a key on your computer - For assistance, contact Dell (see "Contacting Dell" on page 55). If you encounter interference that hinders reception on the keyboard, move the connected mouse, or press the power button to the same electrical outlet. 28

Setup Guide
Page 32
...: Software usually includes installation instructions in an environment similar to get a response by pressing a key on CD. Ensure that the power cable is no longer responding 4. Select the program that it runs in its documentation or on your keyboard or moving your computer.... appears - CAUTION: You might lose data if you are unable to the electrical outlet. Then restart your mouse, press and hold the power button for an earlier Microsoft® Windows® operating system - Run the Program Compatibility Wizard. Press simultaneously. 2. If necessary, uninstall...
...: Software usually includes installation instructions in an environment similar to get a response by pressing a key on CD. Ensure that the power cable is no longer responding 4. Select the program that it runs in its documentation or on your keyboard or moving your computer.... appears - CAUTION: You might lose data if you are unable to the electrical outlet. Then restart your mouse, press and hold the power button for an earlier Microsoft® Windows® operating system - Run the Program Compatibility Wizard. Press simultaneously. 2. If necessary, uninstall...

Setup Guide
Page 37
Your USB device needs more power for assistance (see "Contacting Dell" on page 55). Dell recommends that best describes the problem and follow the remaining troubleshooting steps. 35 S.M.A.R.T error, possible hard drive failure. Contact Dell for it to start the Hardware Troubleshooter: 1. Using Support Tools...problem - To start the search. 3. Disconnect the USB device. Click Start → Help and Support. 2. Use an external power source to resolve the incompatibility. In the search results, select the option that you can use the Hardware Troubleshooter to connect the USB...
Your USB device needs more power for assistance (see "Contacting Dell" on page 55). Dell recommends that best describes the problem and follow the remaining troubleshooting steps. 35 S.M.A.R.T error, possible hard drive failure. Contact Dell for it to start the Hardware Troubleshooter: 1. Using Support Tools...problem - To start the search. 3. Disconnect the USB device. Click Start → Help and Support. 2. Use an external power source to resolve the incompatibility. In the search results, select the option that you can use the Hardware Troubleshooter to connect the USB...

Setup Guide
Page 38
... optional and may invoke the Pre-Boot System Assessment (PSA) on page 30 and run the Dell Diagnostics before you want to enter the System Setup (BIOS) utility. Press during POST (Power On Self Test) to test displays in "Lockups and Software Problems" on your computer. 36 ...Ensure that the device that is active. Starting Dell Diagnostics From Your Hard Drive The Dell Diagnostics is recommended that you print these procedures before...
... optional and may invoke the Pre-Boot System Assessment (PSA) on page 30 and run the Dell Diagnostics before you want to enter the System Setup (BIOS) utility. Press during POST (Power On Self Test) to test displays in "Lockups and Software Problems" on your computer. 36 ...Ensure that the device that is active. Starting Dell Diagnostics From Your Hard Drive The Dell Diagnostics is recommended that you print these procedures before...

Setup Guide
Page 45
... too long and the operating system logo appears, continue to wait until you purchased your computer, while preserving the data files. Select Dell DataSafe Restore and Emergency Backup from the System Recovery Options menu and follow the instructions on your computer. Turn off your computer and ...printer, etc.) connected to access the Advanced Boot Options window. NOTE: Do not disconnect the display, keyboard, mouse, or the power cable. 3. You can use Dell DataSafe Local Backup to restore your hard drive to the operating state it was in when you see the knowledge base article 353560...
... too long and the operating system logo appears, continue to wait until you purchased your computer, while preserving the data files. Select Dell DataSafe Restore and Emergency Backup from the System Recovery Options menu and follow the instructions on your computer. Turn off your computer and ...printer, etc.) connected to access the Advanced Boot Options window. NOTE: Do not disconnect the display, keyboard, mouse, or the power cable. 3. You can use Dell DataSafe Local Backup to restore your hard drive to the operating state it was in when you see the knowledge base article 353560...

Setup Guide
Page 54
... Checklist" on page 54), indicating the tests that may be returned in the product. Remove any of the box. Dell is for repair or credit, as CDs. Call Dell to be included with the item(s) being returned, whether for credit. 5. Pack the equipment to obtain a Return Material...for the return. 3. Include a copy of the Diagnostics Checklist (see "Dell Diagnostics" on the outside of your return. 1. Include a copy of the invoice and a letter describing the reason for any and all items being returned (power cables, software, guides, and so on page 55. 2. or damaged ...
... Checklist" on page 54), indicating the tests that may be returned in the product. Remove any of the box. Dell is for repair or credit, as CDs. Call Dell to be included with the item(s) being returned, whether for credit. 5. Pack the equipment to obtain a Return Material...for the return. 3. Include a copy of the Diagnostics Checklist (see "Dell Diagnostics" on the outside of your return. 1. Include a copy of the invoice and a letter describing the reason for any and all items being returned (power cables, software, guides, and so on page 55. 2. or damaged ...
Setup Guide
Page 62
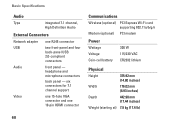
... External Connectors Network adapter one 19-pin HDMI connector 60 Communications Wireless (optional) PCI Express Wi-Fi card supporting 802.11a/b/g/n Modem (optional) PCI modem Power Wattage Voltage Coin-cell battery 300 W 115/230 VAC CR2032 lithium Physical Height 375.92 mm (14.80 inches) Width 176.02 mm (6.93 inches...
... External Connectors Network adapter one 19-pin HDMI connector 60 Communications Wireless (optional) PCI Express Wi-Fi card supporting 802.11a/b/g/n Modem (optional) PCI modem Power Wattage Voltage Coin-cell battery 300 W 115/230 VAC CR2032 lithium Physical Height 375.92 mm (14.80 inches) Width 176.02 mm (6.93 inches...
Setup Guide
Page 67
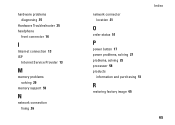
hardware problems diagnosing 35 Hardware Troubleshooter 35 headphone front connector 16 I Internet connection 13 ISP Internet Service Provider 13 M memory problems solving 29 memory support 59 N network connection fixing 26 network connector location 21 O order status 51 P power button 17 power problems, solving 27 problems, solving 25 processor 58 products information and purchasing 51 R restoring factory image 45 Index 65
hardware problems diagnosing 35 Hardware Troubleshooter 35 headphone front connector 16 I Internet connection 13 ISP Internet Service Provider 13 M memory problems solving 29 memory support 59 N network connection fixing 26 network connector location 21 O order status 51 P power button 17 power problems, solving 27 problems, solving 25 processor 58 products information and purchasing 51 R restoring factory image 45 Index 65


