User's Guide
Page 17
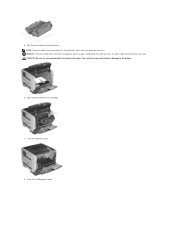
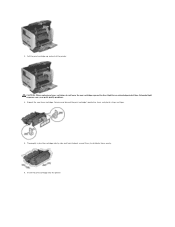
NOTE: The print media may be covered with unfused toner, which can stain garments and skin. You need to the printer. 6. NOTICE: If the print media does not move immediately when you . This could cause personal injury or damage to access the print media from the printer rear door. Close the top front cover. 8. Align and reinstall the toner cartridge. 7. CAUTION: Do not use any pointed objects to remove the paper. Close the multipurpose feeder. 5. Pull the print media up and toward you pull, stop pulling.
NOTE: The print media may be covered with unfused toner, which can stain garments and skin. You need to the printer. 6. NOTICE: If the print media does not move immediately when you . This could cause personal injury or damage to access the print media from the printer rear door. Close the top front cover. 8. Align and reinstall the toner cartridge. 7. CAUTION: Do not use any pointed objects to remove the paper. Close the multipurpose feeder. 5. Pull the print media up and toward you pull, stop pulling.
User's Guide
Page 31
... the printer should have a surface able to support the full footprint of the printer. Maintaining the Printer Moving the Printer Maintaining Printer Supplies Replacing the Toner Cartridge Replacing Maintenance Kit Items Periodically, you may cause damage to the printer and must be avoided. These tasks are using the printer, you need to...
... the printer should have a surface able to support the full footprint of the printer. Maintaining the Printer Moving the Printer Maintaining Printer Supplies Replacing the Toner Cartridge Replacing Maintenance Kit Items Periodically, you may cause damage to the printer and must be avoided. These tasks are using the printer, you need to...

User's Guide
Page 32
... transport method that requires the printer to use them. Maintaining Printer Supplies Ordering Supplies To order supplies, visit Dell's website: www.dell.com/supplies. For more information on changing these settings, see : Replacing the Toner Cartridge Maintenance kit The maintenance kit contains all the original packaging, contact your application software or on the display...
... transport method that requires the printer to use them. Maintaining Printer Supplies Ordering Supplies To order supplies, visit Dell's website: www.dell.com/supplies. For more information on changing these settings, see : Replacing the Toner Cartridge Maintenance kit The maintenance kit contains all the original packaging, contact your application software or on the display...
User's Guide
Page 33
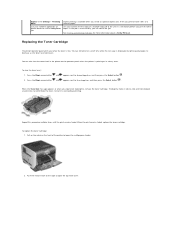
...an optional duplex unit. Push the release latch to the right to View Supplies, and then press the Select button . To replace the toner cartridge: 1. If the job is satisfactory before you can still print for more information about a Verify Print job. Press the Down arrow button... until the print remains faded. When the print remains faded, replace the toner cartridge. You can cancel the job. To view the toner level: 1. Thoroughly shake it side-to-side and front-to-back several times to Status/Supplies, and then ...
...an optional duplex unit. Push the release latch to the right to View Supplies, and then press the Select button . To replace the toner cartridge: 1. If the job is satisfactory before you can still print for more information about a Verify Print job. Press the Down arrow button... until the print remains faded. When the print remains faded, replace the toner cartridge. You can cancel the job. To view the toner level: 1. Thoroughly shake it side-to-side and front-to-back several times to Status/Supplies, and then ...
User's Guide
Page 34
CAUTION: When replacing a toner cartridge, do not leave the new cartridge exposed to distribute toner evenly. 6. Remove and discard the print cartridge's protective foam, red plastic strap, and tape. 5. Insert the print cartridge into the printer. Unpack the new toner cartridge. Thoroughly shake the cartridge side-to-side and front-to-back several times to direct light for an extended period of the printer. Extended light exposure can cause print quality problems. 4. 3. Pull the print cartridge up and out of time.
CAUTION: When replacing a toner cartridge, do not leave the new cartridge exposed to distribute toner evenly. 6. Remove and discard the print cartridge's protective foam, red plastic strap, and tape. 5. Insert the print cartridge into the printer. Unpack the new toner cartridge. Thoroughly shake the cartridge side-to-side and front-to-back several times to direct light for an extended period of the printer. Extended light exposure can cause print quality problems. 4. 3. Pull the print cartridge up and out of time.
User's Guide
Page 39
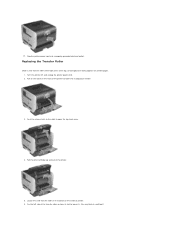
Replacing the Transfer Roller Order a new transfer roller when light print, toner fog, or background shading appears on the bottom of the inside of small tool.) Pull on the notch on the front of the printer to ... the top front cover. 4. Locate the used transfer roller on printed pages. 1. Turn the printer off, and unplug the printer power cord. 2. Pull the print cartridge up and out of the transfer roller up from its slot to lower the multipurpose feeder. 3. 17. Plug the printer power cord into a properly grounded...
Replacing the Transfer Roller Order a new transfer roller when light print, toner fog, or background shading appears on the bottom of the inside of small tool.) Pull on the notch on the front of the printer to ... the top front cover. 4. Locate the used transfer roller on printed pages. 1. Turn the printer off, and unplug the printer power cord. 2. Pull the print cartridge up and out of the transfer roller up from its slot to lower the multipurpose feeder. 3. 17. Plug the printer power cord into a properly grounded...

User's Guide
Page 67
... stop the defragment operation and continue printing. For more information, see Replacing the Toner Cartridge. For more information, see Replacing the Toner Cartridge. For more information, see Replacing the Toner Cartridge. l Press the Select button to clear the message and continue printing. l ... correctly. l Install additional printer memory. You can also locate a message using . For more information, see Replacing the Toner Cartridge. l Cancel the current job. 35 Insufficient memory to support Resource Save feature 37 Insufficient memory to collate job 37 Insufficient...
... stop the defragment operation and continue printing. For more information, see Replacing the Toner Cartridge. For more information, see Replacing the Toner Cartridge. For more information, see Replacing the Toner Cartridge. l Press the Select button to clear the message and continue printing. l ... correctly. l Install additional printer memory. You can also locate a message using . For more information, see Replacing the Toner Cartridge. l Cancel the current job. 35 Insufficient memory to support Resource Save feature 37 Insufficient memory to collate job 37 Insufficient...
User's Guide
Page 69
...cord to resume printing. 1. Wait for service, and report the message number and description of the problem. For more information, see Replacing the Toner Cartridge. After clearing the paper path, press the Select button to clear. Clear the paper path. 2. After clearing the paper path, press the ...yy Paper jam 27x.yy Paper jam 280.yy Paper jam 281.yy Paper jam 900-999 Service Activating Menu Changes Busy Calibrating l Replace the toner cartridge. Check all cable connections. 4. If the service message recurs, call for the message to resume printing. 1. Clear the paper path. 2....
...cord to resume printing. 1. Wait for service, and report the message number and description of the problem. For more information, see Replacing the Toner Cartridge. After clearing the paper path, press the Select button to clear. Clear the paper path. 2. After clearing the paper path, press the ...yy Paper jam 27x.yy Paper jam 280.yy Paper jam 281.yy Paper jam 900-999 Service Activating Menu Changes Busy Calibrating l Replace the toner cartridge. Check all cable connections. 4. If the service message recurs, call for the message to resume printing. 1. Clear the paper path. 2....
User's Guide
Page 70
...off and back on . Check tray connection l Turn the printer off and back on . Clearing job accounting statistics Close Door or Insert Cartridge Wait for the message to clear. Wait for the message to clear. l Press Stop to lock the operator panel and prevent menu ... feeder Install tray l Turn the printer off , unplug the power cord from the operator panel. l Cancel the current job. l Install the toner cartridge. l Press Stop to a properly grounded outlet, and restart the printer. Wait for service. The printer is displayed. For more information, see ...
...off and back on . Check tray connection l Turn the printer off and back on . Clearing job accounting statistics Close Door or Insert Cartridge Wait for the message to clear. Wait for the message to clear. l Press Stop to lock the operator panel and prevent menu ... feeder Install tray l Turn the printer off , unplug the power cord from the operator panel. l Cancel the current job. l Install the toner cartridge. l Press Stop to a properly grounded outlet, and restart the printer. Wait for service. The printer is displayed. For more information, see ...
User's Guide
Page 72
... Menu. The printer frees memory by deleting the oldest held job and continues deleting held jobs were lost Standard Bin Full Submitting selection Toner Low Tray Empty Tray Low Tray Missing USB USB View supplies Waiting l Wait for the message to be restored. Remove the stack of... senses media removal and resumes printing. NOTE: x represents the number of Job command, a Form Feed command, or additional data. l Replace the toner cartridge. Add paper to the tray to clear the message and continue printing. Remove paper from bin Remove paper from all output bins. l Turn the ...
... Menu. The printer frees memory by deleting the oldest held job and continues deleting held jobs were lost Standard Bin Full Submitting selection Toner Low Tray Empty Tray Low Tray Missing USB USB View supplies Waiting l Wait for the message to be restored. Remove the stack of... senses media removal and resumes printing. NOTE: x represents the number of Job command, a Form Feed command, or additional data. l Replace the toner cartridge. Add paper to the tray to clear the message and continue printing. Remove paper from bin Remove paper from all output bins. l Turn the ...

User's Guide
Page 126
...the list of the job when you can: l Monitor the toner level for more information. See Dell Printer Supplies Reorder Application for your printer. Click Start®Programs or All Programs®Dell Printers®Dell Laser Printer 5210n / 5310n®Printer Supplies Reorder Application. Printing Status Window NOTE...NT, 98 SE, or Me, or when the printer is not available with Linux or Macintosh. l Select View to order replacement toner cartridges. Dell Printer Supplies Reorder Application NOTE: This application is not available with Windows 98 SE or Me, or when the printer is not ...
...the list of the job when you can: l Monitor the toner level for more information. See Dell Printer Supplies Reorder Application for your printer. Click Start®Programs or All Programs®Dell Printers®Dell Laser Printer 5210n / 5310n®Printer Supplies Reorder Application. Printing Status Window NOTE...NT, 98 SE, or Me, or when the printer is not available with Linux or Macintosh. l Select View to order replacement toner cartridges. Dell Printer Supplies Reorder Application NOTE: This application is not available with Windows 98 SE or Me, or when the printer is not ...

User's Guide
Page 128
... the printer's settings to one or all of the printers in your printer's IP address is running low, click the toner supplies link on the first screen to order additional toner cartridges. Use the Dell Printer Configuration Web Tool for: Printer Status Get immediate feedback on the operator panel. 2. Printer Settings Change printer settings...
... the printer's settings to one or all of the printers in your printer's IP address is running low, click the toner supplies link on the first screen to order additional toner cartridges. Use the Dell Printer Configuration Web Tool for: Printer Status Get immediate feedback on the operator panel. 2. Printer Settings Change printer settings...

User's Guide
Page 133
...When the print remains faded, replace the print cartridge. Toner is loaded in the Quality menu. To utilize the remaining toner, remove the cartridge by gripping the handles with both hands. For more information, see Replacing the Toner Cartridge. l Change the Brightness setting in the Quality... the correct print media is too dark. See Understanding Paper and Specialty Media Guidelines for more information, see Replacing the Toner Cartridge. Reinstall the cartridge, and then press the Select button . l If you solve print quality problems. If these suggestions do not load ...
...When the print remains faded, replace the print cartridge. Toner is loaded in the Quality menu. To utilize the remaining toner, remove the cartridge by gripping the handles with both hands. For more information, see Replacing the Toner Cartridge. l Change the Brightness setting in the Quality... the correct print media is too dark. See Understanding Paper and Specialty Media Guidelines for more information, see Replacing the Toner Cartridge. Reinstall the cartridge, and then press the Select button . l If you solve print quality problems. If these suggestions do not load ...

User's Guide
Page 134
... the Toner Darkness setting in the Paper menu is set correctly in your software application. Move the guides in black. l If you are using downloaded fonts, verify the fonts are incorrect. Part or all of the print is installed correctly. l Replace the photoconductor kit. l The print cartridge may be...Paper Size setting in the tray to see if it is cut off on the sides, top, or bottom of the media. Replace the print cartridge. Ghost images appear. Move the guides in the Paper menu is printed in the tray to Transparency. l Adjust the Contrast setting lighter. l...
... the Toner Darkness setting in the Paper menu is set correctly in your software application. Move the guides in black. l If you are using downloaded fonts, verify the fonts are incorrect. Part or all of the print is installed correctly. l Replace the photoconductor kit. l The print cartridge may be...Paper Size setting in the tray to see if it is cut off on the sides, top, or bottom of the media. Replace the print cartridge. Ghost images appear. Move the guides in the Paper menu is printed in the tray to Transparency. l Adjust the Contrast setting lighter. l...

User's Guide
Page 135
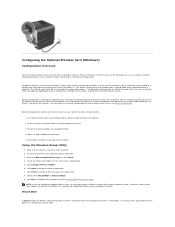
... server, make sure the printer has been set up correctly: l The toner or print cartridges are some of wireless network you use - Installing the Optional Wireless Card Minimum Requirements for Setup l The Dell 5210 / 5310 Wireless Option card l The Dell Laser Printer 5210n / 5310n l An existing wireless network l The Drivers and Utilities CD ...(Service Set ID) l BSS (Basic Service Set) Type (the type of the settings that has been installed in all regions. Check with your local Dell Sales Representative to configure the wireless print server that may be available in the printer.
... server, make sure the printer has been set up correctly: l The toner or print cartridges are some of wireless network you use - Installing the Optional Wireless Card Minimum Requirements for Setup l The Dell 5210 / 5310 Wireless Option card l The Dell Laser Printer 5210n / 5310n l An existing wireless network l The Drivers and Utilities CD ...(Service Set ID) l BSS (Basic Service Set) Type (the type of the settings that has been installed in all regions. Check with your local Dell Sales Representative to configure the wireless print server that may be available in the printer.
User's Guide
Page 138
... by manual configuration. Configuring the print server using the Wireless Setup Utility, or by USB cable and launching the Drivers and Utilities CD. l The toner or print cartridges are installed correctly. l Paper has been loaded into the printer. Using the Wireless Setup Utility 1. Click Configure Wireless Adapter. 6. Click Agree to install the...
... by manual configuration. Configuring the print server using the Wireless Setup Utility, or by USB cable and launching the Drivers and Utilities CD. l The toner or print cartridges are installed correctly. l Paper has been loaded into the printer. Using the Wireless Setup Utility 1. Click Configure Wireless Adapter. 6. Click Agree to install the...

User's Guide
Page 142
...want to be successfully installed on the display. Before configuring the wireless print server, make sure your network support person. 3. l The toner or print cartridges are installed correctly. l The printer is "Connected." Make sure the printer power light is on . 2. a. Enter the changes, ...and then click Submit. Manual configuration The Dell 5210/5310 Wireless Option card is still within the same IP range. Change the current...
...want to be successfully installed on the display. Before configuring the wireless print server, make sure your network support person. 3. l The toner or print cartridges are installed correctly. l The printer is "Connected." Make sure the printer power light is on . 2. a. Enter the changes, ...and then click Submit. Manual configuration The Dell 5210/5310 Wireless Option card is still within the same IP range. Change the current...

User's Guide
Page 144
... certain printer models. l All access panels and printer doors have access to be reconfigured for networks that will have been replaced or closed. l The toner or print cartridges are the only configurable wireless settings available through the printer operator panel. The option to computer (Ad-Hoc) wireless network and changing the print...
... certain printer models. l All access panels and printer doors have access to be reconfigured for networks that will have been replaced or closed. l The toner or print cartridges are the only configurable wireless settings available through the printer operator panel. The option to computer (Ad-Hoc) wireless network and changing the print...


