User's Guide
Page 15
... information on the printer, and then remove the jam. 3 201 Paper Jam Remove Cartridge Open the top front cover, remove the print cartridge, and then remove the jam. 4 200 Paper Jam Remove Cartridge Open the top front cover, remove the print cartridge, and then remove the jam. 5 23x Paper Jam Open Duplex Open the...
... information on the printer, and then remove the jam. 3 201 Paper Jam Remove Cartridge Open the top front cover, remove the print cartridge, and then remove the jam. 4 200 Paper Jam Remove Cartridge Open the top front cover, remove the print cartridge, and then remove the jam. 5 23x Paper Jam Open Duplex Open the...
User's Guide
Page 16
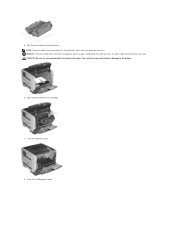
... locations and require the removal of the output options. CAUTION: The inside the printer occur in one of the print cartridge. To go to light for extended periods. Use the cartridge handle whenever you quickly clear the print path. However, they have been grouped to lower the multipurpose feeder. 2. Lift... the paper path is fairly easy depending on the jam message or messages displayed on the underside of the printer. Place the print cartridge aside. NOTICE: Do not touch the photoconductor drum on the operator panel. Paper jams can also occur at the rear of the...
... locations and require the removal of the output options. CAUTION: The inside the printer occur in one of the print cartridge. To go to light for extended periods. Use the cartridge handle whenever you quickly clear the print path. However, they have been grouped to lower the multipurpose feeder. 2. Lift... the paper path is fairly easy depending on the jam message or messages displayed on the underside of the printer. Place the print cartridge aside. NOTICE: Do not touch the photoconductor drum on the operator panel. Paper jams can also occur at the rear of the...
User's Guide
Page 17
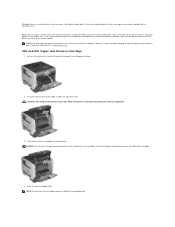
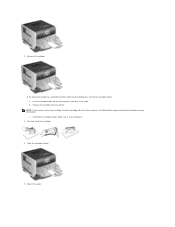
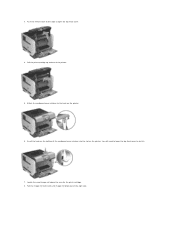
Pull the print media up and toward you pull, stop pulling. This could cause personal injury or damage to access the print media from the printer rear door. NOTE: The print media may be covered with unfused toner, which can stain garments and skin. You need to the printer. 6. Close the multipurpose feeder. Align and reinstall the toner cartridge. 7. Close the top front cover. 8. CAUTION: Do not use any pointed objects to remove the paper. 5. NOTICE: If the print media does not move immediately when you .
Pull the print media up and toward you pull, stop pulling. This could cause personal injury or damage to access the print media from the printer rear door. NOTE: The print media may be covered with unfused toner, which can stain garments and skin. You need to the printer. 6. Close the multipurpose feeder. Align and reinstall the toner cartridge. 7. Close the top front cover. 8. CAUTION: Do not use any pointed objects to remove the paper. 5. NOTICE: If the print media does not move immediately when you .
User's Guide
Page 22
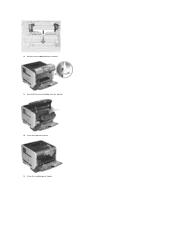
2. Remove all envelopes. b. c. Load the envelope feeder. 5. If the jammed envelope has entered the printer and cannot be removed. Adjust the guide. a. See 200 and 201 Paper Jam Remove Cartridge for more information. Reinstall the envelope feeder. Make sure it aside. Flex and stack the envelopes. 4. Lift the envelope feeder up out of the printer, and then set it snaps into place. 3. Remove the envelope from the printer. NOTE: If you cannot remove the envelope, the print cartridge will have to be pulled out, remove the envelope feeder.
2. Remove all envelopes. b. c. Load the envelope feeder. 5. If the jammed envelope has entered the printer and cannot be removed. Adjust the guide. a. See 200 and 201 Paper Jam Remove Cartridge for more information. Reinstall the envelope feeder. Make sure it aside. Flex and stack the envelopes. 4. Lift the envelope feeder up out of the printer, and then set it snaps into place. 3. Remove the envelope from the printer. NOTE: If you cannot remove the envelope, the print cartridge will have to be pulled out, remove the envelope feeder.
User's Guide
Page 31
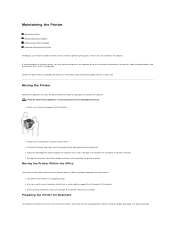
... footprint of the printer. l Always turn off the printer using the proper packaging. Maintaining the Printer Moving the Printer Maintaining Printer Supplies Replacing the Toner Cartridge Replacing Maintenance Kit Items Periodically, you may cause damage to the printer and must remain in your area. Moving the Printer Follow these guidelines to...
... footprint of the printer. l Always turn off the printer using the proper packaging. Maintaining the Printer Moving the Printer Maintaining Printer Supplies Replacing the Toner Cartridge Replacing Maintenance Kit Items Periodically, you may cause damage to the printer and must remain in your area. Moving the Printer Follow these guidelines to...

User's Guide
Page 32
...Roller When the paper fails to properly feed from 1 (lightest setting) to print two or more information on changing these settings, see : Replacing the Toner Cartridge Maintenance kit The maintenance kit contains all the original packaging, contact your application software or on the back). must be securely fastened to 32 pages... on a sheet of print media. The printer must stay upright throughout the shipment. Maintaining Printer Supplies Ordering Supplies To order supplies, visit Dell's website: www.dell.com/supplies. Store supplies right side up to its pallet.
...Roller When the paper fails to properly feed from 1 (lightest setting) to print two or more information on changing these settings, see : Replacing the Toner Cartridge Maintenance kit The maintenance kit contains all the original packaging, contact your application software or on the back). must be securely fastened to 32 pages... on a sheet of print media. The printer must stay upright throughout the shipment. Maintaining Printer Supplies Ordering Supplies To order supplies, visit Dell's website: www.dell.com/supplies. Store supplies right side up to its pallet.
User's Guide
Page 33
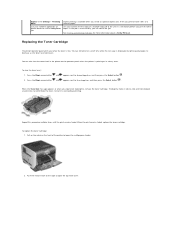
... the toner is unsatisfactory, you install an optional duplex unit. Replacing the Toner Cartridge The printer operator panel alerts you experience faded print, remove the toner cartridge. When the print remains faded, replace the toner cartridge. To replace the toner cartridge: 1. It lets you print on both sides of a sheet of a multiple-copy job...
... the toner is unsatisfactory, you install an optional duplex unit. Replacing the Toner Cartridge The printer operator panel alerts you experience faded print, remove the toner cartridge. When the print remains faded, replace the toner cartridge. To replace the toner cartridge: 1. It lets you print on both sides of a sheet of a multiple-copy job...
User's Guide
Page 34
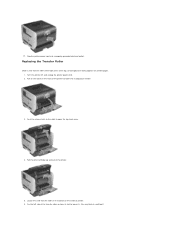
Unpack the new toner cartridge. Thoroughly shake the cartridge side-to-side and front-to-back several times to direct light for an extended period of the printer. Pull the print cartridge up and out of time. Extended light exposure can cause print quality problems. 4. Insert the print cartridge into the printer. Remove and discard the print cartridge's protective foam, red plastic strap, and tape. 5. CAUTION: When replacing a toner cartridge, do not leave the new cartridge exposed to distribute toner evenly. 6. 3.
Unpack the new toner cartridge. Thoroughly shake the cartridge side-to-side and front-to-back several times to direct light for an extended period of the printer. Pull the print cartridge up and out of time. Extended light exposure can cause print quality problems. 4. Insert the print cartridge into the printer. Remove and discard the print cartridge's protective foam, red plastic strap, and tape. 5. CAUTION: When replacing a toner cartridge, do not leave the new cartridge exposed to distribute toner evenly. 6. 3.
User's Guide
Page 36
Attach the cardboard cover retainer to the left until charge roll drops out of the printer. 5. Push the release latch to the right to do this. 7. Insert the hook on the bottom of the cardboard cover retainer into the slot on the printer. 6. You will need to lower the top front cover to open the top front cover. 4. Locate the used charge roll above the area for the print cartridge. 8. Pull the print cartridge up and out of the right side. Pull the charge roll to the hook on the printer. 3.
Attach the cardboard cover retainer to the left until charge roll drops out of the printer. 5. Push the release latch to the right to do this. 7. Insert the hook on the bottom of the cardboard cover retainer into the slot on the printer. 6. You will need to lower the top front cover to open the top front cover. 4. Locate the used charge roll above the area for the print cartridge. 8. Pull the print cartridge up and out of the right side. Pull the charge roll to the hook on the printer. 3.
User's Guide
Page 38
Close the multipurpose feeder. Close the top front cover. 16. Reinstall the print cartridge into the printer. 15. Remove the cardboard cover retainer. 14. 13.
Close the multipurpose feeder. Close the top front cover. 16. Reinstall the print cartridge into the printer. 15. Remove the cardboard cover retainer. 14. 13.
User's Guide
Page 39
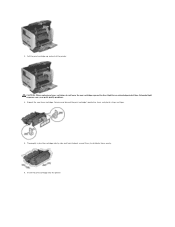
... left side of the transfer roller up and out of small tool.) Turn the printer off, and unplug the printer power cord. 2. Pull the print cartridge up from its slot to open the top front cover. 4.
... left side of the transfer roller up and out of small tool.) Turn the printer off, and unplug the printer power cord. 2. Pull the print cartridge up from its slot to open the top front cover. 4.
User's Guide
Page 40
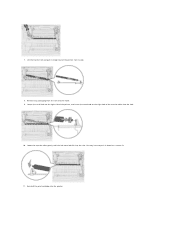
7. Lift the transfer roll and pull it straight out of the transfer roller into the hole. 10. Remove any packaging from the new transfer roller. 9. Locate the small hole on the right side of the printer, and insert the metal tab on the right side of the printer. Set it down for a secure fit. 11. Lower the transfer roller gently until the left metal tab fits into the printer. Reinstall the print cartridge into the slot. You may have to push it aside. 8.
7. Lift the transfer roll and pull it straight out of the transfer roller into the hole. 10. Remove any packaging from the new transfer roller. 9. Locate the small hole on the right side of the printer, and insert the metal tab on the right side of the printer. Set it down for a secure fit. 11. Lower the transfer roller gently until the left metal tab fits into the printer. Reinstall the print cartridge into the slot. You may have to push it aside. 8.
User's Guide
Page 50
..., use envelopes that can cause feeding problems and print quality problems. Print five more sheets of any doubts about the envelopes you replace the print cartridge), complete the following steps to Heavy, or set the Paper Size/Type from the operator panel, the printer driver, or the Local Printer Setup Utility...
..., use envelopes that can cause feeding problems and print quality problems. Print five more sheets of any doubts about the envelopes you replace the print cartridge), complete the following steps to Heavy, or set the Paper Size/Type from the operator panel, the printer driver, or the Local Printer Setup Utility...
User's Guide
Page 51
... grain direction of paper packages. Card Stock Card stock is preferred, especially when printing bar codes. Print five more sheets of the sheet. Dell recommends zone coating of the original carton, make sure they rest on card stock: l Set the Paper Type menu item in the Paper...chemicals that have adhesive to avoid paper feeding problems and uneven print quality. Adhesive material contaminates the printer and could void the printer and cartridge warranties. After printing approximately 10,000 pages of card stock (or each time you store individual packages of paper out of the adhesive...
... grain direction of paper packages. Card Stock Card stock is preferred, especially when printing bar codes. Print five more sheets of the sheet. Dell recommends zone coating of the original carton, make sure they rest on card stock: l Set the Paper Type menu item in the Paper...chemicals that have adhesive to avoid paper feeding problems and uneven print quality. Adhesive material contaminates the printer and could void the printer and cartridge warranties. After printing approximately 10,000 pages of card stock (or each time you store individual packages of paper out of the adhesive...

User's Guide
Page 67
.... l Install additional printer memory. l Install additional printer memory. For more information, see Replacing the Toner Cartridge. For more information, see Replacing the Toner Cartridge. l Check tray length and width guides to stop the defragment operation and continue printing. l Cancel the current... Make sure the link buffers are using the index. l Cancel the current job. l Install additional printer memory. Remove the print cartridge, and install a supported one. If MP Feeder Size is set to Auto, then exit the menus to activate the link buffer changes...
.... l Install additional printer memory. l Install additional printer memory. For more information, see Replacing the Toner Cartridge. For more information, see Replacing the Toner Cartridge. l Check tray length and width guides to stop the defragment operation and continue printing. l Cancel the current... Make sure the link buffers are using the index. l Cancel the current job. l Install additional printer memory. Remove the print cartridge, and install a supported one. If MP Feeder Size is set to Auto, then exit the menus to activate the link buffer changes...
User's Guide
Page 69
... to resume printing. 1. After clearing the paper path, press the Select button to resume printing. 1. For more information, see Replacing the Toner Cartridge. After clearing the paper path, press the Select button to clear the message and continue printing. 1. Clear the paper path. 2. 88 Toner ...Paper jam 27x.yy Paper jam 280.yy Paper jam 281.yy Paper jam 900-999 Service Activating Menu Changes Busy Calibrating l Replace the toner cartridge. l Press the Select button to resume printing. 1. Clear the paper path. 2. After clearing the paper path, press the Select button to ...
... to resume printing. 1. After clearing the paper path, press the Select button to resume printing. 1. For more information, see Replacing the Toner Cartridge. After clearing the paper path, press the Select button to clear the message and continue printing. 1. Clear the paper path. 2. 88 Toner ...Paper jam 27x.yy Paper jam 280.yy Paper jam 281.yy Paper jam 900-999 Service Activating Menu Changes Busy Calibrating l Replace the toner cartridge. l Press the Select button to resume printing. 1. Clear the paper path. 2. After clearing the paper path, press the Select button to ...
User's Guide
Page 70
l Press the Select button to cancel the operation. l Install the toner cartridge. l Press Stop to clear the message and print without using the device. NOTE: Do not turn the printer off , unplug the power cord from the ... the printer off , unplug the power cord from the wall outlet, and then remove the duplex unit. Clearing job accounting statistics Close Door or Insert Cartridge Wait for the message to delete the specified job. l Close the upper front door. l Press the Select button to clear. Delete all held jobs. Deleting...
l Press the Select button to cancel the operation. l Install the toner cartridge. l Press Stop to clear the message and print without using the device. NOTE: Do not turn the printer off , unplug the power cord from the ... the printer off , unplug the power cord from the wall outlet, and then remove the duplex unit. Clearing job accounting statistics Close Door or Insert Cartridge Wait for the message to delete the specified job. l Close the upper front door. l Press the Select button to clear. Delete all held jobs. Deleting...
User's Guide
Page 72
... . Wait for the message to clear. Restoring held job(s) x/y Some held jobs until there is processing data through the specified USB port. l Replace the toner cartridge. Load paper in the tray to the factory default setting except: ¡ The Display Language setting in the "Setup" Menu. ¡ All settings in the...
... . Wait for the message to clear. Restoring held job(s) x/y Some held jobs until there is processing data through the specified USB port. l Replace the toner cartridge. Load paper in the tray to the factory default setting except: ¡ The Display Language setting in the "Setup" Menu. ¡ All settings in the...

User's Guide
Page 126
...the job when you send a job to change the appearance of the list of toner so you can be launched from the Web, click Visit Dell's cartridge ordering web site. 3. You can order toner by phone, call the number that came with your operating system. Software Overview...Windows NT, 98 SE, or Me, or when the printer is connected locally to a network. Click Start®Programs or All Programs®Dell Printers®Dell Laser Printer 5210n / 5310n®Printer Supplies Reorder Application. Printing Status Window NOTE: This application is not available with Windows 98 SE or Me, or when...
...the job when you send a job to change the appearance of the list of toner so you can be launched from the Web, click Visit Dell's cartridge ordering web site. 3. You can order toner by phone, call the number that came with your operating system. Software Overview...Windows NT, 98 SE, or Me, or when the printer is connected locally to a network. Click Start®Programs or All Programs®Dell Printers®Dell Laser Printer 5210n / 5310n®Printer Supplies Reorder Application. Printing Status Window NOTE: This application is not available with Windows 98 SE or Me, or when...

User's Guide
Page 128
.... Press the Menu button on printer supply status. When toner is , print a network setup page, which lists the IP address. The Dell Printer Configuration Web Tool feature also lets you change printer settings and keep track of each printer's IP address. NOTE: You must be a... network administrator to Reports, and then press the Select button . 3. Press the Down arrow button until appears next to order additional toner cartridges. Copy Printer Settings Quickly clone the printer's settings to another printer or printers on the network just by typing each printer on the network...
.... Press the Menu button on printer supply status. When toner is , print a network setup page, which lists the IP address. The Dell Printer Configuration Web Tool feature also lets you change printer settings and keep track of each printer's IP address. NOTE: You must be a... network administrator to Reports, and then press the Select button . 3. Press the Down arrow button until appears next to order additional toner cartridges. Copy Printer Settings Quickly clone the printer's settings to another printer or printers on the network just by typing each printer on the network...


