Owner's Manual
Page 2
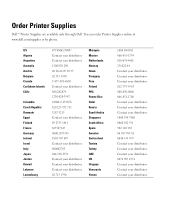
... distributor. Contact your distributor. 0870 907 4574 Contact your distributor. Contact your distributor. You can order Printer Supplies online at www.dell.com/supplies or by phone. Contact your distributor. 02.713 1590 Malaysia Mexico Netherlands Norway Oman Paraguay Peru Poland ... 7486 0860 102 591 902 120 385 08 587 705 81 0848 335 599 Contact your distributor. Order Printer Supplies Dell™ Printer Supplies are available only through Dell. US Algeria Argentina Australia Austria Belgium Canada Caribbean Islands Chile Colombia Czech Republic Denmark Egypt Finland France Germany ...
... distributor. Contact your distributor. 0870 907 4574 Contact your distributor. Contact your distributor. You can order Printer Supplies online at www.dell.com/supplies or by phone. Contact your distributor. 02.713 1590 Malaysia Mexico Netherlands Norway Oman Paraguay Peru Poland ... 7486 0860 102 591 902 120 385 08 587 705 81 0848 335 599 Contact your distributor. Order Printer Supplies Dell™ Printer Supplies are available only through Dell. US Algeria Argentina Australia Austria Belgium Canada Caribbean Islands Chile Colombia Czech Republic Denmark Egypt Finland France Germany ...
Owner's Manual
Page 4
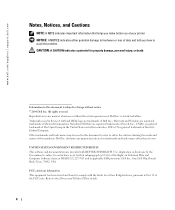
...252.227-7013 and in the United States and other than its own. www.dell.com/supplies | support.dell.com Notes, Notices, and Cautions NOTE: A NOTE indicates important information that helps you make better use of your printer NOTICE: A NOTICE indicates either the entities claiming the marks and names of ...data and tells you how to avoid the problem. Other trademarks and trade names may be used in subparagraph (c)(1)(ii) of Dell Inc.; All rights reserved. UNIX is...
...252.227-7013 and in the United States and other than its own. www.dell.com/supplies | support.dell.com Notes, Notices, and Cautions NOTE: A NOTE indicates important information that helps you make better use of your printer NOTICE: A NOTICE indicates either the entities claiming the marks and names of ...data and tells you how to avoid the problem. Other trademarks and trade names may be used in subparagraph (c)(1)(ii) of Dell Inc.; All rights reserved. UNIX is...
Owner's Manual
Page 6
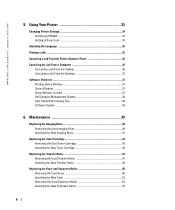
www.dell.com/supplies | support.dell.com 5 Using Your Printer 33 Changing Printer Settings 34 Initializing NVRAM ...35 Setting of Panel Lock 35 Adjusting the Language 36 Printing a Job ...36 Canceling a Job From the Printer Operator Panel 36 Canceling the Job From a Computer 36 Canceling a Job From the Taskbar 36 Canceling a Job From the Desktop 37 Software...
www.dell.com/supplies | support.dell.com 5 Using Your Printer 33 Changing Printer Settings 34 Initializing NVRAM ...35 Setting of Panel Lock 35 Adjusting the Language 36 Printing a Job ...36 Canceling a Job From the Printer Operator Panel 36 Canceling the Job From a Computer 36 Canceling a Job From the Taskbar 36 Canceling a Job From the Desktop 37 Software...

Owner's Manual
Page 12
NOTE: For A4 paper, push the lever to the edge of the tray. Pull the tray out of your print jobs in the standard 500-sheet tray. 1. www.dell.com/supplies | support.dell.com Loading the Standard Tray Load the print media used for the majority of the printer until it from the printer. 2. The width guides should be fully extended. Slide the width guides to the A4 position. 12 Loading Paper Hold the tray with both hands, lift the front slightly, and remove it stops.
NOTE: For A4 paper, push the lever to the edge of the tray. Pull the tray out of your print jobs in the standard 500-sheet tray. 1. www.dell.com/supplies | support.dell.com Loading the Standard Tray Load the print media used for the majority of the printer until it from the printer. 2. The width guides should be fully extended. Slide the width guides to the A4 position. 12 Loading Paper Hold the tray with both hands, lift the front slightly, and remove it stops.

Owner's Manual
Page 14
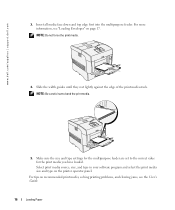
Insert the tray into the tray, configure the Paper Type settings for that tray according to the message on the operator panel. 14 Loading Paper If you load any print media into the printer, and push until they rest lightly against the edge of the print media stack. 7. www.dell.com/supplies | support.dell.com 6. Slide the width guides and length guide until it stops. 8.
Insert the tray into the tray, configure the Paper Type settings for that tray according to the message on the operator panel. 14 Loading Paper If you load any print media into the printer, and push until they rest lightly against the edge of the print media stack. 7. www.dell.com/supplies | support.dell.com 6. Slide the width guides and length guide until it stops. 8.
Owner's Manual
Page 16
www.dell.com/supplies | support.dell.com 3. For more information, see the User's Guide. 16 Loading Paper NOTE: Be careful not to the correct value for the print media you have ... and top edge first into the multipurpose feeder. For tips on recommended print media, solving printing problems, and clearing jams, see "Loading Envelopes" on the printer operator panel. Slide the width guides until they rest lightly against the edge of the print media stack. Make sure the size and type settings...
www.dell.com/supplies | support.dell.com 3. For more information, see the User's Guide. 16 Loading Paper NOTE: Be careful not to the correct value for the print media you have ... and top edge first into the multipurpose feeder. For tips on recommended print media, solving printing problems, and clearing jams, see "Loading Envelopes" on the printer operator panel. Slide the width guides until they rest lightly against the edge of the print media stack. Make sure the size and type settings...

Owner's Manual
Page 20
..., click to a network and not your computer or a print server using a USB or parallel cable. Click Cancel. www.dell.com/supplies | support.dell.com A local printer is a printer attached to the options you installed. After the printer driver has been installed, you need to do the Installable Options settings in Windows 2000, Windows XP, and Server...
..., click to a network and not your computer or a print server using a USB or parallel cable. Click Cancel. www.dell.com/supplies | support.dell.com A local printer is a printer attached to the options you installed. After the printer driver has been installed, you need to do the Installable Options settings in Windows 2000, Windows XP, and Server...

Owner's Manual
Page 24
... appears in a UNIX or Linux environment, you need to mount the CD according to your system environment. The Printer Settings page is displayed. www.dell.com/supplies | support.dell.com Network Set-Up NOTE: To use this situation, disable the Windows XP firewall before you install the... Dell printer software. In the Search box, type firewall and then click the green arrow. 3. NOTICE: Dell recommends that you enable your...
... appears in a UNIX or Linux environment, you need to mount the CD according to your system environment. The Printer Settings page is displayed. www.dell.com/supplies | support.dell.com Network Set-Up NOTE: To use this situation, disable the Windows XP firewall before you install the... Dell printer software. In the Search box, type firewall and then click the green arrow. 3. NOTICE: Dell recommends that you enable your...

Owner's Manual
Page 26
... Adobe License Agreement appears, click to install the Dell software and documentation. When the Congratulations! Launch the Dell Printer Configuration Web Tool. 2. Click E-Mail Alert link. 3. You can set up the Dell Printer Configuration Web Tool to send you want to order replacement consumables, just click the Dell supplies link right from your User's Guide for Network...
... Adobe License Agreement appears, click to install the Dell software and documentation. When the Congratulations! Launch the Dell Printer Configuration Web Tool. 2. Click E-Mail Alert link. 3. You can set up the Dell Printer Configuration Web Tool to send you want to order replacement consumables, just click the Dell supplies link right from your User's Guide for Network...
Owner's Manual
Page 28
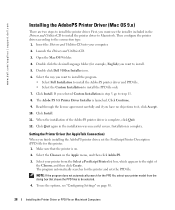
...printer driver to install the printer driver. Then configure the printer driver according to it, click Accept. 10. Click Continue. 9. Click Quit again in step 5, go to be selected. 4. Select the Chooser on . 2. Launch the Drivers and Utilities CD. 3. Double click Dell 5100cn... to the connection type. 1. Open the Mac OS 9 folder. 4. The program automatically searches for this printer. 1. www.dell.com/supplies | support.dell.com Installing the AdobePS Printer Driver (Mac OS 9.x) There are two steps to Macintosh. Click Install. When the installation of the Chooser...
...printer driver to install the printer driver. Then configure the printer driver according to it, click Accept. 10. Click Continue. 9. Click Quit again in step 5, go to be selected. 4. Select the Chooser on . 2. Launch the Drivers and Utilities CD. 3. Double click Dell 5100cn... to the connection type. 1. Open the Mac OS 9 folder. 4. The program automatically searches for this printer. 1. www.dell.com/supplies | support.dell.com Installing the AdobePS Printer Driver (Mac OS 9.x) There are two steps to Macintosh. Click Install. When the installation of the Chooser...
Owner's Manual
Page 30
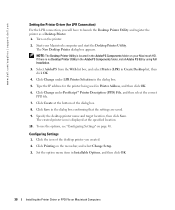
www.dell.com/supplies | support.dell.com Setting the Printer Driver (for the printer being used in the dialog box confirming that the settings are saved. 9. Click Create at the specified location. 10. The New Desktop Printer dialog box appears. Specify the desktop printer name and target ...install Adobe PS 8.8 by using Full Installation. 3. The created printer icon is displayed at the bottom of the desktop printer you will have to launch the Desktop Printer Utility and register the printer as a Desktop Printer. 1. Configuring Settings 1. Set the option menu item in ...
www.dell.com/supplies | support.dell.com Setting the Printer Driver (for the printer being used in the dialog box confirming that the settings are saved. 9. Click Create at the specified location. 10. The New Desktop Printer dialog box appears. Specify the desktop printer name and target ...install Adobe PS 8.8 by using Full Installation. 3. The created printer icon is displayed at the bottom of the desktop printer you will have to launch the Desktop Printer Utility and register the printer as a Desktop Printer. 1. Configuring Settings 1. Set the option menu item in ...

Owner's Manual
Page 32
... options that have to use . 3. Select your printer from Printer Model. 4. Select IP Printing from Printer Model, and confirm Dell Laser Printer 5100cn is not selected, select it. www.dell.com/supplies | support.dell.com When Using AppleTalk 1. Start Print Center. Select the printer you want to change the settings. 32 Installing the Printer Driver or PPD File on the Print Center...
... options that have to use . 3. Select your printer from Printer Model. 4. Select IP Printing from Printer Model, and confirm Dell Laser Printer 5100cn is not selected, select it. www.dell.com/supplies | support.dell.com When Using AppleTalk 1. Start Print Center. Select the printer you want to change the settings. 32 Installing the Printer Driver or PPD File on the Print Center...

Owner's Manual
Page 34
...appears, and press or . • If the selection is a menu, the menu is opened and the first printer setting in the menus. Press . www.dell.com/supplies | support.dell.com Changing Printer Settings NOTE: For detailed explanations of values for the menu item. When you first enter the... printer menus from the operator panel, an asterisk appears next to the setting to identify it .) Each menu item ...
...appears, and press or . • If the selection is a menu, the menu is opened and the first printer setting in the menus. Press . www.dell.com/supplies | support.dell.com Changing Printer Settings NOTE: For detailed explanations of values for the menu item. When you first enter the... printer menus from the operator panel, an asterisk appears next to the setting to identify it .) Each menu item ...

Owner's Manual
Page 36
... operator panel: 1. Press Menu. 2. Verify that the correct printer is canceled. Double-click the printer icon. A list of copies). 4. Open the file you want to adjust printer settings not available from a Microsoft® Windows® application: 1. Click Properties or Setup to print. 2. www.dell.com/supplies | support.dell.com Adjusting the Language To display a different language...
... operator panel: 1. Press Menu. 2. Verify that the correct printer is canceled. Double-click the printer icon. A list of copies). 4. Open the file you want to adjust printer settings not available from a Microsoft® Windows® application: 1. Click Properties or Setup to print. 2. www.dell.com/supplies | support.dell.com Adjusting the Language To display a different language...

Owner's Manual
Page 38
... the setup disk is located inside the front door of work required when installing the printer driver. • Install in advance the Dell Laser Printer 5100cn printer driver in the computer on the network. Click Start →All Programs →Dell Printers →Dell Laser Printer 5100cn →Dell Supplies Management System. You can order consumables by phone, call the number that you want...
... the setup disk is located inside the front door of work required when installing the printer driver. • Install in advance the Dell Laser Printer 5100cn printer driver in the computer on the network. Click Start →All Programs →Dell Printers →Dell Laser Printer 5100cn →Dell Supplies Management System. You can order consumables by phone, call the number that you want...
Owner's Manual
Page 40
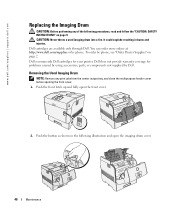
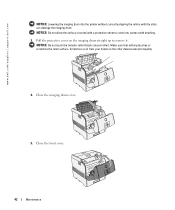
... up and fully open the imaging drum cover. 40 Maintenance Dell cartridges are available only through Dell. You can order more online at http://www.dell.com/supplies or by phone, see "Order Printer Supplies" on page 9. Removing the Used Imaging Drum NOTE: Remove...the button as shown in burns and injuries. Dell recommends Dell cartridges for problems caused by using accessories, parts, or components not supplied by Dell. Dell does not provide warranty coverage for your printer. www.dell.com/supplies | support.dell.com Replacing the Imaging Drum CAUTION: Before performing...
... up and fully open the imaging drum cover. 40 Maintenance Dell cartridges are available only through Dell. You can order more online at http://www.dell.com/supplies or by phone, see "Order Printer Supplies" on page 9. Removing the Used Imaging Drum NOTE: Remove...the button as shown in burns and injuries. Dell recommends Dell cartridges for problems caused by using accessories, parts, or components not supplied by Dell. Dell does not provide warranty coverage for your printer. www.dell.com/supplies | support.dell.com Replacing the Imaging Drum CAUTION: Before performing...
Owner's Manual
Page 42
NOTICE: Do not touch the transfer roller (black-colored roller). Scratches or oil from your hands on the imaging drum straight up to come into the printer without correctly aligning the rollers with a protective sheet to remove it. Make sure that nothing touches or scratches the roller surface. Pull the protective cover ... imaging drum cover. 5. NOTICE: Do not allow the surface covered with the slots can damage the imaging drum. Close the front cover. 42 Maintenance www.dell.com/supplies | support.dell.com NOTICE: Lowering the imaging drum into contact with anything. 3.
NOTICE: Do not touch the transfer roller (black-colored roller). Scratches or oil from your hands on the imaging drum straight up to come into the printer without correctly aligning the rollers with a protective sheet to remove it. Make sure that nothing touches or scratches the roller surface. Pull the protective cover ... imaging drum cover. 5. NOTICE: Do not allow the surface covered with the slots can damage the imaging drum. Close the front cover. 42 Maintenance www.dell.com/supplies | support.dell.com NOTICE: Lowering the imaging drum into contact with anything. 3.

Owner's Manual
Page 43
... the following procedures, read and follow the "CAUTION: SAFETY INSTRUCTIONS" on page 9. To order by phone, see "Order Printer Supplies" on the operator panel to alert you want to replace and then rotate them to order a new toner cartridge. Remove the top ...cover. 2. Dell toner cartridge are available only through Dell. Dell recommends Dell-branded toner cartridges for problems caused by using accessories, parts, or components not supplied by phone. Replacing the Toner Cartridge CAUTION: Before performing any print jobs ...
... the following procedures, read and follow the "CAUTION: SAFETY INSTRUCTIONS" on page 9. To order by phone, see "Order Printer Supplies" on the operator panel to alert you want to replace and then rotate them to order a new toner cartridge. Remove the top ...cover. 2. Dell toner cartridge are available only through Dell. Dell recommends Dell-branded toner cartridges for problems caused by using accessories, parts, or components not supplied by phone. Replacing the Toner Cartridge CAUTION: Before performing any print jobs ...

Owner's Manual
Page 44
Installing the New Toner Cartridge 1. Select the new toner cartridge whose color matches the cartridge carrier and remove it from its packaging. 44 Maintenance Pull out the toner cartridge. www.dell.com/supplies | support.dell.com 3.
Installing the New Toner Cartridge 1. Select the new toner cartridge whose color matches the cartridge carrier and remove it from its packaging. 44 Maintenance Pull out the toner cartridge. www.dell.com/supplies | support.dell.com 3.

Owner's Manual
Page 46
NOTE: If it . In this case, perform step 4 again, or turn the printer off once and then on again. 6. Pulling the toner seal diagonally may appear. NOTE: Pull the toner seal straight up to remove it takes more than five seconds to remove the toner seal after inserting the toner cartridge in the printer, an error message may tear the seal. Replace the top cover by inserting its front side into the printer first. 46 Maintenance Pull the toner seal straight up . www.dell.com/supplies | support.dell.com 5.
NOTE: If it . In this case, perform step 4 again, or turn the printer off once and then on again. 6. Pulling the toner seal diagonally may appear. NOTE: Pull the toner seal straight up to remove it takes more than five seconds to remove the toner seal after inserting the toner cartridge in the printer, an error message may tear the seal. Replace the top cover by inserting its front side into the printer first. 46 Maintenance Pull the toner seal straight up . www.dell.com/supplies | support.dell.com 5.

