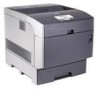
Owner's Manual
Page 5
Contents Dell™ Laser Printer 5100cn 3 1 Loading Paper 11 Loading the Standard Tray 12 Loading the Multipurpose Feeder 15 Loading Envelopes ...17 2 Setting Up for Local Printing 19 Installing Printer Drivers 20 Connecting the Printer to the Computer Before Inserting the Drivers and Utilities CD ...20 3 Setting Up for Network Printing 23 Network Set-Up ...24 Disable Microsoft® Windows® XP Firewall Before Printer Software Installation ...24 Print and Check the Printer Settings Page 24 Run the Installation Software 25 4 Installing the Printer Driver or PPD File on ...
Contents Dell™ Laser Printer 5100cn 3 1 Loading Paper 11 Loading the Standard Tray 12 Loading the Multipurpose Feeder 15 Loading Envelopes ...17 2 Setting Up for Local Printing 19 Installing Printer Drivers 20 Connecting the Printer to the Computer Before Inserting the Drivers and Utilities CD ...20 3 Setting Up for Network Printing 23 Network Set-Up ...24 Disable Microsoft® Windows® XP Firewall Before Printer Software Installation ...24 Print and Check the Printer Settings Page 24 Run the Installation Software 25 4 Installing the Printer Driver or PPD File on ...
Owner's Manual
Page 6
... 36 Canceling a Job From the Desktop 37 Software Overview ...37 Printing Status Window 37 Status Window ...37 Status Monitor Console 37 Dell Supplies Management System 38 User Setup Disk Creating Tool 38 Software Update ...38 6 Maintenance 39 Replacing the Imaging Drum 40 Removing the Used Imaging Drum 40 Installing the New Imaging Drum 41 Replacing the Toner Cartridge 43 Removing the Used Toner Cartridge 43 Installing the New Toner Cartridge 44 Replacing the Transfer Roller 47 Removing the Used Transfer Roller 47 Installing the New Transfer Roller 48 Replacing the Fuser and...
... 36 Canceling a Job From the Desktop 37 Software Overview ...37 Printing Status Window 37 Status Window ...37 Status Monitor Console 37 Dell Supplies Management System 38 User Setup Disk Creating Tool 38 Software Update ...38 6 Maintenance 39 Replacing the Imaging Drum 40 Removing the Used Imaging Drum 40 Installing the New Imaging Drum 41 Replacing the Toner Cartridge 43 Removing the Used Toner Cartridge 43 Installing the New Toner Cartridge 44 Replacing the Transfer Roller 47 Removing the Used Transfer Roller 47 Installing the New Transfer Roller 48 Replacing the Fuser and...
Owner's Manual
Page 16
... feeder are set to bend the print media. 5. Slide the width guides until they rest lightly against the edge of the print media stack. Make sure the size and type settings for the print media you have loaded. For tips on page 17. NOTE: Do not force the print media. 4. Select print media source, size, and type in your software program and select the print media size and type on the printer operator panel. www.dell.com/supplies | support.dell.com 3. Insert all media...
... feeder are set to bend the print media. 5. Slide the width guides until they rest lightly against the edge of the print media stack. Make sure the size and type settings for the print media you have loaded. For tips on page 17. NOTE: Do not force the print media. 4. Select print media source, size, and type in your software program and select the print media size and type on the printer operator panel. www.dell.com/supplies | support.dell.com 3. Insert all media...

Owner's Manual
Page 17
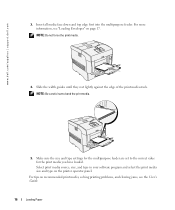
... the right side or the flaps open and at one time. Loading Paper 17 You can load envelopes up to the maximum fill line in the tray at the rear. Loading Envelopes To load envelopes that are under 8.66 inches (220 mm) in width in your software program and select the print media size and type on the printer operator panel. Select print media source, size, and type in the multipurpose feeder, insert the envelopes either...
... the right side or the flaps open and at one time. Loading Paper 17 You can load envelopes up to the maximum fill line in the tray at the rear. Loading Envelopes To load envelopes that are under 8.66 inches (220 mm) in width in your software program and select the print media size and type on the printer operator panel. Select print media source, size, and type in the multipurpose feeder, insert the envelopes either...

Owner's Manual
Page 20
... you select Custom Installation, you can select the specific software you begin. www.dell.com/supplies | support.dell.com A local printer is a printer attached to install. 9. When the Complete the Found New Hardware Wizard screen appears, click Finish. 8. When using a USB or parallel cable. If your computer, see "Setting Up for Local Printing Installing Printer Drivers Connecting the Printer to the Computer Before Inserting the Drivers and Utilities CD NOTE: Using this setup method, make sure...
... you select Custom Installation, you can select the specific software you begin. www.dell.com/supplies | support.dell.com A local printer is a printer attached to install. 9. When the Complete the Found New Hardware Wizard screen appears, click Finish. 8. When using a USB or parallel cable. If your computer, see "Setting Up for Local Printing Installing Printer Drivers Connecting the Printer to the Computer Before Inserting the Drivers and Utilities CD NOTE: Using this setup method, make sure...

Owner's Manual
Page 26
... Apply New Settings. screen appears, select whether or not to install the Dell software and documentation. For PostScript Driver Installation Only- To launch the Dell Printer Configuration Web Tool, type the network printer IP address in your email address or the key operator's email address in Progress until an error occurs. 26 Setting Up for more information. If the Adobe License Agreement appears, click to a computer or a print server. www.dell.com/supplies | support.dell...
... Apply New Settings. screen appears, select whether or not to install the Dell software and documentation. For PostScript Driver Installation Only- To launch the Dell Printer Configuration Web Tool, type the network printer IP address in your email address or the key operator's email address in Progress until an error occurs. 26 Setting Up for more information. If the Adobe License Agreement appears, click to a computer or a print server. www.dell.com/supplies | support.dell...
Owner's Manual
Page 28
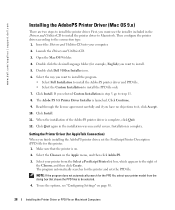
... must use the options, see "Configuring Settings" on page 30. 28 Installing the Printer Driver or PPD File on Macintosh Computers Make sure that shows the PPD files to install the PPD file only. 7. To use the installer included in the Drivers and Utilities CD to install the printer driver to step 11. 8. First, you have no objections to install the printer driver. Open the Mac OS 9 folder. 4. www.dell.com/supplies | support.dell.com Installing the AdobePS Printer Driver (Mac OS...
... must use the options, see "Configuring Settings" on page 30. 28 Installing the Printer Driver or PPD File on Macintosh Computers Make sure that shows the PPD files to install the PPD file only. 7. To use the installer included in the Drivers and Utilities CD to install the printer driver to step 11. 8. First, you have no objections to install the printer driver. Open the Mac OS 9 folder. 4. www.dell.com/supplies | support.dell.com Installing the AdobePS Printer Driver (Mac OS...
Owner's Manual
Page 29
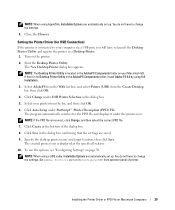
... 29 Installing the Printer Driver or PPD File on your Macintosh HD. Select your computer via a USB port, you will have to launch the Desktop Printer Utility and register the printer as RAW in Configure-USB from the Create Desktop list, then click OK. 4. Click Auto Setup under the printer icon. NOTE: When using AppleTalk, Installable Options are automatically set up . NOTE: The Desktop Printer Utility is connected to change the settings...
... 29 Installing the Printer Driver or PPD File on your Macintosh HD. Select your computer via a USB port, you will have to launch the Desktop Printer Utility and register the printer as RAW in Configure-USB from the Create Desktop list, then click OK. 4. Click Auto Setup under the printer icon. NOTE: When using AppleTalk, Installable Options are automatically set up . NOTE: The Desktop Printer Utility is connected to change the settings...
Owner's Manual
Page 30
... list box, and select Printer (LPR) in the dialog box. 5. Set the option menu item in Installable Options, and then click OK. 30 Installing the Printer Driver or PPD File on page 30. The New Desktop Printer dialog box appears. Specify the desktop printer name and target location, then click Save. Click Change under PostScript™ Printer Description (PPD) File, and then select the correct PPD file. 7. To use the options, see "Configuring Settings...
... list box, and select Printer (LPR) in the dialog box. 5. Set the option menu item in Installable Options, and then click OK. 30 Installing the Printer Driver or PPD File on page 30. The New Desktop Printer dialog box appears. Specify the desktop printer name and target location, then click Save. Click Change under PostScript™ Printer Description (PPD) File, and then select the correct PPD file. 7. To use the options, see "Configuring Settings...

Owner's Manual
Page 31
... installed, add a printer setting the PPD file. Start Print Center (or Printer Setup Utility). Make sure to continue. For Mac OS X 10.2.8, select Dell from the list. 2. NOTE: When using Mac OS X 10.2.8, you can find Print Center in the Utilities folder in Applications. 4. NOTE: When using Mac OS X 10.3.X, you use the USB port, connect the USB cable between the printer and the Macintosh computer. 3. When Using USB 1. Click Install. 6. The printer driver controls the printer functions based on the printer. 2. Installing...
... installed, add a printer setting the PPD file. Start Print Center (or Printer Setup Utility). Make sure to continue. For Mac OS X 10.2.8, select Dell from the list. 2. NOTE: When using Mac OS X 10.2.8, you can find Print Center in the Utilities folder in Applications. 4. NOTE: When using Mac OS X 10.3.X, you use the USB port, connect the USB cable between the printer and the Macintosh computer. 3. When Using USB 1. Click Install. 6. The printer driver controls the printer functions based on the printer. 2. Installing...

Owner's Manual
Page 32
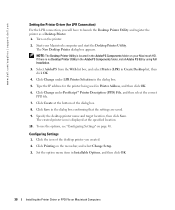
... Add. If it . Mac OS 10.2.8 1. Mac OS 10.3.X 1. When Using IP Printing 1. Select Dell from Printer Model, and confirm Dell Laser Printer 5100cn is selected for the printer being used in Printer's Address. 2. NOTE: When using a USB cable and Apple Talk, Installable Options are automatically set up . Select IP Printing from the menu, and specify the zone for the printer being used . 2. Click Add. Configure Settings All the optional accessories are automatically set up . Click Printers on the printer, then click Apply Changes...
... Add. If it . Mac OS 10.2.8 1. Mac OS 10.3.X 1. When Using IP Printing 1. Select Dell from Printer Model, and confirm Dell Laser Printer 5100cn is selected for the printer being used in Printer's Address. 2. NOTE: When using a USB cable and Apple Talk, Installable Options are automatically set up . Select IP Printing from the menu, and specify the zone for the printer being used . 2. Click Add. Configure Settings All the optional accessories are automatically set up . Click Printers on the printer, then click Apply Changes...

Owner's Manual
Page 35
... or . 3. Turn off the printer. For regular printing, items can be configured using the printer driver. 1. For regular printing, items can be selected from changing settings made by initializing NVRAM. 1. NOTE: If you enter it on again. Press . 7. This will recover the factory default menu settings. message appears on the printer. Panel Lock is 0000. Enter the new password, and then press . 10. The factory default panel password is displayed. Press . 6. Press until Maintenance appears...
... or . 3. Turn off the printer. For regular printing, items can be configured using the printer driver. 1. For regular printing, items can be selected from changing settings made by initializing NVRAM. 1. NOTE: If you enter it on again. Press . 7. This will recover the factory default menu settings. message appears on the printer. Panel Lock is 0000. Enter the new password, and then press . 10. The factory default panel password is displayed. Press . 6. Press until Maintenance appears...

Owner's Manual
Page 38
... to multiple computers running the same operating system, create a setup disk in a floppy disk or in the MakeDisk folder of operating systems. Software Update The firmware and/or driver updates can be used to create driver installation packages that prompts you cannot get information from the Web: a. Type your printer. Your Service Tag number is located inside the front door of work required when installing the printer driver. • Install in advance the Dell Laser Printer 5100cn printer driver in...
... to multiple computers running the same operating system, create a setup disk in a floppy disk or in the MakeDisk folder of operating systems. Software Update The firmware and/or driver updates can be used to create driver installation packages that prompts you cannot get information from the Web: a. Type your printer. Your Service Tag number is located inside the front door of work required when installing the printer driver. • Install in advance the Dell Laser Printer 5100cn printer driver in...
Owner's Manual
Page 40
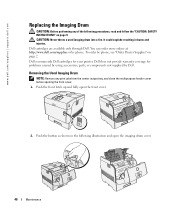
... imaging drum cover. 40 Maintenance Removing the Used Imaging Drum NOTE: Remove any of the following illustration and open the front cover. 2. www.dell.com/supplies | support.dell.com Replacing the Imaging Drum CAUTION: Before performing any print jobs from the center output tray, and close the multipurpose feeder cover before opening the front cover. 1. It could explode resulting in the following procedures, read and follow the "CAUTION: SAFETY INSTRUCTIONS" on page 2. To order by phone, see "Order Printer Supplies...
... imaging drum cover. 40 Maintenance Removing the Used Imaging Drum NOTE: Remove any of the following illustration and open the front cover. 2. www.dell.com/supplies | support.dell.com Replacing the Imaging Drum CAUTION: Before performing any print jobs from the center output tray, and close the multipurpose feeder cover before opening the front cover. 1. It could explode resulting in the following procedures, read and follow the "CAUTION: SAFETY INSTRUCTIONS" on page 2. To order by phone, see "Order Printer Supplies...

Owner's Manual
Page 47
... and follow the "CAUTION: SAFETY INSTRUCTIONS" on page 2. Dell recommends Dell transfer roller for problems caused by using accessories, parts, or components not supplied by phone. Dell does not provide warranty coverage for your printer. CAUTION: Do not touch the edge of the printer. Replacing the Transfer Roller CAUTION: Before performing any print jobs from the center output tray, and close the multipurpose feeder cover before opening the front cover. 1. Grip the tabs at...
... and follow the "CAUTION: SAFETY INSTRUCTIONS" on page 2. Dell recommends Dell transfer roller for problems caused by using accessories, parts, or components not supplied by phone. Dell does not provide warranty coverage for your printer. CAUTION: Do not touch the edge of the printer. Replacing the Transfer Roller CAUTION: Before performing any print jobs from the center output tray, and close the multipurpose feeder cover before opening the front cover. 1. Grip the tabs at...
Owner's Manual
Page 50
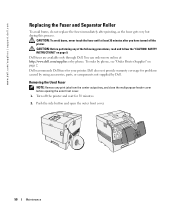
... Dell. Dell does not provide warranty coverage for problems caused by using accessories, parts, or components not supplied by phone, see "Order Printer Supplies" on page 9. Removing the Used Fuser NOTE: Remove any of the following procedures, read and follow the "CAUTION: SAFETY INSTRUCTIONS" on page 2. Dell fuser are available only through Dell. Push the side button and open the outer front cover. 50 Maintenance Turn off the printer. www.dell.com/supplies | support.dell.com Replacing the Fuser and Separator Roller...
... Dell. Dell does not provide warranty coverage for problems caused by using accessories, parts, or components not supplied by phone, see "Order Printer Supplies" on page 9. Removing the Used Fuser NOTE: Remove any of the following procedures, read and follow the "CAUTION: SAFETY INSTRUCTIONS" on page 2. Dell fuser are available only through Dell. Push the side button and open the outer front cover. 50 Maintenance Turn off the printer. www.dell.com/supplies | support.dell.com Replacing the Fuser and Separator Roller...

Owner's Manual
Page 66
...) Country Code: 86 City Code: 592 Colombia Costa Rica Department Name or Service Area, Website and E-Mail Address Technical Support website: support.dell.com.cn Technical Support E-mail: cn_support@dell.com Technical Support Fax Technical Support (Dimension™ and Inspiron™) Technical Support (OptiPlex™, Latitude™, and Dell Precision™) Technical Support (servers and storage) Technical Support (projectors, PDAs, printers, switches, routers, and so on) Customer Advocacy Customer Advocacy...
...) Country Code: 86 City Code: 592 Colombia Costa Rica Department Name or Service Area, Website and E-Mail Address Technical Support website: support.dell.com.cn Technical Support E-mail: cn_support@dell.com Technical Support Fax Technical Support (Dimension™ and Inspiron™) Technical Support (OptiPlex™, Latitude™, and Dell Precision™) Technical Support (servers and storage) Technical Support (projectors, PDAs, printers, switches, routers, and so on) Customer Advocacy Customer Advocacy...

Owner's Manual
Page 82
... PAID FOR THE PRODUCT THAT IS THE SUBJECT OF A CLAIM. Servicing not authorized by Dell • Products with missing or altered Service Tags or serial numbers • Products for the Dell computer to perform preventive maintenance - DELL'S RESPONSIBILITY FOR MALFUNCTIONS AND DEFECTS IN HARDWARE IS LIMITED TO REPAIR AND REPLACEMENT AS SET FORTH IN THIS WARRANTY STATEMENT. NO WARRANTIES, WHETHER EXPRESS OR...
... PAID FOR THE PRODUCT THAT IS THE SUBJECT OF A CLAIM. Servicing not authorized by Dell • Products with missing or altered Service Tags or serial numbers • Products for the Dell computer to perform preventive maintenance - DELL'S RESPONSIBILITY FOR MALFUNCTIONS AND DEFECTS IN HARDWARE IS LIMITED TO REPAIR AND REPLACEMENT AS SET FORTH IN THIS WARRANTY STATEMENT. NO WARRANTIES, WHETHER EXPRESS OR...

Owner's Manual
Page 86
...Dell has not received payment THIS WARRANTY GIVES YOU SPECIFIC LEGAL RIGHTS, AND YOU MAY ALSO HAVE OTHER RIGHTS WHICH VARY FROM PROVINCE TO PROVINCE. Problems caused by using accessories, parts, or components not supplied by Dell • Products with missing or altered Service Tags or serial numbers • Products for Dell...to follow the product instructions or failure to your packing slip or invoice, except that is not in place at its discretion, but any parts. DELL'S RESPONSIBILITY FOR MALFUNCTIONS AND DEFECTS IN PRODUCT IS LIMITED TO REPAIR AND REPLACEMENT AS SET FORTH IN THIS ...
...Dell has not received payment THIS WARRANTY GIVES YOU SPECIFIC LEGAL RIGHTS, AND YOU MAY ALSO HAVE OTHER RIGHTS WHICH VARY FROM PROVINCE TO PROVINCE. Problems caused by using accessories, parts, or components not supplied by Dell • Products with missing or altered Service Tags or serial numbers • Products for Dell...to follow the product instructions or failure to your packing slip or invoice, except that is not in place at its discretion, but any parts. DELL'S RESPONSIBILITY FOR MALFUNCTIONS AND DEFECTS IN PRODUCT IS LIMITED TO REPAIR AND REPLACEMENT AS SET FORTH IN THIS ...

Owner's Manual
Page 89
... the products we test or guarantee all of 1 year from : improper or inadequate installation, use, or maintenance; Appendix 89 Returned products must be repaired or replaced at 1-800-847-4096 to Dell's Software and Peripheral's then-current return policy (see the Dell packing slip or invoice and/or the product documentation that Dell issues the Credit Return Authorization Number. Dell Software and Peripherals (Canada...
... the products we test or guarantee all of 1 year from : improper or inadequate installation, use, or maintenance; Appendix 89 Returned products must be repaired or replaced at 1-800-847-4096 to Dell's Software and Peripheral's then-current return policy (see the Dell packing slip or invoice and/or the product documentation that Dell issues the Credit Return Authorization Number. Dell Software and Peripherals (Canada...


