
User Guide
Page 3
... Apple Inc., registered in the U.S. Other trademarks and trade names may be used in this text: Dell and the DELL logo are registered trademarks of Microsoft Corporation; All rights reserved. Microsoft and Windows are trademarks of Dell Inc.; ENERGY STAR is a trademark or registered trademark of Linus Torvalds in any proprietary interest in the...
... Apple Inc., registered in the U.S. Other trademarks and trade names may be used in this text: Dell and the DELL logo are registered trademarks of Microsoft Corporation; All rights reserved. Microsoft and Windows are trademarks of Dell Inc.; ENERGY STAR is a trademark or registered trademark of Linus Torvalds in any proprietary interest in the...

User Guide
Page 62
Microsoft® Windows® 2000, XP, Server 2003, XP x64, Server 2003 x64, Vista and Mac® OS X or later operating systems support USB connections. Make sure the ...
Microsoft® Windows® 2000, XP, Server 2003, XP x64, Server 2003 x64, Vista and Mac® OS X or later operating systems support USB connections. Make sure the ...
User Guide
Page 67
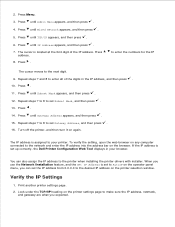
... desired IP address on again. Turn off the printer, and then turn it on the printer selection window. When you use the Network Installation feature, and the Get IP Address is set up correctly, the Dell Printer Configuration Web Tool displays in the IP address, and then press . 10. Press address. 8. Repeat...
... desired IP address on again. Turn off the printer, and then turn it on the printer selection window. When you use the Network Installation feature, and the Get IP Address is set up correctly, the Dell Printer Configuration Web Tool displays in the IP address, and then press . 10. Press address. 8. Repeat...
User Guide
Page 73
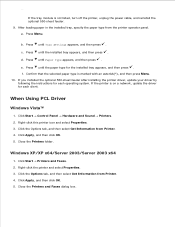
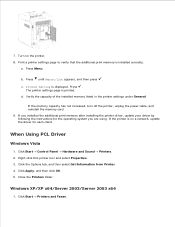
... is on a network, update the driver for each operating system. Right-click this printer icon and select Properties. 3. Close the Printers folder. Windows XP/XP x64/Server 2003/Server 2003 x64 1. Click Start Printers and Faxes. 2. Close the Printers and Faxes dialog box. 1. a. c. .... Click Start Control Panel Hardware and Sound Printers. 2. Click Apply, and then click OK. 5. b. d. Press Menu. When Using PCL Driver Windows Vista™ 1. Press until Paper Type appears, and then press . Click the Options tab, and then select Get Information from Printer. 4. d....
... is on a network, update the driver for each operating system. Right-click this printer icon and select Properties. 3. Close the Printers folder. Windows XP/XP x64/Server 2003/Server 2003 x64 1. Click Start Printers and Faxes. 2. Close the Printers and Faxes dialog box. 1. a. c. .... Click Start Control Panel Hardware and Sound Printers. 2. Click Apply, and then click OK. 5. b. d. Press Menu. When Using PCL Driver Windows Vista™ 1. Press until Paper Type appears, and then press . Click the Options tab, and then select Get Information from Printer. 4. d....
User Guide
Page 74
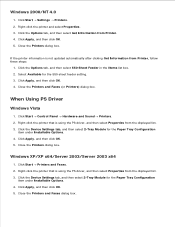
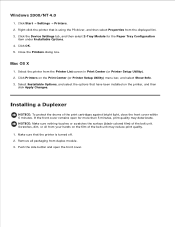
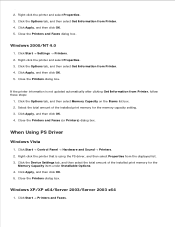
...box. 2. Select Available for the Paper Tray Configuration item under Installable Options. 4. Close the Printers and Faxes (or Printers) dialog box. Windows XP/XP x64/Server 2003/Server 2003 x64 1. Click Start Printers and Faxes. 2. Click Start Settings Printers. 2. Click Apply, and then ..., follow these steps: 1. 5. Right-click the printer that is not updated automatically after clicking Get Information from the displayed list. 3. Windows 2000/NT 4.0 1. Click the Device Settings tab, and then select 2-Tray Module for the 550-sheet feeder setting. 3. Close the Printers...
...box. 2. Select Available for the Paper Tray Configuration item under Installable Options. 4. Close the Printers and Faxes (or Printers) dialog box. Windows XP/XP x64/Server 2003/Server 2003 x64 1. Click Start Printers and Faxes. 2. Click Start Settings Printers. 2. Click Apply, and then ..., follow these steps: 1. 5. Right-click the printer that is not updated automatically after clicking Get Information from the displayed list. 3. Windows 2000/NT 4.0 1. Click the Device Settings tab, and then select 2-Tray Module for the 550-sheet feeder setting. 3. Close the Printers...
User Guide
Page 75
... item under Installable Options. 4. Close the Printers dialog box. If the front cover remains open the front cover. Select the printer from the displayed list. 3. 5. Windows 2000/NT 4.0 1. Right-click the printer that the printer is using the PS driver, and then select Properties from the Printer List screen in Print...
... item under Installable Options. 4. Close the Printers dialog box. If the front cover remains open the front cover. Select the printer from the displayed list. 3. 5. Windows 2000/NT 4.0 1. Right-click the printer that the printer is using the PS driver, and then select Properties from the Printer List screen in Print...
User Guide
Page 79
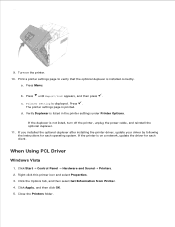
... correctly. d. If the printer is not listed, turn off the printer, unplug the power cable, and reinstall the optional duplexer. 11. When Using PCL Driver Windows Vista 1. Right-click this printer icon and select Properties. 3. Press Menu. If you installed the optional duplexer after installing the printer driver, update your driver...
... correctly. d. If the printer is not listed, turn off the printer, unplug the power cable, and reinstall the optional duplexer. 11. When Using PCL Driver Windows Vista 1. Right-click this printer icon and select Properties. 3. Press Menu. If you installed the optional duplexer after installing the printer driver, update your driver...
User Guide
Page 80
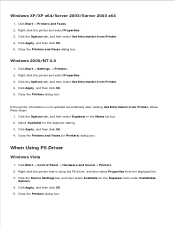
.... 4. Click Start Settings Printers. 2. Close the Printers dialog box. Right-click the printer and select Properties. 3. Close the Printers dialog box. When Using PS Driver Windows Vista 1. Click the Options tab, and then select Get Information from Printer. 4. Close the Printers and Faxes dialog box. Click the Options tab, and then... OK. 5. Click Apply, and then click OK. 5. If the printer information is using the PS driver, and then select Properties from Printer, follow these steps: 1. Windows XP/XP x64/Server 2003/Server 2003 x64 1. Click Apply, and then click OK...
.... 4. Click Start Settings Printers. 2. Close the Printers dialog box. Right-click the printer and select Properties. 3. Close the Printers dialog box. When Using PS Driver Windows Vista 1. Click the Options tab, and then select Get Information from Printer. 4. Close the Printers and Faxes dialog box. Click the Options tab, and then... OK. 5. Click Apply, and then click OK. 5. If the printer information is using the PS driver, and then select Properties from Printer, follow these steps: 1. Windows XP/XP x64/Server 2003/Server 2003 x64 1. Click Apply, and then click OK...
User Guide
Page 81
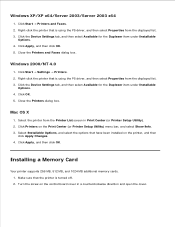
... x64/Server 2003/Server 2003 x64 1. Click Apply, and then click OK. 5. Windows 2000/NT 4.0 1. Click the Device Settings tab, and then select Available for the Duplexer item under Installable Options. 4. Select the printer from the Printer List ...
... x64/Server 2003/Server 2003 x64 1. Click Apply, and then click OK. 5. Windows 2000/NT 4.0 1. Click the Device Settings tab, and then select Available for the Duplexer item under Installable Options. 4. Select the printer from the Printer List ...
User Guide
Page 84
.... Click the Options tab, and then select Get Information from Printer. 4. If the printer is printed. b. Click Start Printers and Faxes. 2. 3. When Using PCL Driver Windows Vista 1. Windows XP/XP x64/Server 2003/Server 2003 x64 1. d. Press until Report/List appears, and then press . Click Apply, and then click OK. 5. a.
.... Click the Options tab, and then select Get Information from Printer. 4. If the printer is printed. b. Click Start Printers and Faxes. 2. 3. When Using PCL Driver Windows Vista 1. Windows XP/XP x64/Server 2003/Server 2003 x64 1. d. Press until Report/List appears, and then press . Click Apply, and then click OK. 5. a.
User Guide
Page 85
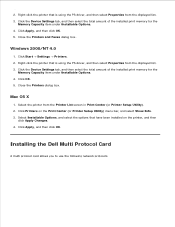
Right-click the printer and select Properties. 3. Close the Printers dialog box. When Using PS Driver Windows Vista 1. Click the Device Settings tab, and then select the total amount of the installed print memory for the Memory Capacity item under ..., and then select Get Information from the displayed list. 3. Right-click the printer that is not updated automatically after clicking Get Information from Printer. 4. Windows XP/XP x64/Server 2003/Server 2003 x64 1. Select the total amount of the installed print memory for the memory capacity setting. 3. 1. 2. Click ...
Right-click the printer and select Properties. 3. Close the Printers dialog box. When Using PS Driver Windows Vista 1. Click the Device Settings tab, and then select the total amount of the installed print memory for the Memory Capacity item under ..., and then select Get Information from the displayed list. 3. Right-click the printer that is not updated automatically after clicking Get Information from Printer. 4. Windows XP/XP x64/Server 2003/Server 2003 x64 1. Select the total amount of the installed print memory for the memory capacity setting. 3. 1. 2. Click ...
User Guide
Page 86
Close the Printers and Faxes dialog box. Windows 2000/NT 4.0 1. Click OK. 5. Close the Printers dialog box. Click Apply, and then click OK. 5. Mac OS X 1. Select Installable Options, and select the options that ... the Device Settings tab, and then select the total amount of the installed print memory for the Memory Capacity item under Installable Options. 4. Installing the Dell Multi Protocol Card A multi protocol card allows you to use the following network protocols.
Close the Printers and Faxes dialog box. Windows 2000/NT 4.0 1. Click OK. 5. Close the Printers dialog box. Click Apply, and then click OK. 5. Mac OS X 1. Select Installable Options, and select the options that ... the Device Settings tab, and then select the total amount of the installed print memory for the Memory Capacity item under Installable Options. 4. Installing the Dell Multi Protocol Card A multi protocol card allows you to use the following network protocols.

User Guide
Page 87
... rear of the MPC card nearest the connecter pins. Network protocol Supported operating systems IPP Windows Vista/XP/XP x64/Server 2003/Server 2003 x64/2000/NT 4.0, Mac OS X 10.3.9/10.4.3 SMB Windows Vista/XP/XP x64/Server 2003/Server 2003 x64/2000/ NT 4.0 IPX/SPX NetWare3.12.../3.2/4.1/4.11/4.2/5/6/6.5* AppleTalk Mac OS X 10.2.8/10.3.9/10.4.3 Bonjour Mac OS X 10.2.8/10.3.9/10.4.3 IPv6 Windows Vista *Only compatible with Support Pack 1.1 or later. 1....
... rear of the MPC card nearest the connecter pins. Network protocol Supported operating systems IPP Windows Vista/XP/XP x64/Server 2003/Server 2003 x64/2000/NT 4.0, Mac OS X 10.3.9/10.4.3 SMB Windows Vista/XP/XP x64/Server 2003/Server 2003 x64/2000/ NT 4.0 IPX/SPX NetWare3.12.../3.2/4.1/4.11/4.2/5/6/6.5* AppleTalk Mac OS X 10.2.8/10.3.9/10.4.3 Bonjour Mac OS X 10.2.8/10.3.9/10.4.3 IPv6 Windows Vista *Only compatible with Support Pack 1.1 or later. 1....
User Guide
Page 92
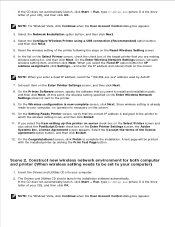
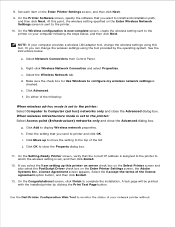
... for IP address assignment, click Settings... Scene 2. The Drivers and Utilities CD should launch the installation software automatically. NOTE: For Windows Vista, click Continue when the User Account Control dialog box appears. 3. On the Printer Software screen, specify the software that you...Insert the Drivers and Utilities CD into your CD), and then click OK. On the Wireless configuration is the drive NOTE: For Windows Vista, click Continue when the User Account Control dialog box appears. 3. On the Congratulations! Select the Network Installation option button, ...
... for IP address assignment, click Settings... Scene 2. The Drivers and Utilities CD should launch the installation software automatically. NOTE: For Windows Vista, click Continue when the User Account Control dialog box appears. 3. On the Printer Software screen, specify the software that you...Insert the Drivers and Utilities CD into your CD), and then click OK. On the Wireless configuration is the drive NOTE: For Windows Vista, click Continue when the User Account Control dialog box appears. 3. On the Congratulations! Select the Network Installation option button, ...
User Guide
Page 93
... "169.254.xxx.xxx" address used by the operating system. Right-click Wireless Network Connection and select Properties. Make sure the check box for Use Windows to the printer: Select Access point (Infrastructure) networks only and close the Advanced dialog box. e. Reset the wireless setting of the following the steps on...
... "169.254.xxx.xxx" address used by the operating system. Right-click Wireless Network Connection and select Properties. Make sure the check box for Use Windows to the printer: Select Access point (Infrastructure) networks only and close the Advanced dialog box. e. Reset the wireless setting of the following the steps on...
User Guide
Page 94
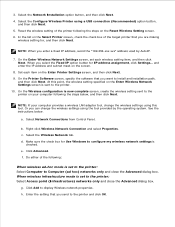
A test page will be printed with Printer screen, and then click Next. NOTE: For Windows Vista, click Continue when the User Account Control dialog box appears. 2. Click Move up this tool. On the Setting-Ready Printer screen, verify that ..., and then click Next. 3. Click OK to the top of your network printer without leaving your computer to order replacement consumables, just click the Dell supplies link right from your Web browser. License Agreement screen appears. screen, click Finish to the already-operating wireless network (When wireless setting is already...
A test page will be printed with Printer screen, and then click Next. NOTE: For Windows Vista, click Continue when the User Account Control dialog box appears. 2. Click Move up this tool. On the Setting-Ready Printer screen, verify that ..., and then click Next. 3. Click OK to the top of your network printer without leaving your computer to order replacement consumables, just click the Dell supplies link right from your Web browser. License Agreement screen appears. screen, click Finish to the already-operating wireless network (When wireless setting is already...

User Guide
Page 95
... Network Settings screen is now complete screen, change the wireless setting of the list. a. b. NOTE: When you select the Fixed IP option button for Use Windows to install and installation path, and then click Next. Right-click Wireless Network Connection and select Properties. Click the Move up button to move the...
... Network Settings screen is now complete screen, change the wireless setting of the list. a. b. NOTE: When you select the Fixed IP option button for Use Windows to install and installation path, and then click Next. Right-click Wireless Network Connection and select Properties. Click the Move up button to move the...

User Guide
Page 96
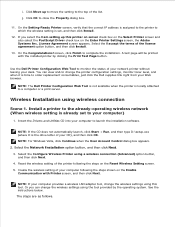
... is assigned to the printer to which the wireless setting is set to your computer to complete the installation. g. h. On the Congratulations! Scene 2. NOTE: For Windows Vista, click Continue when the User Account Control dialog box appears. 2.
... is assigned to the printer to which the wireless setting is set to your computer to complete the installation. g. h. On the Congratulations! Scene 2. NOTE: For Windows Vista, click Continue when the User Account Control dialog box appears. 2.

User Guide
Page 97
... then click Next. 7. Create the wireless setting of the printer following information and click OK. Or you select the Fixed IP option button for Use Windows to write down the current wireless computer settings in steps d and f so that you enter a fixed IP address, avoid the "169.254.xxx.xxx" address...
... then click Next. 7. Create the wireless setting of the printer following information and click OK. Or you select the Fixed IP option button for Use Windows to write down the current wireless computer settings in steps d and f so that you enter a fixed IP address, avoid the "169.254.xxx.xxx" address...
User Guide
Page 98
...verify that you select the I accept the terms of the list. g. screen, click Finish to display Wireless network properties. Use the Dell Printer Configuration Web Tool to the printer on the Enter Printer Settings screen, the Adobe Systems Inc. Set each item on the Enter Wireless...only and close the Advanced dialog box. Select Network Connections from Control Panel. On the Congratulations! c. Make sure the check box for Use Windows to close the Advanced dialog box. i. Click OK to configure my wireless network settings is set , and then click Install. 12. When ...
...verify that you select the I accept the terms of the list. g. screen, click Finish to display Wireless network properties. Use the Dell Printer Configuration Web Tool to the printer on the Enter Printer Settings screen, the Adobe Systems Inc. Set each item on the Enter Wireless...only and close the Advanced dialog box. Select Network Connections from Control Panel. On the Congratulations! c. Make sure the check box for Use Windows to close the Advanced dialog box. i. Click OK to configure my wireless network settings is set , and then click Install. 12. When ...


