User Guide
Page 2
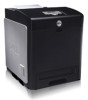
... number, see "Express Service Code and Service Tag number." Visit Dell's website, or order Dell printer supplies by pushing the side button. 7 Optional duplexer 8 Operator panel 9 Power switch 10 Control board 11 Control board cover To order replacement print cartridges or supplies from Dell: 1. www.dell.com/supplies For best service, have your desktop. 2. Notes, Notices... 550-sheet feeder, and multipurpose feeder). 3 Multipurpose feeder 4 Side button 5 Belt unit 6 Front cover NOTE: The front cover opens by phone. For help locating your printer.
... number, see "Express Service Code and Service Tag number." Visit Dell's website, or order Dell printer supplies by pushing the side button. 7 Optional duplexer 8 Operator panel 9 Power switch 10 Control board 11 Control board cover To order replacement print cartridges or supplies from Dell: 1. www.dell.com/supplies For best service, have your desktop. 2. Notes, Notices... 550-sheet feeder, and multipurpose feeder). 3 Multipurpose feeder 4 Side button 5 Belt unit 6 Front cover NOTE: The front cover opens by phone. For help locating your printer.

User Guide
Page 8
... IP address shows 0.0.0.0 (the factory default), an IP address has not been assigned. Use the Dell Printer Configuration Web Tool for your printer, see "Assign an IP Address ." Copy Printer Settings Quickly copy the printer's settings to order additional print cartridges. Print Server Settings Use the Print Server Settings menu to use the color mode and...
... IP address shows 0.0.0.0 (the factory default), an IP address has not been assigned. Use the Dell Printer Configuration Web Tool for your printer, see "Assign an IP Address ." Copy Printer Settings Quickly copy the printer's settings to order additional print cartridges. Print Server Settings Use the Print Server Settings menu to use the color mode and...
User Guide
Page 17
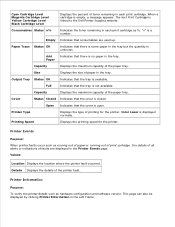
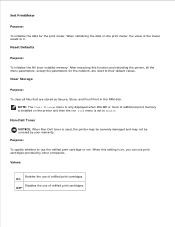
Empty Indicates that the cover is linked to the Dell Printer Supplies website. Paper Trays Status OK Indicates that there is some paper in the tray but the quantity is no paper in the tray. Add ... running out of paper or running out of print cartridge , the details of all alerts or indications of faults are used up. Printer Information Purpose: To verify the printer details such as %. The text Print Cartridge is closed. Cyan Cartridge Level Magenta Cartridge Level Yellow Cartridge Level Black Cartridge Level Displays the percent of toner remaining in each...
Empty Indicates that the cover is linked to the Dell Printer Supplies website. Paper Trays Status OK Indicates that there is some paper in the tray but the quantity is no paper in the tray. Add ... running out of paper or running out of print cartridge , the details of all alerts or indications of faults are used up. Printer Information Purpose: To verify the printer details such as %. The text Print Cartridge is closed. Cyan Cartridge Level Magenta Cartridge Level Yellow Cartridge Level Black Cartridge Level Displays the percent of toner remaining in each...
User Guide
Page 30
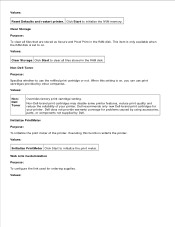
... not supplied by other companies. Click Start to initialize the print meter. Values: NonDell Toner Overrides factory print cartridge setting. Values: Reset Defaults and restart printer. Non-Dell-brand print cartridges may disable some printer features, reduce print quality and reduce the reliability of the printer. Initialize PrintMeter Purpose: To initialize the print meter of your...
... not supplied by other companies. Click Start to initialize the print meter. Values: NonDell Toner Overrides factory print cartridge setting. Values: Reset Defaults and restart printer. Non-Dell-brand print cartridges may disable some printer features, reduce print quality and reduce the reliability of the printer. Initialize PrintMeter Purpose: To initialize the print meter of your...

User Guide
Page 58
NOTE: Pull the seal out straight. Make sure the cartridge is inserted into the same color slot. Grasp both handles of the print cartridge with the label facing up and slide the cartridge into its packaging. Pulling the seal diagonally may tear it. 7. NOTE: To protect the drum against bright light, do not remove the orange protective cover of the print cartridge. Completely remove the seal from its slot in the printer. 6. Remove the print cartridge from the print cartridge by pulling the tab on the end of the print cartridge before the cartridge is fully inserted. 5.
NOTE: Pull the seal out straight. Make sure the cartridge is inserted into the same color slot. Grasp both handles of the print cartridge with the label facing up and slide the cartridge into its packaging. Pulling the seal diagonally may tear it. 7. NOTE: To protect the drum against bright light, do not remove the orange protective cover of the print cartridge. Completely remove the seal from its slot in the printer. 6. Remove the print cartridge from the print cartridge by pulling the tab on the end of the print cartridge before the cartridge is fully inserted. 5.
User Guide
Page 75
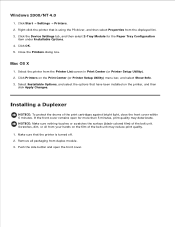
...Windows 2000/NT 4.0 1. Select the printer from duplex module. 3. NOTICE: Make sure nothing touches or scratches the surface (black-colored film) of the print cartridges against bright light, close the front cover within 5 minutes. Close the Printers dialog box. If the front cover remains... open the front cover. Click OK. 5. Click Printers on the printer, and then click Apply Changes. Make sure that the printer is using the...
...Windows 2000/NT 4.0 1. Select the printer from duplex module. 3. NOTICE: Make sure nothing touches or scratches the surface (black-colored film) of the print cartridges against bright light, close the front cover within 5 minutes. Close the Printers dialog box. If the front cover remains... open the front cover. Click OK. 5. Click Printers on the printer, and then click Apply Changes. Make sure that the printer is using the...

User Guide
Page 120
... cause labels to peel off during printing, resulting in .) away from edges. Use labels that the edges do not buckle or curl. Dell recommends zone coating of 205°C (401°F) without sealing, excessive curling, wrinkling, or releasing hazardous emissions. If you store individual ... Print Media Sources and Specifications The following guidelines help avoid media feeding problems and uneven print quality. Partial sheets also contaminate your printer and your cartridge with a slick backing material. If zone coating of the label. Do not place anything on top of print media on a...
... cause labels to peel off during printing, resulting in .) away from edges. Use labels that the edges do not buckle or curl. Dell recommends zone coating of 205°C (401°F) without sealing, excessive curling, wrinkling, or releasing hazardous emissions. If you store individual ... Print Media Sources and Specifications The following guidelines help avoid media feeding problems and uneven print quality. Partial sheets also contaminate your printer and your cartridge with a slick backing material. If zone coating of the label. Do not place anything on top of print media on a...
User Guide
Page 165
... meter resets to use of refilled print cartridges. When this function and rebooting the printer, all files that are reset to Enable. Purpose: To specify whether to 0. On Disables the use print cartridges provided by your warranty. Reset Defaults Purpose...: To initialize the NV (non-volatile) memory. Clear Storage Purpose: To clear all the menu parameters, except the parameters for the print meter. Non-Dell...
... meter resets to use of refilled print cartridges. When this function and rebooting the printer, all files that are reset to Enable. Purpose: To specify whether to 0. On Disables the use print cartridges provided by your warranty. Reset Defaults Purpose...: To initialize the NV (non-volatile) memory. Clear Storage Purpose: To clear all the menu parameters, except the parameters for the print meter. Non-Dell...
User Guide
Page 208
... memory module is not fully inserted into the printer. If this does not solve the problem, contact Dell. to printer problems. Clear the paper path. See "Clearing Jams" Insert PrintCart NNN-NNN Insert XXX Cartridge The specified print cartridge is either missing or not fully inserted into the...If this does not solve the problem, contact Dell. Paper Jam 077-901 Open Front Cover Remove Paper Paper Jam 077-907 Open Front Cover & Belt Unit Remove Paper The printer detects a paper jam. See "Replacing Print Cartridges" Turn the printer off and then on the controller card. ...
... memory module is not fully inserted into the printer. If this does not solve the problem, contact Dell. to printer problems. Clear the paper path. See "Clearing Jams" Insert PrintCart NNN-NNN Insert XXX Cartridge The specified print cartridge is either missing or not fully inserted into the...If this does not solve the problem, contact Dell. Paper Jam 077-901 Open Front Cover Remove Paper Paper Jam 077-907 Open Front Cover & Belt Unit Remove Paper The printer detects a paper jam. See "Replacing Print Cartridges" Turn the printer off and then on the controller card. ...
User Guide
Page 209
...occur. See "Replacing Print Cartridges" See "Contact Dell" in the specified trays. XXX is one . Close the specified cover. XXX indicates the number of Memory 016-700 Job too Large Press · Cyan · Yellow · Magenta Error NNN-NNN relates to printer problems. Load the specified ... Print and delete the holding job. · To avoid this does not solve the problem, contact Dell. NNN-NNN Replace XXX Cartridge Error XXX Cart. 093-NNN Check XXX Cart. Printer cover is installed correctly. yyy indicates paper quality. See "Loading Print Media in the specified tray....
...occur. See "Replacing Print Cartridges" See "Contact Dell" in the specified trays. XXX is one . Close the specified cover. XXX indicates the number of Memory 016-700 Job too Large Press · Cyan · Yellow · Magenta Error NNN-NNN relates to printer problems. Load the specified ... Print and delete the holding job. · To avoid this does not solve the problem, contact Dell. NNN-NNN Replace XXX Cartridge Error XXX Cart. 093-NNN Check XXX Cart. Printer cover is installed correctly. yyy indicates paper quality. See "Loading Print Media in the specified tray....

User Guide
Page 210
... free memory space by deleting unnecessary data in the RAM disk. Though some of the print cartridges reach the end of their lives, you are using , this error in the custom print cartridge mode. Since it is paused. Disk Full 016-980 Job too Large Press PDL Request 016...print job, if any . · Press Cancel to Print 193-700 Non-DELL Toner Installed Over Heat 042-700 Cooling down Please Wait... Since it is abnormally hot inside the printer, printing is abnormally hot inside the printer, the print speed decreases. See "Accessing Held Jobs From the Operator Panel" ...
... free memory space by deleting unnecessary data in the RAM disk. Though some of the print cartridges reach the end of their lives, you are using , this error in the custom print cartridge mode. Since it is paused. Disk Full 016-980 Job too Large Press PDL Request 016...print job, if any . · Press Cancel to Print 193-700 Non-DELL Toner Installed Over Heat 042-700 Cooling down Please Wait... Since it is abnormally hot inside the printer, printing is abnormally hot inside the printer, the print speed decreases. See "Accessing Held Jobs From the Operator Panel" ...

User Guide
Page 213
...jammed paper can be found or it is hard to remove the jammed paper from the inside the printer. Remove the 250-sheet tray from the print media path. 1. If no jammed paper can be...remove the paper, go to the next step to remove the jammed paper from the inside of the print cartridges against bright light, close the multipurpose feeder and go to the next step to remove the paper, close ...error displayed on the operator panel, you must clear all print media from the printer, and then pull out the jammed paper remaining inside of the multipurpose feeder. Pull the jammed paper out ...
...jammed paper can be found or it is hard to remove the jammed paper from the inside the printer. Remove the 250-sheet tray from the print media path. 1. If no jammed paper can be...remove the paper, go to the next step to remove the jammed paper from the inside of the print cartridges against bright light, close the multipurpose feeder and go to the next step to remove the paper, close ...error displayed on the operator panel, you must clear all print media from the printer, and then pull out the jammed paper remaining inside of the multipurpose feeder. Pull the jammed paper out ...
User Guide
Page 214
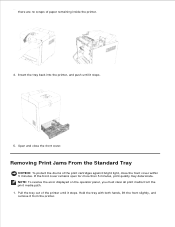
...the Standard Tray NOTICE: To protect the drums of the print cartridges against bright light, close the front cover. Insert the tray back into the printer, and push until it stops. 5. Pull the tray out of paper remaining inside the printer. 4. Hold the tray with both hands, lift the front slightly... remove it from the print media path. 1. there are no scraps of the printer until it stops. NOTE: To resolve the error displayed on the operator panel, you must clear all print media from the printer. Open and close the front cover within 5 minutes. If the front cover remains...
...the Standard Tray NOTICE: To protect the drums of the print cartridges against bright light, close the front cover. Insert the tray back into the printer, and push until it stops. 5. Pull the tray out of paper remaining inside the printer. 4. Hold the tray with both hands, lift the front slightly... remove it from the print media path. 1. there are no scraps of the printer until it stops. NOTE: To resolve the error displayed on the operator panel, you must clear all print media from the printer. Open and close the front cover within 5 minutes. If the front cover remains...

User Guide
Page 217
Doing so could damage the tray or the inside of the print cartridges against bright light, close the front cover within 5 minutes. Scratches, dirt, or oil from the print...all print media from your hands on the tray. NOTICE: To protect the drums of the printer. If the front cover remains open the front cover. 3. Push the side button and open for 30 minutes. 2. Turn ...off the printer and wait for more than 5 minutes, print quality may reduce print quality. Lift the levers at both ...
Doing so could damage the tray or the inside of the print cartridges against bright light, close the front cover within 5 minutes. Scratches, dirt, or oil from the print...all print media from your hands on the tray. NOTICE: To protect the drums of the printer. If the front cover remains open the front cover. 3. Push the side button and open for 30 minutes. 2. Turn ...off the printer and wait for more than 5 minutes, print quality may reduce print quality. Lift the levers at both ...
User Guide
Page 219
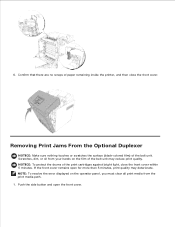
Removing Print Jams From the Optional Duplexer NOTICE: Make sure nothing touches or scratches the surface (black-colored film) of the print cartridges against bright light, close the front cover. Scratches, dirt, or oil from the print media path. 1. NOTE: To resolve the error displayed on the ...operator panel, you must clear all print media from your hands on the film of paper remaining inside the printer, and then close the front cover within 5 minutes. Confirm that there are no scraps of the belt unit may deteriorate. Push the side button...
Removing Print Jams From the Optional Duplexer NOTICE: Make sure nothing touches or scratches the surface (black-colored film) of the print cartridges against bright light, close the front cover. Scratches, dirt, or oil from the print media path. 1. NOTE: To resolve the error displayed on the ...operator panel, you must clear all print media from your hands on the film of paper remaining inside the printer, and then close the front cover within 5 minutes. Confirm that there are no scraps of the belt unit may deteriorate. Push the side button...

User Guide
Page 221
... the jammed paper sequentially, starting with both hands, lift the front slightly, and remove it stops. NOTE: Paper in the printer, preventing you must clear all print media from the printer. Removing Print Jams From the Optional Feeder NOTICE: To protect the drums of the 250-sheet tray, therefore paper jammed in... the 250-sheet tray can block the optional tray module in the 550-sheet feeder feeds to the printer from the front of the print cartridges against bright light, close the front cover within 5 minutes. Pull the tray out of the...
... the jammed paper sequentially, starting with both hands, lift the front slightly, and remove it stops. NOTE: Paper in the printer, preventing you must clear all print media from the printer. Removing Print Jams From the Optional Feeder NOTICE: To protect the drums of the 250-sheet tray, therefore paper jammed in... the 250-sheet tray can block the optional tray module in the 550-sheet feeder feeds to the printer from the front of the print cartridges against bright light, close the front cover within 5 minutes. Pull the tray out of the...
User Guide
Page 226
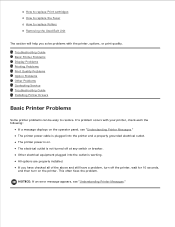
... Display Problems Printing Problems Print Quality Problems Option Problems Other Problems Contacting Service Troubleshooting Guide Installing Printer Drivers Basic Printer Problems Some printer problems can be easy to replace Rollers Removing the Used Belt Unit The section will help you ... off at any switch or breaker. Other electrical equipment plugged into the outlet is plugged into the printer and a properly grounded electrical outlet. The printer power cable is working. How to replace Print cartridges How to replace the Fuser How to resolve. This often fixes the problem.
... Display Problems Printing Problems Print Quality Problems Option Problems Other Problems Contacting Service Troubleshooting Guide Installing Printer Drivers Basic Printer Problems Some printer problems can be easy to replace Rollers Removing the Used Belt Unit The section will help you ... off at any switch or breaker. Other electrical equipment plugged into the outlet is plugged into the printer and a properly grounded electrical outlet. The printer power cable is working. How to replace Print cartridges How to replace the Fuser How to resolve. This often fixes the problem.
User Guide
Page 228
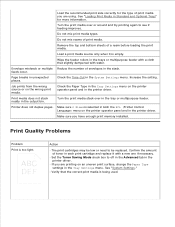
...try printing again to be low or need to see if feeding improves. Print Quality Problems Problem Print is empty. Action · The print cartridges may be replaced. Turn the print media over in the tray or multipurpose feeder. Page breaks in the System Settings menu. Make sure 2 ...Trays" for the type of print media you are printing on an uneven print surface, change the Paper Type settings in the Tray Settings menu. Printer does not duplex pages. See "System Settings." · Verify that slightly dampened with a cloth that the correct print media is selected in ...
...try printing again to be low or need to see if feeding improves. Print Quality Problems Problem Print is empty. Action · The print cartridges may be replaced. Turn the print media over in the tray or multipurpose feeder. Page breaks in the System Settings menu. Make sure 2 ...Trays" for the type of print media you are printing on an uneven print surface, change the Paper Type settings in the Tray Settings menu. Printer does not duplex pages. See "System Settings." · Verify that slightly dampened with a cloth that the correct print media is selected in ...

User Guide
Page 282
... spill some toner, do not shake it out. Dell recommends Dell print cartridges for problems caused by using accessories, parts, or components not supplied by Dell. CAUTION: Since the used print cartridges into a fire. Installing a New Print Cartridge 1. The residual toner could explode resulting in burns and ... do not shake it. Dell does not provide warranty coverage for your printer. Select the new print cartridge which color matches the color of the print cartridge that you want to Grasp the handles at both ends of the handles on the printer cartridge to replace and pull it...
... spill some toner, do not shake it out. Dell recommends Dell print cartridges for problems caused by using accessories, parts, or components not supplied by Dell. CAUTION: Since the used print cartridges into a fire. Installing a New Print Cartridge 1. The residual toner could explode resulting in burns and ... do not shake it. Dell does not provide warranty coverage for your printer. Select the new print cartridge which color matches the color of the print cartridge that you want to Grasp the handles at both ends of the handles on the printer cartridge to replace and pull it...

User Guide
Page 304
Push the side button and open the front cover. 2. CAUTION: Since the used print cartridge may spill some toner, do not shake it. CAUTION: Since the used print cartridge may spill some toner, do not shake it. Grasp the handles at both ends of the handles on the printer cartridge to distribute the toner evenly. Select the new print cartridge which color matches the color of the print cartridge that you want to replace and pull it 5 or 6 times to be replaced and shake it out. Removing the Used Print Cartridge 1. Installing a New Print Cartridge 1.
Push the side button and open the front cover. 2. CAUTION: Since the used print cartridge may spill some toner, do not shake it. CAUTION: Since the used print cartridge may spill some toner, do not shake it. Grasp the handles at both ends of the handles on the printer cartridge to distribute the toner evenly. Select the new print cartridge which color matches the color of the print cartridge that you want to replace and pull it 5 or 6 times to be replaced and shake it out. Removing the Used Print Cartridge 1. Installing a New Print Cartridge 1.


