User Guide
Page 100
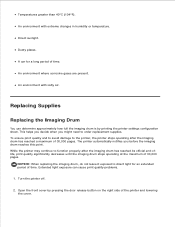
...long period of 30,000 pages. Open the front cover by printing the printer settings configuration sheet. Replacing Supplies Replacing the Imaging Drum You can cause print quality problems. 1. Turn the printer off. 2. The printer automatically notifies you might need to function properly after ...the imaging drum has reached a maximum of time. A car for an extended period of the printer and lowering the cover. An environment where ...
...long period of 30,000 pages. Open the front cover by printing the printer settings configuration sheet. Replacing Supplies Replacing the Imaging Drum You can cause print quality problems. 1. Turn the printer off. 2. The printer automatically notifies you might need to function properly after ...the imaging drum has reached a maximum of time. A car for an extended period of the printer and lowering the cover. An environment where ...
User Guide
Page 101
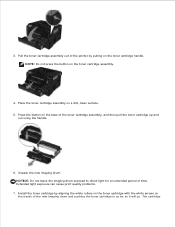
Place the toner cartridge assembly on the toner cartridge assembly. 4. Unpack the new imaging drum. Press the button on the base of the new imaging drum and pushing the toner cartridge in as far as it will go. Install the toner cartridge by pulling on the tracks of the .... 6. The cartridge 2. 3. Extended light exposure can cause print quality problems. 7. Pull the toner cartridge assembly out of time. NOTICE: Do not leave the imaging drum exposed to direct light for an extended period of the printer by aligning the white rollers on the toner cartridge with the white arrows on...
Place the toner cartridge assembly on the toner cartridge assembly. 4. Unpack the new imaging drum. Press the button on the base of the new imaging drum and pushing the toner cartridge in as far as it will go. Install the toner cartridge by pulling on the tracks of the .... 6. The cartridge 2. 3. Extended light exposure can cause print quality problems. 7. Pull the toner cartridge assembly out of time. NOTICE: Do not leave the imaging drum exposed to direct light for an extended period of the printer by aligning the white rollers on the toner cartridge with the white arrows on...
User Guide
Page 102
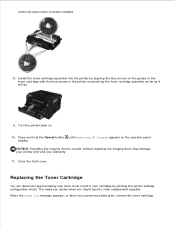
... when you experience faded print, remove the toner cartridge. clicks into the printer by printing the printer settings configuration sheet. NOTICE: Resetting the imaging drum's counter without replacing the imaging drum may damage your printer and void your cartridge by aligning the blue arrows on the guides of the toner cartridge with the blue...
... when you experience faded print, remove the toner cartridge. clicks into the printer by printing the printer settings configuration sheet. NOTICE: Resetting the imaging drum's counter without replacing the imaging drum may damage your printer and void your cartridge by aligning the blue arrows on the guides of the toner cartridge with the blue...

User Guide
Page 103
NOTE: You can cause print quality problems. 1. Open the front cover by pressing the button on the base of the imaging drum and pull the toner cartridge assembly up and out using the handle. 4. Unpack the new toner cartridge assembly. Repeat this procedure multiple times until print ...
NOTE: You can cause print quality problems. 1. Open the front cover by pressing the button on the base of the imaging drum and pull the toner cartridge assembly up and out using the handle. 4. Unpack the new toner cartridge assembly. Repeat this procedure multiple times until print ...

User Guide
Page 104
Close the front cover. Cleaning the Exterior of time. CAUTION: To avoid the risk of the imaging drum kit and pushing the toner cartridge in all cables to distribute the toner. 6. Extended light exposure can cause print quality problems. 5. Rotate the cartridge in ...
Close the front cover. Cleaning the Exterior of time. CAUTION: To avoid the risk of the imaging drum kit and pushing the toner cartridge in all cables to distribute the toner. 6. Extended light exposure can cause print quality problems. 5. Rotate the cartridge in ...

User Guide
Page 110
...sheet drawer (Tray 2)? If the above steps do I set up for Windows? For more information, see Replacing the Imaging Drum. How do I install the Dell 2330d/dn and 2350d/dn Laser Printer driver through network for Network Printing. How do I choose the optional 550-sheet drawer (Tray 2)... 550-Sheet Paper Tray. NOTE: Resetting the imaging drum counter without replacing the imaging drum may damage your printer and void your warranty. If this does not resolve this issue, then try uninstalling and reinstalling the Dell 2330d/dn and 2350d/dn Laser Printer driver. Why can communicate. ...
...sheet drawer (Tray 2)? If the above steps do I set up for Windows? For more information, see Replacing the Imaging Drum. How do I install the Dell 2330d/dn and 2350d/dn Laser Printer driver through network for Network Printing. How do I choose the optional 550-sheet drawer (Tray 2)... 550-Sheet Paper Tray. NOTE: Resetting the imaging drum counter without replacing the imaging drum may damage your printer and void your warranty. If this does not resolve this issue, then try uninstalling and reinstalling the Dell 2330d/dn and 2350d/dn Laser Printer driver. Why can communicate. ...
User Guide
Page 123
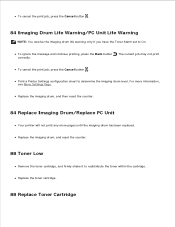
...toner within the cartridge. The current job may not print correctly. To cancel the print job, press the Cancel button . Replace the imaging drum, and reset the counter. 88 Toner Low Remove the toner cartridge, and firmly shake it to On. Print a Printer Settings configuration... sheet to determine the imaging drum level. For more pages until the imaging drum has been replaced. Replace the imaging drum, and then reset the counter. 84 Replace Imaging Drum/Replace PC Unit Your printer will not print any more information, see Menu ...
...toner within the cartridge. The current job may not print correctly. To cancel the print job, press the Cancel button . Replace the imaging drum, and reset the counter. 88 Toner Low Remove the toner cartridge, and firmly shake it to On. Print a Printer Settings configuration... sheet to determine the imaging drum level. For more pages until the imaging drum has been replaced. Replace the imaging drum, and then reset the counter. 84 Replace Imaging Drum/Replace PC Unit Your printer will not print any more information, see Menu ...


