
User's Guide
Page 2
is subject to the entities claiming the marks and names of Dell Inc.; Dell Inc. Microsoft and Windows are trademarks of their products. Trademarks Information in this document is strictly forbidden. Reproduction in any proprietary interest in trademarks and ... in this document to refer to change without the written permission of Microsoft Corporation. Other trademarks and trade names may be used in this text: Dell, the DELL logo, and Dell Toner Management System are registered trademarks of...
is subject to the entities claiming the marks and names of Dell Inc.; Dell Inc. Microsoft and Windows are trademarks of their products. Trademarks Information in this document is strictly forbidden. Reproduction in any proprietary interest in trademarks and ... in this document to refer to change without the written permission of Microsoft Corporation. Other trademarks and trade names may be used in this text: Dell, the DELL logo, and Dell Toner Management System are registered trademarks of...
User's Guide
Page 5
... Alert Utility...76 Installing the Optional XPS Driver...76 Dell Toner Management System...77 Printing Status Window...77 Dell Printer Supplies Reorder Application ...77 Printing 79 Printing a document...79 Printing on both sides of the paper...80 Setting Jam Recovery...... computer ...87 Cleaning the exterior of the printer...87 Storing supplies...87 Conserving supplies...88 Extending the life of your toner cartridge...88 Replacing supplies...89 Replacing the toner cartridge ...89 Replacing the photoconductor kit ...91 Moving the printer...94 Before moving the printer ...94 Moving the printer ...
... Alert Utility...76 Installing the Optional XPS Driver...76 Dell Toner Management System...77 Printing Status Window...77 Dell Printer Supplies Reorder Application ...77 Printing 79 Printing a document...79 Printing on both sides of the paper...80 Setting Jam Recovery...... computer ...87 Cleaning the exterior of the printer...87 Storing supplies...87 Conserving supplies...88 Extending the life of your toner cartridge...88 Replacing supplies...89 Replacing the toner cartridge ...89 Replacing the photoconductor kit ...91 Moving the printer...94 Before moving the printer ...94 Moving the printer ...

User's Guide
Page 6
......96 Clearing jams 97 Avoiding jams...97 Accessing jam areas...98 Understanding jam lights and access locations...98 Clearing jams behind the photoconductor kit and toner cartridge 102 Clearing jams from the standard exit bin...104 Clearing jams from Tray 1...104 Clearing jams from Tray 2...106 Clearing jams in the manual...
......96 Clearing jams 97 Avoiding jams...97 Accessing jam areas...98 Understanding jam lights and access locations...98 Clearing jams behind the photoconductor kit and toner cartridge 102 Clearing jams from the standard exit bin...104 Clearing jams from Tray 1...104 Clearing jams from Tray 2...106 Clearing jams in the manual...
User's Guide
Page 7
Incorrect margins...117 Paper curl...117 Print is too dark...118 Print is too light ...118 Skewed print...119 Toner fog or background shading appears on the page 119 Toner rubs off...120 Toner specks...120 Transparency print quality is poor...120 Streaked horizontal lines...121 Streaked vertical lines ...121 Solid black or white streaks appear on transparencies or paper 122 Appendix 124 Dell Technical Support Policy...124 Contacting Dell...124 Warranty and Return Policy...125 Index 126 Contents 7
Incorrect margins...117 Paper curl...117 Print is too dark...118 Print is too light ...118 Skewed print...119 Toner fog or background shading appears on the page 119 Toner rubs off...120 Toner specks...120 Transparency print quality is poor...120 Streaked horizontal lines...121 Streaked vertical lines ...121 Solid black or white streaks appear on transparencies or paper 122 Appendix 124 Dell Technical Support Policy...124 Contacting Dell...124 Warranty and Return Policy...125 Index 126 Contents 7

User's Guide
Page 14
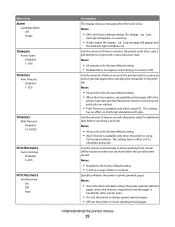
Learning about the printer 14 Item 1 Error light 2 Jam light 3 Load paper light 4 Toner light 5 Ready light 6 Continue button 7 Stop button Attaching cables 1 Connect the printer to a computer using USB or parallel cable. 2 Connect the power cord to the printer first and then to a wall outlet.
Learning about the printer 14 Item 1 Error light 2 Jam light 3 Load paper light 4 Toner light 5 Ready light 6 Continue button 7 Stop button Attaching cables 1 Connect the printer to a computer using USB or parallel cable. 2 Connect the power cord to the printer first and then to a wall outlet.
User's Guide
Page 25
... low message will appear as a warning. • Single means the Toner is the factory default setting. This setting has no effect on PostScript emulation print jobs. Lets the printer automatically continue printing from certain offline situations ... Wait Timeout Disabled 15-65535 Print Recovery Auto Continue Disabled 5-255 Print Recovery Jam Recovery On Off Auto Description The display shows a message when the toner is the factory default setting. Sets the amount of time in seconds the printer waits for other printer tasks. • On sets the printer to...
... low message will appear as a warning. • Single means the Toner is the factory default setting. This setting has no effect on PostScript emulation print jobs. Lets the printer automatically continue printing from certain offline situations ... Wait Timeout Disabled 15-65535 Print Recovery Auto Continue Disabled 5-255 Print Recovery Jam Recovery On Off Auto Description The display shows a message when the toner is the factory default setting. Sets the amount of time in seconds the printer waits for other printer tasks. • On sets the printer to...

User's Guide
Page 29
...8226; 8 is the factory default setting. Note: Off is the factory default setting. • Selecting a smaller number can help conserve toner. Choose whether to make characters more distinct and definite. The Auto setting automatically applies Gray Correction, and Off does not. Adjusts the ...contrast of printed objects Note: 0 is the factory default setting. Adjusts or darkens printed output and conserves toner Note: 0 is the factory default setting. Pixel Boost may be needed when using N-up menus. Note: Off is the factory default...
...8226; 8 is the factory default setting. Note: Off is the factory default setting. • Selecting a smaller number can help conserve toner. Choose whether to make characters more distinct and definite. The Auto setting automatically applies Gray Correction, and Off does not. Adjusts the ...contrast of printed objects Note: 0 is the factory default setting. Adjusts or darkens printed output and conserves toner Note: 0 is the factory default setting. Pixel Boost may be needed when using N-up menus. Note: Off is the factory default...
User's Guide
Page 39
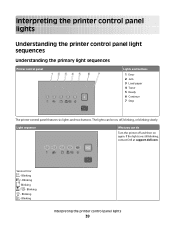
...Understanding the printer control panel light sequences Understanding the primary light sequences Printer control panel Lights and buttons 1 Error 2 Jam 3 Load paper 4 Toner 5 Ready 6 Continue 7 Stop The printer control panel features six lights and two buttons. Light sequence What you can be on again. ... the printer control panel lights 39 Service Error - Blinking - Blinking - Blinking - If the lights are still blinking, contact Dell at support.dell.com. Blinking - Blinking - The lights can do Turn the printer off and then on , off, blinking, or blinking slowly.
...Understanding the printer control panel light sequences Understanding the primary light sequences Printer control panel Lights and buttons 1 Error 2 Jam 3 Load paper 4 Toner 5 Ready 6 Continue 7 Stop The printer control panel features six lights and two buttons. Light sequence What you can be on again. ... the printer control panel lights 39 Service Error - Blinking - Blinking - Blinking - If the lights are still blinking, contact Dell at support.dell.com. Blinking - Blinking - The lights can do Turn the printer off and then on , off, blinking, or blinking slowly.
User's Guide
Page 43
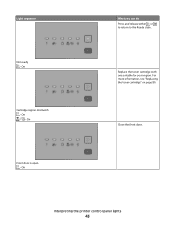
On What you can do Press and release either or l to return to the Ready state. On Cartridge region mismatch - For more information, see "Replacing the toner cartridge" on page 89. Close the front door. Light sequence Not ready - Replace the toner cartridge with one suitable for your region. On Front door is open - On - Interpreting the printer control panel lights 43
On What you can do Press and release either or l to return to the Ready state. On Cartridge region mismatch - For more information, see "Replacing the toner cartridge" on page 89. Close the front door. Light sequence Not ready - Replace the toner cartridge with one suitable for your region. On Front door is open - On - Interpreting the printer control panel lights 43
User's Guide
Page 45
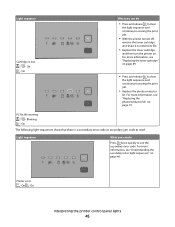
For more information, see "Replacing the toner cartridge" on page 89. • Press and release to clear the light sequence and continue processing the print job. • Replace the photoconductor kit. For ... and release to clear the light sequence and continue processing the print job. • With the printer turned off, remove the toner cartridge and shake it to extend its life. • Replace the toner cartridge, and then turn the printer on. On - On The following light sequences show that there is low -
For more information, see "Replacing the toner cartridge" on page 89. • Press and release to clear the light sequence and continue processing the print job. • Replace the photoconductor kit. For ... and release to clear the light sequence and continue processing the print job. • With the printer turned off, remove the toner cartridge and shake it to extend its life. • Replace the toner cartridge, and then turn the printer on. On - On The following light sequences show that there is low -

User's Guide
Page 46
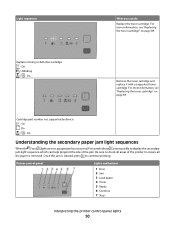
Printer control panel Lights and buttons 1 Error 2 Jam 3 Load paper 4 Toner 5 Ready 6 Continue 7 Stop Interpreting the printer control panel lights 46 Paper jam - On - On Understanding the secondary error light sequences When the and lights are on simultaneously, press twice quickly to see the secondary paper jam code. For more information, see the secondary error code. Light sequence What you can do Press twice quickly to see "Understanding the secondary paper jam light sequences" on page 50.
Printer control panel Lights and buttons 1 Error 2 Jam 3 Load paper 4 Toner 5 Ready 6 Continue 7 Stop Interpreting the printer control panel lights 46 Paper jam - On - On Understanding the secondary error light sequences When the and lights are on simultaneously, press twice quickly to see the secondary paper jam code. For more information, see the secondary error code. Light sequence What you can do Press twice quickly to see "Understanding the secondary paper jam light sequences" on page 50.
User's Guide
Page 49
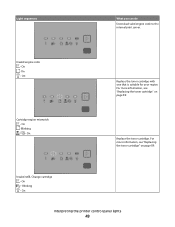
On Replace the toner cartridge with one that is suitable for your region. On - Invalid engine code - On - On - On Cartridge region mismatch - Blinking - For more information, see "Replacing the toner cartridge" on page 89. On - For more information, see "Replacing the toner cartridge" on page 89. Replace the toner cartridge. Invalid refill, Change cartridge - Blinking - Light sequences What you can do Download valid engine code to the internal print server. On Interpreting the printer control panel lights 49
On Replace the toner cartridge with one that is suitable for your region. On - Invalid engine code - On - On - On Cartridge region mismatch - Blinking - For more information, see "Replacing the toner cartridge" on page 89. On - For more information, see "Replacing the toner cartridge" on page 89. Replace the toner cartridge. Invalid refill, Change cartridge - Blinking - Light sequences What you can do Download valid engine code to the internal print server. On Interpreting the printer control panel lights 49
User's Guide
Page 50
... - Cartridge part number not supported by device - Blinking - On - Printer control panel Lights and buttons 1 Error 2 Jam 3 Load paper 4 Toner 5 Ready 6 Continue 7 Stop Interpreting the printer control panel lights 50 On Understanding the secondary paper jam light sequences When the and lights are on ... Be sure to check all areas of the jam. On - On Remove the toner cartridge and replace it with a supported toner cartridge. Once the jam is removed. For more information, see "Replacing the toner cartridge" on , a paper jam has occurred. Light sequences What you can help...
... - Cartridge part number not supported by device - Blinking - On - Printer control panel Lights and buttons 1 Error 2 Jam 3 Load paper 4 Toner 5 Ready 6 Continue 7 Stop Interpreting the printer control panel lights 50 On Understanding the secondary paper jam light sequences When the and lights are on ... Be sure to check all areas of the jam. On - On Remove the toner cartridge and replace it with a supported toner cartridge. Once the jam is removed. For more information, see "Replacing the toner cartridge" on , a paper jam has occurred. Light sequences What you can help...
User's Guide
Page 51
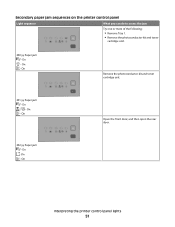
On - On - On - On - On Open the front door, and then open the rear door. 202.yy Paper jam - On - On Interpreting the printer control panel lights 51 Secondary paper jam sequences on the printer control panel Light sequence What you can do to access the jam Try one or more of the following: • Remove Tray 1. • Remove the photoconductor kit and toner cartridge unit. 200.yy Paper jam - On - On Remove the photoconductor kit and toner cartridge unit. 201.yy Paper jam -
On - On - On - On - On Open the front door, and then open the rear door. 202.yy Paper jam - On - On Interpreting the printer control panel lights 51 Secondary paper jam sequences on the printer control panel Light sequence What you can do to access the jam Try one or more of the following: • Remove Tray 1. • Remove the photoconductor kit and toner cartridge unit. 200.yy Paper jam - On - On Remove the photoconductor kit and toner cartridge unit. 201.yy Paper jam -
User's Guide
Page 53
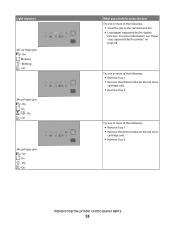
On 24x.yy Paper jam - On - Blinking - On - For more of the following: • Remove Tray 1. • Remove the photoconductor kit and toner cartridge unit. • Remove Tray 2. Interpreting the printer control panel lights 53 On - On - On - On - Light sequence 235.yy Paper jam - On - Try one ...; Load paper supported by the printer" on page 68. Try one or more of the following : • Remove Tray 1. • Remove the photoconductor kit and toner cartridge unit. • Remove Tray 2.
On 24x.yy Paper jam - On - Blinking - On - For more of the following: • Remove Tray 1. • Remove the photoconductor kit and toner cartridge unit. • Remove Tray 2. Interpreting the printer control panel lights 53 On - On - On - On - Light sequence 235.yy Paper jam - On - Try one ...; Load paper supported by the printer" on page 68. Try one or more of the following : • Remove Tray 1. • Remove the photoconductor kit and toner cartridge unit. • Remove Tray 2.
User's Guide
Page 65
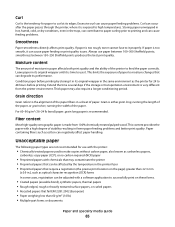
... The following paper types are not recommended for 24 to 48 hours before printing by the temperature in its performance. If paper is too rough, toner cannot fuse to feed the paper correctly. Excessive curl can cause paper feeding problems. Curl can cause feeding problems. Smoothness Paper smoothness directly affects print...
... The following paper types are not recommended for 24 to 48 hours before printing by the temperature in its performance. If paper is too rough, toner cannot fuse to feed the paper correctly. Excessive curl can cause paper feeding problems. Curl can cause feeding problems. Smoothness Paper smoothness directly affects print...

User's Guide
Page 66
.... Inks that has been cut or trimmed by the resin in xerographic copiers. To help avoid jams and poor print quality: • Always use in toner. Selecting preprinted forms and letterhead Use these types of paper, consult your paper supplier. • Suitable sheet-to work very well in the direction of...
.... Inks that has been cut or trimmed by the resin in xerographic copiers. To help avoid jams and poor print quality: • Always use in toner. Selecting preprinted forms and letterhead Use these types of paper, consult your paper supplier. • Suitable sheet-to work very well in the direction of...
User's Guide
Page 74
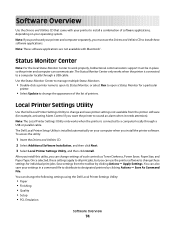
... the printer is connected to a computer locally through a USB cable. Once selected, these settings apply to change the following settings using the Dell Local Printer Settings Utility: • Paper • Finishing • Quality • Setup • PCL Emulation Software Overview 74 To access...command file to distribute to change the appearance of the list of such controls as Toner Darkness, Power Saver, Paper Size, and Paper Type. Local Printer Settings Utility Use the Dell Local Printer Settings Utility to designated printers by clicking Actions Œ Apply Settings. Note...
... the printer is connected to a computer locally through a USB cable. Once selected, these settings apply to change the following settings using the Dell Local Printer Settings Utility: • Paper • Finishing • Quality • Setup • PCL Emulation Software Overview 74 To access...command file to distribute to change the appearance of the list of such controls as Toner Darkness, Power Saver, Paper Size, and Paper Type. Local Printer Settings Utility Use the Dell Local Printer Settings Utility to designated printers by clicking Actions Œ Apply Settings. Note...
User's Guide
Page 75
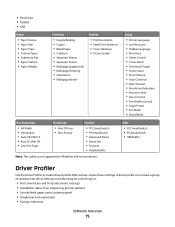
...) • Multipage Ordering • Orientation • Multipage Border Quality • Print Resolution • Small Font Enhancer • Toner Darkness • Picture Grade Setup • Printer Language • Jam Recovery • Display Language • Print Area • Alarm Control •...; Toner Alarm • Download Target • Power Saver • Print Timeout • Auto Continue • Wait Timeout • Resolution Reduction ...
...) • Multipage Ordering • Orientation • Multipage Border Quality • Print Resolution • Small Font Enhancer • Toner Darkness • Picture Grade Setup • Printer Language • Jam Recovery • Display Language • Print Area • Alarm Control •...; Toner Alarm • Download Target • Power Saver • Print Timeout • Auto Continue • Wait Timeout • Resolution Reduction ...
User's Guide
Page 77
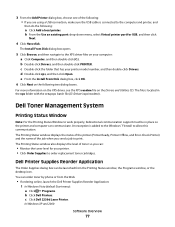
...Click Œ Programs. b Click Dell Printers. e From the Install From Disk dialog box, click OK. 6 Click Next on the Drivers and Utilities CD. 3 From the Add Printer dialog box, choose one of the following: • If you can: • Monitor the toner level for USB, and then ...click Next. 4 Click Have disk. The Install From Disk dialog box opens. 5 Click Browse, and then navigate to order replacement toner cartridges. Dell Toner Management System Printing Status Window Note: For the Printing Status Window to the computer and printer, and then do the following two dialog ...
...Click Œ Programs. b Click Dell Printers. e From the Install From Disk dialog box, click OK. 6 Click Next on the Drivers and Utilities CD. 3 From the Add Printer dialog box, choose one of the following: • If you can: • Monitor the toner level for USB, and then ...click Next. 4 Click Have disk. The Install From Disk dialog box opens. 5 Click Browse, and then navigate to order replacement toner cartridges. Dell Toner Management System Printing Status Window Note: For the Printing Status Window to the computer and printer, and then do the following two dialog ...


