User's Guide
Page 3
... the primary light sequences...39 Contents 3 Contents Safety information 9 Learning about the printer 10 Printer configurations...10 Understanding the printer control panel...13 Attaching cables...14 Understanding the printer menus 16 Paper menu...16 Default Source menu...16 Size/Type menu...16 Paper Texture...menu ...26 Finishing menu...27 Quality menu...29 PostScript menu...30 PCL Emul menu ...30 Using the Finishing menu...32 Additional printer setup 33 Installing internal options...33 Accessing the system board to install internal options...33 Installing a memory card ...34 Installing ...
... the primary light sequences...39 Contents 3 Contents Safety information 9 Learning about the printer 10 Printer configurations...10 Understanding the printer control panel...13 Attaching cables...14 Understanding the printer menus 16 Paper menu...16 Default Source menu...16 Size/Type menu...16 Paper Texture...menu ...26 Finishing menu...27 Quality menu...29 PostScript menu...30 PCL Emul menu ...30 Using the Finishing menu...32 Additional printer setup 33 Installing internal options...33 Accessing the system board to install internal options...33 Installing a memory card ...34 Installing ...
User's Guide
Page 4
... up for local printing 70 Windows®...70 Installing the Printer Drivers ...70 Installing Additional Printer Drivers...70 Installing Additional Printer Software ...71 Macintosh®...72 Mac OS X: Adding the Printer in Print Center or Printer Setup Utility 72 Mac OS 9: Creating a Desktop Printer With Desktop Printer Utility 72 Linux®...73 Software Overview 74 Status Monitor...
... up for local printing 70 Windows®...70 Installing the Printer Drivers ...70 Installing Additional Printer Drivers...70 Installing Additional Printer Software ...71 Macintosh®...72 Mac OS X: Adding the Printer in Print Center or Printer Setup Utility 72 Mac OS 9: Creating a Desktop Printer With Desktop Printer Utility 72 Linux®...73 Software Overview 74 Status Monitor...
User's Guide
Page 5
... Utility...76 Installing the Optional XPS Driver...76 Dell Toner Management System...77 Printing Status Window...77 Dell Printer Supplies Reorder Application ...77 Printing 79 Printing a document...79 Printing on both sides of the paper...80 Setting Jam Recovery...80...page ...84 Printing the print quality test pages ...84 Canceling a print job...85 Maintaining the printer 87 Ordering supplies...87 Printer attached locally to a computer ...87 Cleaning the exterior of the printer...87 Storing supplies...87 Conserving supplies...88 Extending the life of your toner cartridge...88 Replacing ...
... Utility...76 Installing the Optional XPS Driver...76 Dell Toner Management System...77 Printing Status Window...77 Dell Printer Supplies Reorder Application ...77 Printing 79 Printing a document...79 Printing on both sides of the paper...80 Setting Jam Recovery...80...page ...84 Printing the print quality test pages ...84 Canceling a print job...85 Maintaining the printer 87 Ordering supplies...87 Printer attached locally to a computer ...87 Cleaning the exterior of the printer...87 Storing supplies...87 Conserving supplies...88 Extending the life of your toner cartridge...88 Replacing ...

User's Guide
Page 6
... Tray 1...104 Clearing jams from Tray 2...106 Clearing jams in the manual feeder...107 Clearing jams behind the rear door...108 Troubleshooting 110 Solving basic printer problems...110 Solving printing problems...110 Jobs do not print...110 Multiple-language PDFs do not print...111 Job takes longer than expected to print...
... Tray 1...104 Clearing jams from Tray 2...106 Clearing jams in the manual feeder...107 Clearing jams behind the rear door...108 Troubleshooting 110 Solving basic printer problems...110 Solving printing problems...110 Jobs do not print...110 Multiple-language PDFs do not print...111 Job takes longer than expected to print...
User's Guide
Page 9
...'s components. CAUTION-POTENTIAL INJURY: Use the handholds on the power cord. CAUTION-SHOCK HAZARD: If you set it . • Lift the printer off the optional drawer. CAUTION-POTENTIAL INJURY: Before moving it down. The manufacturer is near the product and easily accessible. Use of controls or...-POTENTIAL INJURY: Do not twist, bind, crush, or place heavy objects on the sides of procedures other devices attached to the printer, then turn the printer off using the power switch, and then unplug the power cord from the wall outlet. • Disconnect all external connections (such...
...'s components. CAUTION-POTENTIAL INJURY: Use the handholds on the power cord. CAUTION-SHOCK HAZARD: If you set it . • Lift the printer off the optional drawer. CAUTION-POTENTIAL INJURY: Before moving it down. The manufacturer is near the product and easily accessible. Use of controls or...-POTENTIAL INJURY: Do not twist, bind, crush, or place heavy objects on the sides of procedures other devices attached to the printer, then turn the printer off using the power switch, and then unplug the power cord from the wall outlet. • Disconnect all external connections (such...
User's Guide
Page 10
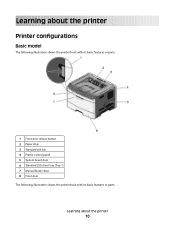
Learning about the printer Printer configurations Basic model The following illustration shows the printer front with its basic features or parts: 1 Front door release button 2 Paper stop 3 Standard exit bin 4 Printer control panel 5 System board door 6 Standard 250-sheet tray (Tray 1) 7 Manual feeder door 8 Front door The following illustration shows the printer back with its basic features or parts: Learning about the printer 10
Learning about the printer Printer configurations Basic model The following illustration shows the printer front with its basic features or parts: 1 Front door release button 2 Paper stop 3 Standard exit bin 4 Printer control panel 5 System board door 6 Standard 250-sheet tray (Tray 1) 7 Manual feeder door 8 Front door The following illustration shows the printer back with its basic features or parts: Learning about the printer 10
User's Guide
Page 11
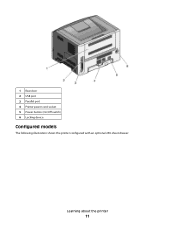
1 Rear door 2 USB port 3 Parallel port 4 Printer power cord socket 5 Power button (On/Off switch) 6 Locking device Configured models The following illustration shows the printer configured with an optional 250-sheet drawer: Learning about the printer 11
1 Rear door 2 USB port 3 Parallel port 4 Printer power cord socket 5 Power button (On/Off switch) 6 Locking device Configured models The following illustration shows the printer configured with an optional 250-sheet drawer: Learning about the printer 11

User's Guide
Page 12
1 Front door release button 2 Paper stop 3 Standard exit bin 4 Printer control panel 5 System board door 6 Standard 250-sheet tray (Tray 1) 7 Optional 250-sheet drawer (Tray 2) 8 Manual feeder door 9 Front door The following illustration shows the printer configured with an optional 550-sheet drawer: Learning about the printer 12
1 Front door release button 2 Paper stop 3 Standard exit bin 4 Printer control panel 5 System board door 6 Standard 250-sheet tray (Tray 1) 7 Optional 250-sheet drawer (Tray 2) 8 Manual feeder door 9 Front door The following illustration shows the printer configured with an optional 550-sheet drawer: Learning about the printer 12

User's Guide
Page 13
1 Front door release button 2 Paper stop 3 Standard exit bin 4 Printer control panel 5 System board door 6 Standard 250-sheet tray (Tray 1) 7 Optional 550-sheet drawer (Tray 2) 8 Manual feeder door 9 Front door Understanding the printer control panel The printer control panel features six lights and two buttons. Learning about the printer 13
1 Front door release button 2 Paper stop 3 Standard exit bin 4 Printer control panel 5 System board door 6 Standard 250-sheet tray (Tray 1) 7 Optional 550-sheet drawer (Tray 2) 8 Manual feeder door 9 Front door Understanding the printer control panel The printer control panel features six lights and two buttons. Learning about the printer 13

User's Guide
Page 14
Item 1 Error light 2 Jam light 3 Load paper light 4 Toner light 5 Ready light 6 Continue button 7 Stop button Attaching cables 1 Connect the printer to a computer using USB or parallel cable. 2 Connect the power cord to the printer first and then to a wall outlet. Learning about the printer 14
Item 1 Error light 2 Jam light 3 Load paper light 4 Toner light 5 Ready light 6 Continue button 7 Stop button Attaching cables 1 Connect the printer to a computer using USB or parallel cable. 2 Connect the power cord to the printer first and then to a wall outlet. Learning about the printer 14

User's Guide
Page 15
1 USB port 2 Parallel port 3 Printer power cord socket Learning about the printer 15
1 USB port 2 Parallel port 3 Printer power cord socket Learning about the printer 15

User's Guide
Page 16
... linked tray. A4 is the international factory default setting. • If the same size and type of menus are available to change the printer settings. Understanding the printer menus A number of paper are in two trays and the Paper Size and Paper Type settings match, then the trays are automatically linked.... From a printer connected by USB or parallel cable, access the menus by printing the menu settings page. When one tray is empty, the job prints using ...
... linked tray. A4 is the international factory default setting. • If the same size and type of menus are available to change the printer settings. Understanding the printer menus A number of paper are in two trays and the Paper Size and Paper Type settings match, then the trays are automatically linked.... From a printer connected by USB or parallel cable, access the menus by printing the menu settings page. When one tray is empty, the job prints using ...

User's Guide
Page 17
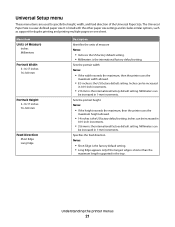
... Universal Lets you specify the size of the paper being manually loaded 7 3/4 Envelope 9 Envelope Note: 10 Envelope is the US factory default setting. Understanding the printer menus 17
... Universal Lets you specify the size of the paper being manually loaded 7 3/4 Envelope 9 Envelope Note: 10 Envelope is the US factory default setting. Understanding the printer menus 17

User's Guide
Page 18
... Bond Texture Envelope Texture Letterhead Texture Preprinted Texture Colored Texture Light Texture Heavy Texture Rough Texture Custom Texture Description Specifies the paper type Understanding the printer menus 18 Menu item Set Type menu for Manual Paper Plain Paper Card Stock Transparency Bond Letterhead Preprinted Colored Paper Light Paper Heavy Paper Rough...
... Bond Texture Envelope Texture Letterhead Texture Preprinted Texture Colored Texture Light Texture Heavy Texture Rough Texture Custom Texture Description Specifies the paper type Understanding the printer menus 18 Menu item Set Type menu for Manual Paper Plain Paper Card Stock Transparency Bond Letterhead Preprinted Colored Paper Light Paper Heavy Paper Rough...

User's Guide
Page 19
... the setting selected for Select Type, Rough is the only Select Texture setting available. • Settings appear only if the paper is supported. Understanding the printer menus 19 Notes: • Normal is the factory default setting for most items. • When Light Weight is the setting selected for Select Type, Light...
... the setting selected for Select Type, Rough is the only Select Texture setting available. • Settings appear only if the paper is supported. Understanding the printer menus 19 Notes: • Normal is the factory default setting for most items. • When Light Weight is the setting selected for Select Type, Light...

User's Guide
Page 20
Description Name a Custom Type , and this user-defined name displays instead of paper, the Set Loading menu appears. Understanding the printer menus 20 Notes: • The Custom Name must be limited to 16 characters. • Paper is the factory default setting for the Custom Type. • ...
Description Name a Custom Type , and this user-defined name displays instead of paper, the Set Loading menu appears. Understanding the printer menus 20 Notes: • The Custom Name must be limited to 16 characters. • Paper is the factory default setting for the Custom Type. • ...
User's Guide
Page 21
...Feed Direction Short Edge Long Edge Description Identifies the units of the Universal Paper Size. Inches can be increased in the tray. Understanding the printer menus 21 It is the US factory default setting. Sets the portrait width Notes: • If the width exceeds the maximum, then the.... The Universal Paper Size is the US factory default setting. Sets the portrait height Notes: • If the height exceeds the maximum, then the printer uses the maximum height allowed. • 14 inches is a user-defined paper size. Universal Setup menu These menu items are used to specify the ...
...Feed Direction Short Edge Long Edge Description Identifies the units of the Universal Paper Size. Inches can be increased in the tray. Understanding the printer menus 21 It is the US factory default setting. Sets the portrait width Notes: • If the width exceeds the maximum, then the.... The Universal Paper Size is the US factory default setting. Sets the portrait height Notes: • If the height exceeds the maximum, then the printer uses the maximum height allowed. • 14 inches is a user-defined paper size. Universal Setup menu These menu items are used to specify the ...

User's Guide
Page 22
... defined by the NPA protocol Notes: • Auto is the factory default setting. • Changing this setting automatically resets the printer. USB Buffer Sets the size of the default printer language Notes: • On is the factory default setting. • When the Off setting is used, the... PS SmartSwitch setting is Off. Any jobs already buffered are printed before normal processing is On. Mac Binary PS On Off Auto Sets the printer to PostScript emulation when a print job received through a USB port requires it , regardless of the USB input buffer Disabled Notes: Auto 3K...
... defined by the NPA protocol Notes: • Auto is the factory default setting. • Changing this setting automatically resets the printer. USB Buffer Sets the size of the default printer language Notes: • On is the factory default setting. • When the Off setting is used, the... PS SmartSwitch setting is Off. Any jobs already buffered are printed before normal processing is On. Mac Binary PS On Off Auto Sets the printer to PostScript emulation when a print job received through a USB port requires it , regardless of the USB input buffer Disabled Notes: Auto 3K...

User's Guide
Page 23
...The parallel buffer size setting can be changed in 1 K increments. • The maximum size allowed depends on the amount of memory in the printer, the size of the other link buffers, and whether Resource Save is the factory default setting. • The Disabled setting turns off job buffering... for the Parallel Buffer, disable or reduce the size of the USB buffer. • Changing this setting automatically resets the printer. It uses the default printer language specified in the Setup menu if PS SmartSwitch is the factory default setting. • The Off setting disables parallel port...
...The parallel buffer size setting can be changed in 1 K increments. • The maximum size allowed depends on the amount of memory in the printer, the size of the other link buffers, and whether Resource Save is the factory default setting. • The Disabled setting turns off job buffering... for the Parallel Buffer, disable or reduce the size of the USB buffer. • Changing this setting automatically resets the printer. It uses the default printer language specified in the Setup menu if PS SmartSwitch is the factory default setting. • The Off setting disables parallel port...

User's Guide
Page 24
... resolve parallel port communication problems. Determines whether the printer honors printer hardware initialization requests from the parallel port. Understanding the printer menus 24 It provides compatibility with most existing parallel ports and is the recommended setting. • The Standard setting tries to process Macintosh binary PostScript ...
... resolve parallel port communication problems. Determines whether the printer honors printer hardware initialization requests from the parallel port. Understanding the printer menus 24 It provides compatibility with most existing parallel ports and is the recommended setting. • The Standard setting tries to process Macintosh binary PostScript ...


