User's Guide (HTML)
Page 3
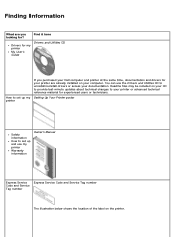
...provide last-minute updates about technical changes to uninstall/reinstall drivers or access your documentation. You can use my printer Warranty information Owner's Manual Express Service Code and Service Tag number Express Service Code and Service Tag number The illustration below shows the ...location of the label on the printer. Find it here Drivers for my printer My User's Guide Drivers and Utilities CD If you purchased your Dell computer and printer...
...provide last-minute updates about technical changes to uninstall/reinstall drivers or access your documentation. You can use my printer Warranty information Owner's Manual Express Service Code and Service Tag number Express Service Code and Service Tag number The illustration below shows the ...location of the label on the printer. Find it here Drivers for my printer My User's Guide Drivers and Utilities CD If you purchased your Dell computer and printer...
User's Guide (HTML)
Page 8
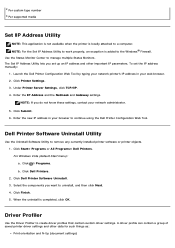
...completed, click OK. Click Finish. 5. The Set IP Address Utility lets you set the IP address manually: 1. Click Printer Settings. 3. Click ® Programs. b. Click Dell Printer Software Uninstall. 3. To set up an IP address and other data for such things as: Print ...For the Set IP Address Utility to continue using the Dell Printer Configuration Web Tool. Launch the Dell Printer Configuration Web Tool by typing your network printer's IP address in your web browser. 2. Click Submit. 6. Dell Printer Software Uninstall Utility Use the Uninstall Software Utility to manage...
...completed, click OK. Click Finish. 5. The Set IP Address Utility lets you set the IP address manually: 1. Click Printer Settings. 3. Click ® Programs. b. Click Dell Printer Software Uninstall. 3. To set up an IP address and other data for such things as: Print ...For the Set IP Address Utility to continue using the Dell Printer Configuration Web Tool. Launch the Dell Printer Configuration Web Tool by typing your network printer's IP address in your web browser. 2. Click Submit. 6. Dell Printer Software Uninstall Utility Use the Uninstall Software Utility to manage...
User's Guide (HTML)
Page 11
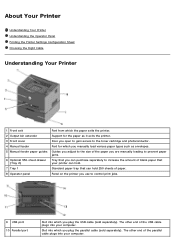
... the paper as envelopes. Standard paper tray that your printer can hold . Slot into your computer. About Your Printer Understanding Your Printer Understanding the Operator Panel Printing the Printer Settings Configuration Sheet Choosing the Right Cable Understanding Your Printer 1 Front exit 2 Output bin extender 3 Front cover 4 Manual feeder 5 Manual feeder paper guides 6 Optional 550-sheet drawer (Tray...
... the paper as envelopes. Standard paper tray that your printer can hold . Slot into your computer. About Your Printer Understanding Your Printer Understanding the Operator Panel Printing the Printer Settings Configuration Sheet Choosing the Right Cable Understanding Your Printer 1 Front exit 2 Output bin extender 3 Front cover 4 Manual feeder 5 Manual feeder paper guides 6 Optional 550-sheet drawer (Tray...
User's Guide (HTML)
Page 14
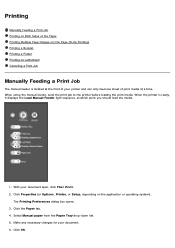
...application or operating system). With your document. 6. Click Properties (or Options, Printer, or Setup, depending on Letterhead Canceling a Print Job Manually Feeding a Print Job The manual feeder is ready, it displays the Load Manual Feeder light sequence, at which point you should load the media. 1. Click ...the Paper tab. 4. Click OK. When using the manual feeder, send the print job to the printer before loading the print media. Select Manual paper from the Paper Tray drop-down list. 5. Printing Manually Feeding a Print Job Printing on Both Sides of print media at...
...application or operating system). With your document. 6. Click Properties (or Options, Printer, or Setup, depending on Letterhead Canceling a Print Job Manually Feeding a Print Job The manual feeder is ready, it displays the Load Manual Feeder light sequence, at which point you should load the media. 1. Click ...the Paper tab. 4. Click OK. When using the manual feeder, send the print job to the printer before loading the print media. Select Manual paper from the Paper Tray drop-down list. 5. Printing Manually Feeding a Print Job Printing on Both Sides of print media at...

User's Guide (HTML)
Page 15
The printer displays the Load Manual Feeder light sequence. 8. Hold transparencies by the edges and avoid touching the ...duplexed: long edge or short edge. If you want your fingers that is a brief pause between the time the printer engages the print media and when it automatically engages. Hold both sides of the page (left edge for landscape). ... media, print side facing up , with the top of the manual feeder, but only to print. Adjust the paper guides to the manual feeder, and push it into the printer until it feeds into the feeder. Long edge means pages are ...
The printer displays the Load Manual Feeder light sequence. 8. Hold transparencies by the edges and avoid touching the ...duplexed: long edge or short edge. If you want your fingers that is a brief pause between the time the printer engages the print media and when it automatically engages. Hold both sides of the page (left edge for landscape). ... media, print side facing up , with the top of the manual feeder, but only to print. Adjust the paper guides to the manual feeder, and push it into the printer until it feeds into the feeder. Long edge means pages are ...
User's Guide (HTML)
Page 16
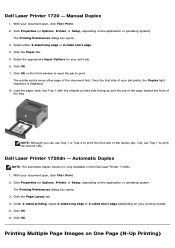
... to send the job to print. Click the Paper tab. 5. Click OK. 7. The Printing Preferences dialog box opens. 3. Once the first side of the tray. Dell Laser Printer 1720 - Manual Duplex 1. Select the appropriate Input Options for your document open , click File® Print. 2. NOTE: Although you can use Tray 1 or Tray 2 to print...
... to send the job to print. Click the Paper tab. 5. Click OK. 7. The Printing Preferences dialog box opens. 3. Once the first side of the tray. Dell Laser Printer 1720 - Manual Duplex 1. Select the appropriate Input Options for your document open , click File® Print. 2. NOTE: Although you can use Tray 1 or Tray 2 to print...
User's Guide (HTML)
Page 18
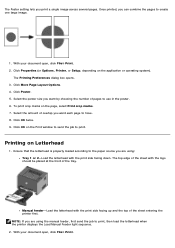
... print side facing up and the top of pages to have. 8. Printing on the Print window to send the job to create one large image. 1. Manual feeder-Load the letterhead with the logo should be placed at the front of overlap you can combine the pages to print. With your document... want each page to use in the poster. 6. NOTE: If you print a single image across several pages. The Poster setting lets you are using the manual feeder, first send the job to print, then load the letterhead when the printer displays the Load Manual Feeder light sequence. 2. Click OK twice. 9.
... print side facing up and the top of pages to have. 8. Printing on the Print window to send the job to create one large image. 1. Manual feeder-Load the letterhead with the logo should be placed at the front of overlap you can combine the pages to print. With your document... want each page to use in the poster. 6. NOTE: If you print a single image across several pages. The Poster setting lets you are using the manual feeder, first send the job to print, then load the letterhead when the printer displays the Load Manual Feeder light sequence. 2. Click OK twice. 9.

User's Guide (HTML)
Page 21
...Continue button until all the lights cycle to fail. Off On* MAC Binary PS Configure the printer to exit the menus. Turn off the printer to process Macintosh binary PostScript print jobs. On-the printer processes raw binary PostScript print jobs from Windows to save a setting. NOTE: This setting ...Press and hold the Cancel button until all of your network. Network Menu Use the Network menu to set the speed manually. From this setting to change printer settings on jobs sent through the menus and menu items. Press the Continue button to advance to the network at 100...
...Continue button until all the lights cycle to fail. Off On* MAC Binary PS Configure the printer to exit the menus. Turn off the printer to process Macintosh binary PostScript print jobs. On-the printer processes raw binary PostScript print jobs from Windows to save a setting. NOTE: This setting ...Press and hold the Cancel button until all of your network. Network Menu Use the Network menu to set the speed manually. From this setting to change printer settings on jobs sent through the menus and menu items. Press the Continue button to advance to the network at 100...
User's Guide (HTML)
Page 32
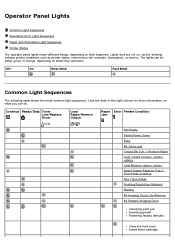
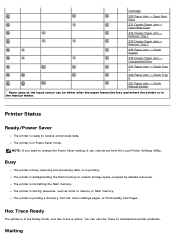
... Waiting 84 Imaging Drum Life Warning 84 Replace Imaging Drum Canceling print job Resetting printer Restoring factory defaults Close the font cover Insert toner cartridge Remove Paper Load Load Manual Insert Duplex Pages in the right column for example, load paper), or service.... Operator Panel Lights Common Light Sequences Secondary Error Light Sequences Paper Jam Secondary Light Sequences Printer Status The operator panel lights mean different...
... Waiting 84 Imaging Drum Life Warning 84 Replace Imaging Drum Canceling print job Resetting printer Restoring factory defaults Close the font cover Insert toner cartridge Remove Paper Load Load Manual Insert Duplex Pages in the right column for example, load paper), or service.... Operator Panel Lights Common Light Sequences Secondary Error Light Sequences Paper Jam Secondary Light Sequences Printer Status The operator panel lights mean different...
User's Guide (HTML)
Page 34
... macros, in Power Saver mode. Busy The printer is busy receiving and processing data, or is formatting the flash memory. The printer is printing. The printer is in flash memory. Remove Tray 1 234 Paper Jam - Unsupported Size 241 Paper Jam - Check Manual Feeder * Paper jams at the input sensor ...can be set from the Local Printer Settings Utility. NOTE: If you want to ...
... macros, in Power Saver mode. Busy The printer is busy receiving and processing data, or is formatting the flash memory. The printer is printing. The printer is in flash memory. Remove Tray 1 234 Paper Jam - Unsupported Size 241 Paper Jam - Check Manual Feeder * Paper jams at the input sensor ...can be set from the Local Printer Settings Utility. NOTE: If you want to ...

User's Guide (HTML)
Page 40
...paper you are using paper that the printer software Paper Type setting is defective. Toner is in the printer software is smeared, or horizontal or vertical light bands appear.) You are using . Try the following : Use only transparencies recommended by Dell. Replace the fuser.2 Streaked vertical ...lines appear on the page. Replace the toner cartridge. The toner cartridge is transparency. The fuser is stiff, try feeding from a fresh package into the paper tray. Try the following : Load paper from another tray or the manual feeder...
...paper you are using paper that the printer software Paper Type setting is defective. Toner is in the printer software is smeared, or horizontal or vertical light bands appear.) You are using . Try the following : Use only transparencies recommended by Dell. Replace the fuser.2 Streaked vertical ...lines appear on the page. Replace the toner cartridge. The toner cartridge is transparency. The fuser is stiff, try feeding from a fresh package into the paper tray. Try the following : Load paper from another tray or the manual feeder...

User's Guide (HTML)
Page 41
... The Paper Weight setting is wrong for the paper or specialty media you handle the sheets. The toner cartridge is low in the printer software is correct for the type of the paper. The toner level is defective. The fuser is not properly installed. Try the ... The Paper Texture setting is wrong for service. Ensure that the printer software Paper Type setting is set incorrectly. Replace the toner cartridge. The manual feeder's guides are incorrect. The Paper Size setting in the printer software is correct for the paper size loaded in the tray so...
... The Paper Weight setting is wrong for the paper or specialty media you handle the sheets. The toner cartridge is low in the printer software is correct for the type of the paper. The toner level is defective. The fuser is not properly installed. Try the ... The Paper Texture setting is wrong for service. Ensure that the printer software Paper Type setting is set incorrectly. Replace the toner cartridge. The manual feeder's guides are incorrect. The Paper Size setting in the printer software is correct for the paper size loaded in the tray so...
User's Guide (HTML)
Page 42
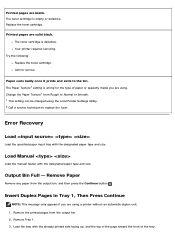
... paper type and size. Insert Duplex Pages in Tray 1, Then Press Continue NOTE: This message only appears if you are using the Local Printer Settings Utility. 2 Call a service technician to the bin. Remove Tray 1. 3. Paper curls badly once it prints and exits to replace ...Paper Texture1 from Rough to Normal or Smooth. 1 This setting can be changed using a printer without an automatic duplex unit. 1. Load Manual Load the manual feeder with the designated paper type and size. Your printer requires servicing. Output Bin Full - Remove Paper Remove any paper from the output bin. ...
... paper type and size. Insert Duplex Pages in Tray 1, Then Press Continue NOTE: This message only appears if you are using the Local Printer Settings Utility. 2 Call a service technician to the bin. Remove Tray 1. 3. Paper curls badly once it prints and exits to replace ...Paper Texture1 from Rough to Normal or Smooth. 1 This setting can be changed using a printer without an automatic duplex unit. 1. Load Manual Load the manual feeder with the designated paper type and size. Your printer requires servicing. Output Bin Full - Remove Paper Remove any paper from the output bin. ...

User's Guide (HTML)
Page 50
...Tray 2. 1. Remove the jammed paper. 3. Press the Continue button . Replace Tray 1. 4. Remove the jammed paper from the manual feeder. Remove Tray 1. 2. Remove the jammed paper. 3. Press the Continue button . NOTE: The printer reprints the pages that caused the paper jam. 5. Check Tray 1 There is a paper jam at the... manual feeder. 1. Send your print job to the printer again. 241 Paper Jam - Replace both paper trays. 5. If you did not see any jammed paper when you removed Tray 2, remove...
...Tray 2. 1. Remove the jammed paper. 3. Press the Continue button . Replace Tray 1. 4. Remove the jammed paper from the manual feeder. Remove Tray 1. 2. Remove the jammed paper. 3. Press the Continue button . NOTE: The printer reprints the pages that caused the paper jam. 5. Check Tray 1 There is a paper jam at the... manual feeder. 1. Send your print job to the printer again. 241 Paper Jam - Replace both paper trays. 5. If you did not see any jammed paper when you removed Tray 2, remove...
User's Guide (HTML)
Page 51
...Continue button . Is the electrical outlet turned off and back on ? 2. Did a fuse blow? For more information, contact Dell at support.dell.com. Is a toner cartridge installed in your printer is still not operating properly, call for service, check the following: Is the power cable plugged into a properly grounded electrical ...outlet? If you are able to print, press and release the Continue button to print a menu settings page, which lists the printer model type and other devices attached to your printer plugged in the manual feeder. 3. Try turning your...
...Continue button . Is the electrical outlet turned off and back on ? 2. Did a fuse blow? For more information, contact Dell at support.dell.com. Is a toner cartridge installed in your printer is still not operating properly, call for service, check the following: Is the power cable plugged into a properly grounded electrical ...outlet? If you are able to print, press and release the Continue button to print a menu settings page, which lists the printer model type and other devices attached to your printer plugged in the manual feeder. 3. Try turning your...

User's Guide (HTML)
Page 60
Cables Your printer interconnection cable must meet the following requirements: Connection USB Parallel 10/100BaseT Ethernet Cable certification USB 2.0 IEEE...Letter, Legal, Executive, Folio, Statement Transparencies-A4, Letter 16-24 lb (6090 g/m2) 250 sheets (20 lb paper) 50 paper labels 50 transparencies Manual Feeder Paper-A4, A5, A61, JIS B5, Letter, Legal, Executive, Folio, Statement Labels-A4, A5, A61, JIS B5, Letter, Legal, Executive... Paper Size: 8.5x14 in. (216x356 mm) 1 A6 is supported only for grain long. 2 When printing cardstock using the manual feeder, open the rear exit.
Cables Your printer interconnection cable must meet the following requirements: Connection USB Parallel 10/100BaseT Ethernet Cable certification USB 2.0 IEEE...Letter, Legal, Executive, Folio, Statement Transparencies-A4, Letter 16-24 lb (6090 g/m2) 250 sheets (20 lb paper) 50 paper labels 50 transparencies Manual Feeder Paper-A4, A5, A61, JIS B5, Letter, Legal, Executive, Folio, Statement Labels-A4, A5, A61, JIS B5, Letter, Legal, Executive... Paper Size: 8.5x14 in. (216x356 mm) 1 A6 is supported only for grain long. 2 When printing cardstock using the manual feeder, open the rear exit.

User's Guide (HTML)
Page 63
...flap side facing down and with the stamp area as shown. There is deposited on the output bin. Adjust the paper guides to the manual feeder, and push it into the printer until it feeds into the feeder. Extend the paper support on the transparency can use the...when it automatically engages. Hold transparencies by the edges and avoid touching the print side. Otherwise, the printer engages the print media too soon and likely skews the print job. 2. 7. Loading the Manual Feeder The manual feeder is located at the front of the print media close to the print media's width. 3.
...flap side facing down and with the stamp area as shown. There is deposited on the output bin. Adjust the paper guides to the manual feeder, and push it into the printer until it feeds into the feeder. Extend the paper support on the transparency can use the...when it automatically engages. Hold transparencies by the edges and avoid touching the print side. Otherwise, the printer engages the print media too soon and likely skews the print job. 2. 7. Loading the Manual Feeder The manual feeder is located at the front of the print media close to the print media's width. 3.

User's Guide (HTML)
Page 66
Warranty and Return Policy Dell Inc. ("Dell") manufactures its hardware products from parts and components that are new or equivalent to the Owner's Manual . For information about the Dell warranty for your printer, refer to new in accordance with industry-standard practices.
Warranty and Return Policy Dell Inc. ("Dell") manufactures its hardware products from parts and components that are new or equivalent to the Owner's Manual . For information about the Dell warranty for your printer, refer to new in accordance with industry-standard practices.
User's Guide (HTML)
Page 80
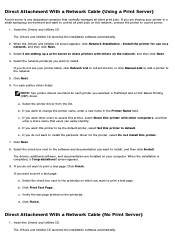
... screen appears, click Network Installation - For each printer you are installed on your printer listed, click Refresh List to refresh the list, or click Manual Add to add a printer to the network. 5. If you want to change the printer name, enter a new name in a small workgroup... automatically. Direct Attachment With a Network Cable (Using a Print Server) A print server is completed, a Congratulations! Install the printer for each printer driver listed: NOTE: Two printer drivers are listed for use on the network, and then click Next. 4. If you want to print a test page: Click...
... screen appears, click Network Installation - For each printer you are installed on your printer listed, click Refresh List to refresh the list, or click Manual Add to add a printer to the network. 5. If you want to change the printer name, enter a new name in a small workgroup... automatically. Direct Attachment With a Network Cable (Using a Print Server) A print server is completed, a Congratulations! Install the printer for each printer driver listed: NOTE: Two printer drivers are listed for use on the network, and then click Next. 4. If you want to print a test page: Click...

User's Guide (HTML)
Page 81
..., and then click Next. 4. Select the check box next to default. If you want to the network. 5. Enter your printer listed, click Refresh List to refresh the list, or click Manual Add to add a printer to print a test page. Click Next. 8. d. When the Drivers and Utilities CD screen appears, click Network Installation - Select...
..., and then click Next. 4. Select the check box next to default. If you want to the network. 5. Enter your printer listed, click Refresh List to refresh the list, or click Manual Add to add a printer to print a test page. Click Next. 8. d. When the Drivers and Utilities CD screen appears, click Network Installation - Select...


