User's Guide (HTML)
Page 1
... Microsoft and Windows are registered trademarks of Microsoft Corporation.Windows Vista is subject to avoid the problem. and other countries. in trademarks and trade names other countries. Dell Inc. Trademarks used in the United States and other countries. in this document is a ...is subject to hardware or loss of Microsoft Corporation in the U.S. SUSE is strictly forbidden. Dell™ Laser Printer 1720/1720dn User's Guide To order toner cartridges and supplies from Dell: 1. in the United States and/or other countries, and are trademarks of Sun Microsystems,...
... Microsoft and Windows are registered trademarks of Microsoft Corporation.Windows Vista is subject to avoid the problem. and other countries. in trademarks and trade names other countries. Dell Inc. Trademarks used in the United States and other countries. in this document is a ...is subject to hardware or loss of Microsoft Corporation in the U.S. SUSE is strictly forbidden. Dell™ Laser Printer 1720/1720dn User's Guide To order toner cartridges and supplies from Dell: 1. in the United States and/or other countries, and are trademarks of Sun Microsystems,...
User's Guide (HTML)
Page 4
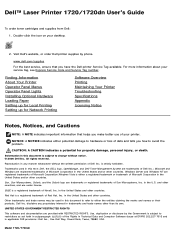
... shown on the screen. Type a word or phrase that describes your problem, and then click the magnifying glass icon. 3. Dell Support website: support.dell.com Latest drivers for my printer 1. Click the topic that best describes your problem. 4. Type a word or phrase that describes your problem, and then click the arrow icon. 3. How to technical service...
... shown on the screen. Type a word or phrase that describes your problem, and then click the magnifying glass icon. 3. Dell Support website: support.dell.com Latest drivers for my printer 1. Click the topic that best describes your problem. 4. Type a word or phrase that describes your problem, and then click the arrow icon. 3. How to technical service...
User's Guide (HTML)
Page 12
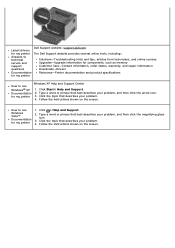
... buttons. Press and hold the Continue button as those printed on to select and save new settings. 1. Printing the Printer Settings Configuration Sheet To help resolve printing problems or to change printer configuration settings, advanced users can print the Printer Settings Configuration sheet for instructions on advancing through the configuration menus to reset the...
... buttons. Press and hold the Continue button as those printed on to select and save new settings. 1. Printing the Printer Settings Configuration Sheet To help resolve printing problems or to change printer configuration settings, advanced users can print the Printer Settings Configuration sheet for instructions on advancing through the configuration menus to reset the...

User's Guide (HTML)
Page 15
...from your job duplexed: long edge or short edge. Hold both sides of the sheet entering the printer first. You can choose how you experience problems with the stamp area as shown. The printer displays the Load Manual Feeder light sequence. 8. Adjust the paper guides to the manual feeder, and ...push it into the printer until it feeds into the feeder. NOTICE: Do not force the print media into the printer. Forcing the...
...from your job duplexed: long edge or short edge. Hold both sides of the sheet entering the printer first. You can choose how you experience problems with the stamp area as shown. The printer displays the Load Manual Feeder light sequence. 8. Adjust the paper guides to the manual feeder, and ...push it into the printer until it feeds into the feeder. NOTICE: Do not force the print media into the printer. Forcing the...
User's Guide (HTML)
Page 23
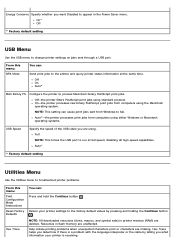
... and hold the Continue button . Auto* * Factory default setting Utilities Menu Use the Utilities menu to troubleshoot printer problems. From this menu: NPA Mode You can: Send print jobs to fail. Help isolate printing problems when unexpected characters print or characters are using either Windows or Macintosh operating systems. USB Speed Specify the...
... and hold the Continue button . Auto* * Factory default setting Utilities Menu Use the Utilities menu to troubleshoot printer problems. From this menu: NPA Mode You can: Send print jobs to fail. Help isolate printing problems when unexpected characters print or characters are using either Windows or Macintosh operating systems. USB Speed Specify the...
User's Guide (HTML)
Page 24
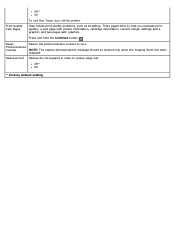
Help isolate print quality problems, such as streaking. Reduced Curl Reduce the throughput in order to zero. Photoconductor Counter NOTE: The replace photoconductor message should be cleared only when the ... pages print to help you evaluate print quality: a text page with graphics. Reset Return the photoconductor counter to reduce page curl. and two pages with printer information, cartridge information, current margin settings and a graphic; Off* On Print Quality Test Pages To exit Hex Trace, turn off the...
Help isolate print quality problems, such as streaking. Reduced Curl Reduce the throughput in order to zero. Photoconductor Counter NOTE: The replace photoconductor message should be cleared only when the ... pages print to help you evaluate print quality: a text page with graphics. Reset Return the photoconductor counter to reduce page curl. and two pages with printer information, cartridge information, current margin settings and a graphic; Off* On Print Quality Test Pages To exit Hex Trace, turn off the...
User's Guide (HTML)
Page 25
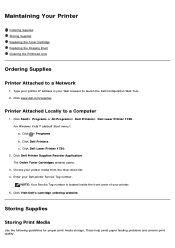
... window opens. 3. Click Start® Programs or All Programs® Dell Printers® Dell Laser Printer 1720. Click Dell Printer Supplies Reorder Application. Enter your printer model from the drop-down list. 4. These help avoid paper feeding problems and uneven print quality. Click Visit Dell's cartridge ordering website. Maintaining Your Printer Ordering Supplies Storing Supplies Replacing the Toner Cartridge Replacing the...
... window opens. 3. Click Start® Programs or All Programs® Dell Printers® Dell Laser Printer 1720. Click Dell Printer Supplies Reorder Application. Enter your printer model from the drop-down list. 4. These help avoid paper feeding problems and uneven print quality. Click Visit Dell's cartridge ordering website. Maintaining Your Printer Ordering Supplies Storing Supplies Replacing the Toner Cartridge Replacing the...
User's Guide (HTML)
Page 27
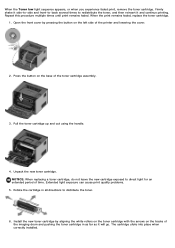
... using the handle. 4. The cartridge clicks into place when correctly installed. Extended light exposure can cause print quality problems. 5. Install the new toner cartridge by pressing the button on the tracks of the printer and lowering the cover. 2. Open the front cover by aligning the white rollers on the toner cartridge with...
... using the handle. 4. The cartridge clicks into place when correctly installed. Extended light exposure can cause print quality problems. 5. Install the new toner cartridge by pressing the button on the tracks of the printer and lowering the cover. 2. Open the front cover by aligning the white rollers on the toner cartridge with...
User's Guide (HTML)
Page 28
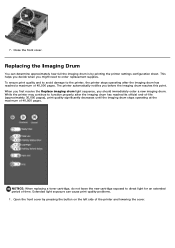
...quality significantly decreases until the imaging drum stops operating at the maximum of the printer and lowering the cover. Extended light exposure can determine approximately how full the imaging... To ensure print quality and to avoid damage to order replacement supplies. While the printer may continue to direct light for an extended period of 40,000 pages. NOTICE: ...time. Close the front cover. The printer automatically notifies you should immediately order a new imaging drum. Open the front cover by printing the printer settings configuration sheet. 7. When you first...
...quality significantly decreases until the imaging drum stops operating at the maximum of the printer and lowering the cover. Extended light exposure can determine approximately how full the imaging... To ensure print quality and to avoid damage to order replacement supplies. While the printer may continue to direct light for an extended period of 40,000 pages. NOTICE: ...time. Close the front cover. The printer automatically notifies you should immediately order a new imaging drum. Open the front cover by printing the printer settings configuration sheet. 7. When you first...
User's Guide (HTML)
Page 31
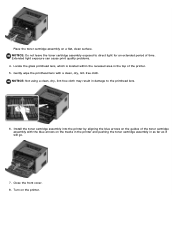
Extended light exposure can cause print quality problems. 4. Turn on the tracks in the printer and pushing the toner cartridge assembly in as far as it will go. 7. Install the toner cartridge assembly into the printer by aligning the blue arrows on the guides of the toner cartridge assembly with a clean, dry, lint-free..., clean surface. Locate the glass printhead lens, which is located within the recessed area in damage to direct light for an extended period of the printer. 5. Gently wipe the printhead lens with the blue arrows on the...
Extended light exposure can cause print quality problems. 4. Turn on the tracks in the printer and pushing the toner cartridge assembly in as far as it will go. 7. Install the toner cartridge assembly into the printer by aligning the blue arrows on the guides of the toner cartridge assembly with a clean, dry, lint-free..., clean surface. Locate the glass printhead lens, which is located within the recessed area in damage to direct light for an extended period of the printer. 5. Gently wipe the printhead lens with the blue arrows on the...
User's Guide (HTML)
Page 34
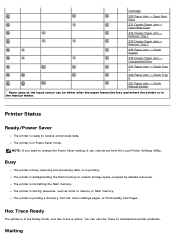
... flash memory to troubleshoot printer problems. Waiting NOTE: If you want to receive and process data. The printer is printing a directory, font list, menu settings pages, or Print Quality Test Pages. The printer is storing resources, such as fonts or macros, in flash memory. Unsupported Size 241 Paper Jam - Busy The printer is busy receiving...
... flash memory to troubleshoot printer problems. Waiting NOTE: If you want to receive and process data. The printer is printing a directory, font list, menu settings pages, or Print Quality Test Pages. The printer is storing resources, such as fonts or macros, in flash memory. Unsupported Size 241 Paper Jam - Busy The printer is busy receiving...
User's Guide (HTML)
Page 36
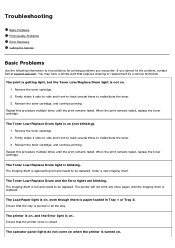
... is turned on . The imaging drum is closed. Troubleshooting Basic Problems Print Quality Problems Error Recovery Calling for printing problems you cannot fix the problem, contact Dell at support.dell.com. Ensure that the printer cover is full and needs to find solutions for Service Basic Problems Use the following information to be replaced. Remove the toner cartridge...
... is turned on . The imaging drum is closed. Troubleshooting Basic Problems Print Quality Problems Error Recovery Calling for printing problems you cannot fix the problem, contact Dell at support.dell.com. Ensure that the printer cover is full and needs to find solutions for Service Basic Problems Use the following information to be replaced. Remove the toner cartridge...
User's Guide (HTML)
Page 37
...or network cable is positioned correctly. Dell recommends you cannot print a menu settings page, contact Dell at support.dell.com. You cannot close the front cover. The printer is in at the back of toner. to print a menu settings page to determine if the problem is with the If you are blank.... This may be out of the printer and at the electrical...
...or network cable is positioned correctly. Dell recommends you cannot print a menu settings page, contact Dell at support.dell.com. You cannot close the front cover. The printer is in at the back of toner. to print a menu settings page to determine if the problem is with the If you are blank.... This may be out of the printer and at the electrical...
User's Guide (HTML)
Page 38
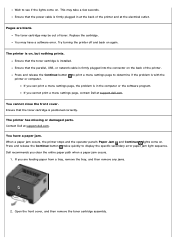
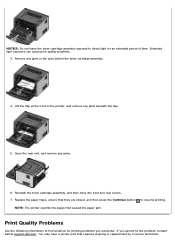
... remove any jams beneath the flap. 5. Remove any jams. 6. Extended light exposure can cause print quality problems. 3. You may have a printer part that caused the paper jam. Lift the flap at support.dell.com. NOTE: The printer reprints the pages that requires cleaning or replacement by a service technician. Replace the paper trays, ensure that...
... remove any jams beneath the flap. 5. Remove any jams. 6. Extended light exposure can cause print quality problems. 3. You may have a printer part that caused the paper jam. Lift the flap at support.dell.com. NOTE: The printer reprints the pages that requires cleaning or replacement by a service technician. Replace the paper trays, ensure that...
User's Guide (HTML)
Page 59
Use transparencies designed for laser printers. Use envelopes made from 24 lb (90 g/m2) bond paper. Are stuck together. Use card stock with a ...Professional 9.2, 9.3, 10.0, 10.1 Mac OS 9 and Mac OS 10 Print Media Guidelines Selecting the right paper or other media reduces printing problems. For best print quality, try a sample of the paper or specialty media you are considering before buying large quantities. To reduce paper ... Have excessive curl. You must understand the section in the sealed position. Use paper labels designed for laser printers. Have postage stamps attached.
Use transparencies designed for laser printers. Use envelopes made from 24 lb (90 g/m2) bond paper. Are stuck together. Use card stock with a ...Professional 9.2, 9.3, 10.0, 10.1 Mac OS 9 and Mac OS 10 Print Media Guidelines Selecting the right paper or other media reduces printing problems. For best print quality, try a sample of the paper or specialty media you are considering before buying large quantities. To reduce paper ... Have excessive curl. You must understand the section in the sealed position. Use paper labels designed for laser printers. Have postage stamps attached.
User's Guide (HTML)
Page 64
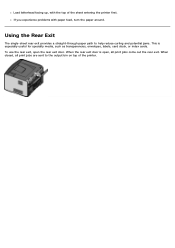
When closed, all print jobs are sent to help reduce curling and potential jams. This is open the rear exit door. If you experience problems with the top of the printer. Load letterhead facing up, with paper feed, turn the paper around. To use the rear exit, open , all print jobs come out.... Using the Rear Exit The single-sheet rear exit provides a straight-through paper path to the output bin on top of the sheet entering the printer first. When the rear exit door is especially useful for specialty media, such as transparencies, envelopes, labels, card stock, or index cards.
When closed, all print jobs are sent to help reduce curling and potential jams. This is open the rear exit door. If you experience problems with the top of the printer. Load letterhead facing up, with paper feed, turn the paper around. To use the rear exit, open , all print jobs come out.... Using the Rear Exit The single-sheet rear exit provides a straight-through paper path to the output bin on top of the sheet entering the printer first. When the rear exit door is especially useful for specialty media, such as transparencies, envelopes, labels, card stock, or index cards.


