User Guide
Page 1
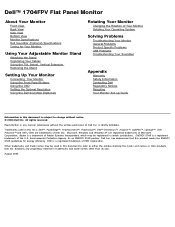
... Environmental Protection Agency. disclaims any manner whatsoever without notice. © 2004 Dell Inc. As an ENERGY STAR partner, Dell Inc. Dell™ 1704FPV Flat Panel Monitor About Your Monitor Front View Back View Side View Bottom View Monitor Specifications Dell Soundbar (Optional) Specifications Caring for energy efficiency. Dell Inc. Reproduction in any proprietary interest in this product meets the...
... Environmental Protection Agency. disclaims any manner whatsoever without notice. © 2004 Dell Inc. As an ENERGY STAR partner, Dell Inc. Dell™ 1704FPV Flat Panel Monitor About Your Monitor Front View Back View Side View Bottom View Monitor Specifications Dell Soundbar (Optional) Specifications Caring for energy efficiency. Dell Inc. Reproduction in any proprietary interest in this product meets the...
User Guide
Page 2
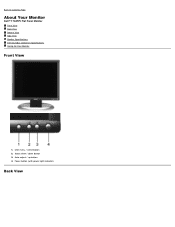
Power button (with power light indicator) Back View OSD menu / select button 2. Auto-adjust / up button 4. Back to Contents Page About Your Monitor Dell™ 1704FPV Flat Panel Monitor Front View Back View Bottom View Side View Monitor Specifications Dell Soundbar (Optional) Specifications Caring for Your Monitor Front View 1. Input select / down button 3.
Power button (with power light indicator) Back View OSD menu / select button 2. Auto-adjust / up button 4. Back to Contents Page About Your Monitor Dell™ 1704FPV Flat Panel Monitor Front View Back View Bottom View Side View Monitor Specifications Dell Soundbar (Optional) Specifications Caring for Your Monitor Front View 1. Input select / down button 3.
User Guide
Page 3
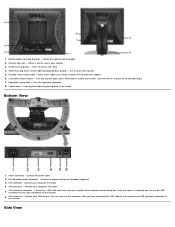
... this cable is connected you need to this label if you can only use the USB connectors on the monitor. Attach the optional Dell Soundbar. 2. Attach a lock to the monitor and the computer. Stand removal button - Use to release the stand. 4. Lists the regulatory approvals. 8.... VGA connector - Connect the USB cable that came with your computer VGA cable 5. Connect your monitor to secure your USB devices. Dell Soundbar power connector - Connect your computer DVI cable 4. Once this connector after you have connected the USB cable to the...
... this cable is connected you need to this label if you can only use the USB connectors on the monitor. Attach the optional Dell Soundbar. 2. Attach a lock to the monitor and the computer. Stand removal button - Use to release the stand. 4. Lists the regulatory approvals. 8.... VGA connector - Connect the USB cable that came with your computer VGA cable 5. Connect your monitor to secure your USB devices. Dell Soundbar power connector - Connect your computer DVI cable 4. Once this connector after you have connected the USB cable to the...
User Guide
Page 4
... Save Mode Press Any Key on Keyboard or Move Mouse Press Any Key on Keyboard or Move Mouse Activate the computer and 'wake up ". This monitor is a U.S. registered mark. Analog Input 2. Off Less than 3 W Switch off mode. 1. ENERGY STAR® is ENERGY STAR®-compliant as well as...the following table shows the power consumption and signaling of the 15-Pin Side Signal Cable As an ENERGY STAR® Partner, DELL has determined that this automatic power saving feature: VESA Modes Horizontal Sync Vertical Sync Video Power Indicator Power Consumption Normal operation( with...
... Save Mode Press Any Key on Keyboard or Move Mouse Press Any Key on Keyboard or Move Mouse Activate the computer and 'wake up ". This monitor is a U.S. registered mark. Analog Input 2. Off Less than 3 W Switch off mode. 1. ENERGY STAR® is ENERGY STAR®-compliant as well as...the following table shows the power consumption and signaling of the 15-Pin Side Signal Cable As an ENERGY STAR® Partner, DELL has determined that this automatic power saving feature: VESA Modes Horizontal Sync Vertical Sync Video Power Indicator Power Consumption Normal operation( with...
User Guide
Page 5
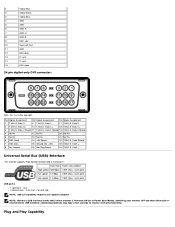
...on rear; 2 on left side NOTE: USB 2.0 capability requires 2.0 capable computer NOTE: Monitor's USB interface works ONLY when monitor is at the top right. Plug and Play Capability Data 1- 17 T.M.D.S. Data 2+ 10 T.M.D.S. Data 0+ 3 T.M.D.S. Clock + 8 No Connect 16 Hot ...Signal Assignment Pin Signal Assignment Pin Signal Assignment 1 T.M.D.S. Clock - attached peripherals may take a few seconds to resume normal functionality. Switching your monitor OFF and then ON would reenumerate its USB interface; Data 2- 9 T.M.D.S. 1 Video-Red 2 Video-Green 3 Video-Blue 4 GND 5...
...on rear; 2 on left side NOTE: USB 2.0 capability requires 2.0 capable computer NOTE: Monitor's USB interface works ONLY when monitor is at the top right. Plug and Play Capability Data 1- 17 T.M.D.S. Data 2+ 10 T.M.D.S. Data 0+ 3 T.M.D.S. Clock + 8 No Connect 16 Hot ...Signal Assignment Pin Signal Assignment Pin Signal Assignment 1 T.M.D.S. Clock - attached peripherals may take a few seconds to resume normal functionality. Switching your monitor OFF and then ON would reenumerate its USB interface; Data 2- 9 T.M.D.S. 1 Video-Red 2 Video-Green 3 Video-Blue 4 GND 5...
User Guide
Page 6
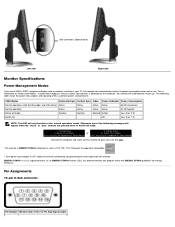
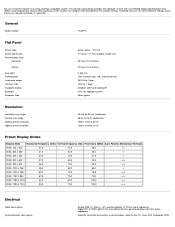
TFT LCD 17 inches (17-inch viewable image size) 337 mm (13.3 inches) 270 mm (10.6 inches... Display Data Channel (DDC) protocols so the system can configure itself and optimize the monitor settings. General Model number 1704FPV Flat Panel Screen type Screen dimensions Preset display area: Horizontal Vertical Pixel pitch Viewing angle...Vertical) VESA, 720 x 400 31.5 70.0 28.3 -/+ VESA, 640 x 480 31.5 60.0 25.2 -/- The monitor automatically provides the computer system with hard-coating 3H CCFL (4) edgelight system 25ms typical Resolution Horizontal scan range Vertical scan range...
TFT LCD 17 inches (17-inch viewable image size) 337 mm (13.3 inches) 270 mm (10.6 inches... Display Data Channel (DDC) protocols so the system can configure itself and optimize the monitor settings. General Model number 1704FPV Flat Panel Screen type Screen dimensions Preset display area: Horizontal Vertical Pixel pitch Viewing angle...Vertical) VESA, 720 x 400 31.5 70.0 28.3 -/+ VESA, 640 x 480 31.5 60.0 25.2 -/- The monitor automatically provides the computer system with hard-coating 3H CCFL (4) edgelight system 25ms typical Resolution Horizontal scan range Vertical scan range...
User Guide
Page 7
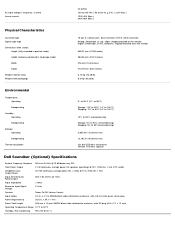
...657.6m (12,000 ft) max 12,192 m (40,000 ft) max 221.937 BTU/hour (maximum) 109.261 BTU/hour (typical) Dell Soundbar (Optional) Specifications System Frequency Response 95 Hz to enclosure, with packaging) 15-pin D-subminiature, blue connector; AC input voltage / frequency / ...Characteristics Connector type Signal cable type Dimensions (with stand): Height (fully extended in portrait mode) Height (compressed/locked in landscape mode) Width Depth Weight (monitor only) Weight (with DC plug (5.5 x 2.1 x 12 mm) Operating Temperature Range 10°C to 40°C Humidity, Non-condensing 95% RH...
...657.6m (12,000 ft) max 12,192 m (40,000 ft) max 221.937 BTU/hour (maximum) 109.261 BTU/hour (typical) Dell Soundbar (Optional) Specifications System Frequency Response 95 Hz to enclosure, with packaging) 15-pin D-subminiature, blue connector; AC input voltage / frequency / ...Characteristics Connector type Signal cable type Dimensions (with stand): Height (fully extended in portrait mode) Height (compressed/locked in landscape mode) Width Depth Weight (monitor only) Weight (with DC plug (5.5 x 2.1 x 12 mm) Operating Temperature Range 10°C to 40°C Humidity, Non-condensing 95% RH...

User Guide
Page 8
... screen, lightly dampen a soft, clean cloth with water. To clean your monitor, wipe it off with care as some detergents leave a milky film on the plastics. Avoid using detergent of the monitor. This white powder occurs during the shipping of any kind as darker-colored ...plastics may scratch and show white scuff marks more than lighter-colored monitor. Handle your monitor with a cloth. If possible, use benzene, thinner, ammonia, abrasive cleaners, or compressed air. Back to clean the plastics. Caring...
... screen, lightly dampen a soft, clean cloth with water. To clean your monitor, wipe it off with care as some detergents leave a milky film on the plastics. Avoid using detergent of the monitor. This white powder occurs during the shipping of any kind as darker-colored ...plastics may scratch and show white scuff marks more than lighter-colored monitor. Handle your monitor with a cloth. If possible, use benzene, thinner, ammonia, abrasive cleaners, or compressed air. Back to clean the plastics. Caring...
User Guide
Page 9
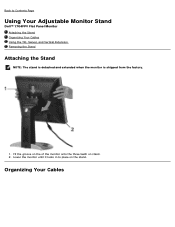
Organizing Your Cables Fit the groove on the of the monitor onto the three teeth on the stand. Back to place on stand. 2. Lower the monitor until it locks in to Contents Page Using Your Adjustable Monitor Stand Dell™ 1704FPV Flat Panel Monitor Attaching the Stand Organizing Your Cables Using the Tilt, Swivel, and Vertical Extension Removing the Stand Attaching the Stand NOTE: The stand is detached and extended when the monitor is shipped from the factory. 1.
Organizing Your Cables Fit the groove on the of the monitor onto the three teeth on the stand. Back to place on stand. 2. Lower the monitor until it locks in to Contents Page Using Your Adjustable Monitor Stand Dell™ 1704FPV Flat Panel Monitor Attaching the Stand Organizing Your Cables Using the Tilt, Swivel, and Vertical Extension Removing the Stand Attaching the Stand NOTE: The stand is detached and extended when the monitor is shipped from the factory. 1.

User Guide
Page 10
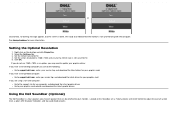
... organize all cables as shown above. Using the Tilt, Swivel, and Vertical Extension Adjusting Your Monitor Using Tilt, Swivel, and Vertical Extension. NOTE: Before you move the monitor to a new location, lock the stand by lowering monitor until in clicks in to the desired position. You can adjust the stand vertically, up to... 5.12 inches (130mm) using the stand lock/release button. Press the stand lock/release button on the back of the monitor and then lift or lower the stand to place. After attaching all necessary cables to your viewing needs.
... organize all cables as shown above. Using the Tilt, Swivel, and Vertical Extension Adjusting Your Monitor Using Tilt, Swivel, and Vertical Extension. NOTE: Before you move the monitor to a new location, lock the stand by lowering monitor until in clicks in to the desired position. You can adjust the stand vertically, up to... 5.12 inches (130mm) using the stand lock/release button. Press the stand lock/release button on the back of the monitor and then lift or lower the stand to place. After attaching all necessary cables to your viewing needs.
User Guide
Page 11
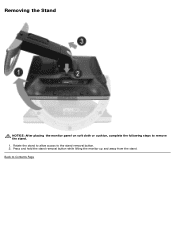
Back to the stand removal button. 2. Rotate the stand to allow access to Contents Page Removing the Stand NOTICE: After placing the monitor panel on soft cloth or cushion, complete the following steps to remove the stand. 1. Press and hold the stand removal button while lifting the monitor up and away from the stand.
Back to the stand removal button. 2. Rotate the stand to allow access to Contents Page Removing the Stand NOTICE: After placing the monitor panel on soft cloth or cushion, complete the following steps to remove the stand. 1. Press and hold the stand removal button while lifting the monitor up and away from the stand.
User Guide
Page 12
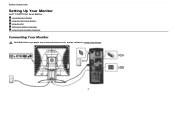
or Back to Contents Page Setting Up Your Monitor Dell™ 1704FPV Flat Panel Monitor Connecting Your Monitor Using the Front Panel Buttons Using the OSD Setting the Optimal Resolution Using the Dell Soundbar (Optional) Connecting Your Monitor CAUTION: Before you begin any of the procedures in this section, follow the safety instructions.
or Back to Contents Page Setting Up Your Monitor Dell™ 1704FPV Flat Panel Monitor Connecting Your Monitor Using the Front Panel Buttons Using the OSD Setting the Optimal Resolution Using the Dell Soundbar (Optional) Connecting Your Monitor CAUTION: Before you begin any of the procedures in this section, follow the safety instructions.
User Guide
Page 13
..., and to the connectors on the monitor. Depending upon the selected input, one of the monitor to the computer and the upstream USB connector on the computer and the monitor. 3. If you still do not see Troubleshooting Your Monitor. NOTE: The floating 'Dell - Connect either the white DVI or... blue VGA cables to exit the OSD. The Menu button is connected to your monitor to adjust the image settings. Connect...
..., and to the connectors on the monitor. Depending upon the selected input, one of the monitor to the computer and the upstream USB connector on the computer and the monitor. 3. If you still do not see Troubleshooting Your Monitor. NOTE: The floating 'Dell - Connect either the white DVI or... blue VGA cables to exit the OSD. The Menu button is connected to your monitor to adjust the image settings. Connect...
User Guide
Page 14
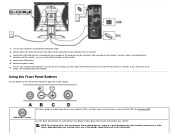
... Input Main Menu for Analog (VGA) Input Main Menu for the OSD to turn the monitor on and off. Input select or Use these buttons to another menu, or exit the OSD, the monitor automatically saves any adjustments you have made. Use the power button to disappear the adjustment are... press the button while there are saved. 1. Down (-) and Up (+) Use this button to the incoming video signal. The green light indicates the monitor is on a black screen as the monitor self-adjusts to the current input: Auto Adjust In Progress Auto Adjust Auto Adjustment button allows the...
... Input Main Menu for Analog (VGA) Input Main Menu for the OSD to turn the monitor on and off. Input select or Use these buttons to another menu, or exit the OSD, the monitor automatically saves any adjustments you have made. Use the power button to disappear the adjustment are... press the button while there are saved. 1. Down (-) and Up (+) Use this button to the incoming video signal. The green light indicates the monitor is on a black screen as the monitor self-adjusts to the current input: Auto Adjust In Progress Auto Adjust Auto Adjustment button allows the...
User Guide
Page 15
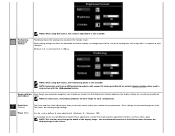
See the table below for the monitor. 3. and + buttons, according to the indicators on the monitor screen. Push the + button to decrease luminance (min 0 ~ max 100). or NOTE: Positioning and Image settings are only available when you move between darkness and ...
See the table below for the monitor. 3. and + buttons, according to the indicators on the monitor screen. Push the + button to decrease luminance (min 0 ~ max 100). or NOTE: Positioning and Image settings are only available when you move between darkness and ...
User Guide
Page 16
... OSD rotation feature. Pixel Clock (Coarse) Phase (Fine) The Phase and Pixel Clock adjustments allow you to more closely adjust your monitor to your particular setup. These settings are not obtained using DVI source, the contrast adjustment is 100 (+). When making changes to either... the viewing area, the image shifts in conjunction with your selection. Image settings: Auto Adjust Even though your computer recognizes your monitor on the monitor screen. Use the Horizontal function of the display image. Minimum is 0 (-) and maximum is not available Positioning moves the viewing...
... OSD rotation feature. Pixel Clock (Coarse) Phase (Fine) The Phase and Pixel Clock adjustments allow you to more closely adjust your monitor to your particular setup. These settings are not obtained using DVI source, the contrast adjustment is 100 (+). When making changes to either... the viewing area, the image shifts in conjunction with your selection. Image settings: Auto Adjust Even though your computer recognizes your monitor on the monitor screen. Use the Horizontal function of the display image. Minimum is 0 (-) and maximum is not available Positioning moves the viewing...
User Guide
Page 18
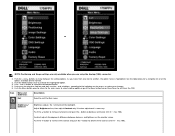
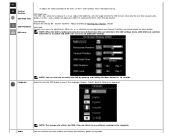
... OSD settings menu, with OSD Lock selected. Audio NOTE: The change only affects the OSD, it is in use the - Adjust according to Rotating Your Monitor setction OSD Lock: Controls user access to all applicable settings. When Yes (+) is selected, no effect on any software running on or off when the... monitor is locked, pressing the menu button takes the user directly to adjust the slider in one of the OSD, use . NOTE: When the OSD is ...
... OSD settings menu, with OSD Lock selected. Audio NOTE: The change only affects the OSD, it is in use the - Adjust according to Rotating Your Monitor setction OSD Lock: Controls user access to all applicable settings. When Yes (+) is selected, no effect on any software running on or off when the... monitor is locked, pressing the menu button takes the user directly to adjust the slider in one of the OSD, use . NOTE: When the OSD is ...
User Guide
Page 19
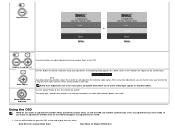
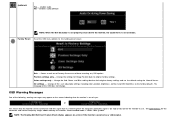
disables audio (default) NOTE: When the Dell Soundbar is not properly connected to the monitor, the audio menu is 1280 X 1024 @ 60Hz. Position settings only - Change all the user adjustable settings including color, position, brightness, contrast and OSD hold... time to exit out of the following warning messages may appear on -screen if the monitor cannot sense a video signal. OSD Warning Messages One of Factory Reset menu without resetting any OSD options. Recommended mode is not available. Select to...
disables audio (default) NOTE: When the Dell Soundbar is not properly connected to the monitor, the audio menu is 1280 X 1024 @ 60Hz. Position settings only - Change all the user adjustable settings including color, position, brightness, contrast and OSD hold... time to exit out of the following warning messages may appear on -screen if the monitor cannot sense a video signal. OSD Warning Messages One of Factory Reset menu without resetting any OSD options. Recommended mode is not available. Select to...
User Guide
Page 20
... could also indicate that the monitor is a four-speaker, two-channel speaker that can do not see 1280 x 1024 as an option, you computer and download the latest graphic drivers Go to your graphics card website and download the latest graphic drivers Using the Dell Soundbar (Optional) The Dell Soundbar is not synchronizing...
... could also indicate that the monitor is a four-speaker, two-channel speaker that can do not see 1280 x 1024 as an option, you computer and download the latest graphic drivers Go to your graphics card website and download the latest graphic drivers Using the Dell Soundbar (Optional) The Dell Soundbar is not synchronizing...
User Guide
Page 21
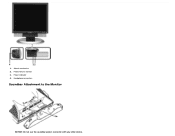
Headphone connectors Soundbar Attachment to the Monitor NOTICE: Do not use the soundbar power connector with any other device. Power/volume control 3. Power indicator 4. Attach mechanism 2. 1.
Headphone connectors Soundbar Attachment to the Monitor NOTICE: Do not use the soundbar power connector with any other device. Power/volume control 3. Power indicator 4. Attach mechanism 2. 1.


