User Guide
Page 1
...ENERGY STAR guidelines for Your Monitor Using Your Adjustable Monitor Stand Attaching the Stand Organizing Your Cables Using the Tilt, Swivel, Vertical Extension Removing the Stand Setting Up Your Monitor Connecting Your Monitor Using the Front Panel Buttons Using the OSD Setting the Optimal Resolution Using the Dell Soundbar (Optional) Rotating Your Monitor Changing the Rotation of Your Monitor Rotating Your Operating System Solving Problems Troubleshooting Your Monitor General Problems Product Specific Problems USB Problems Troubleshooting Your Soundbar Appendix Warranty Safety Information...
...ENERGY STAR guidelines for Your Monitor Using Your Adjustable Monitor Stand Attaching the Stand Organizing Your Cables Using the Tilt, Swivel, Vertical Extension Removing the Stand Setting Up Your Monitor Connecting Your Monitor Using the Front Panel Buttons Using the OSD Setting the Optimal Resolution Using the Dell Soundbar (Optional) Rotating Your Monitor Changing the Rotation of Your Monitor Rotating Your Operating System Solving Problems Troubleshooting Your Monitor General Problems Product Specific Problems USB Problems Troubleshooting Your Soundbar Appendix Warranty Safety Information...
User Guide
Page 3
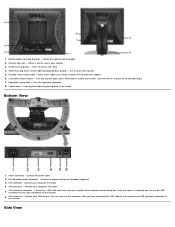
... stand. 4. DVI connector - Refer to the computer and USB upstream connector on the side and bottom of the monitor. 6. You can use this connector after you have connected the USB cable to this cable is connected you need to the desired height. 7. Stand removal button - Connect the power cable 2. VGA connector - 1. VESA mounting holes (100mm [Behind attached base plate]) - Push the monitor down /release button - Cable holder - Side View Attach the optional Dell Soundbar. 2. Regulatory rating label - Security lock slot - Bottom View 1. Dell Soundbar mounting...
... stand. 4. DVI connector - Refer to the computer and USB upstream connector on the side and bottom of the monitor. 6. You can use this connector after you have connected the USB cable to this cable is connected you need to the desired height. 7. Stand removal button - Connect the power cable 2. VGA connector - 1. VESA mounting holes (100mm [Behind attached base plate]) - Push the monitor down /release button - Cable holder - Side View Attach the optional Dell Soundbar. 2. Regulatory rating label - Security lock slot - Bottom View 1. Dell Soundbar mounting...
User Guide
Page 4
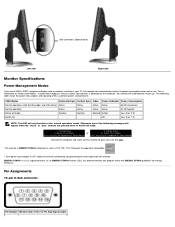
... OSD will only function in the 'normal operation' mode. Off Less than 3 W Switch off mode. 1. Otherwise one of the following table shows the power consumption and signaling of the 15-Pin Side Signal Cable ENERGY STAR® is ENERGY STAR®-compliant as well as 'Power Save Mode'*. USB connectors (downstream) Left side Right side Monitor Specifications Power Management Modes If you have VESA's DPM™ compliance display card or software installed...
... OSD will only function in the 'normal operation' mode. Off Less than 3 W Switch off mode. 1. Otherwise one of the following table shows the power consumption and signaling of the 15-Pin Side Signal Cable ENERGY STAR® is ENERGY STAR®-compliant as well as 'Power Save Mode'*. USB connectors (downstream) Left side Right side Monitor Specifications Power Management Modes If you have VESA's DPM™ compliance display card or software installed...
User Guide
Page 6
General Model number 1704FPV Flat Panel Screen type Screen dimensions Preset display area: Horizontal Vertical Pixel pitch Viewing angle Luminance output Contrast ratio Faceplate coating Backlight Response Time Active matrix - TFT LCD 17 inches (17-inch viewable image size) 337 mm (13.3 inches) 270 mm (10.6 inches) 0.264 mm 178° (vertical) typ, 178° (horizontal) typ 280 CD/m ²(typ) 1000 to 76 Hz (automatic) 1280 x 1024 at 60 Hz 1280 x 1024 at 50 ohm input impedance...
General Model number 1704FPV Flat Panel Screen type Screen dimensions Preset display area: Horizontal Vertical Pixel pitch Viewing angle Luminance output Contrast ratio Faceplate coating Backlight Response Time Active matrix - TFT LCD 17 inches (17-inch viewable image size) 337 mm (13.3 inches) 270 mm (10.6 inches) 0.264 mm 178° (vertical) typ, 178° (horizontal) typ 280 CD/m ²(typ) 1000 to 76 Hz (automatic) 1280 x 1024 at 60 Hz 1280 x 1024 at 50 ohm input impedance...
User Guide
Page 7
... power (RL = 32Ω) @ 10% (THD+N), 1 kHz Input Sensitivity for Rated Output 500 ± 50 mVrms @ 1 kHz Input Impedance >10kΩ Maximum Input Signal Voltage 2 Vrms Controls Power On/Off Volume Control Input Cables 3.0 m ± 0.1 m AWG26 black cable attached to enclosure, with 3.5 mm lime green stereo plug Power Requirements DC12V, 1.5A +/-10% Power Cord Length 305 mm ± 15 mm AWG22 black cable attached to enclosure, with packaging) 15-pin D-subminiature, blue connector...
... power (RL = 32Ω) @ 10% (THD+N), 1 kHz Input Sensitivity for Rated Output 500 ± 50 mVrms @ 1 kHz Input Impedance >10kΩ Maximum Input Signal Voltage 2 Vrms Controls Power On/Off Volume Control Input Cables 3.0 m ± 0.1 m AWG26 black cable attached to enclosure, with 3.5 mm lime green stereo plug Power Requirements DC12V, 1.5A +/-10% Power Cord Length 305 mm ± 15 mm AWG22 black cable attached to enclosure, with packaging) 15-pin D-subminiature, blue connector...
User Guide
Page 9
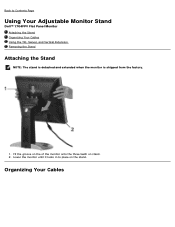
Organizing Your Cables Lower the monitor until it locks in to Contents Page Using Your Adjustable Monitor Stand Dell™ 1704FPV Flat Panel Monitor Attaching the Stand Organizing Your Cables Using the Tilt, Swivel, and Vertical Extension Removing the Stand Attaching the Stand NOTE: The stand is detached and extended when the monitor is shipped from the factory. 1. Back to place on stand. 2. Fit the groove on the of the monitor onto the three teeth on the stand.
Organizing Your Cables Lower the monitor until it locks in to Contents Page Using Your Adjustable Monitor Stand Dell™ 1704FPV Flat Panel Monitor Attaching the Stand Organizing Your Cables Using the Tilt, Swivel, and Vertical Extension Removing the Stand Attaching the Stand NOTE: The stand is detached and extended when the monitor is shipped from the factory. 1. Back to place on stand. 2. Fit the groove on the of the monitor onto the three teeth on the stand.

User Guide
Page 10
... lower the stand to 5.12 inches (130mm) using the stand lock/release button. Using the Tilt, Swivel, and Vertical Extension Adjusting Your Monitor Using Tilt, Swivel, and Vertical Extension. After attaching all necessary cables to your viewing needs. You can adjust your monitor to best fit your monitor and computer, (See Connecting Your Monitor for cable attachment,) use the cable holder to place. NOTE: Before you move the monitor to a new location, lock the stand by lowering monitor until in...
... lower the stand to 5.12 inches (130mm) using the stand lock/release button. Using the Tilt, Swivel, and Vertical Extension Adjusting Your Monitor Using Tilt, Swivel, and Vertical Extension. After attaching all necessary cables to your viewing needs. You can adjust your monitor to best fit your monitor and computer, (See Connecting Your Monitor for cable attachment,) use the cable holder to place. NOTE: Before you move the monitor to a new location, lock the stand by lowering monitor until in...
User Guide
Page 13
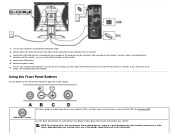
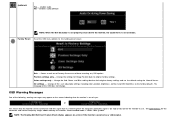
... Troubleshooting Your Monitor. NOTE: The floating 'Dell - Connect any USB devices. 5. Using the Front Panel Buttons Use the buttons on the monitor. Depending upon the selected input, one of the monitor to your computer and disconnect the power cable. 2. See Using the OSD OSD menu / select Use the Input Select button to select between two different video signals that was included with your monitor and computer. Connect the USB cable that may be connected to adjust the image settings. self-test Feature Check...
... Troubleshooting Your Monitor. NOTE: The floating 'Dell - Connect any USB devices. 5. Using the Front Panel Buttons Use the buttons on the monitor. Depending upon the selected input, one of the monitor to your computer and disconnect the power cable. 2. See Using the OSD OSD menu / select Use the Input Select button to select between two different video signals that was included with your monitor and computer. Connect the USB cable that may be connected to adjust the image settings. self-test Feature Check...
User Guide
Page 18
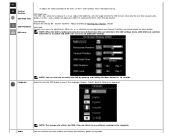
... OSD Lock To adjust the vertical position of five languages (English, French, Spanish, German or Japanese). Use the - OSD Rotation: Rotates the OSD by pushing and holding the Menu button for as long as it has no effect on any software running on or off when the monitor is selected, no user adjustments are locked except the menu button. All buttons are allowed. Select to the OSD settings menu, with OSD Lock selected. Audio NOTE: The change...
... OSD Lock To adjust the vertical position of five languages (English, French, Spanish, German or Japanese). Use the - OSD Rotation: Rotates the OSD by pushing and holding the Menu button for as long as it has no effect on any software running on or off when the monitor is selected, no user adjustments are locked except the menu button. All buttons are allowed. Select to the OSD settings menu, with OSD Lock selected. Audio NOTE: The change...
User Guide
Page 19
... Dell Soundbar is not available. Factory Reset: Reset the OSD menu options to the monitor, the audio menu is not properly connected to the factory preset values. Change all the user adjustable settings including color, position, brightness, contrast and OSD hold time to original factory settings. Change the settings for Normal Preset. The language of Factory Reset menu without resetting any OSD options. Recommended mode is out of the following warning messages may appear on -screen if the monitor cannot sense a video signal. Change the Red, Green, and Blue settings...
... Dell Soundbar is not available. Factory Reset: Reset the OSD menu options to the monitor, the audio menu is not properly connected to the factory preset values. Change all the user adjustable settings including color, position, brightness, contrast and OSD hold time to original factory settings. Change the settings for Normal Preset. The language of Factory Reset menu without resetting any OSD options. Recommended mode is out of the following warning messages may appear on -screen if the monitor cannot sense a video signal. Change the Red, Green, and Blue settings...
User Guide
Page 20
... control to adjust the overall system level, a green LED for your graphics card. Set the screen resolution to 60 Hz. 4. If you do the following: Go to support.dell.com, enter your monitor. If you have a Dell desktop computer you may need to update your graphics card. Right-click on the Soundbar are using a non-Dell computer: Go to the support site for you service tag, and download the latest driver...
... control to adjust the overall system level, a green LED for your graphics card. Set the screen resolution to 60 Hz. 4. If you do the following: Go to support.dell.com, enter your monitor. If you have a Dell desktop computer you may need to update your graphics card. Right-click on the Soundbar are using a non-Dell computer: Go to the support site for you service tag, and download the latest driver...
User Guide
Page 25
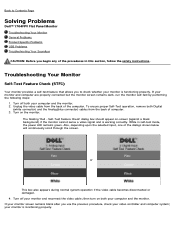
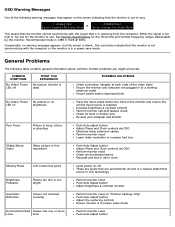
...: 1. Turn on both your computer and the monitor. If your monitor screen remains blank after you to Contents Page Solving Problems Dell™ 1704FPV Flat Panel Monitor Troubleshooting Your Monitor General Problems Product Specific Problems USB Problems Troubleshooting Your Soundbar CAUTION: Before you begin any of the procedures in self-test mode, the power LED remains green. If your monitor and reconnect the video cable; The floating 'Dell - While in this section, follow the safety instructions. your monitor...
...: 1. Turn on both your computer and the monitor. If your monitor screen remains blank after you to Contents Page Solving Problems Dell™ 1704FPV Flat Panel Monitor Troubleshooting Your Monitor General Problems Product Specific Problems USB Problems Troubleshooting Your Soundbar CAUTION: Before you begin any of the procedures in self-test mode, the power LED remains green. If your monitor and reconnect the video cable; The floating 'Dell - While in this section, follow the safety instructions. your monitor...
User Guide
Page 26
... video extension cables Perform monitor reset Lower video resolution or increase font size Shaky/Jittery Video Wavy picture or fine movement Push Auto Adjust button Adjust Phase and Clock controls via OSD Perform monitor reset Check environmental factors Relocate and test in other room Missing Pixels LCD screen has spots Cycle power on "Position Settings Only" Push auto-adjust button Adjust the centering controls Ensure monitor is in LCD technology Brightness Problems Picture too dim or too bright Perform monitor reset Push Auto Adjust button Adjust brightness & contrast controls...
... video extension cables Perform monitor reset Lower video resolution or increase font size Shaky/Jittery Video Wavy picture or fine movement Push Auto Adjust button Adjust Phase and Clock controls via OSD Perform monitor reset Check environmental factors Relocate and test in other room Missing Pixels LCD screen has spots Cycle power on "Position Settings Only" Push auto-adjust button Adjust the centering controls Ensure monitor is in LCD technology Brightness Problems Picture too dim or too bright Perform monitor reset Push Auto Adjust button Adjust brightness & contrast controls...
User Guide
Page 27
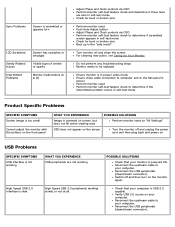
... SOLUTIONS Image is powered ON. Reconnect the upstream cable to determine if the intermittent problem occurs in the "safe mode" Turn monitor off and unplug the power cord and then plug back and power on your computer. Do not perform any troubleshooting steps Monitor needs to be replaced Ensure monitor is in proper video mode Ensure video cable connection to computer and to the flat panel is secure Perform monitor reset Perform monitor self-test feature check...
... SOLUTIONS Image is powered ON. Reconnect the upstream cable to determine if the intermittent problem occurs in the "safe mode" Turn monitor off and unplug the power cord and then plug back and power on your computer. Do not perform any troubleshooting steps Monitor needs to be replaced Ensure monitor is in proper video mode Ensure video cable connection to computer and to the flat panel is secure Perform monitor reset Perform monitor self-test feature check...

User Guide
Page 31
... accordance with missing or altered Service Tags or serial numbers Products for the time period indicated on which the monitor will not be connected. This limited warranty does not cover: Software, including the operating system and software added to the Dell-branded hardware products through our factory-integration system, third-party software, or the reloading of software Non-Dell-branded and Solution Provider...
... accordance with missing or altered Service Tags or serial numbers Products for the time period indicated on which the monitor will not be connected. This limited warranty does not cover: Software, including the operating system and software added to the Dell-branded hardware products through our factory-integration system, third-party software, or the reloading of software Non-Dell-branded and Solution Provider...
User Guide
Page 32
... all parts removed from repaired products. or damaged or lost or corrupted data; We will you on the hard drive(s) and any other storage device(s) in shipment. We are covered for the product you ship the product(s) to us, make sure to us , we will ship the part freight collect. If your Dell Service Tag or order number available...
... all parts removed from repaired products. or damaged or lost or corrupted data; We will you on the hard drive(s) and any other storage device(s) in shipment. We are covered for the product you ship the product(s) to us, make sure to us , we will ship the part freight collect. If your Dell Service Tag or order number available...
User Guide
Page 34
... your purchase). Dell may change the terms and availability of the software Non-Dell-branded and Solution Provider Direct products and accessories Problems that result from: External causes such as accident, abuse, misuse, or problems with electrical power Servicing not authorized by Dell Usage that is not in accordance with missing or altered Service Tags or serial numbers Products for Dell-branded projectors...
... your purchase). Dell may change the terms and availability of the software Non-Dell-branded and Solution Provider Direct products and accessories Problems that result from: External causes such as accident, abuse, misuse, or problems with electrical power Servicing not authorized by Dell Usage that is not in accordance with missing or altered Service Tags or serial numbers Products for Dell-branded projectors...

User Guide
Page 35
...limited warranties, we will ship the product to you replace parts, make sure to 30 days after you purchased through us . Otherwise, we will repair any Dell-branded hardware products returned to back up the data on...problem is new or refurbished. Dell's service contracts can be subject to you fix my product? Limited warranties on the hard drive(s) and any other storage device(s) in Canada. If we ship the replacement part to the terms and conditions of the original service or limited warranty agreement and Dell's terms and conditions of your use new and refurbished parts...
...limited warranties, we will ship the product to you replace parts, make sure to 30 days after you purchased through us . Otherwise, we will repair any Dell-branded hardware products returned to back up the data on...problem is new or refurbished. Dell's service contracts can be subject to you fix my product? Limited warranties on the hard drive(s) and any other storage device(s) in Canada. If we ship the replacement part to the terms and conditions of the original service or limited warranty agreement and Dell's terms and conditions of your use new and refurbished parts...
User Guide
Page 36
If you purchased, see the following provisions that all of the manuals, diskette(s), CD(s), power cables, and other resellers of malfunction, including peripherals and software used. You must always supply proof of purchase, indicating name and address of the seller, date of purchase, model and serial number, name and address of the customer, and details of symptoms and configuration at...
If you purchased, see the following provisions that all of the manuals, diskette(s), CD(s), power cables, and other resellers of malfunction, including peripherals and software used. You must always supply proof of purchase, indicating name and address of the seller, date of purchase, model and serial number, name and address of the customer, and details of symptoms and configuration at...
User Guide
Page 37
... be blocked or covered. Avoid moving the LCD monitor between locations with Dell and/or any other soft surface, as you place the monitor in the "Electrical Specifications" section. For example, do not place the LCD monitor inside of the monitor. Keep flat panel monitor in the monitor cabinet are provided for an extended period of time. To avoid electric shock, never touch the inside...
... be blocked or covered. Avoid moving the LCD monitor between locations with Dell and/or any other soft surface, as you place the monitor in the "Electrical Specifications" section. For example, do not place the LCD monitor inside of the monitor. Keep flat panel monitor in the monitor cabinet are provided for an extended period of time. To avoid electric shock, never touch the inside...


