Owner's Manual
Page 1
Dell™ Laser Multi-Function Printer 1600n Owner's Manual Look Inside For: • Preparing Your Multi-Function Printer • Understanding the Software • Loading Print Media • Using Your Multi-Function Printer • Maintenance • Troubleshooting • Installing Options www.dell.com/supplies | support.dell.com
Dell™ Laser Multi-Function Printer 1600n Owner's Manual Look Inside For: • Preparing Your Multi-Function Printer • Understanding the Software • Loading Print Media • Using Your Multi-Function Printer • Maintenance • Troubleshooting • Installing Options www.dell.com/supplies | support.dell.com

Owner's Manual
Page 3
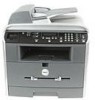
...scanner glass. The Express Service Code is not available in all countries. 5 Manual Feeder Load print media one sheet at a time. 6 Tray 1 Load ...Output Tray Hold paper as it exits the front of the multi-function printer. 10 ADF Output Tray Hold the document as it exit the ADF... and sending faxes. 12 Cover Open to direct your multi-function printer when you want to: 1 Automatic Document Load the document for copying, ... faxes. iii Feeder (ADF) 2 Operator Panel Operate the multi-function printer. 3 Paper Output Extension Keep print media from falling off the front ...
...scanner glass. The Express Service Code is not available in all countries. 5 Manual Feeder Load print media one sheet at a time. 6 Tray 1 Load ...Output Tray Hold paper as it exits the front of the multi-function printer. 10 ADF Output Tray Hold the document as it exit the ADF... and sending faxes. 12 Cover Open to direct your multi-function printer when you want to: 1 Automatic Document Load the document for copying, ... faxes. iii Feeder (ADF) 2 Operator Panel Operate the multi-function printer. 3 Paper Output Extension Keep print media from falling off the front ...

Owner's Manual
Page 4
...phone communication is serial in your country (such as Germany, Sweden, Denmark, Austria, Belgium, Italy, France and Switzerland), remove the plug from the manual feeder. 16 Rear Output Slot Hold paper as a telephone or answering machine, to the network port. 23 Control Board Cover Install the optional memory card... from the Phone connector ( ) and insert the supplied terminator. 19 Wall Jack Connector Connect the telephone line to your multi-function printer. Power Cord Connector 18 Phone Connector Connect additional devices, such as it exits at the rear of the multi-function...
...phone communication is serial in your country (such as Germany, Sweden, Denmark, Austria, Belgium, Italy, France and Switzerland), remove the plug from the manual feeder. 16 Rear Output Slot Hold paper as a telephone or answering machine, to the network port. 23 Control Board Cover Install the optional memory card... from the Phone connector ( ) and insert the supplied terminator. 19 Wall Jack Connector Connect the telephone line to your multi-function printer. Power Cord Connector 18 Phone Connector Connect additional devices, such as it exits at the rear of the multi-function...

Owner's Manual
Page 7
Assigning an IP Address 20 Installing Dell Software For Network Printing 20 Uninstalling Software 22 3 Loading Print Media Print Media Guidelines 24 Loading Paper and Transparencies 27 Loading Paper Into the Paper Tray 27 Loading Paper Into the Manual Feeder 31 Loading Envelopes 32 Setting the Paper... Size and Type 35 Setting the Paper Size 35 Setting the Paper Type 35 Placing Documents on the Scanner Glass 36 Loading Documents Into the ADF 37 4 Using Your Multi-Function Printer Printing 40 Accessing Printer Properties ...
Assigning an IP Address 20 Installing Dell Software For Network Printing 20 Uninstalling Software 22 3 Loading Print Media Print Media Guidelines 24 Loading Paper and Transparencies 27 Loading Paper Into the Paper Tray 27 Loading Paper Into the Manual Feeder 31 Loading Envelopes 32 Setting the Paper... Size and Type 35 Setting the Paper Size 35 Setting the Paper Type 35 Placing Documents on the Scanner Glass 36 Loading Documents Into the ADF 37 4 Using Your Multi-Function Printer Printing 40 Accessing Printer Properties ...

Owner's Manual
Page 8
... Machine 52 Using a Computer Modem 53 5 Maintenance Replacing the ADF Rubber Pad 56 Ordering Supplies 58 Replacing the Toner Cartridge 59 Cleaning Your Multi-Function Printer 61 Cleaning the Exterior 61 Cleaning the Interior 62 Cleaning the scanner 63 Cleaning the Drum 64 6 Troubleshooting Clearing Jams in the ADF 66 Clearing... Jams in the Paper Tray 68 Paper Feed Jam (Tray 1 68 Paper Exit Jam 70 Fuser Area Jam 71 Manual Feeder Jam 73 Paper Feed Jam (Optional Tray 2 73 Tips for Avoiding Paper Jams 74 More Troubleshooting 74 viii Contents
... Machine 52 Using a Computer Modem 53 5 Maintenance Replacing the ADF Rubber Pad 56 Ordering Supplies 58 Replacing the Toner Cartridge 59 Cleaning Your Multi-Function Printer 61 Cleaning the Exterior 61 Cleaning the Interior 62 Cleaning the scanner 63 Cleaning the Drum 64 6 Troubleshooting Clearing Jams in the ADF 66 Clearing... Jams in the Paper Tray 68 Paper Feed Jam (Tray 1 68 Paper Exit Jam 70 Fuser Area Jam 71 Manual Feeder Jam 73 Paper Feed Jam (Optional Tray 2 73 Tips for Avoiding Paper Jams 74 More Troubleshooting 74 viii Contents

Owner's Manual
Page 23
...your Administrator user name and password, and then click OK. • Manually enter or browse for the clients or servers and click Add. • When you expected: a Insert the Drivers and Utilities CD into your multi-function printer doesn't respond, or if the IP address is not what you are... SETUP.EXE, and then click OK. g Click Close. e Select your changes. h Print and check the network setup page to verify your multi-function printer from the Configure Print Servers list, and then click TCP/IP Settings. Pr eparing Yo ur Multi-Function Pr inter 1 3 d When the Drivers and Utilities...
...your Administrator user name and password, and then click OK. • Manually enter or browse for the clients or servers and click Add. • When you expected: a Insert the Drivers and Utilities CD into your multi-function printer doesn't respond, or if the IP address is not what you are... SETUP.EXE, and then click OK. g Click Close. e Select your changes. h Print and check the network setup page to verify your multi-function printer from the Configure Print Servers list, and then click TCP/IP Settings. Pr eparing Yo ur Multi-Function Pr inter 1 3 d When the Drivers and Utilities...

Owner's Manual
Page 30
...ready to your network and powered on . You will need administrative access to install printer drivers on the network computers. 1 Make sure that the multi-function printer is connected to install the Dell software on the same network, select Remote Installation. NOTE: You need this computer...or remotely. To configure the IP address manually, you must exist on the network. Close all unnecessary programs. For details about connecting on the main screen. 4 Select SetIP Address Utility. The printer's default IP address can install the Dell software on the Configuration page for the...
...ready to your network and powered on . You will need administrative access to install printer drivers on the network computers. 1 Make sure that the multi-function printer is connected to install the Dell software on the same network, select Remote Installation. NOTE: You need this computer...or remotely. To configure the IP address manually, you must exist on the network. Close all unnecessary programs. For details about connecting on the main screen. 4 Select SetIP Address Utility. The printer's default IP address can install the Dell software on the Configuration page for the...
Owner's Manual
Page 34
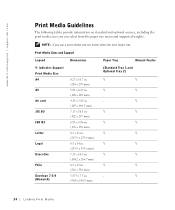
Print Media Sizes and Support Legend Dimensions Paper Tray Manual Feeder Y- Y Y Y Y Y Y Y Y Y Y Y Y Y - indicates Support Print Media Size A4 A5 A6 card JIS B5 ISO B5 Letter Legal Executive Folio Envelope 7-3/4 (Monarch) 8.27 x 11.7 ...and Optional Tray 2) Y Y Y Y - NOTE: If you can select from the paper size menu and supported weights. Y 24 Loading Print Media www.dell.com/supplies | support.dell.com Print Media Guidelines The following tables provide information on standard and optional sources, including the print media sizes you use a print media size...
Print Media Sizes and Support Legend Dimensions Paper Tray Manual Feeder Y- Y Y Y Y Y Y Y Y Y Y Y Y Y - indicates Support Print Media Size A4 A5 A6 card JIS B5 ISO B5 Letter Legal Executive Folio Envelope 7-3/4 (Monarch) 8.27 x 11.7 ...and Optional Tray 2) Y Y Y Y - NOTE: If you can select from the paper size menu and supported weights. Y 24 Loading Print Media www.dell.com/supplies | support.dell.com Print Media Guidelines The following tables provide information on standard and optional sources, including the print media sizes you use a print media size...
Owner's Manual
Page 35
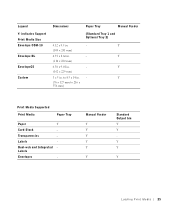
... (Standard Tray 1 and Optional Tray 2) 4.12 x 9.5 in . - Labels - Dual-web and Integrated Labels Envelopes - Y (110 x 220 mm) 6.38 x 9.01 in . - Manual Feeder Y Y Y Y Y Y Standard Output bin Y Y Y Y Y Loading Print Media 25 Y (105 x 241 mm) 4.33 x 8.66 in . Transparencies - Legend Y- Y (162 x 229 mm) 3 x 5 in . - to 216 x 356 mm) Print ...
... (Standard Tray 1 and Optional Tray 2) 4.12 x 9.5 in . - Labels - Dual-web and Integrated Labels Envelopes - Y (110 x 220 mm) 6.38 x 9.01 in . - Manual Feeder Y Y Y Y Y Y Standard Output bin Y Y Y Y Y Loading Print Media 25 Y (105 x 241 mm) 4.33 x 8.66 in . Transparencies - Legend Y- Y (162 x 229 mm) 3 x 5 in . - to 216 x 356 mm) Print ...

Owner's Manual
Page 36
www.dell.com/supplies | support.dell.com Print Media Types and Weights Print Media Type Print Media Weight Standard Tray 1 and Optional Tray 2 Manual Feeder Paper Xerographic or business paper 60-90 g/...163 g/m2 (43 lb) 163 g/m2 (43 lb) 163 g/m2 (43 lb) 163 g/m2 (43 lb) Transparencies Laser printer 138-146 g/m2 138-146 g/m2 (37-39 lb bond) (37-39 lb bond) Labels-maximum Paper 163 g/m2... 163 g/m2 163 g/m2 (43 lb liner) (43 lb liner) Integrated Forms Pressuresensitive area (must enter the printer first) 135-140 g/m2 (36-40 lb bond) 135-140 g/m2 (36-40 lb bond) Paper base ...
www.dell.com/supplies | support.dell.com Print Media Types and Weights Print Media Type Print Media Weight Standard Tray 1 and Optional Tray 2 Manual Feeder Paper Xerographic or business paper 60-90 g/...163 g/m2 (43 lb) 163 g/m2 (43 lb) 163 g/m2 (43 lb) 163 g/m2 (43 lb) Transparencies Laser printer 138-146 g/m2 138-146 g/m2 (37-39 lb bond) (37-39 lb bond) Labels-maximum Paper 163 g/m2... 163 g/m2 163 g/m2 (43 lb liner) (43 lb liner) Integrated Forms Pressuresensitive area (must enter the printer first) 135-140 g/m2 (36-40 lb bond) 135-140 g/m2 (36-40 lb bond) Paper base ...
Owner's Manual
Page 37
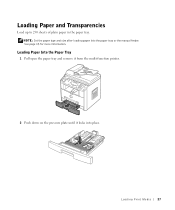
NOTE: Set the paper type and size after loading paper into place. Loading Paper Into the Paper Tray 1 Pull open the paper tray and remove it from the multi-function printer. 2 Push down on the pressure plate until it locks into the paper tray or the manual feeder. Loading Print Media 27 Loading Paper and Transparencies Load up to 250 sheets of plain paper in the paper tray. See page 35 for more information.
NOTE: Set the paper type and size after loading paper into place. Loading Paper Into the Paper Tray 1 Pull open the paper tray and remove it from the multi-function printer. 2 Push down on the pressure plate until it locks into the paper tray or the manual feeder. Loading Print Media 27 Loading Paper and Transparencies Load up to 250 sheets of plain paper in the paper tray. See page 35 for more information.
Owner's Manual
Page 41
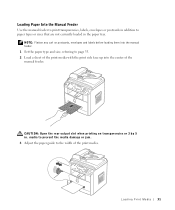
... 3 by 5 in. Loading Print Media 31 CAUTION: Open the rear output slot when printing on postcards, envelopes and labels before loading them into the manual feeder. 1 Set the paper type and size, referring to paper types or sizes that are not currently loaded in the paper tray. Loading Paper Into... the Manual Feeder Use the manual feeder to print transparencies, labels, envelopes or postcards in addition to page 35. 2 Load a sheet of the print media with the print...
... 3 by 5 in. Loading Print Media 31 CAUTION: Open the rear output slot when printing on postcards, envelopes and labels before loading them into the manual feeder. 1 Set the paper type and size, referring to paper types or sizes that are not currently loaded in the paper tray. Loading Paper Into... the Manual Feeder Use the manual feeder to print transparencies, labels, envelopes or postcards in addition to page 35. 2 Load a sheet of the print media with the print...

Owner's Manual
Page 42
Loading Envelopes NOTICE: Never load envelopes with the stamp area on the top left side. These envelopes may severely damage the multi-function printer. 1 Load an envelope with the flap side face down and with stamps, clasps, snaps, windows, coated linings, or self-stick adhesives. The end of the envelope with the stamp area enters the manual feeder first. 32 Loading Print Media www.dell.com/supplies | support.dell.com 4 Open the rear cover to use the rear output slot. 5 After printing, close the rear cover.
Loading Envelopes NOTICE: Never load envelopes with the stamp area on the top left side. These envelopes may severely damage the multi-function printer. 1 Load an envelope with the flap side face down and with stamps, clasps, snaps, windows, coated linings, or self-stick adhesives. The end of the envelope with the stamp area enters the manual feeder first. 32 Loading Print Media www.dell.com/supplies | support.dell.com 4 Open the rear cover to use the rear output slot. 5 After printing, close the rear cover.
Owner's Manual
Page 44
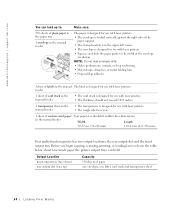
... embossing. • Metal clasps, string ties, or metal folding bars. • Exposed flap adhesive. 1sheet of labels in the manual The label is designed for use with laser printers. • The rough side faces you begin copying, scanning, printing, or sending faxes, refer to the width of paper one ... locations; www.dell.com/supplies | support.dell.com You can hold: Output Location front output tray (face down) rear output slot (face up to: 250 sheets of plain paper in the paper tray 1 envelope in the manual feeder Make sure: The paper is designed for use with laser printers. • ...
... embossing. • Metal clasps, string ties, or metal folding bars. • Exposed flap adhesive. 1sheet of labels in the manual The label is designed for use with laser printers. • The rough side faces you begin copying, scanning, printing, or sending faxes, refer to the width of paper one ... locations; www.dell.com/supplies | support.dell.com You can hold: Output Location front output tray (face down) rear output slot (face up to: 250 sheets of plain paper in the paper tray 1 envelope in the manual feeder Make sure: The paper is designed for use with laser printers. • ...
Owner's Manual
Page 45
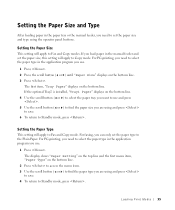
If you load paper in the manual feeder and set the paper size, this setting will apply to Fax and Copy modes. For PC-printing, you need to select the paper type ... setting will apply to Copy mode. Loading Print Media 35 Setting the Paper Size and Type After loading paper in the paper tray or the manual feeder, you need to select the paper type in the application program you use. 1 Press . If the optional Tray2 is installed, "Tray1 Paper" displays on...
If you load paper in the manual feeder and set the paper size, this setting will apply to Fax and Copy modes. For PC-printing, you need to select the paper type ... setting will apply to Copy mode. Loading Print Media 35 Setting the Paper Size and Type After loading paper in the paper tray or the manual feeder, you need to select the paper type in the application program you use. 1 Press . If the optional Tray2 is installed, "Tray1 Paper" displays on...

Owner's Manual
Page 57
... such as Broadcasting, Delay Fax, Priority Fax, and Toll save. NOTE: Only one document at a time is stored, the multi-function printer dials the receiving fax machine and sends the fax. Select "2:No" when all pages are faxing multiple pages automatically from the fax queue. ... fax manually, press and enter the fax number when you hear a high-pitched fax tone from the scanner glass. For more information about loading documents, see page 50~51. If the receiving fax machine is stored into its memory. Sending a Fax NOTE: The Dell Laser Multi-Function Printer 1600n can always...
... such as Broadcasting, Delay Fax, Priority Fax, and Toll save. NOTE: Only one document at a time is stored, the multi-function printer dials the receiving fax machine and sends the fax. Select "2:No" when all pages are faxing multiple pages automatically from the fax queue. ... fax manually, press and enter the fax number when you hear a high-pitched fax tone from the scanner glass. For more information about loading documents, see page 50~51. If the receiving fax machine is stored into its memory. Sending a Fax NOTE: The Dell Laser Multi-Function Printer 1600n can always...

Owner's Manual
Page 58
...dell.com/supplies | support.dell.com Receiving a Fax NOTE: The Dell Laser Multi-Function Printer 1600n cannot receive color faxes. 1 Press until "Fax Setup" appears on the top line of rings before the multi-function printer answers can be installed on the operator panel. • Ans/Fax mode: The multi-function printer...8226; Tel mode (manual receive mode): Automatic fax reception is turned off. If the user memory is full, the multi-function printer is not available. ...to dial your country is serial, this mode, the multifunction printer will monitor the fax signal and pick up the handset ...
...dell.com/supplies | support.dell.com Receiving a Fax NOTE: The Dell Laser Multi-Function Printer 1600n cannot receive color faxes. 1 Press until "Fax Setup" appears on the top line of rings before the multi-function printer answers can be installed on the operator panel. • Ans/Fax mode: The multi-function printer...8226; Tel mode (manual receive mode): Automatic fax reception is turned off. If the user memory is full, the multi-function printer is not available. ...to dial your country is serial, this mode, the multifunction printer will monitor the fax signal and pick up the handset ...

Owner's Manual
Page 62
...Dell Laser MFP 1600n Figure 1 You can connect a telephone answering device (TAD) directly to answer setting for the TAD. • When the TAD picks up the receiver. 5 2 Using Yo ur Multi-Function Pr inter Faxes are sent error free even in Figure 1. www.dell.com/supplies | support.dell.... • If you answer the call and hear fax tones, the multi-function printer will answer the fax call if you • press and then button and hang up... starts receiving the fax. • If the answering device is sent manually and if the remote machine supports color fax reception. 3 The fax machine...
...Dell Laser MFP 1600n Figure 1 You can connect a telephone answering device (TAD) directly to answer setting for the TAD. • When the TAD picks up the receiver. 5 2 Using Yo ur Multi-Function Pr inter Faxes are sent error free even in Figure 1. www.dell.com/supplies | support.dell.... • If you answer the call and hear fax tones, the multi-function printer will answer the fax call if you • press and then button and hang up... starts receiving the fax. • If the answering device is sent manually and if the remote machine supports color fax reception. 3 The fax machine...

Owner's Manual
Page 78
If the paper does not exit, continue to clear the jam. www.dell.com/supplies | support.dell.com Clearing Jams in the Paper Tray Operator Panel Message Location of Jam Go to [Paper Jam 0] Open/Close Door [Paper Jam 1] Open/Close Door ... to step 2. 2 Pull the paper tray open. 68 Troubleshooting To avoid tearing the paper, pull the jammed paper out gently and slowly. page 73. Jam] Manual Feeder Jam page 73. Follow the steps below . Paper Feed Jam (Tray 1) 1 Open and close the front cover. page 70. [Paper Jam 2] Check Inside Fuser...
If the paper does not exit, continue to clear the jam. www.dell.com/supplies | support.dell.com Clearing Jams in the Paper Tray Operator Panel Message Location of Jam Go to [Paper Jam 0] Open/Close Door [Paper Jam 1] Open/Close Door ... to step 2. 2 Pull the paper tray open. 68 Troubleshooting To avoid tearing the paper, pull the jammed paper out gently and slowly. page 73. Jam] Manual Feeder Jam page 73. Follow the steps below . Paper Feed Jam (Tray 1) 1 Open and close the front cover. page 70. [Paper Jam 2] Check Inside Fuser...

Owner's Manual
Page 83
Troubleshooting 73 Jam" appears on the display when you cannot see the paper in the manual feeder 2 Gently pull the paper straight out of the multi-function printer. If you try to print using the manual feeder and the multi-function printer does not detect paper, due to improper paper loading. 1 Locate the jammed paper in this area or the paper does not move when pulled, go to step 3. 3 Pull the standard Tray 1 open . 2 Remove the jammed paper from the multi-function printer. Paper Feed Jam (Optional Tray 2) 1 Pull the optional Tray 2 open . Manual Feeder Jam "Manual F.
Troubleshooting 73 Jam" appears on the display when you cannot see the paper in the manual feeder 2 Gently pull the paper straight out of the multi-function printer. If you try to print using the manual feeder and the multi-function printer does not detect paper, due to improper paper loading. 1 Locate the jammed paper in this area or the paper does not move when pulled, go to step 3. 3 Pull the standard Tray 1 open . 2 Remove the jammed paper from the multi-function printer. Paper Feed Jam (Optional Tray 2) 1 Pull the optional Tray 2 open . Manual Feeder Jam "Manual F.


