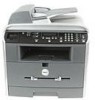

Owner's Manual
Page 7
... Paper and Transparencies 27 Loading Paper Into the Paper Tray 27 Loading Paper Into the Manual Feeder 31 Loading Envelopes 32 Setting the Paper Size and Type 35 Setting the Paper Size 35 Setting the Paper Type 35 Placing Documents on the Scanner Glass 36 Loading Documents Into the ADF 37 4 Using Your Multi-Function Printer Printing 40 Accessing Printer...
... Paper and Transparencies 27 Loading Paper Into the Paper Tray 27 Loading Paper Into the Manual Feeder 31 Loading Envelopes 32 Setting the Paper Size and Type 35 Setting the Paper Size 35 Setting the Paper Type 35 Placing Documents on the Scanner Glass 36 Loading Documents Into the ADF 37 4 Using Your Multi-Function Printer Printing 40 Accessing Printer...

Owner's Manual
Page 8
... Cartridge 59 Cleaning Your Multi-Function Printer 61 Cleaning the Exterior 61 Cleaning the Interior 62 Cleaning the scanner 63 Cleaning the Drum 64 6 Troubleshooting Clearing Jams in the ADF 66 Clearing Jams in the Paper Tray 68 Paper Feed Jam (Tray 1 68 Paper Exit Jam 70 Fuser Area Jam ...71 Manual Feeder Jam 73 Paper Feed Jam (Optional Tray 2 73 Tips for Avoiding Paper Jams 74 More Troubleshooting 74 viii Contents
... Cartridge 59 Cleaning Your Multi-Function Printer 61 Cleaning the Exterior 61 Cleaning the Interior 62 Cleaning the scanner 63 Cleaning the Drum 64 6 Troubleshooting Clearing Jams in the ADF 66 Clearing Jams in the Paper Tray 68 Paper Feed Jam (Tray 1 68 Paper Exit Jam 70 Fuser Area Jam ...71 Manual Feeder Jam 73 Paper Feed Jam (Optional Tray 2 73 Tips for Avoiding Paper Jams 74 More Troubleshooting 74 viii Contents
Owner's Manual
Page 34
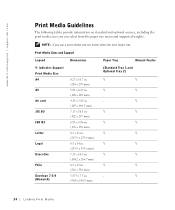
...dell.com/supplies | support.dell.com Print Media Guidelines The following tables provide information on standard and optional sources, including the print media sizes you use a print media size not listed, select the next larger size. Y Y Y Y Y Y Y Y Y Y Y Y Y - NOTE: If you can select from the paper... size menu and supported weights. Y 24 Loading Print Media Print Media Sizes and Support Legend Dimensions Paper Tray Manual Feeder Y- indicates Support Print Media Size A4 A5 A6 card JIS B5 ISO B5 ...
...dell.com/supplies | support.dell.com Print Media Guidelines The following tables provide information on standard and optional sources, including the print media sizes you use a print media size not listed, select the next larger size. Y Y Y Y Y Y Y Y Y Y Y Y Y - NOTE: If you can select from the paper... size menu and supported weights. Y 24 Loading Print Media Print Media Sizes and Support Legend Dimensions Paper Tray Manual Feeder Y- indicates Support Print Media Size A4 A5 A6 card JIS B5 ISO B5 ...
Owner's Manual
Page 35
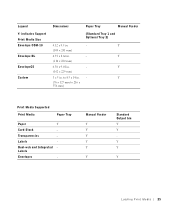
... mm) 6.38 x 9.01 in . - indicates Support Print Media Size Envelope COM-10 Envelope DL EnvelopeC5 Custom Dimensions Paper Tray Manual Feeder (Standard Tray 1 and Optional Tray 2) 4.12 x 9.5 in . - to 216 x 356 mm) Print Media Supported Print Media Paper Tray Paper Y Card Stock - Y (162 x 229 mm) 3 x 5 in . - Manual Feeder Y Y Y Y Y Y Standard Output bin Y Y Y Y Y Loading Print Media 25 Transparencies - Dual...
... mm) 6.38 x 9.01 in . - indicates Support Print Media Size Envelope COM-10 Envelope DL EnvelopeC5 Custom Dimensions Paper Tray Manual Feeder (Standard Tray 1 and Optional Tray 2) 4.12 x 9.5 in . - to 216 x 356 mm) Print Media Supported Print Media Paper Tray Paper Y Card Stock - Y (162 x 229 mm) 3 x 5 in . - Manual Feeder Y Y Y Y Y Y Standard Output bin Y Y Y Y Y Loading Print Media 25 Transparencies - Dual...
Owner's Manual
Page 37
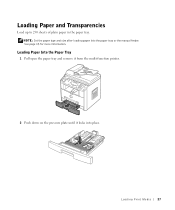
See page 35 for more information. Loading Paper Into the Paper Tray 1 Pull open the paper tray and remove it from the multi-function printer. 2 Push down on the pressure plate until it locks into the paper tray or the manual feeder. Loading Print Media 27 Loading Paper and Transparencies Load up to 250 sheets of plain paper in the paper tray. NOTE: Set the paper type and size after loading paper into place.
See page 35 for more information. Loading Paper Into the Paper Tray 1 Pull open the paper tray and remove it from the multi-function printer. 2 Push down on the pressure plate until it locks into the paper tray or the manual feeder. Loading Print Media 27 Loading Paper and Transparencies Load up to 250 sheets of plain paper in the paper tray. NOTE: Set the paper type and size after loading paper into place.
Owner's Manual
Page 38
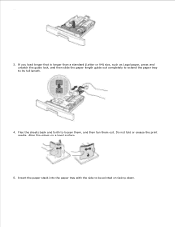
Do not fold or crease the print media. www.dell.com/supplies | support.dell.com 3 If you load longer that is longer than a standard (Letter or A4) size, such as legal paper, press and unlatch the guide lock, then slide the paper length guide out completely to extend the paper tray to its full length. 4 Flex the sheets back and forth to be printed on a level surface. 5 Insert the paper stack into the paper tray with the side to loosen them, and then fan them out. Align the edges on facing down. 28 Loading Print Media
Do not fold or crease the print media. www.dell.com/supplies | support.dell.com 3 If you load longer that is longer than a standard (Letter or A4) size, such as legal paper, press and unlatch the guide lock, then slide the paper length guide out completely to extend the paper tray to its full length. 4 Flex the sheets back and forth to be printed on a level surface. 5 Insert the paper stack into the paper tray with the side to loosen them, and then fan them out. Align the edges on facing down. 28 Loading Print Media

Owner's Manual
Page 39
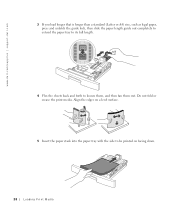
6 Do not exceed the maximum stack height indicated by the paper limit marks on both inside walls of the paper stack. Loading Print Media 29 Overloading the paper tray may cause paper jams. 7 Slide in the length guide until it lightly touches the end of tray. For paper smaller than Letter size, adjust the inner paper length guide so that lightly touches the paper stack.
6 Do not exceed the maximum stack height indicated by the paper limit marks on both inside walls of the paper stack. Loading Print Media 29 Overloading the paper tray may cause paper jams. 7 Slide in the length guide until it lightly touches the end of tray. For paper smaller than Letter size, adjust the inner paper length guide so that lightly touches the paper stack.

Owner's Manual
Page 40
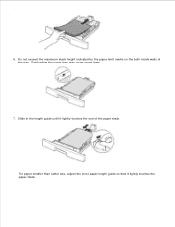
www.dell.com/supplies | support.dell.com 8 Pinch the paper width guide, as shown and move it towards the stack of paper until it lightly touches the side of paper guides can result in paper jams. 9 Insert and slide the paper tray back into the multi-function printer. 10 Set the paper type and size. NOTE: Improper adjustment of the stack. For details, see page 35. 30 Loading Print Media
www.dell.com/supplies | support.dell.com 8 Pinch the paper width guide, as shown and move it towards the stack of paper until it lightly touches the side of paper guides can result in paper jams. 9 Insert and slide the paper tray back into the multi-function printer. 10 Set the paper type and size. NOTE: Improper adjustment of the stack. For details, see page 35. 30 Loading Print Media
Owner's Manual
Page 41
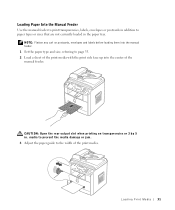
CAUTION: Open the rear output slot when printing on postcards, envelopes and labels before loading them into the manual feeder. 1 Set the paper type and size, referring to page 35. 2 Load a sheet of the print media with the print side face up into the center of the...Flatten any curl on transparencies or 3 by 5 in. media to prevent the media damage or jam. 3 Adjust the paper guide to paper types or sizes that are not currently loaded in the paper tray. Loading Paper Into the Manual Feeder Use the manual feeder to print transparencies, labels, envelopes or postcards in addition to the...
CAUTION: Open the rear output slot when printing on postcards, envelopes and labels before loading them into the manual feeder. 1 Set the paper type and size, referring to page 35. 2 Load a sheet of the print media with the print side face up into the center of the...Flatten any curl on transparencies or 3 by 5 in. media to prevent the media damage or jam. 3 Adjust the paper guide to paper types or sizes that are not currently loaded in the paper tray. Loading Paper Into the Manual Feeder Use the manual feeder to print transparencies, labels, envelopes or postcards in addition to the...
Owner's Manual
Page 44
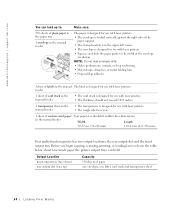
... output slot and the front output tray. www.dell.com/supplies | support.dell.com You can hold: Output Location front output tray (face down) rear output slot (face up to: 250 sheets of plain paper in the paper tray 1 envelope in the manual feeder Make sure: The paper is designed for use with laser printers. • The envelope is loaded...
... output slot and the front output tray. www.dell.com/supplies | support.dell.com You can hold: Output Location front output tray (face down) rear output slot (face up to: 250 sheets of plain paper in the paper tray 1 envelope in the manual feeder Make sure: The paper is designed for use with laser printers. • The envelope is loaded...
Owner's Manual
Page 45
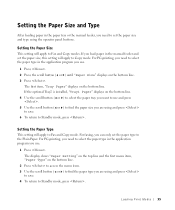
...this setting will apply to Copy mode. Loading Print Media 35 The first item, "Tray Paper" displays on the bottom line. 4 Use the scroll button ( or ) to select the paper tray you want to use . 1 Press . Setting the Paper Size This setting will apply to Fax and Copy modes. If the optional Tray2 is...Fax and Copy mode. For PC-printing, you need to set the paper size and type using the operator panel buttons. Setting the Paper Size and Type After loading paper in the paper tray or the manual feeder, you need to select the paper type in the application program you use and press . 5 Use ...
...this setting will apply to Copy mode. Loading Print Media 35 The first item, "Tray Paper" displays on the bottom line. 4 Use the scroll button ( or ) to select the paper tray you want to use . 1 Press . Setting the Paper Size This setting will apply to Fax and Copy modes. If the optional Tray2 is...Fax and Copy mode. For PC-printing, you need to set the paper size and type using the operator panel buttons. Setting the Paper Size and Type After loading paper in the paper tray or the manual feeder, you need to select the paper type in the application program you use and press . 5 Use ...
Owner's Manual
Page 75
SECTION 6 Troubleshooting Clearing Jams in the ADF Clearing Jams in the Paper Tray More Troubleshooting
SECTION 6 Troubleshooting Clearing Jams in the ADF Clearing Jams in the Paper Tray More Troubleshooting

Owner's Manual
Page 78
... cover. www.dell.com/supplies | support.dell.com Clearing Jams in the Paper Tray Operator Panel Message Location of Jam Go to [Paper Jam 0] Open/Close Door [Paper Jam 1] Open/Close Door Paper Feed Jam (Tray 1) Paper Feed Jam (optional Tray 2) Paper Exit Jam Image below to step 2. 2 Pull the paper tray open. 68 Troubleshooting The jammed paper automatically exits the multi-function printer. Jam...
... cover. www.dell.com/supplies | support.dell.com Clearing Jams in the Paper Tray Operator Panel Message Location of Jam Go to [Paper Jam 0] Open/Close Door [Paper Jam 1] Open/Close Door Paper Feed Jam (Tray 1) Paper Feed Jam (optional Tray 2) Paper Exit Jam Image below to step 2. 2 Pull the paper tray open. 68 Troubleshooting The jammed paper automatically exits the multi-function printer. Jam...

Owner's Manual
Page 79
3 Remove the paper by gently pulling it snaps into the multi-function printer until it straight out. Troubleshooting 69 If you cannot see page 71. 4 Insert the paper tray into place. 5 Open and close the front cover to resume printing. For more information, see the paper or the paper does not move when pulled, check the fuser area.
3 Remove the paper by gently pulling it snaps into the multi-function printer until it straight out. Troubleshooting 69 If you cannot see page 71. 4 Insert the paper tray into place. 5 Open and close the front cover to resume printing. For more information, see the paper or the paper does not move when pulled, check the fuser area.
Owner's Manual
Page 84
...printer is facing down in the paper tray and facing up and out. 5 Insert Tray 1 in the multi-function printer until it snaps into place. 6 Open and close the front cover to load paper correctly. Tips for Avoiding Paper Jams By selecting the correct paper types, most paper jams can be avoided. When a paper...Flex, fan and straighten the paper before loading. • Do not use creased, damp or curled paper. • Do not mix paper types in the paper tray. • Use only recommended print materials. www.dell.com/supplies | support.dell.com 4 Pull the paper straight up in the manual feeder...
...printer is facing down in the paper tray and facing up and out. 5 Insert Tray 1 in the multi-function printer until it snaps into place. 6 Open and close the front cover to load paper correctly. Tips for Avoiding Paper Jams By selecting the correct paper types, most paper jams can be avoided. When a paper...Flex, fan and straighten the paper before loading. • Do not use creased, damp or curled paper. • Do not mix paper types in the paper tray. • Use only recommended print materials. www.dell.com/supplies | support.dell.com 4 Pull the paper straight up in the manual feeder...

Dell Laser Multi-Function Printer 1600n User's Guide
Page 17
NOTE: Set the paper type and size after loading paper into place. 4. To load paper: 1. Push down on the pressure plate until it from the multi-function printer. 2. See page 66 -67 for the paper used in the paper tray. Loading Paper Load up to 250 sheets of plain paper in copying and faxing, or page 75 for PC-printing. Pull open the paper tray and remove it locks into the paper tray.
NOTE: Set the paper type and size after loading paper into place. 4. To load paper: 1. Push down on the pressure plate until it from the multi-function printer. 2. See page 66 -67 for the paper used in the paper tray. Loading Paper Load up to 250 sheets of plain paper in copying and faxing, or page 75 for PC-printing. Pull open the paper tray and remove it locks into the paper tray.
Dell Laser Multi-Function Printer 1600n User's Guide
Page 18
Align the edges on facing down. 2. 3. Do not fold or crease the print media. Insert the paper stack into the paper tray with the side to loosen them, and then fan them out. Flex the sheets back and forth to be printed on a level surface. 5. If you load longer that is longer than a standard (Letter or A4) size, such as Legal paper, press and unlatch the guide lock, and then slide the paper length guide out completely to extend the paper tray to its full length. 4.
Align the edges on facing down. 2. 3. Do not fold or crease the print media. Insert the paper stack into the paper tray with the side to loosen them, and then fan them out. Flex the sheets back and forth to be printed on a level surface. 5. If you load longer that is longer than a standard (Letter or A4) size, such as Legal paper, press and unlatch the guide lock, and then slide the paper length guide out completely to extend the paper tray to its full length. 4.
Dell Laser Multi-Function Printer 1600n User's Guide
Page 19
Slide in the length guide until it lightly touches the paper stack. For paper smaller than Letter size, adjust the inner paper length guide so that it lightly touches the end of the tray. Overloading the paper tray may cause paper jams. 7. 5. 6. Do not exceed the maximum stack height indicated by the paper limit marks on the both inside walls of the paper stack.
Slide in the length guide until it lightly touches the paper stack. For paper smaller than Letter size, adjust the inner paper length guide so that it lightly touches the end of the tray. Overloading the paper tray may cause paper jams. 7. 5. 6. Do not exceed the maximum stack height indicated by the paper limit marks on the both inside walls of the paper stack.
Dell Laser Multi-Function Printer 1600n User's Guide
Page 20
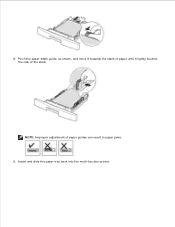
NOTE: Improper adjustment of the stack. 8. Insert and slide the paper tray back into the multi-function printer. Pinch the paper width guide, as shown, and move it towards the stack of paper until it lightly touches the side of paper guides can result in paper jams. 9.
NOTE: Improper adjustment of the stack. 8. Insert and slide the paper tray back into the multi-function printer. Pinch the paper width guide, as shown, and move it towards the stack of paper until it lightly touches the side of paper guides can result in paper jams. 9.

Dell Laser Multi-Function Printer 1600n User's Guide
Page 39
... in the paper tray. Try a sample of print media. Paper For the best print quality, use 75 Selecting the appropriate print media for your multi-function printer helps you avoid printing problems. This chapter provides information on the paper package, and load paper accordingly. When loading paper, note the... We recommend that you are considering using with the multi-function printer before buying large quantities. Your printer provides high quality printing on page 64 for the print media, and how to load it in the Paper Tray" on page 63 and "Using the Manual Feeder" on ...
... in the paper tray. Try a sample of print media. Paper For the best print quality, use 75 Selecting the appropriate print media for your multi-function printer helps you avoid printing problems. This chapter provides information on the paper package, and load paper accordingly. When loading paper, note the... We recommend that you are considering using with the multi-function printer before buying large quantities. Your printer provides high quality printing on page 64 for the print media, and how to load it in the Paper Tray" on page 63 and "Using the Manual Feeder" on ...


