Setup Guide
Page 7
Restricting airflow around your Dell™ computer in an enclosed space, such as carpets or rugs, while it is normal ...in the air vents. You should never place your computer, ensure that you allow dust to place your Studio 1555/1557/1558 laptop. CAUTION: Placing or stacking heavy or sharp objects on the computer may cause it to the computer. ...5 The computer turns on all other sides. To prevent overheating ensure that you leave at least 10.2 cm (4 inches) at the back...
Restricting airflow around your Dell™ computer in an enclosed space, such as carpets or rugs, while it is normal ...in the air vents. You should never place your computer, ensure that you allow dust to place your Studio 1555/1557/1558 laptop. CAUTION: Placing or stacking heavy or sharp objects on the computer may cause it to the computer. ...5 The computer turns on all other sides. To prevent overheating ensure that you leave at least 10.2 cm (4 inches) at the back...
Setup Guide
Page 8
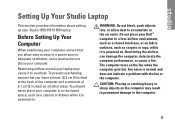
WARNING: The AC adapter works with electrical outlets worldwide. Using an incompatible cable or improperly connecting the cable to a power strip or electrical outlet may cause fire or permanent damage to the adapter firmly and ensure that the light on the adapter is on when you turn on power. 6 However, power connectors and power strips vary among countries. NOTE: Connect the power cord to your computer. Setting Up Your Studio Laptop Connect the AC Adapter Connect the AC adapter to the computer and then plug it into an electrical outlet or surge protector.
WARNING: The AC adapter works with electrical outlets worldwide. Using an incompatible cable or improperly connecting the cable to a power strip or electrical outlet may cause fire or permanent damage to the adapter firmly and ensure that the light on the adapter is on when you turn on power. 6 However, power connectors and power strips vary among countries. NOTE: Connect the power cord to your computer. Setting Up Your Studio Laptop Connect the AC Adapter Connect the AC adapter to the computer and then plug it into an electrical outlet or surge protector.
Setup Guide
Page 14
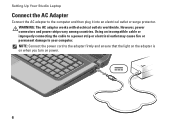
... battery bay, slide the SIM card into the SIM card slot. 4. Replace the battery (see "Removing and Replacing the Battery" on your computer. 2. Turn on page 42). 3. To install the SIM card: 1. Remove the battery (see "Removing and Replacing the Battery" on your cellular service provider. To ...remove the SIM card, press and eject the SIM card. 12 Installing a Subscriber Identity Module (SIM) card on page 42). 5. Setting Up Your Studio Laptop Install the SIM Card (Optional) NOTE: Installing a SIM is not required if you are using an EVDO card to the Internet. To access ...
... battery bay, slide the SIM card into the SIM card slot. 4. Replace the battery (see "Removing and Replacing the Battery" on your computer. 2. Turn on page 42). 3. To install the SIM card: 1. Remove the battery (see "Removing and Replacing the Battery" on your cellular service provider. To ...remove the SIM card, press and eject the SIM card. 12 Installing a Subscriber Identity Module (SIM) card on page 42). 5. Setting Up Your Studio Laptop Install the SIM Card (Optional) NOTE: Installing a SIM is not required if you are using an EVDO card to the Internet. To access ...
Setup Guide
Page 16
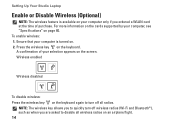
...radios. For more information on the cards supported by your computer, see "Specifications" on the keyboard. NOTE: The wireless key allows you to quickly turn off wireless radios (Wi-Fi and Bluetooth®), such as when you ordered a WLAN card at the time of your selection appears on the ...screen. Press the wireless key on page 80. Setting Up Your Studio Laptop Enable or Disable Wireless (Optional) NOTE: The wireless feature is turned on. 2. Ensure that your computer is available on your computer only if you are asked to...
...radios. For more information on the cards supported by your computer, see "Specifications" on the keyboard. NOTE: The wireless key allows you to quickly turn off wireless radios (Wi-Fi and Bluetooth®), such as when you ordered a WLAN card at the time of your selection appears on the ...screen. Press the wireless key on page 80. Setting Up Your Studio Laptop Enable or Disable Wireless (Optional) NOTE: The wireless feature is turned on. 2. Ensure that your computer is available on your computer only if you are asked to...
Setup Guide
Page 25
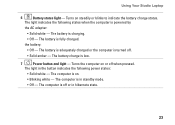
... the AC adapter: • Solid white - The light in the button indicates the following states when the computer is turned off when pressed. Using Your Studio Laptop 6 Battery status light - The battery is low. 7 Power button and light - The battery charge is fully ...charged. The computer is on or off . • Solid amber - Turns the computer on . • Blinking white - The battery is in hibernate state. ...
... the AC adapter: • Solid white - The light in the button indicates the following states when the computer is turned off when pressed. Using Your Studio Laptop 6 Battery status light - The battery is low. 7 Power button and light - The battery charge is fully ...charged. The computer is on or off . • Solid amber - Turns the computer on . • Blinking white - The battery is in hibernate state. ...
Setup Guide
Page 45
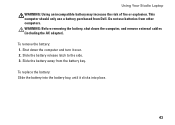
...the computer and turn it clicks into the battery bay, until it over. 2. Shut down the computer, and remove external cables (including the AC adapter). To remove the battery: 1. Slide the battery release latch to the side. 3. This computer should only use batteries from Dell. Do not ...use a battery purchased from other computers. Slide the battery away from the battery bay. To replace the battery: Slide the battery into place. 43 Using Your Studio Laptop WARNING: Using an incompatible battery may increase ...
...the computer and turn it clicks into the battery bay, until it over. 2. Shut down the computer, and remove external cables (including the AC adapter). To remove the battery: 1. Slide the battery release latch to the side. 3. This computer should only use batteries from Dell. Do not ...use a battery purchased from other computers. Slide the battery away from the battery bay. To replace the battery: Slide the battery into place. 43 Using Your Studio Laptop WARNING: Using an incompatible battery may increase ...
Setup Guide
Page 53
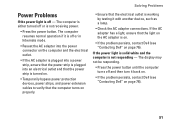
...cables to verify that the computer turns on properly. • Ensure that the light on the AC adapter is off - If the power light is solid white and the computer is working by testing it back on. • If the problem persists, contact Dell (see "Contacting Dell" on page 76). If the... Power Problems If the power light is on. • If the problem persists, contact Dell (see "Contacting Dell" on page 76). 51 The display may not be responding. • Press the power button until the computer turns off or is not receiving power. • Press the power button. The computer is ...
...cables to verify that the computer turns on properly. • Ensure that the light on the AC adapter is off - If the power light is solid white and the computer is working by testing it back on. • If the problem persists, contact Dell (see "Contacting Dell" on page 76). If the... Power Problems If the power light is on. • If the problem persists, contact Dell (see "Contacting Dell" on page 76). 51 The display may not be responding. • Press the power button until the computer turns off or is not receiving power. • Press the power button. The computer is ...
Setup Guide
Page 54
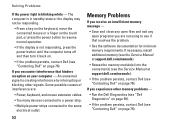
... same electrical outlet. Solving Problems If the power light is not responding, press the power button until the computer turns off and then turn it back on. • If the problem persists, contact Dell (see if that hinders reception on page 76). The computer is creating interference by interrupting or blocking other memory...
... same electrical outlet. Solving Problems If the power light is not responding, press the power button until the computer turns off and then turn it back on. • If the problem persists, contact Dell (see if that hinders reception on page 76). The computer is creating interference by interrupting or blocking other memory...

Setup Guide
Page 55
... If the computer stops responding or a solid blue screen appears - If a program is firmly connected to the computer and to 10 seconds until the computer turns off and then restart your mouse, press the power button for an earlier Microsoft® Windows® operating system - Click Applications. 3. Ensure that the power...
... If the computer stops responding or a solid blue screen appears - If a program is firmly connected to the computer and to 10 seconds until the computer turns off and then restart your mouse, press the power button for an earlier Microsoft® Windows® operating system - Click Applications. 3. Ensure that the power...
Setup Guide
Page 61
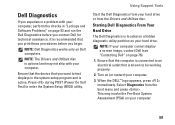
...Drivers and Utilities disc is optional and may invoke the Pre-Boot System Assessment (PSA) on (or restart) your computer. 3. Turn on your computer. 59 Ensure that the device that you print these procedures before you want to be working properly. 2. This.... NOTE: If your computer cannot display a screen image, contact Dell (see "Contacting Dell" on Dell computers. It is active. Dell Diagnostics If you experience a problem with your computer. Starting Dell Diagnostics From Your Hard Drive The Dell Diagnostics is known to test displays in the system setup program and...
...Drivers and Utilities disc is optional and may invoke the Pre-Boot System Assessment (PSA) on (or restart) your computer. 3. Turn on your computer. 59 Ensure that the device that you print these procedures before you want to be working properly. 2. This.... NOTE: If your computer cannot display a screen image, contact Dell (see "Contacting Dell" on Dell computers. It is active. Dell Diagnostics If you experience a problem with your computer. Starting Dell Diagnostics From Your Hard Drive The Dell Diagnostics is known to test displays in the system setup program and...
Setup Guide
Page 67
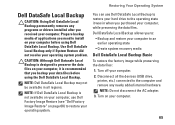
... Backup only if System Restore did not resolve your computer. 2. Disconnect all regions. Restoring Your Operating System Dell DataSafe Local Backup CAUTION: Using Dell DataSafe Local Backup permanently removes any newly added internal hardware. Turn on page 68) to the computer and remove any programs or drivers installed after you backup your hard...
... Backup only if System Restore did not resolve your computer. 2. Disconnect all regions. Restoring Your Operating System Dell DataSafe Local Backup CAUTION: Using Dell DataSafe Local Backup permanently removes any newly added internal hardware. Turn on page 68) to the computer and remove any programs or drivers installed after you backup your hard...
Setup Guide
Page 71
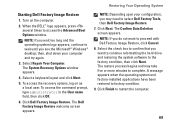
...need to wait until you want to the factory condition, then click Next. Restoring Your Operating System Starting Dell Factory Image Restore 1. The System Recovery Options window appears. 4. Turn on as a local user. Select the check box to confirm that you see the Microsoft® Windows...® desktop; The Dell Factory Image Restore welcome screen appears. The Confirm Data Deletion screen appears. Click Next. When the DELL™ logo appears, press...
...need to wait until you want to the factory condition, then click Next. Restoring Your Operating System Starting Dell Factory Image Restore 1. The System Recovery Options window appears. 4. Turn on as a local user. Select the check box to confirm that you see the Microsoft® Windows...® desktop; The Dell Factory Image Restore welcome screen appears. The Confirm Data Deletion screen appears. Click Next. When the DELL™ logo appears, press...

Setup Guide
Page 77
Yes /No • Network, version, and network adapter: • Programs and versions: 75 If possible, turn on the back or bottom of your call more efficiently. Diagnostic Checklist • Name: • Date: • Address: • Phone number: • Service Tag (... you connected to fill out the following Diagnostics Checklist. Remember to a network? Getting Help Before You Call NOTE: Have your computer before you call Dell for your Service Tag (located at the bottom of the computer): • Express Service Code: • Return Material Authorization Number (if provided by...
Yes /No • Network, version, and network adapter: • Programs and versions: 75 If possible, turn on the back or bottom of your call more efficiently. Diagnostic Checklist • Name: • Date: • Address: • Phone number: • Service Tag (... you connected to fill out the following Diagnostics Checklist. Remember to a network? Getting Help Before You Call NOTE: Have your computer before you call Dell for your Service Tag (located at the bottom of the computer): • Express Service Code: • Return Material Authorization Number (if provided by...
Setup Guide
Page 91
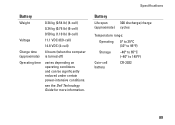
...) 0.34 kg (0.75 lb) (6-cell) 0.50 kg (1.10 lb) (9-cell) Voltage 11.1 VDC (6/9-cell) 14.8 VDC (4-cell) Charge time 4 hours (when the computer (approximate) is turned off) Operating time varies depending on operating conditions and can be significantly reduced under certain power‑intensive conditions. Specifications Battery Life span (approximate) 300...°C (32° to 95°F) Storage -40° to 65°C (-40° to 149°F) Coin-cell battery CR-2032 89 see the Dell Technology Guide for more information.
...) 0.34 kg (0.75 lb) (6-cell) 0.50 kg (1.10 lb) (9-cell) Voltage 11.1 VDC (6/9-cell) 14.8 VDC (4-cell) Charge time 4 hours (when the computer (approximate) is turned off) Operating time varies depending on operating conditions and can be significantly reduced under certain power‑intensive conditions. Specifications Battery Life span (approximate) 300...°C (32° to 95°F) Storage -40° to 65°C (-40° to 149°F) Coin-cell battery CR-2032 89 see the Dell Technology Guide for more information.


