
User Guide
Page 23
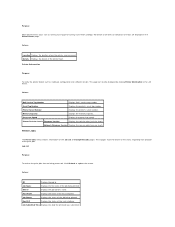
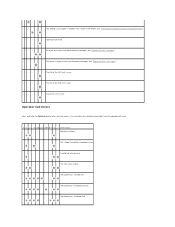
... the status of the host interface. Host I/F Displays the status of the job being printed. Values: Location Displays the location where the printer error occurred. Values: Dell Service Tag Number Displays Dell's service tag number. Processor Speed Displays the processing speed. Job List Purpose: To confirm the print jobs that are displayed in the...
... the status of the host interface. Host I/F Displays the status of the job being printed. Values: Location Displays the location where the printer error occurred. Values: Dell Service Tag Number Displays Dell's service tag number. Processor Speed Displays the processing speed. Job List Purpose: To confirm the print jobs that are displayed in the...

User Guide
Page 24
... job. Job Submitted Time Displays the date the print job was submitted. Fault Tone Displays whether the printer sounds the tone when an error occurs. Click Refresh to configure printer settings. Menu Settings Purpose: To display the current settings of the host computer. Owner Displays the job...the amount of sheets in the print job. Job Complete Tone Displays whether the printer sounds the tone when a job is completed. Alert Tone Displays whether the printer sounds an alarm when an error occurs. Out of the host interface. Up to the last 22 print jobs ...
... job. Job Submitted Time Displays the date the print job was submitted. Fault Tone Displays whether the printer sounds the tone when an error occurs. Click Refresh to configure printer settings. Menu Settings Purpose: To display the current settings of the host computer. Owner Displays the job...the amount of sheets in the print job. Job Complete Tone Displays whether the printer sounds the tone when a job is completed. Alert Tone Displays whether the printer sounds an alarm when an error occurs. Out of the host interface. Up to the last 22 print jobs ...
User Guide
Page 26
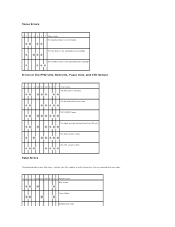
... Ready Tone Displays whether the printer sounds the tone when the machine becomes ready. Alert Tone Specifies whether the printer sounds an alarm when an error occurs. Device Language Determine the language to print the error history report. Values: Plain Light...printer sounds the tone when a job is low. Printer Maintenance The Printer Maintenance tab includes Paper Density, Adjust BTR, Adjust Fuser, Auto Registration Adjustment, Color Registration Adjustments, Adjust Altitude, Reset Defaults, Non-Dell Toner, Initialize PrintMeter, and Web Link Customization pages. Color...
... Ready Tone Displays whether the printer sounds the tone when the machine becomes ready. Alert Tone Specifies whether the printer sounds an alarm when an error occurs. Device Language Determine the language to print the error history report. Values: Plain Light...printer sounds the tone when a job is low. Printer Maintenance The Printer Maintenance tab includes Paper Density, Adjust BTR, Adjust Fuser, Auto Registration Adjustment, Color Registration Adjustments, Adjust Altitude, Reset Defaults, Non-Dell Toner, Initialize PrintMeter, and Web Link Customization pages. Color...

User Guide
Page 30
... the HTTP port number. Trap Notification (IP) Displays the status of the Trap Notification (IP) feature and IP address. 1-3 Authenticate Error Trap Displays the status of Ethernet transmission rate and the duplex settings. The following tabbed pages are displayed in the Print Server Settings tab... Status Displays the port status. Print Server Setup Page Purpose: To verify the current settings of printer interface and necessary conditions for the IP address. Premier premier.dell.com Print Server Settings Use the Print Server Settings menu to the pages in the top of ...
... the HTTP port number. Trap Notification (IP) Displays the status of the Trap Notification (IP) feature and IP address. 1-3 Authenticate Error Trap Displays the status of Ethernet transmission rate and the duplex settings. The following tabbed pages are displayed in the Print Server Settings tab... Status Displays the port status. Print Server Setup Page Purpose: To verify the current settings of printer interface and necessary conditions for the IP address. Premier premier.dell.com Print Server Settings Use the Print Server Settings menu to the pages in the top of ...

User Guide
Page 34
...access (read and write) the data up to 31 alphanumeric characters. Trap Notification (IP) 1-3 Select the check boxes to notify Authenticate Error Trap. However, 127 and 224-254 cannot be displayed on the screen. Permit Permits printing from specified network address. Select Alerts for...a variable value between 0 and 255 in the address field. Values: Address Sets the address in each items can be changed by using Dell Printer Configuration Web Tool. Service Call Select the check box to receive an E-Mail Alert for consumables. E-Mail List 2 Sets acceptable e-mail ...
...access (read and write) the data up to 31 alphanumeric characters. Trap Notification (IP) 1-3 Select the check boxes to notify Authenticate Error Trap. However, 127 and 224-254 cannot be displayed on the screen. Permit Permits printing from specified network address. Select Alerts for...a variable value between 0 and 255 in the address field. Values: Address Sets the address in each items can be changed by using Dell Printer Configuration Web Tool. Service Call Select the check box to receive an E-Mail Alert for consumables. E-Mail List 2 Sets acceptable e-mail ...
User Guide
Page 51
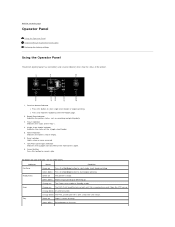
.... Ready/Data indicator Indicates the printer status, such as receiving and printing data. 3. Toner indicators Indicates the toner is open. 8. Jam/Front Cover Open indicator Indicates that show the status of the printer. 1. Indicator Continue Ready/Data Error Tray Status Condition Green on Press... the Continue button to start single sheet feeder or duplex printing. Orange blinks An error occurred. Green on the tray. l Press and hold ...
.... Ready/Data indicator Indicates the printer status, such as receiving and printing data. 3. Toner indicators Indicates the toner is open. 8. Jam/Front Cover Open indicator Indicates that show the status of the printer. 1. Indicator Continue Ready/Data Error Tray Status Condition Green on Press... the Continue button to start single sheet feeder or duplex printing. Orange blinks An error occurred. Green on the tray. l Press and hold ...
User Guide
Page 52
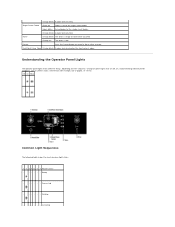
.../Front Cover Open Orange blinks A paper jam occurred or the front cover is empty or toner error occurred. Printing - - - - - - Orange blinks A paper jam occurred. Single Sheet Feeder Green on The toner is set to the single... on Paper is low. Press the Cancel button to the single sheet feeder. Common Light Sequences The following table shows the most common light status. 1 2 3 4 5 6 7 Printer status - - - - - - Canceling Toner Orange blinks The toner is open. Ready - - - - - - Off On Blink - - Processing - - - - - - Orange or green lights that...
.../Front Cover Open Orange blinks A paper jam occurred or the front cover is empty or toner error occurred. Printing - - - - - - Orange blinks A paper jam occurred. Single Sheet Feeder Green on The toner is set to the single... on Paper is low. Press the Cancel button to the single sheet feeder. Common Light Sequences The following table shows the most common light status. 1 2 3 4 5 6 7 Printer status - - - - - - Canceling Toner Orange blinks The toner is open. Ready - - - - - - Off On Blink - - Processing - - - - - - Orange or green lights that...

User Guide
Page 54
...the Tray 1. The wrong size of paper size is open. - - - - See "Manual Duplex Printing From the Single Sheet Feeder." - - - - When an Error Occurred The following conditions prompt you can do. 1 2 3 4 5 6 7 Action - - - - Press the Continue key. Load paper in the Tray 1....From the Single Sheet Feeder." - - - - - Load paper in the Tray 1. The following table shows the location where an error occurred. 1 2 3 4 5 6 7 Printer status -- - - - See "Clearing Jams." -- - - - Paper jam occurred in the single sheet feeder. See "Loading the Single Sheet Feeder." - - - -
...the Tray 1. The wrong size of paper size is open. - - - - See "Manual Duplex Printing From the Single Sheet Feeder." - - - - When an Error Occurred The following conditions prompt you can do. 1 2 3 4 5 6 7 Action - - - - Press the Continue key. Load paper in the Tray 1....From the Single Sheet Feeder." - - - - - Load paper in the Tray 1. The following table shows the location where an error occurred. 1 2 3 4 5 6 7 Printer status -- - - - See "Clearing Jams." -- - - - Paper jam occurred in the single sheet feeder. See "Loading the Single Sheet Feeder." - - - -
User Guide
Page 55
.... Reached limit See "Identifying Print Media Sources and Specifications." -- - - - - Invalid job environment - -- - - - Invalid user - - - Dell ColorTrack - Dell ColorTrack - The toner is over . -- - - - - PDL (Page Description Language) error - --- - - - Dell ColorTrack - The life of the belt unit is over . -- - - - - Memory overflow - - - - - - - -- - - - An error occurred in the specified toner cartridge. Disabled function - - - The life of the PHD unit...
.... Reached limit See "Identifying Print Media Sources and Specifications." -- - - - - Invalid job environment - -- - - - Invalid user - - - Dell ColorTrack - Dell ColorTrack - The toner is over . -- - - - - PDL (Page Description Language) error - --- - - - Dell ColorTrack - The life of the belt unit is over . -- - - - - Memory overflow - - - - - - - -- - - - An error occurred in the specified toner cartridge. Disabled function - - - The life of the PHD unit...
User Guide
Page 56
... PHD unit. - - - The CTD sensor is not installed. - - - NVRAM (IOT) error Errors in the specified toner cartridge. - - - Fatal Errors The following table shows fatal errors. Contact your Dell supplier to notify the printer status associated with each error. 1 2 3 4 5-K 5-C 5-M 5-Y 6 7 Printer status - - - - - - The belt unit life is over . - - Fuser failure - -- - - - Toner Errors 1 2 3 4 5 6 7 Toner status - - - The low toner in the PHD Unit...
... PHD unit. - - - The CTD sensor is not installed. - - - NVRAM (IOT) error Errors in the specified toner cartridge. - - - Fatal Errors The following table shows fatal errors. Contact your Dell supplier to notify the printer status associated with each error. 1 2 3 4 5-K 5-C 5-M 5-Y 6 7 Printer status - - - - - - The belt unit life is over . - - Fuser failure - -- - - - Toner Errors 1 2 3 4 5 6 7 Toner status - - - The low toner in the PHD Unit...

User Guide
Page 57
- -- - - - ESS NVRAM1 W/R Check Failure - -- - - - Environmental sensor failure - - - - - PageC timeout error ESS-Related Errors 1 2 3 4 5-K 5-C 5-M 5-Y 6 7 Error Status - - - - - ESS Instruction Error - - - - ESS ROM Check Failure - - - - - - Fan motor failure - - - - - - Motor failure - - - - - - MCU (Machine Control Unit) error - - - - - - ASIC Failure - - - - ESS Illegal Exception - - - - - ESS Data Cache Error - - - - - ESS On-Board RAM W/R Check Failure - - - - CTD (Conductivity Temperature Depth) sensor failure -...
- -- - - - ESS NVRAM1 W/R Check Failure - -- - - - Environmental sensor failure - - - - - PageC timeout error ESS-Related Errors 1 2 3 4 5-K 5-C 5-M 5-Y 6 7 Error Status - - - - - ESS Instruction Error - - - - ESS ROM Check Failure - - - - - - Fan motor failure - - - - - - Motor failure - - - - - - MCU (Machine Control Unit) error - - - - - - ASIC Failure - - - - ESS Illegal Exception - - - - - ESS Data Cache Error - - - - - ESS On-Board RAM W/R Check Failure - - - - CTD (Conductivity Temperature Depth) sensor failure -...

User Guide
Page 58
... the side cover. 3. CAUTION: Never attempt to the Printer Settings and Device Settings pages. l Prints the Printer Settings and Device Settings pages. 6. On-Board Network MAC Address Checksum Error - - - - l Restarts. After the Continue, Error, and Ready/Data indicators go out, close the side ...and Cancel buttons at the same time, turn off . 2. On-Board Network Fatal Error - - - - The printer will cease to contents page Ensure that the printer is turned off the printer. After all the indicators are restored by referring to turn on , release the Continue...
... the side cover. 3. CAUTION: Never attempt to the Printer Settings and Device Settings pages. l Prints the Printer Settings and Device Settings pages. 6. On-Board Network MAC Address Checksum Error - - - - l Restarts. After the Continue, Error, and Ready/Data indicators go out, close the side ...and Cancel buttons at the same time, turn off . 2. On-Board Network Fatal Error - - - - The printer will cease to contents page Ensure that the printer is turned off the printer. After all the indicators are restored by referring to turn on , release the Continue...
User Guide
Page 63
...Auto Registration Adjustment Adjust Altitude Non-Dell Toner Web Link Customization Power Saver Timer Mode 1 Displays the amount of the fuser (-2-2) for thick coated paper. Fault Tone Displays whether the printer sounds the tone when an error occurs. Plain Displays the temperature... settings of the transfer roller (-6-6) for plain paper. The default is ready. Reorder URL Premier Displays the URL (premier.dell.com). The default is 0. The...
...Auto Registration Adjustment Adjust Altitude Non-Dell Toner Web Link Customization Power Saver Timer Mode 1 Displays the amount of the fuser (-2-2) for thick coated paper. Fault Tone Displays whether the printer sounds the tone when an error occurs. Plain Displays the temperature... settings of the transfer roller (-6-6) for plain paper. The default is ready. Reorder URL Premier Displays the URL (premier.dell.com). The default is 0. The...
User Guide
Page 64
... Click the Start (1) button to print the error history report. Color Test Page Click the Start (5) button to print the color test page. Gateway Address Displays the gateway address. IP Address Displays the printer's IP address. The reports are the factory default menu settings. Printer Maintenance The Printer Maintenance tab includes the System Settings, Paper Density...
... Click the Start (1) button to print the error history report. Color Test Page Click the Start (5) button to print the color test page. Gateway Address Displays the gateway address. IP Address Displays the printer's IP address. The reports are the factory default menu settings. Printer Maintenance The Printer Maintenance tab includes the System Settings, Paper Density...

User Guide
Page 65
...computer. Alert Tone Off* Does not sound an alert when an error occurs. Time-Out 0 Disables the job timeout. 5-300 sec 30 sec* Specifies the amount of time the printer waits to receive additional bytes of time before the printer enters the Power Saver Timer Mode 2 (deep sleep mode) ...Alert Tone Off* Does not sound an alert when the printer runs out of paper. Device Language English* Determines the language to put the printer in constant use. On Sounds an alert when an error occurs. When this keeps the printer ready to the standby mode from the computer. Apply ...
...computer. Alert Tone Off* Does not sound an alert when an error occurs. Time-Out 0 Disables the job timeout. 5-300 sec 30 sec* Specifies the amount of time the printer waits to receive additional bytes of time before the printer enters the Power Saver Timer Mode 2 (deep sleep mode) ...Alert Tone Off* Does not sound an alert when the printer runs out of paper. Device Language English* Determines the language to put the printer in constant use. On Sounds an alert when an error occurs. When this keeps the printer ready to the standby mode from the computer. Apply ...
User Guide
Page 74
... connections. Select a URL from the Status Window when a toner error occurs. Click Start® All Programs® Dell Printers® Additional Color Laser Software® Dell Supplies Management System. Select your Dell printer Service Tag number in the MakeDisk folder of your operating system. Type your printer from the printer automatically by clicking its name to manage multiple Status Window...
... connections. Select a URL from the Status Window when a toner error occurs. Click Start® All Programs® Dell Printers® Additional Color Laser Software® Dell Supplies Management System. Select your Dell printer Service Tag number in the MakeDisk folder of your operating system. Type your printer from the printer automatically by clicking its name to manage multiple Status Window...
User Guide
Page 84
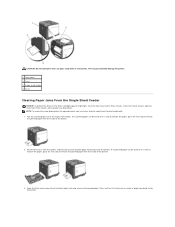
...paper from the print media path. 1. Remove the tray 1 from the printer, and then pull out the jammed paper remaining inside of the printer. 2. CAUTION: Do not attempt to remove the jammed paper from the inside the printer. Pull the jammed paper out of the toner cartridges against bright light, ...to remove the paper, go to the next step to clear any jams using tools or instruments. NOTE: To resolve the error displayed on the operator panel, you must clear all print media from the inside the printer. This may deteriorate. If no scraps of paper remaining inside of the...
...paper from the print media path. 1. Remove the tray 1 from the printer, and then pull out the jammed paper remaining inside of the printer. 2. CAUTION: Do not attempt to remove the jammed paper from the inside the printer. Pull the jammed paper out of the toner cartridges against bright light, ...to remove the paper, go to the next step to clear any jams using tools or instruments. NOTE: To resolve the error displayed on the operator panel, you must clear all print media from the inside the printer. This may deteriorate. If no scraps of paper remaining inside of the...

User Guide
Page 85
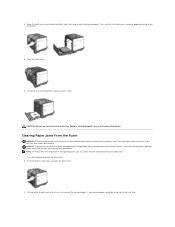
... the next step to avoid tearing it. Insert the tray back into the printer, and push until it from the inside of the toner cartridges against bright light, close the front cover within three minutes. NOTE: To resolve the error displayed on the operator panel, you must clear all the jammed and.../or creased paper from the print media path. 1. Pull the tray out of the printer carefully. Remove all print media from the tray. 3. If the front cover...
... the next step to avoid tearing it. Insert the tray back into the printer, and push until it from the inside of the toner cartridges against bright light, close the front cover within three minutes. NOTE: To resolve the error displayed on the operator panel, you must clear all the jammed and.../or creased paper from the print media path. 1. Pull the tray out of the printer carefully. Remove all print media from the tray. 3. If the front cover...
User Guide
Page 86
... push until it stops. Doing so could damage the tray or the inside the printer. 5. Clearing Paper Jams From the Fuser NOTICE: Ensure nothing touches or scratches the surface (black-colored film) of the toner cartridges against bright light, close the front cover within three minutes. NOTICE: To protect...unit. Push the button (right side) and open for 30 minutes. 2. Turn off the printer and wait for more than three minutes, print quality may reduce print quality. NOTE: To resolve the error displayed on the operator panel, you must clear all print media from your hands on the ...
... push until it stops. Doing so could damage the tray or the inside the printer. 5. Clearing Paper Jams From the Fuser NOTICE: Ensure nothing touches or scratches the surface (black-colored film) of the toner cartridges against bright light, close the front cover within three minutes. NOTICE: To protect...unit. Push the button (right side) and open for 30 minutes. 2. Turn off the printer and wait for more than three minutes, print quality may reduce print quality. NOTE: To resolve the error displayed on the operator panel, you must clear all print media from your hands on the ...
User Guide
Page 98
Auger mark Is the error print match with Letter(A). See "Replacing the PHD (Print Head Device) Unit" and "Installing the PHD Unit". No. Remove the toner cartridges, fuser, and PHD ... the abnormal noise. 1. Replace the PHD unit. Replace the PHD unit. See "Replacing the PHD (Print Head Device) Unit" and "Installing the PHD Unit". Contact Dell. See "Removing the Used Fuser" and "Installing a New Fuser". 4. After you perform the Developer Stir Mode, click the Tool Box button, and then press Print...
Auger mark Is the error print match with Letter(A). See "Replacing the PHD (Print Head Device) Unit" and "Installing the PHD Unit". No. Remove the toner cartridges, fuser, and PHD ... the abnormal noise. 1. Replace the PHD unit. Replace the PHD unit. See "Replacing the PHD (Print Head Device) Unit" and "Installing the PHD Unit". Contact Dell. See "Removing the Used Fuser" and "Installing a New Fuser". 4. After you perform the Developer Stir Mode, click the Tool Box button, and then press Print...


