User's Guide
Page 17
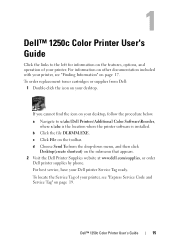
... page 19. To order replacement toner cartridges or supplies from the drop-down menu, and then click Desktop(create shortcut) on page 17. b Click the file DLRMM.EXE. To locate the Service Tag of your desktop. 1 Dell™ 1250c Color Printer User's Guide Click the links to x:\abc\Dell Printers\Additional Color Software\Reorder, where x:\abc...
... page 19. To order replacement toner cartridges or supplies from the drop-down menu, and then click Desktop(create shortcut) on page 17. b Click the file DLRMM.EXE. To locate the Service Tag of your desktop. 1 Dell™ 1250c Color Printer User's Guide Click the links to x:\abc\Dell Printers\Additional Color Software\Reorder, where x:\abc...
User's Guide
Page 29
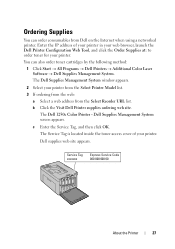
...cartridges by the following method: 1 Click Start All Programs Dell Printers Additional Color Laser Software Dell Supplies Management System. You can order consumables from the Select Reorder URL list. The Service Tag is located inside the toner access cover of your printer in your web browser, launch the Dell Printer... Configuration Web Tool, and click the Order Supplies at: to order toner for your printer. Dell supplies web site appears. The Dell 1250c Color Printer - Service Tag...
...cartridges by the following method: 1 Click Start All Programs Dell Printers Additional Color Laser Software Dell Supplies Management System. You can order consumables from the Select Reorder URL list. The Service Tag is located inside the toner access cover of your printer in your web browser, launch the Dell Printer... Configuration Web Tool, and click the Order Supplies at: to order toner for your printer. Dell supplies web site appears. The Dell 1250c Color Printer - Service Tag...
User's Guide
Page 58
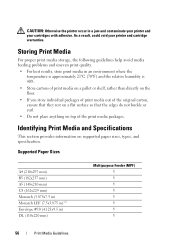
... and Specifications This section provides information on top of the print media packages. As a result, could void your cartridges with adhesive. Storing Print Media For proper print media storage, the following guidelines help avoid media feeding problems and uneven...in ) DL (110x220 mm) Multipurpose Feeder (MPF) Y Y Y Y Y Y Y Y 56 Print Media Guidelines CAUTION: Otherwise the printer occur in a jam and contaminate your printer and your printer and cartridge warranties. Supported Paper Sizes A4 (210x297 mm) B5 (182x257 mm) A5 (148x210 mm) C5 (162x229 mm) Monarch (3.875x7.5 in) ...
... and Specifications This section provides information on top of the print media packages. As a result, could void your cartridges with adhesive. Storing Print Media For proper print media storage, the following guidelines help avoid media feeding problems and uneven...in ) DL (110x220 mm) Multipurpose Feeder (MPF) Y Y Y Y Y Y Y Y 56 Print Media Guidelines CAUTION: Otherwise the printer occur in a jam and contaminate your printer and your printer and cartridge warranties. Supported Paper Sizes A4 (210x297 mm) B5 (182x257 mm) A5 (148x210 mm) C5 (162x229 mm) Monarch (3.875x7.5 in) ...
User's Guide
Page 72
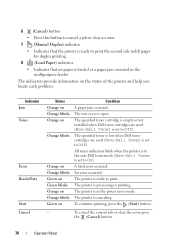
... on Condition A paper jam occurred. The printer is in the multipurpose feeder. The specified toner cartridge is empty or not installed when Dell toner cartridges are used (Non-Dell Toner is set to On). The printer is processing or printing. The specified toner is low when Dell toner cartridges are used (Non-Dell Toner is set to Off). To...
... on Condition A paper jam occurred. The printer is in the multipurpose feeder. The specified toner cartridge is empty or not installed when Dell toner cartridges are used (Non-Dell Toner is set to On). The printer is processing or printing. The specified toner is low when Dell toner cartridges are used (Non-Dell Toner is set to Off). To...
User's Guide
Page 75
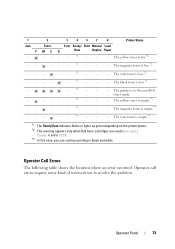
...the problem. The cyan toner is empty.*3 *1 The Ready/Data indicator blinks or lights up green depending on the printer status. *2 This warning appears only when Dell toner cartridges are used (Non-Dell Toner is in black and white. The cyan toner is empty.*3 -- *1 - - - The yellow toner is...*1 - - - Operator call errors require some kind of intervention to Off). *3 In this case, you can continue printing in the non-Dell toner mode. - 1 Jam Y ---- --- 2 Toner MC -- -- -- - 3 4 5 7 8 Printer Status Error Ready/ Start Manual Load K Data Duplex Paper -- *1 - - -
...the problem. The cyan toner is empty.*3 *1 The Ready/Data indicator blinks or lights up green depending on the printer status. *2 This warning appears only when Dell toner cartridges are used (Non-Dell Toner is in black and white. The cyan toner is empty.*3 -- *1 - - - The yellow toner is...*1 - - - Operator call errors require some kind of intervention to Off). *3 In this case, you can continue printing in the non-Dell toner mode. - 1 Jam Y ---- --- 2 Toner MC -- -- -- - 3 4 5 7 8 Printer Status Error Ready/ Start Manual Load K Data Duplex Paper -- *1 - - -
User's Guide
Page 91
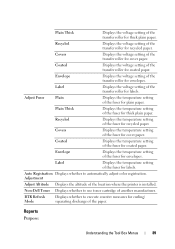
... the temperature setting of the fuser for envelopes. Envelope Displays the temperature setting of the fuser for plain paper. Non-Dell Toner Displays whether to use toner cartridge of the location where the printer is installed. Adjustment Adjust Altitude Displays the altitude of another manufacturer. Plain Thick Displays the voltage setting of the...
... the temperature setting of the fuser for envelopes. Envelope Displays the temperature setting of the fuser for plain paper. Non-Dell Toner Displays whether to use toner cartridge of the location where the printer is installed. Adjustment Adjust Altitude Displays the altitude of another manufacturer. Plain Thick Displays the voltage setting of the...
User's Guide
Page 98
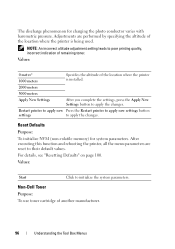
Values: 0 meter* 1000 meters Specifies the altitude of the location where the printer is installed. 2000 meters 3000 meters Apply New Settings After you complete the settings, press the Apply New Settings button to apply the changes.... phenomenon for system parameters. Restart printer to apply new Press the Restart printer to apply new settings button settings to initialize the system parameters. For details, see "Resetting Defaults" on page 100. Values: Start Click to apply the changes. Non-Dell Toner Purpose: To use toner cartridge of remaining toner. Adjustments are ...
Values: 0 meter* 1000 meters Specifies the altitude of the location where the printer is installed. 2000 meters 3000 meters Apply New Settings After you complete the settings, press the Apply New Settings button to apply the changes.... phenomenon for system parameters. Restart printer to apply new Press the Restart printer to apply new settings button settings to initialize the system parameters. For details, see "Resetting Defaults" on page 100. Values: Start Click to apply the changes. Non-Dell Toner Purpose: To use toner cartridge of remaining toner. Adjustments are ...

User's Guide
Page 99
... Purpose: To execute counter measures for your printer. Restart printer to apply new Press the Restart printer to apply new settings button settings to apply the changes. Values: Non-Dell Off* Toner On Does not use toner cartridge of your printer. NOTE: Using non-Dell-brand toner cartridges may make some printer features unusable, reduce print quality and decrease...
... Purpose: To execute counter measures for your printer. Restart printer to apply new Press the Restart printer to apply new settings button settings to apply the changes. Values: Non-Dell Off* Toner On Does not use toner cartridge of your printer. NOTE: Using non-Dell-brand toner cartridges may make some printer features unusable, reduce print quality and decrease...
User's Guide
Page 100
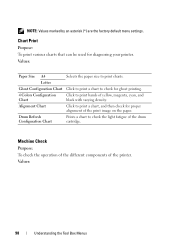
... Configuration Chart Selects the paper size to check for ghost printing. Click to print a chart, and then check for diagnosing your printer. Prints a chart to print bands of the drum cartridge. Click to check the light fatigue of yellow, magenta, cyan, and black with varying density. Values: 98 Understanding the Tool Box...
... Configuration Chart Selects the paper size to check for ghost printing. Click to print a chart, and then check for diagnosing your printer. Prints a chart to print bands of the drum cartridge. Click to check the light fatigue of yellow, magenta, cyan, and black with varying density. Values: 98 Understanding the Tool Box...
User's Guide
Page 101
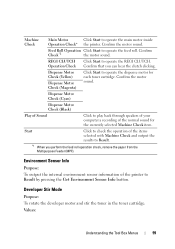
... REGI CLUTCH. REGI CLUTCH Operation Check Click Start to operate the main motor inside Operation Check* the printer. Developer Stir Mode Purpose: To rotate the developer motor and stir the toner in the toner cartridge. Dispense Motor Check (Yellow) Dispense Motor Check (Magenta) Click Start to play back through speakers of your...
... REGI CLUTCH. REGI CLUTCH Operation Check Click Start to operate the main motor inside Operation Check* the printer. Developer Stir Mode Purpose: To rotate the developer motor and stir the toner in the toner cartridge. Dispense Motor Check (Yellow) Dispense Motor Check (Magenta) Click Start to play back through speakers of your...
User's Guide
Page 102
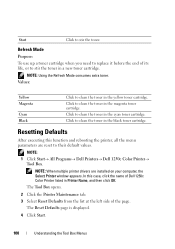
... Click to clean the toner in Printer Name, and then click OK. Resetting Defaults After executing this case, click the name of Dell 1250c Color Printer listed in the yellow toner cartridge. Click to their default values. NOTE: When multiple printer drivers are reset to clean the ...toner in a new toner cartridge. NOTE: Using the Refresh Mode consumes extra toner. ...
... Click to clean the toner in Printer Name, and then click OK. Resetting Defaults After executing this case, click the name of Dell 1250c Color Printer listed in the yellow toner cartridge. Click to their default values. NOTE: When multiple printer drivers are reset to clean the ...toner in a new toner cartridge. NOTE: Using the Refresh Mode consumes extra toner. ...

User's Guide
Page 119
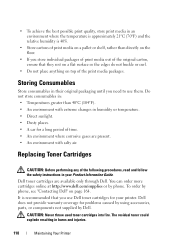
Refer printing problems and maintenance tasks to conserve toner cartridge and paper. If several settings in your printer. Supply Toner cartridge Print media Setting Function Toner Saving Mode in the The printer prints two or more pages on the back) Storing Print Media To avoid potential paper feeding problems and ... of paper. (32 images on the front and 32 on Layout tab of the printer oneside of paper are using the printer, you may want to designate a key operator to maintain your printer driver to this feature is used, the image quality will be lower than when it...
Refer printing problems and maintenance tasks to conserve toner cartridge and paper. If several settings in your printer. Supply Toner cartridge Print media Setting Function Toner Saving Mode in the The printer prints two or more pages on the back) Storing Print Media To avoid potential paper feeding problems and ... of paper. (32 images on the front and 32 on Layout tab of the printer oneside of paper are using the printer, you may want to designate a key operator to maintain your printer driver to this feature is used, the image quality will be lower than when it...
User's Guide
Page 120
...40%. • Store cartons of print media on a pallet or shelf, rather than 40°C (104°F). • An environment with salty air. Dell toner cartridges are present. • An environment with extreme changes in humidity or temperature. • Direct sunlight. • Dusty places. • A car for problems...curl. • Do not place anything on top of the following procedures, read and follow the safety instructions in your printer. Dell does not provide warranty coverage for a long period of time. • An environment where corrosive gases are available only through...
...40%. • Store cartons of print media on a pallet or shelf, rather than 40°C (104°F). • An environment with salty air. Dell toner cartridges are present. • An environment with extreme changes in humidity or temperature. • Direct sunlight. • Dusty places. • A car for problems...curl. • Do not place anything on top of the following procedures, read and follow the safety instructions in your printer. Dell does not provide warranty coverage for a long period of time. • An environment where corrosive gases are available only through...
User's Guide
Page 121
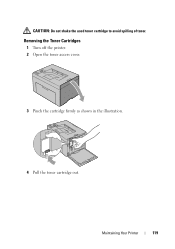
CAUTION: Do not shake the used toner cartridge to avoid spilling of toner. Removing the Toner Cartridges 1 Turn off the printer. 2 Open the toner access cover. 3 Pinch the cartridge firmly as shown in the illustration. 4 Pull the toner cartridge out. Maintaining Your Printer 119
CAUTION: Do not shake the used toner cartridge to avoid spilling of toner. Removing the Toner Cartridges 1 Turn off the printer. 2 Open the toner access cover. 3 Pinch the cartridge firmly as shown in the illustration. 4 Pull the toner cartridge out. Maintaining Your Printer 119

User's Guide
Page 122
CAUTION: Always pull the cartridge out slowly so that on the handle before replacing it five to six times to avoid spillage of the toner. 2 Remove the tape from the toner cartridge. 120 Maintaining Your Printer NOTE: Ensure that the color of the desired color and shake it . Installing a Toner Cartridge 1 Unpack a new toner cartridge of the new toner cartridge matches that you do not spill any toner. NOTE: Handle the toner cartridge carefully to distribute the toner evenly.
CAUTION: Always pull the cartridge out slowly so that on the handle before replacing it five to six times to avoid spillage of the toner. 2 Remove the tape from the toner cartridge. 120 Maintaining Your Printer NOTE: Ensure that the color of the desired color and shake it . Installing a Toner Cartridge 1 Unpack a new toner cartridge of the new toner cartridge matches that you do not spill any toner. NOTE: Handle the toner cartridge carefully to distribute the toner evenly.
User's Guide
Page 123
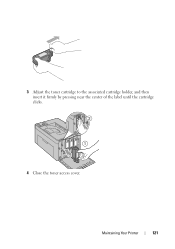
Maintaining Your Printer 121 3 Adjust the toner cartridge to the associated cartridge holder, and then insert it firmly by pressing near the center of the label until the cartridge clicks. 4 Close the toner access cover.
Maintaining Your Printer 121 3 Adjust the toner cartridge to the associated cartridge holder, and then insert it firmly by pressing near the center of the label until the cartridge clicks. 4 Close the toner access cover.
User's Guide
Page 124
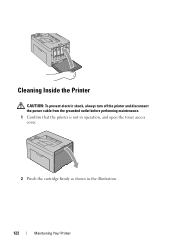
Y Cleaning Inside the Printer CAUTION: To prevent electric shock, always turn off the printer and disconnect the power cable from the grounded outlet before performing maintenance. 1 Confirm that the printer is not in operation, and open the toner access cover. 2 Pinch the cartridge firmly as shown in the illustration. 122 Maintaining Your Printer
Y Cleaning Inside the Printer CAUTION: To prevent electric shock, always turn off the printer and disconnect the power cable from the grounded outlet before performing maintenance. 1 Confirm that the printer is not in operation, and open the toner access cover. 2 Pinch the cartridge firmly as shown in the illustration. 122 Maintaining Your Printer
User's Guide
Page 125
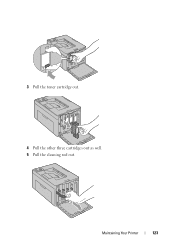
Maintaining Your Printer 123 3 Pull the toner cartridge out. 4 Pull the other three cartridges out as well. 5 Pull the cleaning rod out.
Maintaining Your Printer 123 3 Pull the toner cartridge out. 4 Pull the other three cartridges out as well. 5 Pull the cleaning rod out.

User's Guide
Page 126
6 Insert the cleaning rod fully into the hole beside the arrow on the printer until its tip reaches the interior of the printer as illustrated below, and then pull it out. 7 Repeat the same procedure for the other three holes. 8 Return the cleaning rod to its original location. 9 Replace the black cartridge by adjusting it to the associated cartridge holder, and then insert it firmly by pressing near the center of the label until the cartridge clicks. 124 Maintaining Your Printer
6 Insert the cleaning rod fully into the hole beside the arrow on the printer until its tip reaches the interior of the printer as illustrated below, and then pull it out. 7 Repeat the same procedure for the other three holes. 8 Return the cleaning rod to its original location. 9 Replace the black cartridge by adjusting it to the associated cartridge holder, and then insert it firmly by pressing near the center of the label until the cartridge clicks. 124 Maintaining Your Printer
User's Guide
Page 127
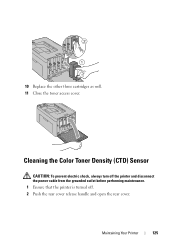
Maintaining Your Printer 125 Y Cleaning the Color Toner Density (CTD) Sensor CAUTION: To prevent electric shock, always turn off the printer and disconnect the power cable from the grounded outlet before performing maintenance. 1 Ensure that the printer is turned off. 2 Push the rear cover release handle and open the rear cover. 10 Replace the other three cartridges as well. 11 Close the toner access cover.
Maintaining Your Printer 125 Y Cleaning the Color Toner Density (CTD) Sensor CAUTION: To prevent electric shock, always turn off the printer and disconnect the power cable from the grounded outlet before performing maintenance. 1 Ensure that the printer is turned off. 2 Push the rear cover release handle and open the rear cover. 10 Replace the other three cartridges as well. 11 Close the toner access cover.


