Manual
Page 3
... TCP/IP Printing for Windows Vista 51 TCP/IP Printing for Windows XP 63 TCP/IP Printing for Windows 2000 76 TCP/IP Printing for Windows 98SE/ME 94 Unix/Linux Printing 107 Printing Text Files form Unix 107 Printing form BSD Unix Versions 108 Printing from SCO Unix System V/386 111 Printing from Solaris 113 Printing from Red Hat Linux 114 Setting up Printing in...
... TCP/IP Printing for Windows Vista 51 TCP/IP Printing for Windows XP 63 TCP/IP Printing for Windows 2000 76 TCP/IP Printing for Windows 98SE/ME 94 Unix/Linux Printing 107 Printing Text Files form Unix 107 Printing form BSD Unix Versions 108 Printing from SCO Unix System V/386 111 Printing from Solaris 113 Printing from Red Hat Linux 114 Setting up Printing in...

Manual
Page 7
... users. The DP-300U offers extraordinary flexibility, operating with all major network operating systems and protocols: „ TCP/IP UNIX lpr/lpd (HP-UX, SunOS, Solaris, SCO, UnixWare, IBM AIX) Windows NT/2000, Windows 95/98SE/ME, Windows XP/Vista, NetWare 5.x NDPS LPR Remote Printing „ NetBEUI Windows NT/2000/XP, Windows 95/98SE/ME, Windows for the print server, and...
... users. The DP-300U offers extraordinary flexibility, operating with all major network operating systems and protocols: „ TCP/IP UNIX lpr/lpd (HP-UX, SunOS, Solaris, SCO, UnixWare, IBM AIX) Windows NT/2000, Windows 95/98SE/ME, Windows XP/Vista, NetWare 5.x NDPS LPR Remote Printing „ NetBEUI Windows NT/2000/XP, Windows 95/98SE/ME, Windows for the print server, and...
Manual
Page 15
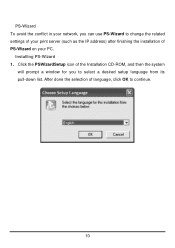
After done the selection of the Installation CD-ROM, and then the system will prompt a window for you can use PS-Wizard to continue. 10 Installing PS-Wizard 1. Click the PSWizardSetup icon of language, click OK to change the related settings of your print server (such as the IP address) after finishing the installation of PS-Wizard on your network, you to select a desired setup language from its pull-down list. PS-Wizard To avoid the conflict in your PC.
After done the selection of the Installation CD-ROM, and then the system will prompt a window for you can use PS-Wizard to continue. 10 Installing PS-Wizard 1. Click the PSWizardSetup icon of language, click OK to change the related settings of your print server (such as the IP address) after finishing the installation of PS-Wizard on your network, you to select a desired setup language from its pull-down list. PS-Wizard To avoid the conflict in your PC.
Manual
Page 16
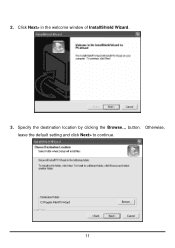
Otherwise, leave the default setting and click Next> to continue. 11 2. Specify the destination location by clicking the Browse... Click Next> in the welcome window of InstallShield Wizard. 3. button.
Otherwise, leave the default setting and click Next> to continue. 11 2. Specify the destination location by clicking the Browse... Click Next> in the welcome window of InstallShield Wizard. 3. button.
Manual
Page 19
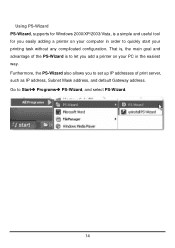
Furthermore, the PS-Wizard also allows you add a printer on your printing task without any complicated configuration. Go to set up IP addresses of the PS-Wizard is to quickly start your PC in order to let you to StartÎ ProgramsÎ PS-Wizard, and select PS-Wizard. 14 That is, the main goal and advantage of print server, such as IP address, Subnet Mask address, and default Gateway address. Using PS-Wizard PS-Wizard, supports for Windows 2000/XP/2003/Vista, is a simple and useful tool for you easily adding a printer on your computer in the easiest way.
Furthermore, the PS-Wizard also allows you add a printer on your printing task without any complicated configuration. Go to set up IP addresses of the PS-Wizard is to quickly start your PC in order to let you to StartÎ ProgramsÎ PS-Wizard, and select PS-Wizard. 14 That is, the main goal and advantage of print server, such as IP address, Subnet Mask address, and default Gateway address. Using PS-Wizard PS-Wizard, supports for Windows 2000/XP/2003/Vista, is a simple and useful tool for you easily adding a printer on your computer in the easiest way.
Manual
Page 21
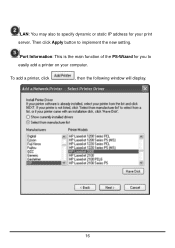
Then click Apply button to easily add a printer on your print server. To add a printer, click , then the following window will display. 16 LAN: You may also to specify dynamic or static IP address for you to implement the new setting. Port Information: This is the main function of the PS-Wizard for your computer.
Then click Apply button to easily add a printer on your print server. To add a printer, click , then the following window will display. 16 LAN: You may also to specify dynamic or static IP address for you to implement the new setting. Port Information: This is the main function of the PS-Wizard for your computer.

Manual
Page 81
TCP/IP Printing for Windows 2000 Go to Start Î Settings Î Printers and Faxes Î Add a Printer. 76
TCP/IP Printing for Windows 2000 Go to Start Î Settings Î Printers and Faxes Î Add a Printer. 76
Manual
Page 126
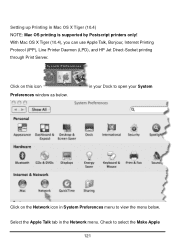
Check to view the menu below . in System Preferences menu to select the Make Apple 121 Select the Apple Talk tab in Mac OS X Tiger (10.4) NOTE: Mac OS printing is supported by Postscript printers only! Setting up Printing in the Network menu. Click on the Network icon in your Dock to open your System Click on this icon Preferences window as below . With Mac OS X Tiger (10.4), you can use Apple Talk, Bonjour, Internet Printing Protocol (IPP), Line Printer Daemon (LPD), and HP Jet Direct-Socket printing through Print Server.
Check to view the menu below . in System Preferences menu to select the Make Apple 121 Select the Apple Talk tab in Mac OS X Tiger (10.4) NOTE: Mac OS printing is supported by Postscript printers only! Setting up Printing in the Network menu. Click on the Network icon in your Dock to open your System Click on this icon Preferences window as below . With Mac OS X Tiger (10.4), you can use Apple Talk, Bonjour, Internet Printing Protocol (IPP), Line Printer Daemon (LPD), and HP Jet Direct-Socket printing through Print Server.

Manual
Page 128
Adding a Printer Use the Go menu at the top tool bar and select Applications option and find and select to open Printer List window. Click Add button on the pop-up on your Macintosh, you will be prompted to open the Utilities folder directly in Go menu. In the Utilities folder, find the Utilities folder or open Printer Browser window. 123 If no printer has been set up dialogue box to add a printer.
Adding a Printer Use the Go menu at the top tool bar and select Applications option and find and select to open Printer List window. Click Add button on the pop-up on your Macintosh, you will be prompted to open the Utilities folder directly in Go menu. In the Utilities folder, find the Utilities folder or open Printer Browser window. 123 If no printer has been set up dialogue box to add a printer.
Manual
Page 130
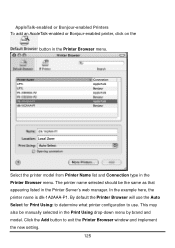
...button in the Printer Browser menu. Click the Add button to use the Auto Select for Print Using: to determine what printer configuration to exit the Printer Browser window and implement the new setting. 125 Select the printer model from Printer Name list and Connection type in the Printer ...Browser menu. This may also be the same as that appearing listed in the Print Using drop-down menu by brand and model. The printer name selected should be manually selected in the Printer Server...
...button in the Printer Browser menu. Click the Add button to use the Auto Select for Print Using: to determine what printer configuration to exit the Printer Browser window and implement the new setting. 125 Select the printer model from Printer Name list and Connection type in the Printer ...Browser menu. This may also be the same as that appearing listed in the Print Using drop-down menu by brand and model. The printer name selected should be manually selected in the Printer Server...
Manual
Page 140
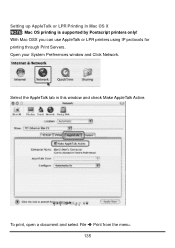
Select the AppleTalk tab in Mac OS X NOTE: Mac OS printing is supported by Postscript printers only! With Mac OSX you can use AppleTalk or LPR printers using IP protocols for printing through Print Servers. To print, open a document and select File Î Print from the menu. 135 Setting up AppleTalk or LPR Printing in this window and check Make AppleTalk Active. Open your System Preferences window and Click Network.
Select the AppleTalk tab in Mac OS X NOTE: Mac OS printing is supported by Postscript printers only! With Mac OSX you can use AppleTalk or LPR printers using IP protocols for printing through Print Servers. To print, open a document and select File Î Print from the menu. 135 Setting up AppleTalk or LPR Printing in this window and check Make AppleTalk Active. Open your System Preferences window and Click Network.

Manual
Page 149
Click Open. (If your printer is not listed, click Generic to use the Setup button in the future, you for your computer's default printer. The selected printer will prompt you can use a generic printer description.) If you wish to choose Page Setup in any applications you have not previously set this printer as the default, your computer will become your printer. Select the appropriate printer description file for a PostScript Printer Description file. Choose Select PPD. If you have open. 144 You may need to access this setting in the Chooser window.
Click Open. (If your printer is not listed, click Generic to use the Setup button in the future, you for your computer's default printer. The selected printer will prompt you can use a generic printer description.) If you wish to choose Page Setup in any applications you have not previously set this printer as the default, your computer will become your printer. Select the appropriate printer description file for a PostScript Printer Description file. Choose Select PPD. If you have open. 144 You may need to access this setting in the Chooser window.

