Manual
Page 8
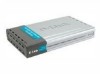
...print server's Telnet interface. Default IP Address of DP-300U is set as automatically getting from DHCP server or Router which build-in the same subnet as the print server's IP Address for the two devices to configure settings through the web browser. External Features Port Connectors The DP-300U has two parallel ports and one USB port located on its back panel. The Print Server...'s Web configuration permits users to communicate. (For example, if print server's IP Address is 192.168...
...print server's Telnet interface. Default IP Address of DP-300U is set as automatically getting from DHCP server or Router which build-in the same subnet as the print server's IP Address for the two devices to configure settings through the web browser. External Features Port Connectors The DP-300U has two parallel ports and one USB port located on its back panel. The Print Server...'s Web configuration permits users to communicate. (For example, if print server's IP Address is 192.168...
Manual
Page 14
...your computer in PDF format for detailed information of the print server. • Install Acrobat Reader - Changing IP address - click to complete further settings for step-by-step instructions of PDF files in PDF format for the print server, such as: - click to install PS-Wizard ...to launch Acrobat Reader for the viewing and printing of the print server Installation. • View...
...your computer in PDF format for detailed information of the print server. • Install Acrobat Reader - Changing IP address - click to complete further settings for step-by-step instructions of PDF files in PDF format for the print server, such as: - click to install PS-Wizard ...to launch Acrobat Reader for the viewing and printing of the print server Installation. • View...
Manual
Page 15
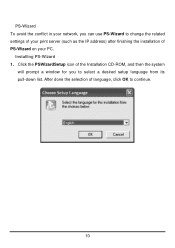
Installing PS-Wizard 1. PS-Wizard To avoid the conflict in your PC. After done the selection of language, click OK to change the related settings of your print server (such as the IP address) after finishing the installation of the Installation CD-ROM, and then the system will prompt a window for you can use PS-Wizard to continue. 10 Click the PSWizardSetup icon of PS-Wizard on your network, you to select a desired setup language from its pull-down list.
Installing PS-Wizard 1. PS-Wizard To avoid the conflict in your PC. After done the selection of language, click OK to change the related settings of your print server (such as the IP address) after finishing the installation of the Installation CD-ROM, and then the system will prompt a window for you can use PS-Wizard to continue. 10 Click the PSWizardSetup icon of PS-Wizard on your network, you to select a desired setup language from its pull-down list.
Manual
Page 19
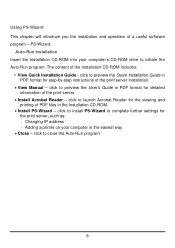
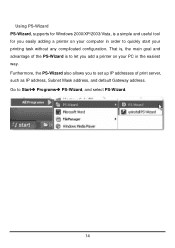
Using PS-Wizard PS-Wizard, supports for Windows 2000/XP/2003/Vista, is a simple and useful tool for you add a printer on your printing task without any complicated configuration. That is to let you easily adding a printer on your PC in order to quickly start your computer in the easiest way. Furthermore, the PS-Wizard also allows you to StartÎ ProgramsÎ PS-Wizard, and select PS-Wizard. 14 Go to set up IP addresses of the PS-Wizard is , the main goal and advantage of print server, such as IP address, Subnet Mask address, and default Gateway address.
Using PS-Wizard PS-Wizard, supports for Windows 2000/XP/2003/Vista, is a simple and useful tool for you add a printer on your printing task without any complicated configuration. That is to let you easily adding a printer on your PC in order to quickly start your computer in the easiest way. Furthermore, the PS-Wizard also allows you to StartÎ ProgramsÎ PS-Wizard, and select PS-Wizard. 14 Go to set up IP addresses of the PS-Wizard is , the main goal and advantage of print server, such as IP address, Subnet Mask address, and default Gateway address.
Manual
Page 21
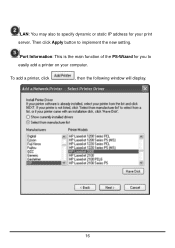
LAN: You may also to specify dynamic or static IP address for you to implement the new setting. Then click Apply button to easily add a printer on your print server. Port Information: This is the main function of the PS-Wizard for your computer. To add a printer, click , then the following window will display. 16
LAN: You may also to specify dynamic or static IP address for you to implement the new setting. Then click Apply button to easily add a printer on your print server. Port Information: This is the main function of the PS-Wizard for your computer. To add a printer, click , then the following window will display. 16

Manual
Page 29
... automatic method. Please note that this section is optional and you to assign IP address in each option, click Apply Settings to store the settings, or Cancel to get print server up and running. TCP/IP This field allows you should enter the related information in the following boxes, ...including IP Address, Subnet Mask, and Default Gateway. Once you configure the local network settings of the...
... automatic method. Please note that this section is optional and you to assign IP address in each option, click Apply Settings to store the settings, or Cancel to get print server up and running. TCP/IP This field allows you should enter the related information in the following boxes, ...including IP Address, Subnet Mask, and Default Gateway. Once you configure the local network settings of the...
Manual
Page 49
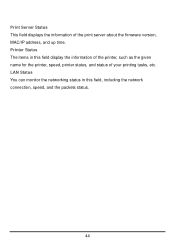
Printer Status The items in this field display the information of the printer, such as the given name for the printer, speed, printer status, and status of the print server about the firmware version, MAC/IP address, and up time. LAN Status You can monitor the networking status in this field, including the network connection, speed, and the packets status. 44 Print Server Status This field displays the information of your printing tasks, etc.
Printer Status The items in this field display the information of the printer, such as the given name for the printer, speed, printer status, and status of the print server about the firmware version, MAC/IP address, and up time. LAN Status You can monitor the networking status in this field, including the network connection, speed, and the packets status. 44 Print Server Status This field displays the information of your printing tasks, etc.

Manual
Page 52
STATUS >Print Log The Print Log screen displays the printing record of printing tasks. 47 Print Log The items in this field display the user(s) information, which include the user(s) MAC address, IP address, name, and status of the authorized users.
STATUS >Print Log The Print Log screen displays the printing record of printing tasks. 47 Print Log The items in this field display the user(s) information, which include the user(s) MAC address, IP address, name, and status of the authorized users.
Manual
Page 59
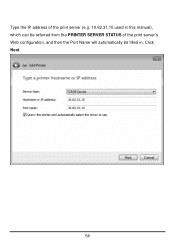
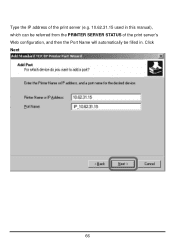
Click Next 54 Type the IP address of the print server (e.g. 10.62.31.15 used in this manual), which can be referred from the PRINTER SERVER STATUS of the print server's Web configuration, and then the Port Name will automatically be filled in.
Click Next 54 Type the IP address of the print server (e.g. 10.62.31.15 used in this manual), which can be referred from the PRINTER SERVER STATUS of the print server's Web configuration, and then the Port Name will automatically be filled in.
Manual
Page 71
Type the IP address of the print server (e.g. 10.62.31.15 used in this manual), which can be referred from the PRINTER SERVER STATUS of the print server's Web configuration, and then the Port Name will automatically be filled in. Click Next 66
Type the IP address of the print server (e.g. 10.62.31.15 used in this manual), which can be referred from the PRINTER SERVER STATUS of the print server's Web configuration, and then the Port Name will automatically be filled in. Click Next 66

Manual
Page 87
Click Next 82 Type the IP address of the print server (e.g. 10.62.31.15 used in this manual), which can be checked from the PRINTER SERVER STATUS of the print server's Web configuration, and then the Port Name will automatically be filled in.
Click Next 82 Type the IP address of the print server (e.g. 10.62.31.15 used in this manual), which can be checked from the PRINTER SERVER STATUS of the print server's Web configuration, and then the Port Name will automatically be filled in.

Manual
Page 103
Type in the IP address and Port Name of the print server, which can be referred from the PRINTER SERVER STATUS and PRINTER STATUS of the print server's Web configuration, in the corresponding field, and then click OK. (The IP Address and Port Name here are just for example only.) 98 Click Add Port.
Type in the IP address and Port Name of the print server, which can be referred from the PRINTER SERVER STATUS and PRINTER STATUS of the print server's Web configuration, in the corresponding field, and then click OK. (The IP Address and Port Name here are just for example only.) 98 Click Add Port.

Manual
Page 105
The IP Address and Port Name will be displayed in the following screen. (The IP Address and Port Name here are just for example only.) Click OK. 100
The IP Address and Port Name will be displayed in the following screen. (The IP Address and Port Name here are just for example only.) Click OK. 100

Manual
Page 109
If the network path is not specified, type in the IP Address and Port Name of the print server. Select Yes or No to enable or disable printing from MS-DOS based programs. Click Next. 104
If the network path is not specified, type in the IP Address and Port Name of the print server. Select Yes or No to enable or disable printing from MS-DOS based programs. Click Next. 104
Manual
Page 113
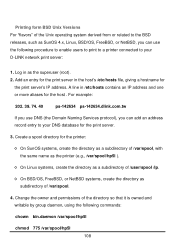
Add an entry for the print server in /etc/hosts contains an IP address and one or more aliases for the printer: ◊ On SunOS systems, create the directory as a....dlink.com.tw If you use DNS (the Domain Naming Services protocol), you can add an address record entry to your DNS database for the print server's IP address. Printing form BSD Unix Versions For "flavors" of the Unix operating system derived from or related to ...is owned and writable by group daemon, using the following procedure to enable users to print to a printer connected to your D-LINK network print server: 1.
Add an entry for the print server in /etc/hosts contains an IP address and one or more aliases for the printer: ◊ On SunOS systems, create the directory as a....dlink.com.tw If you use DNS (the Domain Naming Services protocol), you can add an address record entry to your DNS database for the print server's IP address. Printing form BSD Unix Versions For "flavors" of the Unix operating system derived from or related to ...is owned and writable by group daemon, using the following procedure to enable users to print to a printer connected to your D-LINK network print server: 1.
Manual
Page 116
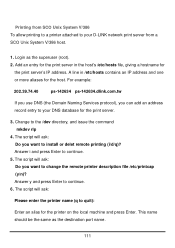
... the local machine and press Enter. The script will ask: Do you can add an address record entry to your D-LINK network print server from SCO Unix System V/386 To allow printing to a printer attached to your DNS database for the print server's IP address. For example: 202.39.74.40 ps-142634 ps-142634.dlink.com.tw If...
... the local machine and press Enter. The script will ask: Do you can add an address record entry to your D-LINK network print server from SCO Unix System V/386 To allow printing to a printer attached to your DNS database for the print server's IP address. For example: 202.39.74.40 ps-142634 ps-142634.dlink.com.tw If...
Manual
Page 118
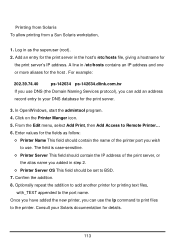
...the fields as the superuser (root). 2. Add an entry for the print server in as follow: ◊ Printer Name This field should contain the name of the print server, or the alias name you wish to the port name. The ...address record entry to the printer. In OpenWindows, start the admintool program. 4. Confirm the addition. 8. Enter values for the print server. 3. A line in step 2. ◊ Printer Server OS This field should contain the IP address of the printer port you added in /etc/hosts contains an IP address and one or more aliases for the print server's IP address...
...the fields as the superuser (root). 2. Add an entry for the print server in as follow: ◊ Printer Name This field should contain the name of the print server, or the alias name you wish to the port name. The ...address record entry to the printer. In OpenWindows, start the admintool program. 4. Confirm the addition. 8. Enter values for the print server. 3. A line in step 2. ◊ Printer Server OS This field should contain the IP address of the printer port you added in /etc/hosts contains an IP address and one or more aliases for the print server's IP address...

Manual
Page 122
... Select a queue type pull down menu, enter the IP address of printer. 117 The printer name cannot contain spaces and must begin with a letter. Select Networked UNIX (LPD) in the Name text field. Click Forward to select the type of the print server to enter Queue type window. 7. Enter a unique ...name for the printer, which the printer is attached in Server field, and type the port name in queue field. 6. The printer name may contain letters...
... Select a queue type pull down menu, enter the IP address of printer. 117 The printer name cannot contain spaces and must begin with a letter. Select Networked UNIX (LPD) in the Name text field. Click Forward to select the type of the print server to enter Queue type window. 7. Enter a unique ...name for the printer, which the printer is attached in Server field, and type the port name in queue field. 6. The printer name may contain letters...

Manual
Page 133
... printer is verifying the address. Adding an IP Printer To add an Internet Printing Protocol enabled, Line Printer Daemon enabled or HP Jet Direct - The Printer Browser will indicate that it is found . The printer utility is found , the Printer Browser will appear in the Printer Browser window. Type the IP Address of the printer...
... printer is verifying the address. Adding an IP Printer To add an Internet Printing Protocol enabled, Line Printer Daemon enabled or HP Jet Direct - The Printer Browser will indicate that it is found . The printer utility is found , the Printer Browser will appear in the Printer Browser window. Type the IP Address of the printer...

Manual
Page 135
Type the port name in the Print Using drop-down menu. 130 For set up LPD Printing: 1. Click Add button after done the section of the print server to which the printer is attached in Address field. 2. Enter the IP address of printer model in queue field.
Type the port name in the Print Using drop-down menu. 130 For set up LPD Printing: 1. Click Add button after done the section of the print server to which the printer is attached in Address field. 2. Enter the IP address of printer model in queue field.


