Manual
Page 22
...following window. If not, you may select this option, "Select from drop-down menus by brand and model. After done the selection of printer driver, click Next> to continue. 3. Have Disk: Click Have Disk to bring up the following window. After the correct... driver is selected, click OK to install the printer driver. After done the selection of printer driver, click Next> button to continue. 2. If not, try the next method. Beside, you find a desired driver. Show current installed drivers: You may try the last way (Have Disk)....
...following window. If not, you may select this option, "Select from drop-down menus by brand and model. After done the selection of printer driver, click Next> to continue. 3. Have Disk: Click Have Disk to bring up the following window. After the correct... driver is selected, click OK to install the printer driver. After done the selection of printer driver, click Next> button to continue. 2. If not, try the next method. Beside, you find a desired driver. Show current installed drivers: You may try the last way (Have Disk)....
Manual
Page 30
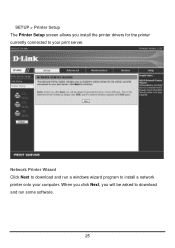
Network Printer Wizard Click Next to download and run some software. 25 When you click Next, you install the printer drivers for the printer currently connected to your computer. SETUP > Printer Setup The Printer Setup screen allows you will be asked to download and run a windows wizard program to install a network printer onto your print server.
Network Printer Wizard Click Next to download and run some software. 25 When you click Next, you install the printer drivers for the printer currently connected to your computer. SETUP > Printer Setup The Printer Setup screen allows you will be asked to download and run a windows wizard program to install a network printer onto your print server.

Manual
Page 32
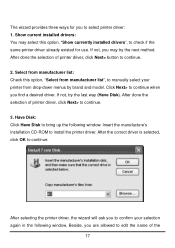
After done the selection of printer driver, click Next> to select printer driver: 1. Show current installed drivers: You may try the next method. The wizard provides three ways for use. If not, you may select this option, "Show currently installed drivers", to check if the same printer driver already existed for you to continue. 27
After done the selection of printer driver, click Next> to select printer driver: 1. Show current installed drivers: You may try the next method. The wizard provides three ways for use. If not, you may select this option, "Show currently installed drivers", to check if the same printer driver already existed for you to continue. 27
Manual
Page 33
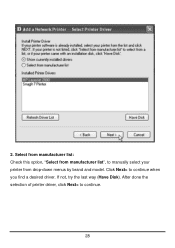
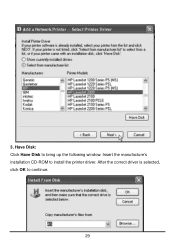
Select from manufacturer list: Check this option, "Select from manufacturer list", to continue. 28 After done the selection of printer driver, click Next> to manually select your printer from drop-down menus by brand and model. If not, try the last way (Have Disk). 2. Click Next> to continue when you find a desired driver.
Select from manufacturer list: Check this option, "Select from manufacturer list", to continue. 28 After done the selection of printer driver, click Next> to manually select your printer from drop-down menus by brand and model. If not, try the last way (Have Disk). 2. Click Next> to continue when you find a desired driver.
Manual
Page 34
After the correct driver is selected, click OK to bring up the following window. 3. Have Disk: Click Have Disk to continue. 29 Insert the manufacture's installation CD-ROM to install the printer driver.
After the correct driver is selected, click OK to bring up the following window. 3. Have Disk: Click Have Disk to continue. 29 Insert the manufacture's installation CD-ROM to install the printer driver.
Manual
Page 35
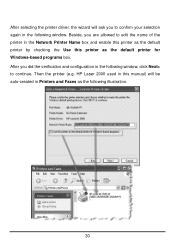
Then the printer (e.g. Beside, you are allowed to edit the name of the printer in the Network Printer Name box and enable this printer as the default printer by checking the Use this manual) will ask you did the verification and configuration in the following window, click Next> to confirm your selection again in this printer as the following window. After selecting the printer driver, the wizard will be auto-created in Printers and Faxes as the default printer for Windows-based programs box. After you to continue. HP Laser 2000 used in the following illustration. 30
Then the printer (e.g. Beside, you are allowed to edit the name of the printer in the Network Printer Name box and enable this printer as the default printer by checking the Use this manual) will ask you did the verification and configuration in the following window, click Next> to confirm your selection again in this printer as the following window. After selecting the printer driver, the wizard will be auto-created in Printers and Faxes as the default printer for Windows-based programs box. After you to continue. HP Laser 2000 used in the following illustration. 30

Manual
Page 64
Highlight the printer, as shown. Click Next 59 If the desired printer is not on the list, click Have Disk and insert the printer driver disk that came with your printer to install the printer drivers.
Highlight the printer, as shown. Click Next 59 If the desired printer is not on the list, click Have Disk and insert the printer driver disk that came with your printer to install the printer drivers.

Manual
Page 78
Click Next At this screen, you can input a name for the printer, and then click Next 73 Highlight the printer, as shown. If the desired printer is not on the list, click Have Disk and insert the printer driver disk that came with your printer to install the printer drivers.
Click Next At this screen, you can input a name for the printer, and then click Next 73 Highlight the printer, as shown. If the desired printer is not on the list, click Have Disk and insert the printer driver disk that came with your printer to install the printer drivers.

Manual
Page 94
Highlight the printer, as shown. If the desired printer is not on the list, click Have Disk and insert the printer driver disk that came with your printer to install the printer drivers. Click Next. 89
Highlight the printer, as shown. If the desired printer is not on the list, click Have Disk and insert the printer driver disk that came with your printer to install the printer drivers. Click Next. 89

Manual
Page 110
Highlight the printer, as shown. If the desired printer is not on the list, click Have Disk and insert the printer driver disk that came with your printer to install the printer drivers. Click Next. Click Next 105
Highlight the printer, as shown. If the desired printer is not on the list, click Have Disk and insert the printer driver disk that came with your printer to install the printer drivers. Click Next. Click Next 105
Manual
Page 134
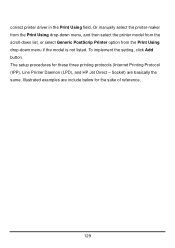
Or manually select the printer-maker from the Print Using drop-down menu, and then select the printer model from the scroll-down list, or select Generic PostScrip Printer option from the Print Using drop-down menu if the model is not listed. The setup procedures for the sake of reference. 129 correct printer driver in the Print Using field. Socket) are include below for these three printing protocols (Internet Printing Protocol (IPP), Line Printer Daemon (LPD), and HP Jet Direct - Illustrated examples are basically the same. To implement the setting, click Add button.
Or manually select the printer-maker from the Print Using drop-down menu, and then select the printer model from the scroll-down list, or select Generic PostScrip Printer option from the Print Using drop-down menu if the model is not listed. The setup procedures for the sake of reference. 129 correct printer driver in the Print Using field. Socket) are include below for these three printing protocols (Internet Printing Protocol (IPP), Line Printer Daemon (LPD), and HP Jet Direct - Illustrated examples are basically the same. To implement the setting, click Add button.

Manual
Page 148
... your MacOS workstation's default printer, open the Chooser by selecting Chooser from the Apple menu. To choose a printer connected to print server may vary slightly, depending on the left. A list of the Printer Port you are using . Double-click the name of ... from the pull-down menu (Level 1 or Level 2). The Printer Ports shown are using the LaserWriter 8. Chooser Name: Display the print server's port name. In the following options, enter the related configuration, such as follow. Select the LaserWriter 8 icon on what printer driver version you are examples only. 143
... your MacOS workstation's default printer, open the Chooser by selecting Chooser from the Apple menu. To choose a printer connected to print server may vary slightly, depending on the left. A list of the Printer Port you are using . Double-click the name of ... from the pull-down menu (Level 1 or Level 2). The Printer Ports shown are using the LaserWriter 8. Chooser Name: Display the print server's port name. In the following options, enter the related configuration, such as follow. Select the LaserWriter 8 icon on what printer driver version you are examples only. 143