
Product Manual
Page 3
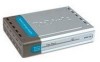
Minimum System Requirements Computer with the DNS-120 will cause damage and void the warranty for this product. DNS-120 User's Manual Package Contents Package Contents D-Link DNS-120 Network Storage Adapter CD-ROM with Manual and Software Ethernet (CAT5 UTP/Straight-Through) Cable 5V 2.5A Power Supply Note: Using a... Internet Explorer version 6.0 or Netscape Navigator version 7.0 and above items are missing, please contact your reseller. If any of the above USB Hard Drive(s) An available Ethernet port on the network...
Minimum System Requirements Computer with the DNS-120 will cause damage and void the warranty for this product. DNS-120 User's Manual Package Contents Package Contents D-Link DNS-120 Network Storage Adapter CD-ROM with Manual and Software Ethernet (CAT5 UTP/Straight-Through) Cable 5V 2.5A Power Supply Note: Using a... Internet Explorer version 6.0 or Netscape Navigator version 7.0 and above items are missing, please contact your reseller. If any of the above USB Hard Drive(s) An available Ethernet port on the network...

Product Manual
Page 4
...-drive or drive-to-drive backups. Simply connect the DNS-120 to a Fast Ethernet port on your data remains on the USB drive connected to the DNS-120 and ready to take on the network. * USB drives sold separately. DNS-120 User's Manual Introduction Introduction The D-Link DNS-120 Network Storage Adapter connects USB drives* to the network, and provides authorized users...
...-drive or drive-to-drive backups. Simply connect the DNS-120 to a Fast Ethernet port on your data remains on the USB drive connected to the DNS-120 and ready to take on the network. * USB drives sold separately. DNS-120 User's Manual Introduction Introduction The D-Link DNS-120 Network Storage Adapter connects USB drives* to the network, and provides authorized users...

Product Manual
Page 5
...plug and play setup, installing the DNS-120 into your network! DNS-120 User's Manual Features and Benefits Features and Benefits Connect USB 2.0/1.1 Add extra storage space to all stored files. Built-in FTP Server The DNS-120 can also prevent any data loss ...your USB drives are accessible over the Internet, making it convenient to access your network router or switch, plug in Web-based configuration utility including firmware upgrade, user account management, folder management, scheduled downloads, and DHCP/manual network settings. D-Link ...
...plug and play setup, installing the DNS-120 into your network! DNS-120 User's Manual Features and Benefits Features and Benefits Connect USB 2.0/1.1 Add extra storage space to all stored files. Built-in FTP Server The DNS-120 can also prevent any data loss ...your USB drives are accessible over the Internet, making it convenient to access your network router or switch, plug in Web-based configuration utility including firmware upgrade, user account management, folder management, scheduled downloads, and DHCP/manual network settings. D-Link ...

Product Manual
Page 6
Blinking green indicates activity on the Ethernet network. Solid green indicates the USB drive is initially connected to the DNS-120. USB LED Blinking green indicates when an USB drive is ready for use. Power LED Solid green indicates a good power source connection. DNS-120 User's Manual Hardware Overview Front Panel Hardware Overview Ethernet LED Solid green indicates an Ethernet connection. D-Link Systems, Inc. 6
Blinking green indicates activity on the Ethernet network. Solid green indicates the USB drive is initially connected to the DNS-120. USB LED Blinking green indicates when an USB drive is ready for use. Power LED Solid green indicates a good power source connection. DNS-120 User's Manual Hardware Overview Front Panel Hardware Overview Ethernet LED Solid green indicates an Ethernet connection. D-Link Systems, Inc. 6
Product Manual
Page 7
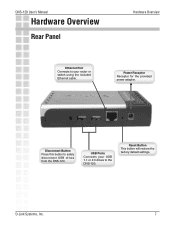
USB Ports Connects your router or switch using the included Ethernet cable. Reset Button This button will restore the factory default settings. D-Link Systems, Inc. 7 Disconnect Button Press this button to the DNS-120. Power Receptor Receptor for the provided power adapter. DNS-120 User's Manual Hardware Overview Rear Panel Hardware Overview Ethernet Port Connects to your USB 1.1 or 2.0 drives to safely disconnect USB drives from the DNS-120.
USB Ports Connects your router or switch using the included Ethernet cable. Reset Button This button will restore the factory default settings. D-Link Systems, Inc. 7 Disconnect Button Press this button to the DNS-120. Power Receptor Receptor for the provided power adapter. DNS-120 User's Manual Hardware Overview Rear Panel Hardware Overview Ethernet Port Connects to your USB 1.1 or 2.0 drives to safely disconnect USB drives from the DNS-120.
Product Manual
Page 9
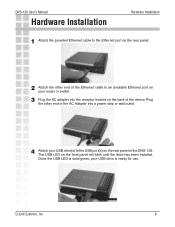
DNS-120 User's Manual Hardware Installation Hardware Installation 1 Attach the provided Ethernet cable to the USB port(s) on the rear panel of the device. D-Link Systems, Inc. 9 Once the USB LED is ready for use. Plug the other end of the Ethernet cable to an available Ethernet port on your USB drive is ... power strip or wall outlet. 4 Attach your USB drive(s) to the Ethernet port on the rear panel. 2 Attach the other end of the AC Adapter into the receptor located on the front panel will blink until the drive has been installed. The USB LED on the back of the DNS-120.
DNS-120 User's Manual Hardware Installation Hardware Installation 1 Attach the provided Ethernet cable to the USB port(s) on the rear panel of the device. D-Link Systems, Inc. 9 Once the USB LED is ready for use. Plug the other end of the Ethernet cable to an available Ethernet port on your USB drive is ... power strip or wall outlet. 4 Attach your USB drive(s) to the Ethernet port on the rear panel. 2 Attach the other end of the AC Adapter into the receptor located on the front panel will blink until the drive has been installed. The USB LED on the back of the DNS-120.

Product Manual
Page 11
... Browse to locate your shared DNS-120 folder. Click Tools and click Map Network Drive. Click Finish D-Link Systems, Inc. \\DNS-120\Shared folder 11 You will find the DNS-120 shared folder under the Workgroup Name that it is accessible from the My Computer screen. DNS-120 User's Manual Mapping a Drive... the Setup Wizard or in the Home>LAN screen in Windows. Please see the following instructions for mapping a USB drive so that you can access the DNS-120's USB drive(s) by mapping the shared folders as drives in the Configuration Utility. Right-click Start and click...
... Browse to locate your shared DNS-120 folder. Click Tools and click Map Network Drive. Click Finish D-Link Systems, Inc. \\DNS-120\Shared folder 11 You will find the DNS-120 shared folder under the Workgroup Name that it is accessible from the My Computer screen. DNS-120 User's Manual Mapping a Drive... the Setup Wizard or in the Home>LAN screen in Windows. Please see the following instructions for mapping a USB drive so that you can access the DNS-120's USB drive(s) by mapping the shared folders as drives in the Configuration Utility. Right-click Start and click...

Product Manual
Page 21
..., the drive(s) must be displayed in the list similar to the USB drive(s) if formatted with FAT or FAT32. Note: Currently, you would like to the DNS-120. D-Link Systems, Inc. 21 To assign read /write permissions to all users on the USB drive(s) that you may only assign Read Only permissions to the picture...
..., the drive(s) must be displayed in the list similar to the USB drive(s) if formatted with FAT or FAT32. Note: Currently, you would like to the DNS-120. D-Link Systems, Inc. 21 To assign read /write permissions to all users on the USB drive(s) that you may only assign Read Only permissions to the picture...

Product Manual
Page 22
Once the settings are set for the folder "Drivers" on the USB drive named "Storage1". User1 has been assigned read only permissions for the Drivers folder (as seen in the network access list. D-Link Systems, Inc. 22 Once the rule is deleted, users will appear in the network access list...created (refer to delete the rule. To delete a rule from the list by clicking on the trash can icon to page 20 on the icon. DNS-120 User's Manual Using the Configuration Utility Advanced > Network Access (continued) To create a network access rule, you must first delete ...
Once the settings are set for the folder "Drivers" on the USB drive named "Storage1". User1 has been assigned read only permissions for the Drivers folder (as seen in the network access list. D-Link Systems, Inc. 22 Once the rule is deleted, users will appear in the network access list...created (refer to delete the rule. To delete a rule from the list by clicking on the trash can icon to page 20 on the icon. DNS-120 User's Manual Using the Configuration Utility Advanced > Network Access (continued) To create a network access rule, you must first delete ...

Product Manual
Page 23
Path: Click Open and select the folder from the USB drive that you would like to create the rule for. Root: Check the Root box to save your share/permissions. User: Select a user from the ... drop-down menu. Add: Click Add to select the root level of both USB drives at once. D-Link Systems, Inc. 23 DNS-120 User's Manual Using the Configuration Utility Advanced > FTP Server You can use the built-in FTP server to allow users from the Internet or Intranet FTP access to the drive(s) or...
Path: Click Open and select the folder from the USB drive that you would like to create the rule for. Root: Check the Root box to save your share/permissions. User: Select a user from the ... drop-down menu. Add: Click Add to select the root level of both USB drives at once. D-Link Systems, Inc. 23 DNS-120 User's Manual Using the Configuration Utility Advanced > FTP Server You can use the built-in FTP server to allow users from the Internet or Intranet FTP access to the drive(s) or...

Product Manual
Page 25
D-Link Systems, Inc. 25 Select a user from the drop-down menu or check All Accounts. Click Add. Check Root to assign access to . Select Read Only ... folder and click OK. Click Open to select the folder you want to allow FTP access to both USB drives at once. Click the + sign to expand the folder tree. DNS-120 User's Manual Advanced > FTP Server (continued) Using the Configuration Utility Example: Log into the web-based configuration by...
D-Link Systems, Inc. 25 Select a user from the drop-down menu or check All Accounts. Click Add. Check Root to assign access to . Select Read Only ... folder and click OK. Click Open to select the folder you want to allow FTP access to both USB drives at once. Click the + sign to expand the folder tree. DNS-120 User's Manual Advanced > FTP Server (continued) Using the Configuration Utility Example: Log into the web-based configuration by...

Product Manual
Page 35
... is Year/Month/ Day. Note: Incremental Backup is not available for the backup to occur. To select a folder, click on the USB drive(s). Incremental Backup: By default all backups and file/folder downloads are available to initiate or cancel an active or pending backup ...folder transfer to commence. daily, weekly, or monthly) and specific time for HTTP or FTP downloads as a reference point. D-Link Systems, Inc. 35 DNS-120 User's Manual Using the Configuration Menu Download Scheduling (continued) Test: This button is provided to test the given URL to ...
... is Year/Month/ Day. Note: Incremental Backup is not available for the backup to occur. To select a folder, click on the USB drive(s). Incremental Backup: By default all backups and file/folder downloads are available to initiate or cancel an active or pending backup ...folder transfer to commence. daily, weekly, or monthly) and specific time for HTTP or FTP downloads as a reference point. D-Link Systems, Inc. 35 DNS-120 User's Manual Using the Configuration Menu Download Scheduling (continued) Test: This button is provided to test the given URL to ...

Product Manual
Page 43
...readable but cannot be back to page 10). What is the USB LED orange when I reset my DNS-120 to factory defaults? 2. The drive must be formatted with an incompatible file system. After the DNS-120 reboots it will need to use the Easy Search utility to ...61550; Locate the reset hole on the back on the unit. DNS-120 User's Manual Troubleshooting Troubleshooting 1. D-Link Systems, Inc. 43 How do I reset the DNS-120 back to by the DNS-120. Why is the default IP address of the DNS-120? The DNS-120 does not have a default IP address. Using a paper clip,...
...readable but cannot be back to page 10). What is the USB LED orange when I reset my DNS-120 to factory defaults? 2. The drive must be formatted with an incompatible file system. After the DNS-120 reboots it will need to use the Easy Search utility to ...61550; Locate the reset hole on the back on the unit. DNS-120 User's Manual Troubleshooting Troubleshooting 1. D-Link Systems, Inc. 43 How do I reset the DNS-120 back to by the DNS-120. Why is the default IP address of the DNS-120? The DNS-120 does not have a default IP address. Using a paper clip,...

Product Manual
Page 44
...5VDC, 2.5A • Max Power 36W, 100-110V Weight • 7.9oz (0.5 lbs) LEDs • Power • Ethernet • USB Temperature • Operating: 41ºF to 122ºF (5ºC to 50ºC) • Storing: -4ºF to 122ºF (-20&#...• H = 1.2 inches (30mm) Warranty • 1 Year D-Link Systems, Inc. 44 Internet Explorer v6 or later; DNS-120 User's Manual Technical Specifications Technical Specifications Standards • IEEE 802.3 • IEEE 802.3u • USB 1.1 • USB 2.0 Device Management • Web-Based - or other Java-enabled browsers.
...5VDC, 2.5A • Max Power 36W, 100-110V Weight • 7.9oz (0.5 lbs) LEDs • Power • Ethernet • USB Temperature • Operating: 41ºF to 122ºF (5ºC to 50ºC) • Storing: -4ºF to 122ºF (-20&#...• H = 1.2 inches (30mm) Warranty • 1 Year D-Link Systems, Inc. 44 Internet Explorer v6 or later; DNS-120 User's Manual Technical Specifications Technical Specifications Standards • IEEE 802.3 • IEEE 802.3u • USB 1.1 • USB 2.0 Device Management • Web-Based - or other Java-enabled browsers.