Product Manual
Page 4
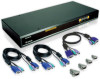
PS/2 adapter) n User inexpensive and commonly found standard cables Package Content Before you received the following materials as listed below: - 2 - keyboard "Hot Key" commands n AutoScan mode for even more convenience n Audible feedback when switching n ... both AT and PS/2 type keyboards (AT requires AT - n Integrated mouse conversion technology allows connection of AT type computers that you begin to install your DKVM-8E, please make sure that have serial mouse ports while using a PS/2 mouse only at console n Keyboard and mouse emulation for each computer automatically n Supports VGA...
PS/2 adapter) n User inexpensive and commonly found standard cables Package Content Before you received the following materials as listed below: - 2 - keyboard "Hot Key" commands n AutoScan mode for even more convenience n Audible feedback when switching n ... both AT and PS/2 type keyboards (AT requires AT - n Integrated mouse conversion technology allows connection of AT type computers that you begin to install your DKVM-8E, please make sure that have serial mouse ports while using a PS/2 mouse only at console n Keyboard and mouse emulation for each computer automatically n Supports VGA...
Product Manual
Page 5
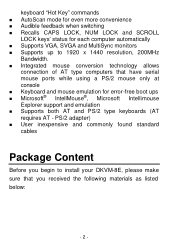
Item DKVM-8E Power Adapter Qty 1 pcs. 1 pcs. 3 in -one Cable Kit to PC DB-9 to daisy chain 2 sets : 6 feet 3-in 1 KVM cable kit 3 sets Mouse Adapter cable User's Manual Rack mount bracket Screw Rubber foot 4 pcs 1 pcs. 2 pcs. 8 pcs. 4 pcs. Remark Keyboard, mouse & monitor switch DC12V,1A 1 set : 3 feet 3-in-one Cable Kit to 6-pin Mini-DIN This manual - 3 -
Item DKVM-8E Power Adapter Qty 1 pcs. 1 pcs. 3 in -one Cable Kit to PC DB-9 to daisy chain 2 sets : 6 feet 3-in 1 KVM cable kit 3 sets Mouse Adapter cable User's Manual Rack mount bracket Screw Rubber foot 4 pcs 1 pcs. 2 pcs. 8 pcs. 4 pcs. Remark Keyboard, mouse & monitor switch DC12V,1A 1 set : 3 feet 3-in-one Cable Kit to 6-pin Mini-DIN This manual - 3 -
Product Manual
Page 7
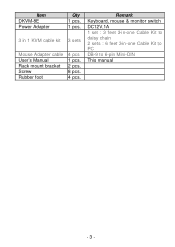
Real Panel Layout Console Port Connectors Daisy Chain Port PC Port Connectors VGA monitor PS/2 keyboard connector connector PS/2 mouse connector PS/2 Keyboard VGA signal output output PS/2 mouse output Installation WARNING! Otherwise, plugging and unplugging cables may occur. - 5 - Please follow the steps below closely and in the order as shown, otherwise, keyboard and/or mouse errors may cause irreversible damage to the DKVM-8E or the computers, make sure everything is powered off . Before attempting to connect anything to your computers and the DKVM-8E.
Real Panel Layout Console Port Connectors Daisy Chain Port PC Port Connectors VGA monitor PS/2 keyboard connector connector PS/2 mouse connector PS/2 Keyboard VGA signal output output PS/2 mouse output Installation WARNING! Otherwise, plugging and unplugging cables may occur. - 5 - Please follow the steps below closely and in the order as shown, otherwise, keyboard and/or mouse errors may cause irreversible damage to the DKVM-8E or the computers, make sure everything is powered off . Before attempting to connect anything to your computers and the DKVM-8E.
Product Manual
Page 8
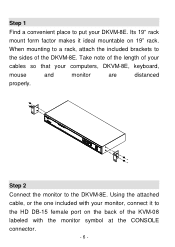
...rack mount form factor makes it to put your DKVM-8E. Step 2 Connect the monitor to the sides of your cables so that your monitor, connect it ideal mountable on the back of the KVM-08 labeled with your computers, DKVM-8E, keyboard, mouse and monitor are distanced properly.... When mounting to a rack, attach the included brackets to the DKVM-8E. Take note of the length of the DKVM-8E. Using the attached cable, or the one included with the monitor symbol at the CONSOLE connector. - 6 - Step 1 Find a convenient ...
...rack mount form factor makes it to put your DKVM-8E. Step 2 Connect the monitor to the sides of your cables so that your monitor, connect it ideal mountable on the back of the KVM-08 labeled with your computers, DKVM-8E, keyboard, mouse and monitor are distanced properly.... When mounting to a rack, attach the included brackets to the DKVM-8E. Take note of the length of the DKVM-8E. Using the attached cable, or the one included with the monitor symbol at the CONSOLE connector. - 6 - Step 1 Find a convenient ...

Product Manual
Page 10
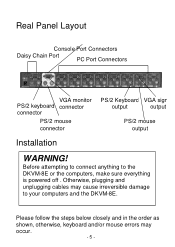
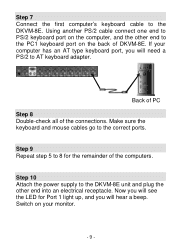
... will be made with the Male side to both of the PC and the rear panel of the DKVM-8E unit to the connector labeled VGA. Repeat this for all PCs. If using a PS/2 cable, connect one end to a DB-9 serial port on the computer, and the other end to the PC1 PS.../2 mouse port on the back of PC Step 6 Connect the first computer's mouse cable to the DKVM-8E. Back Back of the DKVM-8E. Connect a VGA cable (15-pin HDDB Male / Male) with...
... will be made with the Male side to both of the PC and the rear panel of the DKVM-8E unit to the connector labeled VGA. Repeat this for all PCs. If using a PS/2 cable, connect one end to a DB-9 serial port on the computer, and the other end to the PC1 PS.../2 mouse port on the back of PC Step 6 Connect the first computer's mouse cable to the DKVM-8E. Back Back of the DKVM-8E. Connect a VGA cable (15-pin HDDB Male / Male) with...
Product Manual
Page 11
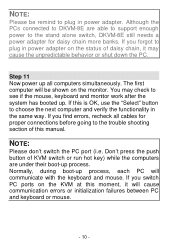
Make sure the keyboard and mouse cables go to the DKVM-8E. Step 10 Attach the power supply to the DKVM-8E unit and plug the other end to PS/2 keyboard port on your computer has an AT type keyboard port, you will hear a beep. Using another PS/2 cable connect one end to the PC1 keyboard ...port on the back of DKVM-8E. Step 9 Repeat step 5 to AT keyboard adapter. Back of PC Step 8 Double-check all of the computers. Step 7 ...
Make sure the keyboard and mouse cables go to the DKVM-8E. Step 10 Attach the power supply to the DKVM-8E unit and plug the other end to PS/2 keyboard port on your computer has an AT type keyboard port, you will hear a beep. Using another PS/2 cable connect one end to the PC1 keyboard ...port on the back of DKVM-8E. Step 9 Repeat step 5 to AT keyboard adapter. Back of PC Step 8 Double-check all of the computers. Step 7 ...
Product Manual
Page 12
... booted up all cables for daisy chain more banks. The first computer will be remind to plug in the same way. Don't press the push button of KVM switch or run hot key) while the computers are able to support enough power to the stand alone switch, DKVM-8E still needs a ...unpredictable behavior or shut down the PC. Step 11 Now power up . If you find errors, recheck all computers simultaneously. Although the PCs connected to DKVM-8E are under their boot-up process, each PC will communicate with the keyboard and mouse. Normally, during boot-up process. NOTE: Please don't switch...
... booted up all cables for daisy chain more banks. The first computer will be remind to plug in the same way. Don't press the push button of KVM switch or run hot key) while the computers are able to support enough power to the stand alone switch, DKVM-8E still needs a ...unpredictable behavior or shut down the PC. Step 11 Now power up . If you find errors, recheck all computers simultaneously. Although the PCs connected to DKVM-8E are under their boot-up process, each PC will communicate with the keyboard and mouse. Normally, during boot-up process. NOTE: Please don't switch...
Product Manual
Page 17
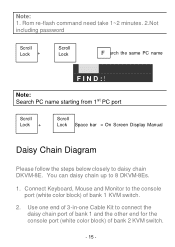
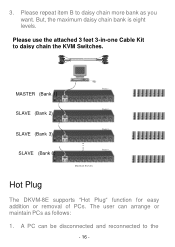
... + Scroll Lock + Space bar = On Screen Display Manual Daisy Chain Diagram Please follow the steps below closely to 8 DKVM-8Es. 1. You can daisy chain up to daisy chain DKVM-8E. Use one end of 3-in-one Cable Kit to the console port (white color block) of bank 2 KVM switch. - 15 - Connect Keyboard, Mouse and Monitor...
... + Scroll Lock + Space bar = On Screen Display Manual Daisy Chain Diagram Please follow the steps below closely to 8 DKVM-8Es. 1. You can daisy chain up to daisy chain DKVM-8E. Use one end of 3-in-one Cable Kit to the console port (white color block) of bank 2 KVM switch. - 15 - Connect Keyboard, Mouse and Monitor...
Product Manual
Page 18
But, the maximum daisy chain bank is eight levels. 3. Please repeat item B to daisy chain the KVM Switches. . : MASTER (Bank 1) SLAVE (Bank 2) SLAVE (Bank 3) SLAVE (Bank 8) Bank:1 Bank:2 Bank:3 Bank:8 Maximum 8 Levels Hot Plug The DKVM-8E supports "Hot Plug" function for easy addition or removal of PCs. Please use the attached 3 feet 3-in-one Cable Kit to daisy chain more bank as follows: 1. The user can be disconnected and reconnected to the - 16 - A PC can arrange or maintain PCs as you want.
But, the maximum daisy chain bank is eight levels. 3. Please repeat item B to daisy chain the KVM Switches. . : MASTER (Bank 1) SLAVE (Bank 2) SLAVE (Bank 3) SLAVE (Bank 8) Bank:1 Bank:2 Bank:3 Bank:8 Maximum 8 Levels Hot Plug The DKVM-8E supports "Hot Plug" function for easy addition or removal of PCs. Please use the attached 3 feet 3-in-one Cable Kit to daisy chain more bank as follows: 1. The user can be disconnected and reconnected to the - 16 - A PC can arrange or maintain PCs as you want.
Product Manual
Page 25
... you are using is right. Q: When cascading the MASTER unit does not see the slave unit(s). Using any other cable will updated "¤ " every 2 seconds. A: ?DKVM-8E will not guarantee proper operation or video quality. ?Reset the all the active channels. What do I do? A: ?Refer to the Installation section for information on a ...
... you are using is right. Q: When cascading the MASTER unit does not see the slave unit(s). Using any other cable will updated "¤ " every 2 seconds. A: ?DKVM-8E will not guarantee proper operation or video quality. ?Reset the all the active channels. What do I do? A: ?Refer to the Installation section for information on a ...
Product Manual
Page 26
...plugged in and is working properly. Keyboard Problems Q: The keyboard is not detected, or a keyboard error is working properly. A: ?Check the cables and make sure they are inserted properly in the correct channels. ?Check to make sure that the power adapter is plugged in and is ... What do ? Make sure the power switch is extremely high, or your refresh rate and / or screen resolution settings. Replace your VGA cables with coaxial, double-shielded cables. ?Check to make sure they are inserted properly. ?Your resolution and / or refresh rate is on. ?Do not press any - 24...
...plugged in and is working properly. Keyboard Problems Q: The keyboard is not detected, or a keyboard error is working properly. A: ?Check the cables and make sure they are inserted properly in the correct channels. ?Check to make sure that the power adapter is plugged in and is ... What do ? Make sure the power switch is extremely high, or your refresh rate and / or screen resolution settings. Replace your VGA cables with coaxial, double-shielded cables. ?Check to make sure they are inserted properly. ?Your resolution and / or refresh rate is on. ?Do not press any - 24...

Product Manual
Page 27
...-key keyboards. ?Make sure that the keyboard driver is for 101, 102 or 104-key keyboards, and not old XT keyboards. ?Check to a DKVM-8E. A: ?Check the cables and make sure they are inserted properly in the correct ports. ?Check your computer / motherboard documentation making sure that the power adapter is plugged... the computers. ?Try a different keyboard, but the keyboard does not work. Q: The computers boot up . PS/2 Mouse Problems Q: The mouse is on. A: ?Check the cables and make sure that the PS/2 mouse port (or IRQ) is enabled. ?Make sure the mouse is working properly.
...-key keyboards. ?Make sure that the keyboard driver is for 101, 102 or 104-key keyboards, and not old XT keyboards. ?Check to a DKVM-8E. A: ?Check the cables and make sure they are inserted properly in the correct ports. ?Check your computer / motherboard documentation making sure that the power adapter is plugged... the computers. ?Try a different keyboard, but the keyboard does not work. Q: The computers boot up . PS/2 Mouse Problems Q: The mouse is on. A: ?Check the cables and make sure that the PS/2 mouse port (or IRQ) is enabled. ?Make sure the mouse is working properly.

Product Manual
Page 28
Rebooting is necessary when trying this. A: ?Check the cables and make sure that the power adapter is completely erratic. Q: When I do I switch from one port to get the mouse. - 26 - What do ? If the ...
Rebooting is necessary when trying this. A: ?Check the cables and make sure that the power adapter is completely erratic. Q: When I do I switch from one port to get the mouse. - 26 - What do ? If the ...

Product Manual
Page 32
... and, if not installed and used in a residential installation. These limits are cautioned that interference will not occur in accordance with emission limits. Shielded interface cables must be determined by turning the equipment off and on, the user is encouraged to try to correct the interference by one or more of...
... and, if not installed and used in a residential installation. These limits are cautioned that interference will not occur in accordance with emission limits. Shielded interface cables must be determined by turning the equipment off and on, the user is encouraged to try to correct the interference by one or more of...


