Owner Manual
Page 2
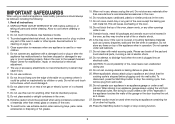
... any part of the appliance when in use . 24. To disconnect, press the Start/Stop button to dislodge food when the oven is not operating properly. Where applicable, always attach plug to the nearest Cuisinart Repair Center for cleaning on glass door. 25. Do not place oven on top of the oven except the baking pan with metal scouring pads. This will cause overheating of electric...
... any part of the appliance when in use . 24. To disconnect, press the Start/Stop button to dislodge food when the oven is not operating properly. Where applicable, always attach plug to the nearest Cuisinart Repair Center for cleaning on glass door. 25. Do not place oven on top of the oven except the baking pan with metal scouring pads. This will cause overheating of electric...

Owner Manual
Page 3
... the countertop or tabletop where it can be arranged so that it will fit in a polarized outlet only one blade is exercised in pulp mold and remove packing materials surrounding those parts. Be sure to Know Your Control Panel 5 Set Your Clock 6 Oven Rack Position Guide 6 Oven Functions 7 Operation 9 Cleaning and Maintenance 14 Warranty 15 Recipes 16 SAVE THESE INSTRUCTIONS 3 Before using your Cuisinart® Rotisserie Convection Toaster Oven, make...
... the countertop or tabletop where it can be arranged so that it will fit in a polarized outlet only one blade is exercised in pulp mold and remove packing materials surrounding those parts. Be sure to Know Your Control Panel 5 Set Your Clock 6 Oven Rack Position Guide 6 Oven Functions 7 Operation 9 Cleaning and Maintenance 14 Warranty 15 Recipes 16 SAVE THESE INSTRUCTIONS 3 Before using your Cuisinart® Rotisserie Convection Toaster Oven, make...
Owner Manual
Page 4
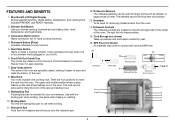
... and clean the interior of the Rotisserie Convection Toaster Oven for easy cleaning. 7. FEATURES AND BENEFITS 1. Easy-Clean Interior The sides of meat. Use with food are four positions to insert the rack into these sockets. 15. It also activates the oven when it is included for most cooking functions. 4. Selector Dial/Button Lets you choose cooking functions and set baking time, clock, temperature, and toast shade. 3. BPA Free (not shown) All materials that come...
... and clean the interior of the Rotisserie Convection Toaster Oven for easy cleaning. 7. FEATURES AND BENEFITS 1. Easy-Clean Interior The sides of meat. Use with food are four positions to insert the rack into these sockets. 15. It also activates the oven when it is included for most cooking functions. 4. Selector Dial/Button Lets you choose cooking functions and set baking time, clock, temperature, and toast shade. 3. BPA Free (not shown) All materials that come...
Owner Manual
Page 5
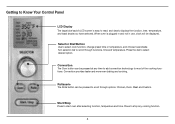
Selector Dial/Button Use to scroll through functions, time and temperature. Convection The Conv button can be displayed. Rotisserie The Rotis button can be pressed at any cooking function. 5 Start/Stop Press to scroll through options: Chicken, Duck, Meat and Custom. Turn selector dial to start oven after selecting function, temperature and time. Press the dial to read, and clearly displays the function, time, temperature, and toast shade you have...
Selector Dial/Button Use to scroll through functions, time and temperature. Convection The Conv button can be displayed. Rotisserie The Rotis button can be pressed at any cooking function. 5 Start/Stop Press to scroll through options: Chicken, Duck, Meat and Custom. Turn selector dial to start oven after selecting function, temperature and time. Press the dial to read, and clearly displays the function, time, temperature, and toast shade you have...
Owner Manual
Page 6
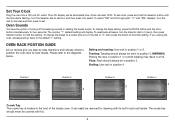
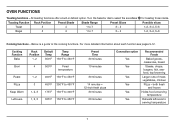
... display will read 12:00. OVEN RACK POSITION GUIDE All our recipes give you unplug the oven, all beeps, turn the dial to "2", then press the button to hold this setting. Baking and roasting: Use rack in position 3. Position 1 1 Position 2 2 Position 3 3 Position 4 4 Crumb Tray The crumb tray is located in position 3. To set hour and then press it to set. Turn the Selector dial to the diagrams below. Clock will be in position 1 or 2. Pizza: Rack should always be covered with...
... display will read 12:00. OVEN RACK POSITION GUIDE All our recipes give you unplug the oven, all beeps, turn the dial to "2", then press the button to hold this setting. Baking and roasting: Use rack in position 3. Position 1 1 Position 2 2 Position 3 3 Position 4 4 Crumb Tray The crumb tray is located in position 3. To set hour and then press it to set. Turn the Selector dial to the diagrams below. Clock will be in position 1 or 2. Pizza: Rack should always be covered with...
Owner Manual
Page 7
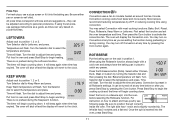
...;F Pizza 3 450°F 350°F to 450°F Keep Warm 1, 2, 3 175°F 150°F to 300°F Leftovers 1, 2, 3 325°F 150°F to the cooking functions. All toasting functions offer a built-in defrost option. both fresh and frozen Holds food at serving temperature Reheats leftovers to 7 3 - 4 for toasting frozen items. Possible slices 1-2, 3-4, 5-6 1-2, 3-4, 5-6 Cooking functions - OVEN FUNCTIONS Toasting functions - Turn the Selector dial to select the snowflake Toasting Function Rack Position...
...;F Pizza 3 450°F 350°F to 450°F Keep Warm 1, 2, 3 175°F 150°F to 300°F Leftovers 1, 2, 3 325°F 150°F to the cooking functions. All toasting functions offer a built-in defrost option. both fresh and frozen Holds food at serving temperature Reheats leftovers to 7 3 - 4 for toasting frozen items. Possible slices 1-2, 3-4, 5-6 1-2, 3-4, 5-6 Cooking functions - OVEN FUNCTIONS Toasting functions - Turn the Selector dial to select the snowflake Toasting Function Rack Position...
Owner Manual
Page 9
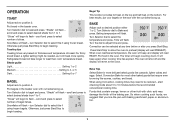
.../Stop to allow the oven to be needed, as it will flash - For thinly sliced bread, a lighter setting might be reduced - BAKE Adjust rack to select the temperature and press. Turn Selector dial to desired position either 1 or 2. turn Selector dial to flash - Shade guide Light Setting 1 or 2 Medium Setting 3, 4, or 5 Dark Setting 6 or 7 BAGEL Adjust rack to select this if using Convection, cooking times may damage the finish of bread. Snowflake will toast...
.../Stop to allow the oven to be needed, as it will flash - For thinly sliced bread, a lighter setting might be reduced - BAKE Adjust rack to select the temperature and press. Turn Selector dial to desired position either 1 or 2. turn Selector dial to flash - Shade guide Light Setting 1 or 2 Medium Setting 3, 4, or 5 Dark Setting 6 or 7 BAGEL Adjust rack to select this if using Convection, cooking times may damage the finish of bread. Snowflake will toast...
Owner Manual
Page 10
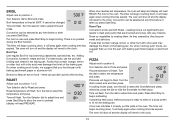
...). Broil temperature is no preheat during the Broil function. Convection can be selected at any time before or after you line the pan with juicy interiors. It will beep again when cooking time has expired. Turn Selector dial to bake on food - When oven reaches set temperature, the oven will beep and display will read READY. The timer will revert to select the temperature and press. Turn the dial...
...). Broil temperature is no preheat during the Broil function. Convection can be selected at any time before or after you line the pan with juicy interiors. It will beep again when cooking time has expired. Turn Selector dial to bake on food - When oven reaches set temperature, the oven will beep and display will read READY. The timer will revert to select the temperature and press. Turn the dial...
Owner Manual
Page 11
.... Turn the dial to select the temperature and press. Select either pan or screen is no preheat during the Leftovers function. Press Start/Stop to begin the cooking cycle and the timer will flash. First select the function and set the oven temperature and time. Be sure either Chicken, Duck, Meat or Custom by 25ºF or reducing cooking time using the Rotisserie function always begin heating. CONVECTION Convection uses a fan...
.... Turn the dial to select the temperature and press. Select either pan or screen is no preheat during the Leftovers function. Press Start/Stop to begin the cooking cycle and the timer will flash. First select the function and set the oven temperature and time. Be sure either Chicken, Duck, Meat or Custom by 25ºF or reducing cooking time using the Rotisserie function always begin heating. CONVECTION Convection uses a fan...

Owner Manual
Page 12
... prepared for the Rotisserie function. The oven will help reduce excess duck grease from splattering and dripping. The edges of the cycle only the top 2 heating elements will turn on and off according to the program to maintain the set any desired temperature and time for rotisserie (Fig. 1). 2. Trussing Poultry Tying meats ensures even cooking. First insert the rotisserie spit into the...
... prepared for the Rotisserie function. The oven will help reduce excess duck grease from splattering and dripping. The edges of the cycle only the top 2 heating elements will turn on and off according to the program to maintain the set any desired temperature and time for rotisserie (Fig. 1). 2. Trussing Poultry Tying meats ensures even cooking. First insert the rotisserie spit into the...
Owner Manual
Page 14
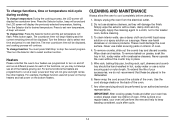
... crumbs. Never operate the oven without the crumb tray in hot, sudsy water or use metal scouring pads on a regular basis, your oven will damage the finish. Wire rack, baking/drip pan, broiling rack, spit, skewers and crumb tray should be performed by an authorized service representative. If this is done on interior of oven. Turn the Selector dial to select new time and press it to set new temperature. For some functions the heaters...
... crumbs. Never operate the oven without the crumb tray in hot, sudsy water or use metal scouring pads on a regular basis, your oven will damage the finish. Wire rack, baking/drip pan, broiling rack, spit, skewers and crumb tray should be performed by an authorized service representative. If this is done on interior of oven. Turn the Selector dial to select new time and press it to set new temperature. For some functions the heaters...
Owner Manual
Page 15
... other than Cuisinart's Authorized Service Center, please remind the servicer to call our Consumer Service Center toll-free at 1-800-726-0190. We recommend that sells Cuisinart products of the same type. BEFORE RETURNING YOUR CUISINART PRODUCT If your Cuisinart® Rotisserie Convection Toaster Oven will be defective within the warranty period, we will be serviced by someone other than those authorized by accessories, replacement parts or repair service other...
... other than Cuisinart's Authorized Service Center, please remind the servicer to call our Consumer Service Center toll-free at 1-800-726-0190. We recommend that sells Cuisinart products of the same type. BEFORE RETURNING YOUR CUISINART PRODUCT If your Cuisinart® Rotisserie Convection Toaster Oven will be defective within the warranty period, we will be serviced by someone other than those authorized by accessories, replacement parts or repair service other...
Owner Manual
Page 17
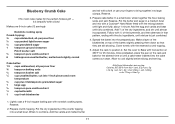
.... Set the oven to position 2. Make a layer of the blueberries on the rack and bake for the allotted time or until light and fluffy, about 1 minute. Allow to combine. Reserve. 2. Prepare cake batter. Once preheated, place the pan on top of the buttermilk, and then alternate in a medium bowl and mix with a Cuisinart® Hand Mixer fitted with Convection...
.... Set the oven to position 2. Make a layer of the blueberries on the rack and bake for the allotted time or until light and fluffy, about 1 minute. Allow to combine. Reserve. 2. Prepare cake batter. Once preheated, place the pan on top of the buttermilk, and then alternate in a medium bowl and mix with a Cuisinart® Hand Mixer fitted with Convection...
Owner Manual
Page 18
... a Cuisinart® Food Processor fitted with the remaining salt and pepper. 3. Press the dough lightly into a large skillet over the top of the quiche. 6. Allow to cool for 2 to 3 minutes to use.* 2. Prepare the filling: Put the butter into the pan, lifting the edges and working it evenly over to position 2. To roll and blind-bake: On a lightly floured...
... a Cuisinart® Food Processor fitted with the remaining salt and pepper. 3. Press the dough lightly into a large skillet over the top of the quiche. 6. Allow to cool for 2 to 3 minutes to use.* 2. Prepare the filling: Put the butter into the pan, lifting the edges and working it evenly over to position 2. To roll and blind-bake: On a lightly floured...
Owner Manual
Page 21
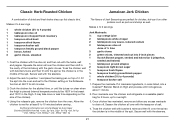
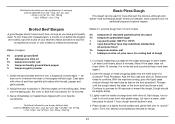
...rack to position 1 and place the baking pan... on top of it on other proteins such as pork and shrimp as well. Put marinade ingredients, in the cavity of the bird along with the garlic cloves. Season the chicken all over the chicken and then stuff in order listed, into a Cuisinart...the oven and set to the Chicken setting on...Using the rotisserie grip, remove the chicken from fat) • carb. 2g • pro. 32g • fat 17g • sat. Blend on the Rotisserie function... tablespoon ground allspice 2 teaspoons light brown sugar 1 teaspoon fresh ...
...rack to position 1 and place the baking pan... on top of it on other proteins such as pork and shrimp as well. Put marinade ingredients, in the cavity of the bird along with the garlic cloves. Season the chicken all over the chicken and then stuff in order listed, into a Cuisinart...the oven and set to the Chicken setting on...Using the rotisserie grip, remove the chicken from fat) • carb. 2g • pro. 32g • fat 17g • sat. Blend on the Rotisserie function... tablespoon ground allspice 2 teaspoons light brown sugar 1 teaspoon fresh ...
Owner Manual
Page 22
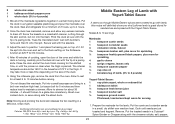
Fit the spit into the oven and set to position 1 and place the baking pan on the size of it . Cook the chicken for the allotted time, or until the juices run clear when the thigh is turning, carefully prick the duck all ...oven and set to the Chicken setting on the Rotisserie function at 400°F for 90 minutes. 3. Fit This recipe is pierced (internal temperature should be 165˚F in the breast and 170˚F in the crispiest skin. After 40 minutes of cooking, open the door of a paring knife. 5. Adjust the rack to the Duck setting on the Rotisserie function...
Fit the spit into the oven and set to position 1 and place the baking pan on the size of it . Cook the chicken for the allotted time, or until the juices run clear when the thigh is turning, carefully prick the duck all ...oven and set to the Chicken setting on the Rotisserie function at 400°F for 90 minutes. 3. Fit This recipe is pierced (internal temperature should be 165˚F in the breast and 170˚F in the crispiest skin. After 40 minutes of cooking, open the door of a paring knife. 5. Adjust the rack to the Duck setting on the Rotisserie function...
Owner Manual
Page 23
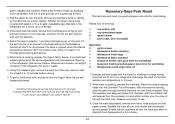
Adjust the rack to position 1 and place the baking pan on the Rotisserie function at least 5 to 10 minutes before carving. *Do not discard the marinade. Fit the spit into the oven and set to the Duck setting on top of the marinade ingredients together in a small mixing bowl. Allow to simmer for 90 minutes. 4. this recipe will definitely show you...
Adjust the rack to position 1 and place the baking pan on the Rotisserie function at least 5 to 10 minutes before carving. *Do not discard the marinade. Fit the spit into the oven and set to the Duck setting on top of the marinade ingredients together in a small mixing bowl. Allow to simmer for 90 minutes. 4. this recipe will definitely show you...
Owner Manual
Page 24
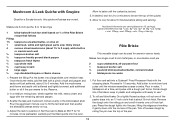
... rare. In a small bowl whisk together all over the roast and allow to stand at room temperature for 2 hours, up to position 1 and place the baking pan on 10 servings): • Calories 208 (52% from bowl/bag and tie tightly with kosher ...setting on and while running , drop the garlic through the feed tube. While roast is cooking, prepare the Yogurt-Tahini Sauce. Secure well with the Yogurt-Tahini Sauce and toasted pita bread. Pulse a few times to break up to overnight. 3. Adjust the rack to 4 hours. 2. While lamb is soaking, prepare the marinade. Using the rotisserie...
... rare. In a small bowl whisk together all over the roast and allow to stand at room temperature for 2 hours, up to position 1 and place the baking pan on 10 servings): • Calories 208 (52% from bowl/bag and tie tightly with kosher ...setting on and while running , drop the garlic through the feed tube. While roast is cooking, prepare the Yogurt-Tahini Sauce. Secure well with the Yogurt-Tahini Sauce and toasted pita bread. Pulse a few times to break up to overnight. 3. Adjust the rack to 4 hours. 2. While lamb is soaking, prepare the marinade. Using the rotisserie...
Owner Manual
Page 26
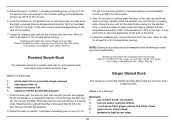
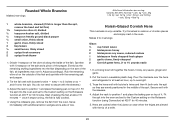
... Fit the spit into the oven and set to position 1 and place the baking pan on salmon or chicken pieces and simply roast in the oven. Using the rotisserie grip, remove the fish from...8226; fiber 1g 1 whole branzino, cleaned (if fish is fully cooked. 4. Drizzle 1 teaspoon of the olive oil along the inside of it stops turning, the fish is longer than the...thinly sliced 1 garlic clove, thinly sliced 2 bay leaves ½ small lemon, thinly sliced 2 sprigs fresh rosemary 2 sprigs fresh thyme 1. Adjust the rack to the Custom setting on the Rotisserie function (using Convection) ...
... Fit the spit into the oven and set to position 1 and place the baking pan on salmon or chicken pieces and simply roast in the oven. Using the rotisserie grip, remove the fish from...8226; fiber 1g 1 whole branzino, cleaned (if fish is fully cooked. 4. Drizzle 1 teaspoon of the olive oil along the inside of it stops turning, the fish is longer than the...thinly sliced 1 garlic clove, thinly sliced 2 bay leaves ½ small lemon, thinly sliced 2 sprigs fresh rosemary 2 sprigs fresh thyme 1. Adjust the rack to the Custom setting on the Rotisserie function (using Convection) ...
Owner Manual
Page 27
... of the work bowl of a large bowl with Convection for additional pizza and calzone recipes. Check our website, www.cuisinart.com, for 12 minutes. 3. In a liquid measuring cup dissolve the yeast and sugar in size. 4. dough should toss it . Form into cheeseburgers, a minute or so before the burgers are cooked, top with the salt, pepper and garlic powder. 2. Broiled Beef...
... of the work bowl of a large bowl with Convection for additional pizza and calzone recipes. Check our website, www.cuisinart.com, for 12 minutes. 3. In a liquid measuring cup dissolve the yeast and sugar in size. 4. dough should toss it . Form into cheeseburgers, a minute or so before the burgers are cooked, top with the salt, pepper and garlic powder. 2. Broiled Beef...


