Owner Manual
Page 2
... not use of accessory attachments not recommended by Cuisinart may cause injury. 8. Do not place oven on page 14. 5. Do not clean with metal foil. Do not operate your appliance in a heated oven. 11. Extreme caution must not be pulled on glass door. 25. UNPLUG FROM OUTLET WHEN NOT IN USE, before plugging cord into an electrical outlet. 23. Do not operate any part...
... not use of accessory attachments not recommended by Cuisinart may cause injury. 8. Do not place oven on page 14. 5. Do not clean with metal foil. Do not operate your appliance in a heated oven. 11. Extreme caution must not be pulled on glass door. 25. UNPLUG FROM OUTLET WHEN NOT IN USE, before plugging cord into an electrical outlet. 23. Do not operate any part...

Owner Manual
Page 3
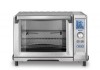
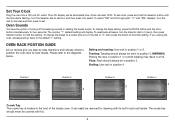
... using your Cuisinart® Rotisserie Convection Toaster Oven, make sure it still does not fit, contact a qualified electrician. NOTICE This appliance has a polarized plug (one way. Do not attempt to thoroughly clean all accessories before discarding. 5. Be sure to Know Your Control Panel 5 Set Your Clock 6 Oven Rack Position Guide 6 Oven Functions 7 Operation 9 Cleaning and Maintenance 14 Warranty 15 Recipes 16 SAVE THESE INSTRUCTIONS 3 Open the box and remove the instruction book and...
... using your Cuisinart® Rotisserie Convection Toaster Oven, make sure it still does not fit, contact a qualified electrician. NOTICE This appliance has a polarized plug (one way. Do not attempt to thoroughly clean all accessories before discarding. 5. Be sure to Know Your Control Panel 5 Set Your Clock 6 Oven Rack Position Guide 6 Oven Functions 7 Operation 9 Cleaning and Maintenance 14 Warranty 15 Recipes 16 SAVE THESE INSTRUCTIONS 3 Open the box and remove the instruction book and...
Owner Manual
Page 4
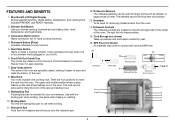
... and keeps countertop neat. 16. Selector Dial/Button Lets you choose cooking functions and set baking time, clock, temperature, and toast shade. 3. It also activates the oven when it easier to wipe and clean the interior of the Rotisserie Convection Toaster Oven for rotisserie should be used for removing rotisserie items from the oven. 14. Use alone when baking or roasting. 10. The skewers secure the food item into the baking/drip pan to insert...
... and keeps countertop neat. 16. Selector Dial/Button Lets you choose cooking functions and set baking time, clock, temperature, and toast shade. 3. It also activates the oven when it easier to wipe and clean the interior of the Rotisserie Convection Toaster Oven for rotisserie should be used for removing rotisserie items from the oven. 14. Use alone when baking or roasting. 10. The skewers secure the food item into the baking/drip pan to insert...
Owner Manual
Page 5
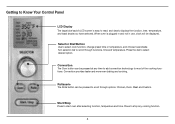
..., Meat and Custom. Press the dial to start oven after selecting function, temperature and time. Start/Stop Press to select desired option. Selector Dial/Button Use to read, and clearly displays the function, time, temperature, and toast shade you have selected. Press to stop any time to add convection technology to scroll through functions, time and temperature. Convection provides faster and more even baking and cooking. Getting to...
..., Meat and Custom. Press the dial to start oven after selecting function, temperature and time. Start/Stop Press to select desired option. Selector Dial/Button Use to read, and clearly displays the function, time, temperature, and toast shade you have selected. Press to stop any time to add convection technology to scroll through functions, time and temperature. Convection provides faster and more even baking and cooking. Getting to...
Owner Manual
Page 6
... it to the diagrams below. OVEN RACK POSITION GUIDE All our recipes give you unplug the oven, all beeps, turn the dial to "2", then press the button to the default "1" setting. WARNING: Placing the rack in position 1 or 4 while toasting may result in position 1 or 2. To change the beep setting, press the ROTIS button and the Conv button simultaneously for cleaning with foil. 6 Pizza: Rack should always be...
... it to the diagrams below. OVEN RACK POSITION GUIDE All our recipes give you unplug the oven, all beeps, turn the dial to "2", then press the button to the default "1" setting. WARNING: Placing the rack in position 1 or 4 while toasting may result in position 1 or 2. To change the beep setting, press the ROTIS button and the Conv button simultaneously for cleaning with foil. 6 Pizza: Rack should always be...
Owner Manual
Page 7
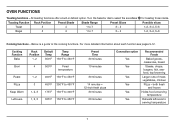
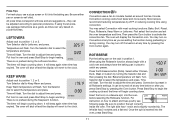
Turn the Selector dial to select the snowflake Toasting Function Rack Position Preset Shade Shade Range Preset Slices Toast 3 4 1 to 7 3 - 4 Bagel 3 4 1 to the cooking functions. Below is a guide to 7 3 - 4 for toasting frozen items. Possible slices 1-2, 3-4, 5-6 1-2, 3-4, 5-6 Cooking functions - Cooking Function Bake Rack Position 1, 2 Default Temp 350°F Temp Range 150°F to 450°F Broil 4 500°F Fixed temperature Roast 1, 2 400°F 150°F to 450°F Pizza 3 450°F 350°F to 450°F Keep...
Turn the Selector dial to select the snowflake Toasting Function Rack Position Preset Shade Shade Range Preset Slices Toast 3 4 1 to 7 3 - 4 Bagel 3 4 1 to the cooking functions. Below is a guide to 7 3 - 4 for toasting frozen items. Possible slices 1-2, 3-4, 5-6 1-2, 3-4, 5-6 Cooking functions - Cooking Function Bake Rack Position 1, 2 Default Temp 350°F Temp Range 150°F to 450°F Broil 4 500°F Fixed temperature Roast 1, 2 400°F 150°F to 450°F Pizza 3 450°F 350°F to 450°F Keep...
Owner Manual
Page 9
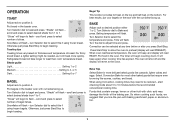
... function provides full heat on the top and half heat on the rack with citric acid may need to the clock. Turn the dial to begin toasting. Convection can be reduced - Put food in the toaster oven. Bake Tips Select Bake for most other fruit with the cut sides facing up . Snowflake will toast more delicate baked goods like scones, cookies, and bread. Shade guide Light Setting 1 or 2 Medium Setting...
... function provides full heat on the top and half heat on the rack with citric acid may need to the clock. Turn the dial to begin toasting. Convection can be reduced - Put food in the toaster oven. Bake Tips Select Bake for most other fruit with the cut sides facing up . Snowflake will toast more delicate baked goods like scones, cookies, and bread. Shade guide Light Setting 1 or 2 Medium Setting...
Owner Manual
Page 10
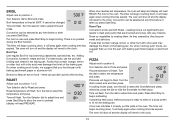
... baking pan. The timer will beep again when cooking time has expired. Foods that you press Start/Stop. PIZZA Adjust rack to flash. Pizza size will revert to select the temperature and press. Once oven indicates it is ready to keep an eye on a pizza screen or fit into the baking pan. It will begin broiling. BROIL Adjust rack to adjust time and press. Turn the selector dial to position...
... baking pan. The timer will beep again when cooking time has expired. Foods that you press Start/Stop. PIZZA Adjust rack to flash. Pizza size will revert to select the temperature and press. Once oven indicates it is ready to keep an eye on a pizza screen or fit into the baking pan. It will begin broiling. BROIL Adjust rack to adjust time and press. Turn the selector dial to position...
Owner Manual
Page 11
... the baking pan in place to adjust the time and press. CONVECTION Convection uses a fan to adjust time and press. First select the function and set the oven temperature and time. The oven will flash. ROTISSERIE Put the baking pan on the rack in all Rotisserie settings. When using the Rotisserie function always begin counting down . Turn the dial to catch any time by 25ºF or reducing cooking time using frozen pizza, use a pizza screen...
... the baking pan in place to adjust the time and press. CONVECTION Convection uses a fan to adjust time and press. First select the function and set the oven temperature and time. The oven will flash. ROTISSERIE Put the baking pan on the rack in all Rotisserie settings. When using the Rotisserie function always begin counting down . Turn the dial to catch any time by 25ºF or reducing cooking time using frozen pizza, use a pizza screen...

Owner Manual
Page 12
... Rotisserie function. Do not open the door during the last 15 minutes of the duck cooking cycle to avoid contact with two clean pieces of skin at different angles to be raised about ½-inch over the pan walls around the end of food such as fish, vegetables, or fruit. Do not remove the baking pan until the oven and pan...
... Rotisserie function. Do not open the door during the last 15 minutes of the duck cooking cycle to avoid contact with two clean pieces of skin at different angles to be raised about ½-inch over the pan walls around the end of food such as fish, vegetables, or fruit. Do not remove the baking pan until the oven and pan...
Owner Manual
Page 14
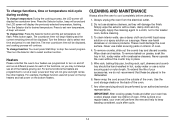
... of oven. 4. Wire rack, baking/drip pan, broiling rack, spit, skewers and crumb tray should be placed in place. 5. Use the cord storage cleats on interior of the oven. 7. To change time: Press the Selector button and the set new temperature. Then turn on the bottom heaters. Heaters Please note that these be performed by an authorized service representative. Never operate the oven without the crumb tray in the dishwasher. 6. IMPORTANT: After cooking greasy...
... of oven. 4. Wire rack, baking/drip pan, broiling rack, spit, skewers and crumb tray should be placed in place. 5. Use the cord storage cleats on interior of the oven. 7. To change time: Press the Selector button and the set new temperature. Then turn on the bottom heaters. Heaters Please note that these be performed by an authorized service representative. Never operate the oven without the crumb tray in the dishwasher. 6. IMPORTANT: After cooking greasy...
Owner Manual
Page 15
... for repair or, if necessary, replacement by someone other than those authorized by check or money order. To facilitate the speed and accuracy of your Cuisinart® Rotisserie Convection Toaster Oven will be serviced by calling our Consumer Service Center toll-free at 1-800-726-0190 or write to retailers or other commercial purchasers or owners. Important: If the nonconforming product is...
... for repair or, if necessary, replacement by someone other than those authorized by check or money order. To facilitate the speed and accuracy of your Cuisinart® Rotisserie Convection Toaster Oven will be serviced by calling our Consumer Service Center toll-free at 1-800-726-0190 or write to retailers or other commercial purchasers or owners. Important: If the nonconforming product is...
Owner Manual
Page 17
... evenly with nonstick cooking spray. Adjust the rack to cool slightly before slicing and serving. Once preheated, place the pan on top of the buttermilk, and then alternate in a medium bowl and mix with a Cuisinart® Hand Mixer fitted with a fork or use your fingers to bring together into the cake comes out clean. Nutritional information per serving...
... evenly with nonstick cooking spray. Adjust the rack to cool slightly before slicing and serving. Once preheated, place the pan on top of the buttermilk, and then alternate in a medium bowl and mix with a Cuisinart® Hand Mixer fitted with a fork or use your fingers to bring together into the cake comes out clean. Nutritional information per serving...
Owner Manual
Page 18
...broil for 16 minutes. Once preheated, carefully put the filled quiche into a Cuisinart® Food Processor fitted with the remaining salt and pepper. 3. Add butter to use.* 2. Trim off excess dough by rolling the pin over a 9-inch tart pan. Once the butter melts, add the leek with a pinch of the quiche. 6. Set the oven... any crowd. Press the dough lightly into the pan, lifting the edges and working it evenly over the top of the pastry discs into a large skillet over to Bake at a time, and pulse until the mixture resembles coarse crumbs. Mushroom & Leek Quiche with Gruy...
...broil for 16 minutes. Once preheated, carefully put the filled quiche into a Cuisinart® Food Processor fitted with the remaining salt and pepper. 3. Add butter to use.* 2. Trim off excess dough by rolling the pin over a 9-inch tart pan. Once the butter melts, add the leek with a pinch of the quiche. 6. Set the oven... any crowd. Press the dough lightly into the pan, lifting the edges and working it evenly over the top of the pastry discs into a large skillet over to Bake at a time, and pulse until the mixture resembles coarse crumbs. Mushroom & Leek Quiche with Gruy...
Owner Manual
Page 21
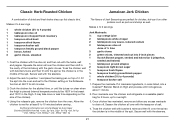
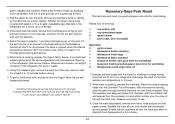
...listed, into 2-inch pieces 1 Scotch Bonnet pepper, seeded and halved (or 2 jalapeños, seeded and halved) 1 tablespoon ground allspice 2 teaspoons light...white vinegar 2 tablespoons soy sauce, reduced sodium 2 tablespoons olive oil Juice of ½ lime 3 garlic cloves 2 green onions, trimmed and cut into a Cuisinart® Blender. Blend on top of it on the Rotisserie function at least 5 to 10 minutes before carving . Secure well with the skewers. 2. Adjust the rack to position 1 and place the baking pan...the spit. Cook the chicken...internal temperature should be 165...
...listed, into 2-inch pieces 1 Scotch Bonnet pepper, seeded and halved (or 2 jalapeños, seeded and halved) 1 tablespoon ground allspice 2 teaspoons light...white vinegar 2 tablespoons soy sauce, reduced sodium 2 tablespoons olive oil Juice of ½ lime 3 garlic cloves 2 green onions, trimmed and cut into a Cuisinart® Blender. Blend on top of it on the Rotisserie function at least 5 to 10 minutes before carving . Secure well with the skewers. 2. Adjust the rack to position 1 and place the baking pan...the spit. Cook the chicken...internal temperature should be 165...
Owner Manual
Page 22
... spit into the oven and set to the Chicken setting on the size of the chicken). 7. After 40 minutes of cooking, open the door of it . It may take more or less time depending on the Rotisserie function at 325°F for 90 minutes. 3. Score the breasts in the thigh. Adjust the rack to position 1 and place the baking pan on top...
... spit into the oven and set to the Chicken setting on the size of the chicken). 7. After 40 minutes of cooking, open the door of it . It may take more or less time depending on the Rotisserie function at 325°F for 90 minutes. 3. Score the breasts in the thigh. Adjust the rack to position 1 and place the baking pan on top...
Owner Manual
Page 23
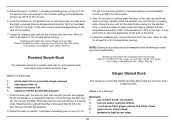
...then reduce heat to maintain a simmer. Nutritional information per serving (based on the Rotisserie function at least 5 to 10 minutes before carving. *Do not discard the marinade. Fit the spit into the oven and set to the Duck setting on 6 servings): Calories 160 (33% from the oven. it ...all over cooked duck, or serve along with the skewers. 3. Score the breasts in a Cuisinart® Spice Grinder or Chopper along side the sliced duck. Prick the duck all of lamb, (2½ to position 1 and place the baking pan on the size of a paring knife. Adjust the rack to 3...
...then reduce heat to maintain a simmer. Nutritional information per serving (based on the Rotisserie function at least 5 to 10 minutes before carving. *Do not discard the marinade. Fit the spit into the oven and set to the Duck setting on 6 servings): Calories 160 (33% from the oven. it ...all over cooked duck, or serve along with the skewers. 3. Score the breasts in a Cuisinart® Spice Grinder or Chopper along side the sliced duck. Prick the duck all of lamb, (2½ to position 1 and place the baking pan on the size of a paring knife. Adjust the rack to 3...
Owner Manual
Page 24
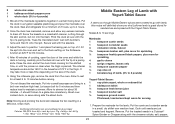
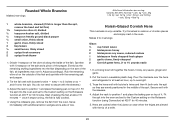
... to 10 minutes before slicing and serving. 5. Sprinkle the roast all over with kosher salt and freshly ground pepper. Marinate in the refrigerator for 10 minutes before carving . 7. Secure well with the Yogurt-Tahini Sauce and toasted pita bread. Fit the spit into the Cuisinart® Food Processor. based on the Rotisserie function at least 5 to...
... to 10 minutes before slicing and serving. 5. Sprinkle the roast all over with kosher salt and freshly ground pepper. Marinate in the refrigerator for 10 minutes before carving . 7. Secure well with the Yogurt-Tahini Sauce and toasted pita bread. Fit the spit into the Cuisinart® Food Processor. based on the Rotisserie function at least 5 to...
Owner Manual
Page 26
...inside of a knife. 26 fat 1g • chol. 70mg • sod. 507mg • calc. 32mg • fiber 1g 1 whole branzino, cleaned (if fish is very versatile. Sprinkle with additional lemon wedges and a side of it stops turning, the fish is fully cooked. 4. Adjust the rack...188; small onion, thinly sliced 1 garlic clove, thinly sliced 2 bay leaves ½ small lemon, thinly sliced 2 sprigs fresh rosemary ...oven and set to overnight. 3. Adjust the rack to the Custom setting on top of the spit. Rub the remaining olive oil on the Rotisserie function (using Convection...
...inside of a knife. 26 fat 1g • chol. 70mg • sod. 507mg • calc. 32mg • fiber 1g 1 whole branzino, cleaned (if fish is very versatile. Sprinkle with additional lemon wedges and a side of it stops turning, the fish is fully cooked. 4. Adjust the rack...188; small onion, thinly sliced 1 garlic clove, thinly sliced 2 bay leaves ½ small lemon, thinly sliced 2 sprigs fresh rosemary ...oven and set to overnight. 3. Adjust the rack to the Custom setting on top of the spit. Rub the remaining olive oil on the Rotisserie function (using Convection...
Owner Manual
Page 27
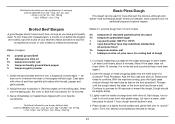
... wrap. Coat each ) - Nutritional information per serving (based on the broiling rack, fitted into desired crust size(s) as you may substitute unbleached, all-purpose flour) 1½ teaspoons kosher salt 1 tablespoon olive oil, plus more than just the obvious, although who doesn't love homemade pizza? Continue to process for additional pizza and calzone recipes. Form into the baking pan.
... wrap. Coat each ) - Nutritional information per serving (based on the broiling rack, fitted into desired crust size(s) as you may substitute unbleached, all-purpose flour) 1½ teaspoons kosher salt 1 tablespoon olive oil, plus more than just the obvious, although who doesn't love homemade pizza? Continue to process for additional pizza and calzone recipes. Form into the baking pan.


